4 Dr.Geo Smalltalk script
Dr.Geo is a dynamic application written in Pharo Smalltalk. This
means that it is possible to modify it within itself as it is
running. We have exploited this feature with the
Numerics→Use a script command to define sketch items in
Dr.Geo which are in fact Smalltalk scripts – code snippets – to
extend the possibilities of Dr.Geo dynamically, without limit. But
what exactly is Smalltalk?
Smalltalk is an object-oriented, dynamically typed, reflective
programming language. Smalltalk was created as the language to
underpin the "new world" of computing exemplified by "human–computer
symbiosis." It was designed and created in part for educational use,
more so for constructionist learning, at the Learning Research Group
(LRG) of Xerox Palo Alto Research Center (PARC) by Alan Kay, Dan
Ingalls, Adele Goldberg, Ted Kaehler, Scott Wallace, and others during
the 1970s. The language was first generally released as Smalltalk-80.
Smalltalk-like languages are in continuing active development, and
have gathered loyal communities of users around them. ANSI Smalltalk
was ratified in 1998 and represents the standard version of
Smalltalk.6
In this definition, object-oriented means that everything in
Smalltalk is an object defined in a class, with its behavior
determined by methods defined in that class. This is in contrast
with the notion of a variable associated with a data type in most
programming languages, where the type system sets few limits on what
can be done with values.
In statically typed languages, the type of a variable has to be
declared before it can be used, and that type cannot be changed within
the program. In particular, the sizes of arrays and other composite
data structures must be declared in advance. In dynamically typed
languages, a variable name can be repurposed to refer to an object of
a different class with a simple assignment, items can be added to or
removed from data structures at will, and the class definition can be
changed while a program is running.
Reflection in programming languages refers to the ability to examine
and modify properties of objects within the live system, rather than
having to read the source code in which variables are declared to
determine their types and infer their properties. Reflection tools
in Smalltalk include the system browser, the inspector, the object
explorer, and the method finder.
This abstract from the book preface Pharo By
Example7 describes the
Smalltalk environment used by Dr.Geo:
Pharo is a modern Open Source development environment for the classic
Smalltalk-80 programming language.
Pharo strives to offer a lean, Open Source platform for professional
software development, and a robust and stable platform for research
and development into dynamic languages and environments.
Dr.Geo uses the Smalltalk environment to create a comfortable
environment for writing scripts providing access to the programming
interfaces for geometric objects. These interfaces are the set of
methods in the definitions of the types of the objects.
Thus the user can write scripts to manipulate the sketch items, and
as scripts pinned in the sketch are also sketch items, they do not
need to be in separate files, but can be saved in the sketch file.
Scripts are not edited as sketch items but as methods stored
globally in Smalltalk. Using a script and pinning the result in a
sketch makes it part of the sketch so that it can be saved and
reloaded with the sketch. However, there is no way to keep scripts
in different sketches separate if they are open at the same time.
This is a design bug, because users will often have all of their
work polluted with scripts meant to be used in other sketches,
unless they exercise great care to avoid this. In fact, the default
state of Dr.Geo contains a number of useless scripts that could have
been put into the examples category or even omitted, so that any new
session would start with an empty scripts category.
A workaround is to close Dr.Geo and open a new session after working
with a sketch containing multiple scripts and before creating any
new sketch, which can then begin without any extraneous scripts.
While it is possible to put scripts for a sketch into a new category
for creating them, it is not possible to select by category when using
a script. Furthermore, in the use a script dialog, scripts seem to be
offered in random order. It is certainly not alphabetical or temporal
order.
Scripts in Dr.Geo are executed in the Pharo Smalltalk environment.
The user thus benefits from the excellent developer tools of the
environment: class browser, inspector, debugger, etc. The user wishing
to explore the power of scripts is invited to study the book
Pharo By Example, where he or she will learn the Smalltalk
language and its environment.
For our purposes in this chapter, it is necessary mainly to understand
how to use a Workspace. Open a new Workspace by clicking in the
background and selecting Tools→Workspace. The
workspace provides
- Basic text editing capability
- Syntax highlighting
- Context-sensitive selector (method name) completion
- Access to a menu of editing commands and development tools
Text editing capabilities in a Workspace consist of the usual Cut,
Copy, and Paste; Find and Replace; Undo and Do again. An Extended
search function displays information about selected items using
various development tools. There are also Accept and Cancel
functions. Typing in the Workspace causes a highlight to appear at
the upper right of the window. Accept checkpoints the contents of
the window, empties the undo stack, and causes the highlight to
disappear. Editing and then cancelling takes the window back to the
last checkpoint without having to undo each action individually.
When editing, object names appear in blue, method names and symbols
such as := in black, and unrecognized text in red. This includes
incomplete names, undeclared local variables, and also syntax
errors. When the user is typing a selector, a menu appears showing
selectors starting with the typed text that are usable in the
current context, that is, for the object that will receive this
message. Move up or down in the menu with the arrow keys, and accept
the highlighted selector by pressing the tab key. If the selector
has more than one part, all of the parts are entered into the
workspace.
Development tools provided on the workspace menu, accessed by
right-clicking in the workspace, are
- Do it Execute the selected text or the current line
otherwise
- Print it Execute text and display the result.
- Inspect it Open an Inspector on a selected class
name, or execute selected text and open an Inspector on the results.
- Explore it Open an object Explorer on a selected
class name, or execute selected text and open an Explorer on the
results.
- Debug it Open a Debugger on selected code.
- Profile it Open a Profiler on selected code.
Development tools accessible in the Extended search menu are the
following.
- browse it
- senders of it
- references to it
- selectors containing it
- method strings with it
- method source with it
- class names containing it
- class comments with it
- change sets with it
Each one opens the tool specified on the text selected or on an object
that that text names, if any. If there is none, a message may appear
saying so.
Some of the functions of these development tools can be discovered
through exploration, clicking on every button to see what happens.
For further details see Pharo Smalltalk documentation.
4.1 Script by the example
|
WARNING: THE FOLLOWING SECTIONS ARE OBSOLETE AND NEED TO BE
SYNCHRONISED WITH THE FRENCH USER GUIDE
|
There are two phases to using scripts:
- creating the script
- inserting the script in a sketch one or more times with
different parameters
The tool to create or edit a script is on the menu
Numeric→Edit a script. It is also reachable
from the toolbar.
The tool to use a script is on the menu
Numeric→Use a script. It is also reachable from
the toolbar.
A script can be defined to receive 0 or more arguments (input
parameters). After selecting a script to insert in the sketch, the
user clicks on the items used as arguments. Then a final click
somewhere in the background sets the location for the returned value.
In the following section, we present a few script examples so that the
function and power of scripting will be more easily understood. The
script and the macro construction give a special dimension to Dr.Geo
– with a different positioning8 – to let the user go into areas that the software was not
initially planned for.
It is important to understand that most Pharo Smalltalk resources are
accessible in scripts. This is particularly true for the class and
method libraries9, which
we will use a lot.
4.1.1 Script without parameter
First example:
The procedure to create a script without an input parameter is as follows:
- Edit the script
- Select Numeric→Edit a script in the menu to open
the script editor:
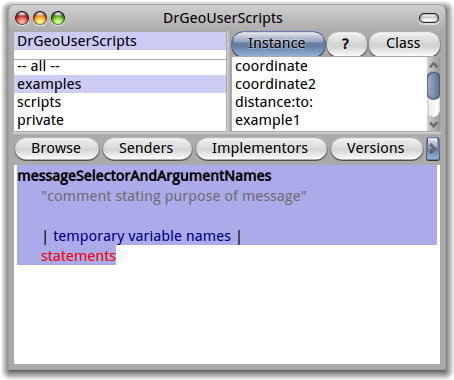
Figure 4.1: Script editor
Within the script editor window there are three panes:
- In the top left, the script categories to keep in good
order: examples, private, and
scripts. It is in this last one that you put your scripts.
- In the top right, the script names in the selected
category. When selecting one, its source code is displayed
in the editor pane at the bottom.
- In the bottom, the source code editor for the selected
script. It is there you create or modify the scripts. To
accept a modification, press the keyboard keys
Ctrl-s.
- In the script editor, select the category scripts. The
text editor in the bottom will display a script source code
template (See scriptEditor).
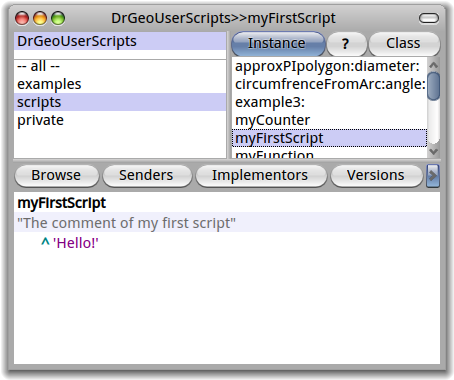
- Input the source code as below (See firstScript):
      myFirstScript
      "Hello, World is the traditional first program in any language.
      It simply displays a text message."
         ^ 'Hello, World!'.
Save the script with Ctrl-s. Dr.Geo will ask
your last name and first name to track the history of the script
modifications. The first script line, myFirstScript is
the name of the script, followed by the source code. It is
followed by an optional comment of one or more lines between
quotation marks. The comment should usually explain the purpose
of the script, what are the expected parameters, and what are
the conditions for its use. We strongly encourage you to
document carefully to prevent confusion and error.
Figure 4.2: My first script
The script editor can now be closed.
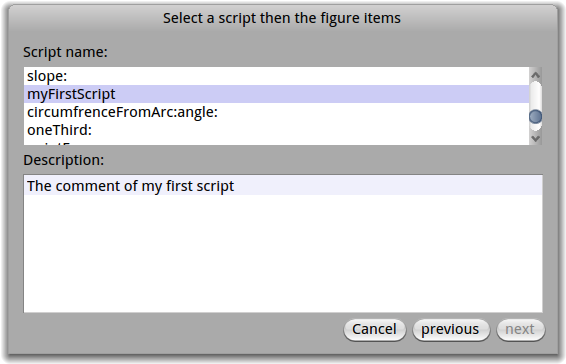
- Using the script in the sketch
Select Numeric→Use a script in the menu. In the
displayed dialogue box, choose the script
myFirstScript. Note: each time a script is selected, its
descriptive comment is displayed in the bottom of the dialogue.
Figure 4.3: Select a script
Once the script selected, click on the sketch at the place to pin
it. In this example the script only returns the message “ Hello,
World ! ”. The returned value is always printed in the sketch. If
necessary it is converted to a text representation.
In the following examples, we only give the source code of the
Smalltalk scripts. To use them in Dr.Geo, just follow the steps
explained previously.
A random number generator and more:
If you need a simple random generator for numbers between 1 and 10,
the following script exactly does that:
random
"I return a random number continuously updated"
   ^ 10 atRandom.
At each sketch update, it generates a different random number in the
interval [1 ; 10]. Updates occur when the sketch is changed by
dragging an object.
In case you prefer a random decimal number in the interval [0 ; 1], use
this script:
random2
"I return a random decimal number continuously updated from 0 to 1"
   ^ (101 atRandom -1) / 100.
Some details:
- The value returned by the script is the result of the
expression after the ^ .
- The returned value can be of any class. Dr.Geo prints its text
representation (a string).
- To return the value of a variable, it is enough to
put its name after the symbol ^ .
Calculate common values
To access an approximate value of pi with the maximum precision
available in Smalltalk:
This returns 3.141592653589793.
or e :
This returns 2.718281828459045.
These returned values are usable in the same way as any other value
generated by Dr.Geo. Even for such small things, the script is your
friend. But it can do much more interesting things when it receives
input parameters.
Indeed, so far the scripts have had no arguments, so that it was not
necessary to select items in the sketch when inserting the script in
the construction. Of course the real interest in scripts comes from
returning the values of numerical computation, pinned in the sketch
for use with other constructions or scripts. In the following
sections we show the use of scripts in a cascade.
4.1.2 Script with one input parameter
The procedure to create a script with one input parameter is mostly
the same:
- When editing the script (Numeric→Edit a
script), the argument is inserted in the first line with the script
name.
For example to calculate the distance from the origin to a point, we
write the following script:
distanceToOrigin: item
"Return the distance from origin to a point"
   ^ item point dist: 0@0
A few explanations:
- item is the argument of our script, which must be a
point. It is in fact an instance of the class DrGPointItem
10
- DrGPointItem has an instance method #point
returning its coordinates. Thus from the argument we can extract
information, here its coordinates, and calculate with it.
- 0@0 is an instance of the class Point with
coordinates (0,0).
- #dist: is a keyword message 11 from the class
Point expecting as its unique argument another instance of
Point. It calculates the distance between these two
instances. It can be understood as: “distance between item point
and (0,0)”. The keyword message syntax is very specific to Smalltalk.
The arguments are declared in the message name line of a method.
- To use a script (Numeric→Use a script), Dr.Geo
expects from the user to click on appropriate objects, then
somewhere in the sketch.
Attention: If an item other than a point is selected when a
point is expected, Dr.Geo throws an error, opening a debugger
window stating the problem and offering further information. The
debugger window can be safely closed. To continue, select the script
again.
Depending on the type of argument received by the script, various
methods are available: to get its value, its coordinate, etc. A list
of the methods you can use is presented below (See api-dgs).
4.1.3 Script with two input parameters:
Let’s say we want to calculate the distance between two points. To
do so we create a script with two input parameters inserted on the
name line of the script. We name it distance:to:, where
each “:” indicates the place of the parameter. Therefore in the
script editor we write the following source code:
distance: item1 to: item2
"Calculate the distance between two points"
   ^ item1 point dist: item2 point
item1 and item2 are the names of the two parameters,
which can be chosen freely. To use this script, proceed as in the
previous example: select two points in the construction and click
somewhere in the sketch to pin the result of the script.
4.1.4 Detailed example with several scripts
In the following section, we present a more complex sketch,
integrating a cascading use of scripts to construct the curve of a
function and its tangent at a mobile point of the curve.
The final sketch is in the Dr.Geo folder examples. It is
named Curve and slope.fgeo.
Figure 4.4: Curve and tangent to a point
In a new empty sketch, we construct a horizontal segment, then add to
this segment a free point named “Move me!”. This point will be the
base to construct the curve as a locus.
Define a function: A script can return any type of object,
so that our first construction simply defines a function. To do so, we
use a Smalltalk object named block of code (an anonymous function in
Scheme and some other languages). We name this script
myFunction, without parameter:
myFunction
"Definition of our function"
   ^ [:x | x cos]
Next we insert the function in the sketch12 So the block of code returned by myFunction
expects one argument :x and it returns the cosine of that
argument. We see later how to manipulate this script.
Image of a value by function:
Now we calculate the coordinates of a point on the curve. We use our
point “Move me!” abscissa and our function previously defined. Our
script will have one unique point argument; as we will see we do not
need to pass myFunction as argument:
pointM: item
"Return a point on the curve of myFunction and driven by item point"
   ^ item point x @(self myFunction value: item point x)
The point returned by this script has the same abscissa as the
argument, and its ordinate is the image of that abscissa by the
function.
Note:
- the direct access to the function: self myFunction,
- the way to pass an argument to this block of code, which can be
understood as myFunction(item point x).
Now we use this script pointM: with the point “Move me!”
as argument; the result of this script is of the form 1.2@0.5 representing a pair of coordinates.
With the tool  , Points→Coordinates, we
create a point with its coordinates specified by the result of this
script.
, Points→Coordinates, we
create a point with its coordinates specified by the result of this
script.
The locus tool  , Lines→Locus, gives the
curve after selecting our two points.
, Lines→Locus, gives the
curve after selecting our two points.
Slope at a point of the function’s curve:
We calculate an approximation of the slope at a given point thus:
p = (f(x + 0.001) - f(x)) / 0.001
This is directly translated in the script slope: with a single
argument, the point at which to approximate the slope:
slope: item
"Compute the slope at the given x point position for myFunction"
| f  x |
   f := self myFunction.
   x := item point x.
   ^ (f value: x + 0.001) - (f value: x) / 0.001
Next we insert this script in the construction.
Note:
- The declaration of temporary variables | f x |. As
explained variables are not typed, so only the name is required.
- A reference to a block of code in a variable f := self
myFunction. The symbol to assign a value to a variable is
“:=”.
- The parenthesis! Smalltalk has no concept of operator priority; in
fact operators do not exist in this language. The reader is
encouraged to study the section about Smalltalk messages in
the book Pharo By Example.
Calculate and display the tangent to a curve:
To construct our tangent we need two points: one on the curve – we
have it already – and a second one on the line. For this last one we
use the previously calculated slope. Let’s write a second script
computing this second point’s coordinates:
pointN: item
"Given an initial point, calculate the coordinates
of a point on the tangent"
| p x |
   p := self slope: item.
   x := item point x + 1.
   ^ x  (item point y + p)
With the protocol of the class Point – message +
sent to a point – this script can be written in one line:
pointN: item
"Given an initial point, calculate the coordinates
of a point on the tangent"
   ^ item point + (1@ (self slope: item))
We use this script with argument the point on the curve. We get as
result the coordinates of the second point on the tangent. With these
inputs we construct the second point13. The tangent is the line
defined by this point and the point on the curve.
When moving the point “Move me!”, the tangent is recomputed.
Equally interesting: modifying the script myFunction
updates the whole construction accordingly. A few examples of
modifications to this script:
   ^ [:x | x * x / 10]

   ^ [:x | x cos + (10 * x) sin]

   ^ [:x | (x * 5) cos + x abs]
4.2 Reference methods for Dr.Geo scripts
An argument passed to a script is always a reference to an instance of
a class from the hierarchy DrGMathItem,the base class of
all items used in a construction. So to know about the messages you
can send to an argument passed to a script, it is wise to examine the
hierarchy of DrGMathItem. It contains more than 80 classes,
but because of class inheritance, only a few classes are interesting to
explore:
- DrGMathItem
- DrGpointItem
- DrGDirectionItem for segment, line, ray, vector
- DrGArcItem
- DrGCircleItem
- DrGLocus2ptsItem
- DrGPolygonNptsItem
- DrGValueItem
To explore these classes, open a workspace – Ctrl-k
after a click in the background of the environment – input and mouse
select the class name to explore then press the shortcut
Ctrl-b to open a class browser on it.
The following sections contain descriptions of some useful messages,
ordered by class.
4.2.1 Math Item
The protocol of the class DrGMathItem concerns all types
of argument passed to a script.
- Method on DrGMathItem: <String> safeName
⇒ text representing the item name
name := point1 safeName.
^ name asUppercase.
To use this method in a script, create a Dr.Geo math item and give it a
name with the style function. Then create the script
myName: item
^item safeName
and use it as usual, clicking on the point and then a place to put
the result. Note that changing the name of the item and then forcing
an update, for example by moving the item, updates the result of the
script.
- Method on DrGMathItem: <Boolean> exist
⇒ boolean indicating whether the item exists in the
current state of the sketch
line exist ifTrue: [ position := line origin ].
- Method on DrGMathItem: <Collection> parents
⇒ collection of the parents of this item
point1 := segment parents first.
In this example, the parents of a segment joining two points are
returned as an array containing the two points. In contrast, the
parents of a free point are returned as nil.
- Method on DrGMathItem: move: vector
vector, a vector (x,y) representing the displacement
Move an item in a given direction, if possible while respecting its
constraints.
- Method on DrGMathItem: <Point> closestPointTo: aPoint
aPoint, coordinates
⇒ coordinates of the point on “curve” the closest to “aPoint”.
This works when the curve is a line, a segment, a vector, an arc, a
circle, a polygon, or a locus.
position := segment closestPointTo: 2@1.
[..]
position := arc closestPointTo: 2@1.
4.2.2 Point
A point item – point object defined in a Dr.Geo construction –
passed as argument to a script is a complex object. It can be a
free point on the plane, on a line, an intersection, etc. A few methods
can be useful in scripts.
- Method on DrGPointItem: <Point> point
⇒ coordinates of this item
abscissa := pointItem point x.
For example, with this script
showOrdinate: aDrGeoPoint
"ordinate of point"
   ^ aDrGeoPoint point y
The user would invoke this script, pick a point, and pin the result in
the sketch showing the ordinate of the selected point.
- Method on DrGPointItem: point: aPoint
aPoint, coordinates
⇒ modify the coordinate of “item”
- Method on DrGPointOnCurveItem: <Float> abscissa
⇒ curvilinear abscissa of this point, in the interval [0 ; 1]
- Method on DrGPointOnCurveItem: abscissa: a
a, decimal number in the interval [0 ; 1]
⇒ modify the curvilinear abscissa of a free point on a line
- Method on DrGPointItem: moveAt: aPoint
aPoint, coordinates where to displace “item”
⇒ displace “item” to the given position
4.2.3 Straight or curved line
- Method on DrGCurveItem: <Float> abscissaOf: aPoint
aPoint, coordinates (x,y) of a point
⇒ number in [0 ; 1] curvilinear abscissa of “aPoint”
on “curve”
a := curve abscissaOf: 2@1.
- Method on DrGCurveItem: <Point> pointAt: anAbscissa
anAbscissa, number in [0 ; 1]
⇒ coordinates of a point on “curve” with curvilinear
abscissa equal to “anAbscissa”
myPoint := curve pointAt: 0.5.
- Method on DrGCurveItem: <Boolean> contains: aPoint
aPoint, coordinates (x, y) of a point
⇒ boolean indicating if the “aPoint” is on “curve”
(curve contains: 0@1) ifTrue: [^ 'Yes!']
  ifFalse: [^ 'No!'].
4.2.4 Line, ray, segment, vector
- Method on DrGDirectionItem: <Point> origin
⇒ coordinates of the origin of this item
- Method on DrGDirectionItem: <Vector> direction
⇒ vector (x, y) indicating the item direction
v := item direction.
slope := v y / v x.
- Method on DrGDirectionItem: <Vector> normal
⇒ unit vector normal to the item direction
4.2.5 Segment
- Method on DrGSegmentItem: <Float> item length
⇒ length of the segment
segment := canvas segment: 0@0 to: 5@5.
l := segment length
- Method on DrGSegmentItem: <Point> extremity1
⇒ coordinates of the extremity 1
segment := canvas segment: 0@0 to: 5@5.
p := segment extremity1.
- Method on DrGSegmentItem: <Point> extremity2
⇒ coordinates of the extremity 2
segment := canvas segment: 0@0 to: 5@5.
p := segment extremity2
- Method on DrGSegmentItem: <Point> middle
⇒ coordinates of the middle of the segment
segment := canvas segment: 0@0 to: 5@5.
m := segment middle
4.2.6 Circle, arc, polygon
- Method on DrGCircleItem|DrGArcItem: <Point> center
⇒ coordinates of the centre of the circle or arc
- Method on DrGCircleItem|DrGArcItem: <Float> radius
⇒ radius of the circle or arc
- Method on DrGCircleItem|DrGArcItem|DrGPolygonItem: <Float> length
⇒ length of the circle, arc or polygon
4.2.7 Value
- Method on DrGValueItem: <Float> valueItem
⇒ value of this item
n1 := item2 valueItem.
n2 := item2 valueItem.
n1 + n2.
- Method on DrGValueItem: valueItem: v
v, decimal number
⇒ modify the value of a free value item
- Method on DrGValueItem: position: aPoint
aPoint, coordinates (x, y) of a point
⇒ displace at the screen the position of a value item
4.2.8 Angle
- Method on DrGAngleItem: <Integer> degreeAngle
⇒ measure of this angle item in degrees
angle1 := a1 degreeAngle.
- Method on DrGAngleItem: <Float> radianAngle
⇒ measure of this angle item in radians
angle1 := a1 radianAngle.