GNU ease.js Manual v0.2.8
Table of Contents
- About GNU ease.js
- 1 Integrating GNU ease.js
- 2 Working With Classes
- 3 Member Keywords
- 4 Interoperability
- Appendix A Source Tree
- Appendix B Implementation Details / Rationale
- Appendix C GNU Free Documentation License
Main
| • About: | About the project | |
| • Integration: | How to integrate ease.js into your project | |
| • Classes: | Learn to work with Classes | |
| • Member Keywords: | Control member visibility and more. | |
| • Interoperability: | Playing nice with vanilla ECMAScript. | |
| • Source Tree: | Overview of source tree | |
| • Implementation Details: | The how and why of ease.js | |
| • License: | Document License |
This manual is for GNU ease.js, version 0.2.8.
Copyright © 2011, 2012, 2013, 2014, 2015, 2016 Free Software Foundation, Inc.
Permission is granted to copy, distribute and/or modify this document under the terms of the GNU Free Documentation License, Version 1.3 or any later version published by the Free Software Foundation; with no Invariant Sections, no Front-Cover Texts, and no Back-Cover Texts. A copy of the license is included in the section entitled "GNU Free Documentation License".
Next: Integration, Previous: Top, Up: Top [Contents]
About GNU ease.js
GNU ease.js is a classical object-oriented framework for Javascript, intended to eliminate boilerplate code and “ease” the transition into JavaScript from other object-oriented languages.
Current support includes:
- Simple and intuitive class definitions
- Classical inheritance
- Abstract classes and methods
- Interfaces
- Traits as mixins
- Visibility (public, protected, and private members)
- Static, constant, and final members
While the current focus of the project is Object-Oriented design, it is likely that ease.js will expand to other paradigms in the future.
History
ease.js was initially developed for use at the author’s place of employment in order to move the familiar concept of object-oriented development over to JavaScript for use in what would one day be liberated under the Liza Data Collection Framework. JavaScript lacks basic core principals of object-oriented development, the most major of which is proper encapsulation.
The library would be required to work both server and client-side, supporting all major web browsers as far back as Internet Explorer 6. Since it would be used in a production system and would be used to develop a core business application, it must also work flawlessly. This meant heavy unit testing.
The solution was to develop a library that would first work server-side. The software of choice for server-side JavaScript was Node.js. Node uses the CommonJS format for modules. This provided an intuitive means of modularizing the code without use of an Object Oriented development style (the closest other option would be Prototypal). ease.js was first developed to work on Node.js.
Moving the code over to the browser is not a difficult concept, since the entire library relied only on standard JavaScript. A couple important factors had to be taken into account, mainly that CommonJS modules don’t simply “work” client-side without some type of wrapper, not all browsers support ECMAScript 5 and the assertion system used for tests is a Node.js module.
This involved writing a simple script to concatenate all the modules and appropriately wrap them in closures, thereby solving the CommonJS issue. The required assertions were ported over to the client. The only issue was then ECMAScript 5 support, which with a little thought, the browser could gracefully fall back on by sacrificing certain features but leaving the core functionality relatively unscathed. This provides a proper cross-browser implementation and, very importantly, allows the unit tests to be run both server and client side. One can then be confident that ease.js will operate on both the server and a wide range of web browsers without having to maintain separate tests for each.
Needless to say, the development was successful and the project has been used in production long before v0.1.0-pre was even conceived. It was thought at the beginning of the project that versions would be unnecessary, due to its relative simplicity and fairly basic feature set. The project has since evolved past its original specification and hopes to introduce a number of exciting features in the future.
GNU ease.js is authored by Mike Gerwitz and owned by the Free Software Foundation. On 22 December 2013, ease.js officially became a part of GNU with the kind help and supervision of Brandon Invergo.
Why ease.js?
There already exists a number of different ways to accomplish inheritance and various levels of encapsulation in JavaScript. Why ease.js? Though a number of frameworks did provide class-like definitions, basic inheritance and other minor feature sets, none of them seemed to be an all-encompassing solution to providing a strong framework for Object-Oriented development in JavaScript.
ease.js was first inspired by John Resig’s post on “Simple JavasScript Inheritance”1. This very basic example provided a means to define a “class” and extend it. It used a PHP-style constructor and was intuitive to use. Though it was an excellent alternative to defining and inheriting classes by working directly with prototypes, it was far from a solid solution. It lacked abstract methods, interfaces, encapsulation (visibility), and many other important features. Another solution was needed.
Using John’s example as a base concept, ease.js was developed to address those core issues. Importantly, the project needed to fulfill the following goals:
- Intuitive Class Definitions
Users of Object-Oriented languages are used to a certain style of class declaration that is fairly consistent. Class definitions within the framework should be reflective of this. A programmer familiar with Object-Oriented development should be able to look at the code and clearly see what the class is doing and how it is defined.
- Encapsulation
The absolute most important concept that ease.js wished to address was that of encapsulation. Encapsulation is one of the most important principals of Object-Oriented development. This meant implementing a system that would not only support public and private members (which can be done conventionally in JavaScript through “privileged members”), but must also support protected members. Protected members have long been elusive to JavaScript developers.
- Interfaces / Abstract Classes
Interfaces and Abstract Classes are a core concept and facilitate code reuse and the development of consistent APIs. They also prove to be very useful for polymorphism. Without them, we must trust that the developer has implemented the correct API. If not, it will likely result in confusing runtime errors. We also cannot ensure an object is passed with the expected API through the use of polymorphism.
- Inheritance
Basic inheritance can be done through use of prototype chains. However, the above concepts introduce additional complications. Firstly, we must be able to implement interfaces. A simple prototype chain cannot do this (an object cannot have multiple prototypes). Furthermore, protected members must be inherited by subtypes, while making private members unavailable. In the future, when traits are added to the mix, we run into the same problem as we do with interfaces.
- CommonJS, Server and Client
The framework would have to be used on both the server and client. Server-side, Node.js was chosen. It used a CommonJS format for modules. In order to get ease.js working client side, it would have to be wrapped in such a way that the code could remain unchanged and still operate the same. Furthermore, all tests written for the framework would have to run both server and client-side, ensuring a consistent experience on the server and across all supported browsers. Support would have to go as far back as Internet Explorer 6 to support legacy systems.
- Performance
Everyone knows that Object-Oriented programming incurs a performance hit in return for numerous benefits. ease.js is not magic; it too would incur a performance it. This hit must be low. Throughout the entire time the software is running, the hit must be low enough that it is insignificant (less than 1% of the total running time). This applies to any time the framework is used - from class creation to method invocation.
- Quality Design
A quality design for the system is important for a number of reasons. This includes consistency with other languages and performance considerations. It must also be easily maintainable and extensible. Object-Oriented programming is all about restricting what the developer can do. It is important to do so properly and ensure it is consistent with other languages. If something is inconsistent early on, and that inconsistency is adopted throughout a piece of software, fixing the inconsistency could potentially result in breaking the software.
- Heavily Tested
The framework would be used to develop critical business applications. It needed to perform flawlessly. A bug could potentially introduce flaws into the entire system. Furthermore, bugs in the framework could create a debugging nightmare, with developers wondering if the flaw exists in their own software or the framework. This is a framework that would be very tightly coupled with the software built atop of it. In order to ensure production quality, the framework would have to be heavily tested. As such, a test-driven development cycle is preferred.
- Well Documented
The framework should be intuitive enough that documentation is generally unneeded, but in the event the developer does need help in implementing the framework in their own software, the help should be readily available. Wasting time attempting to figure out the framework is both frustrating and increases project cost.
The above are the main factors taken into consideration when first developing ease.js. There were no existing frameworks that met all of the above criteria. Therefore, it was determined that ease.js was a valid project that addressed genuine needs for which there was no current, all-encompassing solution.
1 Integrating GNU ease.js
Before diving into ease.js, let’s take a moment to get you set up. How ease.js is integrated depends on how it is being used—on the server or in the client (web browser). You may also wish to build ease.js yourself rather than downloading pre-built packages. Depending on what you are doing, you may not have to build ease.js at all.
| • Getting GNU ease.js: | How to get GNU ease.js | |
| • Building: | How to build GNU ease.js | |
| • Including: | Including GNU ease.js in your own project |
Next: Building, Up: Integration [Contents]
1.1 Getting GNU ease.js
If you simply want to use ease.js in your project, you may be interested in simply grabbing an archive (tarball, zip, etc), or installing through your favorite package manger. More information on those options will become available as ease.js nears its first release.
If you are interested in building ease.js, you need to get a hold of the source tree. Either download an archive (tarball, zip, etc), or clone the Git repository. We will do the latter in the example below. Feel free to clone from your favorite source.
  # to clone from GitHub (do one or the other, not both)
  $ git clone git://github.com/mikegerwitz/easejs

  # to clone from Gitorious (do one or the other, not both)
  $ git clone git://gitorious.org/easejs/easejs.git
The repository will be cloned into the ./easejs directory.
Next: Including, Previous: Getting GNU ease.js, Up: Integration [Contents]
1.2 Building
Feel free to skip this section if you have no interest in building ease.js yourself. The build process is fast, and is unnecessary if using ease.js server-side.
First, we should clarify what the term “build” means in context of ease.js. JavaScript is compiled on the fly. That is, we don’t actually need to compile it manually through a build process. So when we are talking about “building” ease.js, we are not talking about compiling the source code. Rather, we are referring to any of the following:
- Prepare the script for client-side deployment [and testing]
- Generate the documentation (manual and API)
In fact, if you’re using ease.js server-side with software such as Node.js, you do not need to build anything at all. You can simply begin using it.
The aforementioned are built using make. The process that is run
will vary depending on your system. The command will read Makefile in
the root directory and execute the associated command. The following are the
targets available to you:
mkbuildCreates the build/ directory, where all output will be stored. This is run automatically by any of the targets.
combineRuns the
combinetool to produce two separate files: ease.js, which can be used to use ease.js within the web browser, and ease-full.js, which permits both using ease.js and running the unit tests within the browser. The output is stored in the build/ directory.The unit tests can be run by opening the build/browser-test.html file in your web browser.
minRuns
combineand minifies the resulting combined files. These files are output in the build/ directory and are useful for distribution. It is recommended that you use the minified files in production.testRun unit tests. This will first perform the
combineprocess and will also run the tests for the combined script, ensuring that it was properly combined.Unit tests will be covered later in the chapter.
docGenerates documentation. Currently, only the manual is build. API documentation will be added in the near future. The resulting documentation will be stored in build/doc/. For your convenience, the manual is output in the following forms: PDF, HTML (single page), HTML (multiple pages) and plain text.
In order to build the documentation, you must have Texinfo installed. You likely also need LaTeX installed. If you are on a Debian-based system, for example, you will likely be able to run the following command to get started:
$ sudo apt-get install texlive texinfo
installInstalls info documentation. Must first build
doc-info. After installation, the manual may be viewed from the command line with: ‘info easejs’.uninstallRemoves everything from the system that was installed with
make install.allRuns all targets, except for clean, install and uninstall.
cleanCleans up after the build process by removing the build/ directory.
If you do not want to build ease.js yourself, you are welcome to download the pre-built files.
Previous: Building, Up: Integration [Contents]
1.3 Including GNU ease.js In Your Projects
Using ease.js in your projects should be quick and painless. We’ll worry about the details of how to actually use ease.js in a bit. For now, let’s just worry about how to include it in your project.
| • Server-Side Include: | Including ease.js server-side | |
| • Client-Side Include: | Including ease.js in the web browser |
Next: Client-Side Include, Up: Including [Contents]
1.3.1 Server-Side Include
ease.js should work with any CommonJS-compliant system. The examples below have been tested with Node.js. Support is not guaranteed with any other software.
Let’s assume that you have installed ease.js somewhere that is accessible to
require.paths. If you used a tool such as npm, this should
have been done for you.
/** example-include.js **/
var easejs = require( 'easejs' );
Figure 1.1: Including ease.js via require()
It’s important to understand what exactly the above command is doing. We are including the easejs/ directory (adjust your path as needed). Inside that directory is the index.js file, which is loaded. The exports of that module are returned and assigned to the easejs variable. We will discuss what to actually do with those exports later on.
That’s it. You should now have ease.js available to your project.
Previous: Server-Side Include, Up: Including [Contents]
1.3.2 Client-Side Include (Web Browser)
ease.js can also be included in the web browser. Not only does this give you a powerful Object-Oriented framework client-side, but it also facilitates code reuse by permitting you to reuse your server-side code that depends on ease.js.
In order for ease.js to operate within the client, you must either download ease.js or build it yourself. Let’s assume that you have placed ease.js within the scripts/ directory of your web root.
<!-- to simply use ease.js -->
<script type="text/javascript" src="/scripts/ease.js"></script>

<!-- to include both the framework and the unit tests -->
<script type="text/javascript" src="/scripts/ease-full.js"></script>
Figure 1.2: Including ease.js client-side
Likely, you only want the first one. The unit tests can more easily be run by loading build/browser-test.html in your web browser (see Building).
The script will define a global easejs variable, which can be used
exactly like the server-side require() (see Server-Side Include).
Keep that in mind when going through the examples in this manual.
Next: Member Keywords, Previous: Integration, Up: Top [Contents]
2 Working With Classes
In Object-Oriented programming, the most common term you are likely to encounter is “Class”. A class is like a blueprint for creating an object, which is an instance of that class. Classes contain members, which include primarily properties and methods. A property is a value, much like a variable, that a class “owns”. A method, when comparing with JavaScript, is a function that is “owned” by a class. As a consequence, properties and methods are not part of the global scope.
JavaScript does not support classes in the manner traditionally understood by Object-Oriented programmers. This is because JavaScript follows a different model which instead uses prototypes. Using this model, JavaScript supports basic instantiation and inheritance. Rather than instantiating classes, JavaScript instantiates constructors, which are functions. The following example illustrates how you would typically create a class-like object in JavaScript:
    /**
     * Declaring "classes" WITHOUT ease.js
     */

    // our "class"
    var MyClass = function()
    {
        this.prop = 'foobar';
    }

    // a class method
    MyClass.prototype.getProp = function()
    {
        return this.prop;
    };

    // create a new instance of the class and execute doStuff()
    var foo = new MyClass();
    console.log( foo.getProp() ); // outputs "foobar"
Figure 2.1: Basic “Class” in JavaScript without using ease.js
This gets the job done, but the prototypal paradigm has a number of limitations amongst its incredible flexibility. For Object-Oriented programmers, it’s both alien and inadequate. That is not to say that it is not useful. In fact, it is so flexible that an entire Object-Oriented framework was able to be built atop of it.
ease.js aims to address the limitations of the prototype model and provide a familiar environment for Object-Oriented developers. Developers should not have to worry about how classes are implemented in JavaScript (indeed, those details should be encapsulated). You, as a developer, should be concerned with only how to declare and use the classes. If you do not understand what a prototype is, that should be perfectly fine. You shouldn’t need to understand it in order to use the library (though, it’s always good to understand what a prototype is when working with JavaScript).
In this chapter and those that follow, we will see the limitations that ease.js addresses. We will also see how to declare the classes using both prototypes and ease.js, until such a point where prototypes are no longer adequate.
| • Defining Classes: | Learn how to define a class with ease.js | |
| • Inheritance: | Extending classes from another | |
| • Static Members: | Members whose use do not require instantiation | |
| • Abstract Members: | Declare members, deferring definition to subtypes | |
| • Method Proxies: | Methods that proxy calls to another object |
Next: Inheritance, Up: Classes [Contents]
2.1 Defining Classes
C = Class( string name, Object dfn )Define named class C identified by name described by dfn.
C = Class( string name ).extend( Object dfn )Define named class C identified by name described by dfn.
C = Class( Object dfn )Define anonymous class C as described by dfn.
C = Class.extend( Object dfn )Define anonymous class C as described by dfn.
Class C can be defined in a number of manners, as listed above, provided a definition object dfn containing the class members and options. An optional string name may be provided to set an internal identifier for C, which may be used for reflection and error messages. If name is omitted, C will be declared anonymous.
Class must be imported (see Including) from easejs.Class;
it is not available in the global scope.
2.1.1 Definition Object
dfn = { '[keywords] name': value[, ...] }Define definition object dfn containing a member identified by name, described by optional keywords with the value of value. The member type is determined by
typeofvalue. Multiple members may be provided in a single definition object.
The definition object dfn has the following properties:
- The keys represent the member declaration, which may optionally
contain one or more keywords delimited by spaces. A space must delimit
the final keyword and name.
- keywords must consist only of recognized tokens, delimited by spaces.
- Each token in keywords must be unique per name.
- The value represents the member definition, the type of which
determines what type of member will be declared.
- A value of type
functionwill define a method, which is an invokable member whose context is assigned to the class or class instance depending on keywords. - All other types of value will define a property - a mutable value equal to value, assigned to a class or instance depending on keywords. Properties may be made immutable using keywords.
- Getters/setters may be defined in an ECMAScript 5 or greater environment. Getters/setters must share the same value for keywords.
- A value of type
- name must be unique across all members of dfn.
2.1.2 Member Validations
For any member name:
- keywords of member name may contain only one access modifier (see Access Modifiers).
- See Member Keywords for keywords restrictions.
For any member name declared as a method, the following must hold true:
- keywords of member name may not contain
overridewithout a super method of the same name (see Inheritance). - keywords of member name may not contain both
staticandvirtualkeywords (see Static Members and Inheritance). - keywords of member name may not contain the
constkeyword. - For any member name that contains the keyword
abstractin keywords, class C must instead be declared as anAbstractClass(see Abstract Classes).
2.1.3 Discussion
In Figure 2.1, we saw how one would conventionally declare a class-like object (a prototype) in JavaScript. This method is preferred for many developers, but it is important to recognize that there is a distinct difference between Prototypal and Classical Object-Oriented development models. Prototypes lack many of the conveniences and features that are provided by Classical languages, but they can be emulated with prototypes. As an Object-Oriented developer, you shouldn’t concern yourself with how a class is declared in JavaScript. In true OO fashion, that behavior should be encapsulated. With ease.js, it is.
Let’s take a look at how to declare that exact same class using ease.js:
    var Class = require( 'easejs' ).Class;

    var MyClass = Class(
    {
        'public prop': 'foobar',

        'public getProp': function()
        {
            return this.prop;
        }
    } );

    // create a new instance of the class and execute doStuff()
    var foo = MyClass();
    console.log( foo.getProp() ); // outputs "foobar"
Figure 2.2: Basic anonymous class declaration using ease.js
That should look much more familiar to Object-Oriented developers. There are a couple important notes before we continue evaluating this example:
- The first thing you will likely notice is our use of the
publickeyword; this is optional (the default visibility is public); it may be omitted for a more traditional JavaScript feel. We will get more into visibility later on (see Access Modifiers). - Unlike Figure 2.1, we do not use the
newkeyword in order to instantiate our class. You are more than welcome to use thenewkeyword if you wish, but it is optional when using ease.js. This is mainly because without this feature, if the keyword is omitted, the constructor is called as a normal function, which could have highly negative consequences. This style of instantiation also has its benefits, which will be discussed later on. - ease.js’s class module is imported using
require()in the above example. If using ease.js client-side (see Client-Side Include), you can instead use ‘var Class = easejs.Class’. From this point on, importing the module will not be included in examples.
The above example declares an anonymous class, which is stored in the variable MyClass. By convention, we use CamelCase, with the first letter capital, for class names (and nothing else).
| • Class Caveats: | Important things to note about using ease.js classes | |
| • Anonymous vs. Named Classes: | ||
| • Constructors: | How to declare a constructor | |
| • Temporary Classes: | Throwaway classes that only need to be used once | |
| • Temporary Instances: | Throwaway instances that only need to be used once |
Next: Anonymous vs. Named Classes, Up: Defining Classes [Contents]
2.1.4 Class Caveats
ease.js tries to make classes act as in traditional Classical OOP as much as possible, but there are certain limitations, especially when supporting ECMAScript 3. These situations can cause some subtle bugs, so it’s important to note and understand them.
2.1.4.1 Returning Self
Returning this is a common practice for method
chaining.2
In the majority of cases, this works fine in ease.js
(see also Temporary Classes):
  var Foo = Class( 'Foo',
  {
      'public beginning': function()
      {
          return this;
      },

      'public middle': function()
      {
          return this;
      },

      'public end': function()
      {
          // ...
      }
  } );

  Foo().beginning().middle().end();
Figure 2.3: Using this for method chaining
Within the context of the method, this is a reference to
the privacy visibility object for that instance
(see The Visibility Object).
That is—it exposes all of the object’s internal state.
When it is returned from a method call, ease.js recognizes this and
replaces it with a reference to the public visibility
object—the object that the rest of the world interacts with.
But what if you produce this in some other context?
A callback, for example:
  var Foo = Class( 'Foo',
  {
     'private _foo': 'good',

      'public beginning': function( c )
      {
          // XXX: `this' is the private visibility object
          c( this );
      },

      'public end': function()
      {
          return this._foo;
      }
  } );

  // result: 'bad'
  Foo()
      .beginning( function( self )
      {
          // has access to internal state
          self._foo = 'bad';
      } )
      .end();
Figure 2.4: Accidentally revealing internal state via callback
In Figure 2.4,
beginning applies the callback with a reference to what most
would believe to be the class instance
(which is a reasonable assumption,
considering that ease.js usually maintains that facade).
Since this is a reference to the private visibility object,
the callback has access to all its internal state,
and therefore the ability to set _foo.
To solve this problem,
use this.__inst,
which is a reference to the public visibility object
(the same one that ease.js would normally translate to on your
behalf):
  var Foo = Class( 'Foo',
  {
     'private _foo': 'good',

      'public beginning': function( c )
      {
          // OK
          c( this.__inst );
      },

      'public end': function()
      {
          return this._foo;
      }
  } );

  // result: 'good'
  Foo()
      .beginning( function( self )
      {
          // sets public property `_foo', since `self' is now the public
          // visibility object
          self._foo = 'bad';
      } )
      .end();
Figure 2.5: Providing public visibility object using this.__inst
Next: Constructors, Previous: Class Caveats, Up: Defining Classes [Contents]
2.1.5 Anonymous vs. Named Classes
We state that Figure 2.2 declared an anyonmous class because the class was not given a name. Rather, it was simply assigned to a variable, which itself has a name. To help keep this idea straight, consider the common act of creating anonymous functions in JavaScript:
    // anonymous
    var myFunc = function() {};

    // named
    function myNamedFunc() {};
Figure 2.6: Anonymous functions in JavaScript
If the function itself is not given a name, it is considered to be anonymous, even though it is stored within a variable. Just as the engine has no idea what that function is named, ease.js has no idea what the class is named because it does not have access to the name of the variable to which it was assigned.
Names are not required for classes, but they are recommended. For example, consider what may happen when your class is output in an error message.
    // call non-existent method
    foo.baz();

    // TypeError: Object #<anonymous> has no method 'baz'
Figure 2.7: Anonymous classes do not make for useful error messages
If you have more than a couple classes in your software, that error message is not too much help. You are left relying on the stack trace to track down the error. This same output applies to converting a class to a string or viewing it in a debugger. It is simply not helpful. If anything, it is confusing. If you’ve debugged large JS applications that make liberal use of anonymous functions, you might be able to understand that frustration.
Fortunately, ease.js permits you to declare a named class. A named class is simply a class that is assigned a string for its name, so that error messages, debuggers, etc provide more useful information. There is functionally no difference between named and anonymous classes.
    var MyFoo = Class( 'MyFoo', {} ),
        foo   = MyFoo();

    // call non-existent method
    foo.baz();

    // TypeError: Object #<MyFoo> has no method 'baz'
Figure 2.8: Declaring an empty named class
Much better! We now have a useful error message and immediately know which class is causing the issue.
Next: Temporary Classes, Previous: Anonymous vs. Named Classes, Up: Defining Classes [Contents]
2.1.6 Constructors
A “constructor” in JavaScript is simply a function—whether or not
it actually constructs a new object depends on whether the tt
keyword is used. With ease.js, constructors are handled in a manner
similar to most other languages: by providing a separate method.
Until the release of ECMAScript 6, which introduced the class
keyword, there was no convention for constructors defined in this
manner. The implementation ease.js chose is very similar to that of
PHP’s (see Constructor Implementation):
    var Foo = Class( 'Foo',
    {
        // may also use `construct`; see below
        __construct: function( name )
        {
            console.log( 'Hello, ' + name + '!' );
        }
    } );

    // instantiate the class, invoking the constructor
    Foo( 'World' );

    // Output:
    // Hello, World!
Figure 2.9: Declaring constructors using ease.js
ease.js introduced the constructor method in version 0.2.7
to match the ES6 “class” implementation; it is an alias for
__construct. This method name may be used prior to ES6.
    // ECMAScript 6 syntax
    let Foo = Class( 'Foo',
    {
        // you may still use __construct
        constructor( name )
        {
            console.log( 'Hello, ' + name + '!' );
        }
    } );

    // instantiate the class, invoking the constructor
    Foo( 'World' );

    // Output:
    // Hello, World!
Figure 2.10: Declaring constructors in an ECMAScript 6 style
When the class is instantiated, the constructor is invoked, permitting you do to any necessary initialization tasks before the class can be used. The constructor operates exactly how you would expect a constructor to in JavaScript, with one major difference. Returning an object in the constructor does not return that object instead of the new class instance, since this does not make sense in a Class-based model.
If you wish to prevent a class from being instantiated, simply throw an exception within the constructor. This is useful if the class is intended to provide only static methods, or if you wish to enforce a single instance (one means of achieving a Singleton).
    var Foo = Class( 'Foo',
    {
        'public __construct': function( name )
        {
            throw Error( "Cannot instantiate class Foo" );
        }
    } );
Figure 2.11: Prevent class from being instantiated
Constructors are optional. By default, nothing is done after the class is instantiated.
Next: Temporary Instances, Previous: Constructors, Up: Defining Classes [Contents]
2.1.7 Temporary Classes
In Figure 2.2, we saw that the new keyword was unnecessary
when instantiating classes. This permits a form of shorthand that is very
useful for creating temporary classes, or “throwaway“ classes which
are used only once.
Consider the following example:
    // new instance of anonymous class
    var foo = Class(
    {
        'public bar': function()
        {
            return 'baz';
        }
    } )();

    foo.bar(); // returns 'baz'
Figure 2.12: Declaring a temporary (throwaway) class
In Figure 2.12 above, rather than declaring a class, storing that in
a variable, then instantiating it separately, we are doing it in a single
command. Notice the parenthesis at the end of the statement. This invokes
the constructor. Since the new keyword is unnecessary, a new instance
of the class is stored in the variable foo.
We call this a temporary class because it is used only to create a single instance. The class is then never referenced again. Therefore, we needn’t even store it - it’s throwaway.
The downside of this feature is that it is difficult to notice unless the reader is paying very close attention. There is no keyword to tip them off. Therefore, it is very important to clearly document that you are storing an instance in the variable rather than an actual class definition. If you follow the CamelCase convention for class names, then simply do not capitalize the first letter of the destination variable for the instance.
Previous: Temporary Classes, Up: Defining Classes [Contents]
2.1.8 Temporary Instances
Similar to Temporary Classes, you may wish to use an instance temporarily to invoke a method or chain of methods. Temporary instances are instances that are instantiated in order to invoke a method or chain of methods, then are immediately discarded.
    // retrieve the name from an instance of Foo
    var name = Foo().getName();

    // method chaining
    var car = VehicleFactory()
        .createBody()
        .addWheel( 4 )
        .addDoor( 2 )
        .build();

    // temporary class with callback
    HttpRequest( host, port ).get( path, function( data )
    {
        console.log( data );
    } );

    // Conventionally (without ease.js), you'd accomplish the above using
    // the 'new' keyword. You may still do this with ease.js, though it is
    // less clean looking.
    ( new Foo() ).someMethod();
Figure 2.13: Declaring a temporary (throwaway) class
Rather than storing the class instance, we are using it simply to invoke methods. The results of those methods are stored in the variable rather than the class instance. The instance is immediately discarded, since it is no longer able to be referenced, and is as such a temporary instance.
In order for method chaining to work, each method must return itself.
This pattern is useful for when a class requires instantiation in order to invoke a method. Classes that intend to be frequently used in this manner should declare static methods so that they may be accessed without the overhead of creating a new class instance.
Next: Static Members, Previous: Defining Classes, Up: Classes [Contents]
2.2 Inheritance
C' = Class( string name ).extend( Object base, Objectdfn ) Define named class C’ identified by name as a subtype of base, described by dfn. base may be of type
Classor may be any enumerable object.C' = C.extend( Object dfn )Define anonymous class C’ as a subtype of class C, described by dfn.
C' = Class.extend( Object base, Object dfn )Define anonymous class C’ as a subtype of base, described by dfn. base may be of type
Classor may be any enumerable object.
C is a class as defined in Defining Classes. base may be any class or object containing enumerable members. dfn is to be a definition object as defined in Definition Object.
Provided non-final C or base to satisfy requirements of C, class C’ will be defined as a subtype (child) of supertype (parent) class C. Provided base that does not satisfy requirements of C, C’ will be functionally equivalent to a subtype of anonymous class B as defined by B = Class( base ).
2.2.1 Member Inheritance
Let dfn\_n\^c denote a member of dfn in regards to class c that matches (case-sensitive) name n. Let o\_n denote an override, represented as boolean value that is true under the condition that both dfn\_n\^C’ and dfn\_n\^C are defined values.
C’ will inherit all public and protected members of supertype
C such that dfn\_n\^C’ = dfn\_n\^C for each dfn\^C.
For any positive condition o\_n, member dfn\_n\^C’ will be said
to override member dfn\_n\^C, provided that overriding member
n passes all validation rules associated with the operation. A
protected member may be escalated to public, but the
reverse is untrue. private members are invisible to
subtypes.3
For any positive condition o\_n where member n is defined as a method:
- One of the following conditions must always be true:
- dfn\_n\^C is declared with the
virtualkeyword and dfn\_n\^C’ is declared with theoverridekeyword.- Note that dfn\_n\^C’ will not become
virtualby default (unlike languages such as C++); they must be explicitly declared as such.
- Note that dfn\_n\^C’ will not become
- dfn\_n\^C is declared with the
abstractkeyword and dfn\_n\^C’ omits theoverridekeywords.
- dfn\_n\^C is declared with the
- The argument count of method dfn\_n\^C’ must be ≥ the argument count of method dfn\_n\^C to permit polymorphism.
- A reference to super method dfn\_n\^C will be preserved and assigned to ‘this.__super’ within context of method dfn\_n\^C’.4
- A method is said to be concrete when it provides a definition and
abstract when it provides only a declaration
(see Definition Object).
- Any method n such that dfn\_n\^C is declared
abstractmay be overridden by a concrete or abstract method dfn\_n\^C’. - A method n may not be declared
abstractif dfn\_n\^C is concrete.
- Any method n such that dfn\_n\^C is declared
- Member dfn\_n\^C’ must be a method.
- Member dfn\_n\^C must not have been declared
private(see Private Member Dilemma).
Members that have been declared static cannot be overridden
(see Static Members).
2.2.2 Discussion
Inheritance can be a touchy subject among many Object-Oriented developers due to encapsulation concerns and design considerations over method overrides. The decision of whether or not inheritance is an appropriate choice over composition is left to the developer; ease.js provides the facilities for achieving classical inheritance where it is desired.
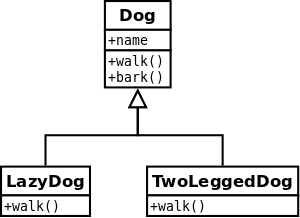
In the above example, we would say that LazyDog and TwoLeggedDog are subtypes of Dog, and that Dog is the supertype of the two. We describe inheritance as an “is a” relationship. That is:
- LazyDog is a Dog.
- TwoLeggedDog is also a Dog.
- Dog is not a LazyDog or a TwoLeggedDog.
Subtypes inherit all public and protected members of their supertypes
(see Access Modifiers). This means that, in the case of our above
example, the walk() and bark() methods would be available to
our subtypes. If the subtype also defines a method of the same name, as was
done above, it will override the parent functionality. For now, we
will limit our discussion to public members. How would we represent these
classes using ease.js?
    // our parent class (supertype)
    var Dog = Class( 'Dog',
    {
        'virtual public walk': function()
        {
            console.log( 'Walking the dog' );
        },

        'public bark': function()
        {
            console.log( 'Woof!' );
        }
    } );

    // subclass (child), as a named class
    var LazyDog = Class( 'LazyDog' ).extend( Dog,
    {
        'override public walk': function()
        {
            console.log( 'Lazy dog refuses to walk.' );
        }
    } );

    // subclass (child), as an anonymous class
    var TwoLeggedDog = Dog.extend(
    {
        'override public walk': function()
        {
            console.log( 'Walking the dog on two feet' );
        }
    } );
Figure 2.15: Inheritance in ease.js
You should already understand how to define a class (see Defining Classes). The above example introduced two means of extending classes – defining a new class that inherits from a parent:
- Named Subclasses
LazyDog is defined as a named subclass (see Anonymous vs. Named Classes). This syntax requires the use of ‘Class( 'Name' )’. The
extend()method then allows you to extend from an existing class by passing the class reference in as the first argument.- Anonymous Subclasses
TwoLeggedDog was declared as an anonymous subclass. The syntax for this declaration is a bit more concise, but you forfeit the benefits of named classes (see Anonymous vs. Named Classes). In this case, you can simply call the supertype’s
extend()method. Alternatively, you can use the ‘Class.extend( Base, {} )’ syntax, as was used with the named subclass LazyDog.
You are always recommended to use the named syntax when declaring classes in order to provide more useful error messages. If you are willing to deal with the less helpful error messages, feel free to use anonymous classes for their conciseness.
| • Understanding Member Inheritance: | How to work with inherited members | |
| • Overriding Methods: | Overriding inherited methods | |
| • Type Checks and Polymorphism: | Substituting similar classes for one-another | |
| • Visibility Escalation: | Increasing visibility of inherited members | |
| • Error Subtypes: | Transparent Error subtyping | |
| • Final Classes: | Classes that cannot be inherited from |
Next: Overriding Methods, Up: Inheritance [Contents]
2.2.3 Understanding Member Inheritance
In Figure 2.15, we took a look at how to inherit from a parent class. What does it mean when we “inherit” from a parent? What are we inheriting? The answer is: the API.
There are two types of APIs that subtypes can inherit from their parents:
- Public API
This is the API that is accessible to everyone using your class. It contains all public members. We will be focusing on public members in this chapter.
- Protected API
Protected members make up a protected API, which is an API available to subclasses but not the outside world. This is discussed more in the Access Modifiers section (see Access Modifiers), so we’re going to leave this untouched for now.
When a subtype inherits a member from its parent, it acts almost as if that member was defined in the class itself5. This means that the subtype can use the inherited members as if they were its own (keep in mind that members also include properties). This means that we do not have to redefine the members in order to use them ourselves.
LazyDog and TwoLeggedDog both inherit the walk() and
bark() methods from the Dog supertype. Using LazyDog as
an example, let’s see what happens when we attempt to use the bark()
method inherited from the parent.
    var LazyDog = Class( 'LazyDog' ).extend( Dog,
    {
        /**
         * Bark when we're poked
         */
        'virtual public poke': function()
        {
            this.bark();
        }
    } );

    // poke() a new instance of LazyDog
    LazyDog().poke();

    // Output:
    // Woof!
Figure 2.16: Using inherited members
In Figure 2.16 above, we added a poke() method to
our LazyDog class. This method will call the bark() method that
was inherited from Dog. If we actually run the example, you will
notice that the dog does indeed bark, showing that we are able to call our
parent’s method even though we did not define it ourselves.
Next: Type Checks and Polymorphism, Previous: Understanding Member Inheritance, Up: Inheritance [Contents]
2.2.4 Overriding Methods
When a method is inherited, you have the option of either keeping the parent’s implementation or overriding it to provide your own. When you override a method, you replace whatever functionality was defined by the parent. This concept was used to make our LazyDog lazy and our TwoLeggedDog walk on two legs in Figure 2.15.
After overriding a method, you may still want to invoke the parent’s method.
This allows you to augment the functionality rather than replacing it
entirely. ease.js provides a magic __super() method to do this. This
method is defined only for the overriding methods and calls the parent
method that was overridden.
In order to demonstrate this, let’s add an additional subtype to our hierarchy. AngryDog will be a subtype of LazyDog. Not only is this dog lazy, but he’s rather moody.
    var AngryDog = Class( 'AngryDog' ).extend( LazyDog,
    {
        'public poke': function()
        {
            // augment the parent method
            console.log( 'Grrrrrr...' );

            // call the overridden method
            this.__super();
        }
    } );

    // poke a new AngryDog instance
    AngryDog().poke();

    // Output:
    // Grrrrrr...
    // Woof!
Figure 2.17: Using __super() method
If you remember from Figure 2.16, we added a
poke() method to LazyDog. In Figure 2.17 above, we are
overriding this method so that AngryDog growls when you poke him.
However, we still want to invoke LazyDog’s default behavior when he’s
poked, so we also call the __super() method. This will also make
AngryDog bark like LazyDog.
It is important to note that __super() must be invoked like any other
method. That is, if the overridden method requires arguments, you must pass
them to __super(). This allows you to modify the argument list before
it is sent to the overridden method.
2.2.4.1 Arbitrary Supertype Method Invocation
The aforementioned __super method satisfies invoking an overridden
method within the context of the method that is overriding it, but falls
short when needing to invoke an overridden method outside of that context.
As an example, consider that AngryDog also implemented a
pokeWithDeliciousBone method, in which case we want to bypass the
dog’s angry tendencies and fall back to behaving like a LazyDog (the
supertype). This poses a problem, as we have overridden LazyDog#poke,
so calling this.poke would not yield the correct result (the dog
would still respond angerly). __super cannot be used, because that
would attempt to invoke a supermethod named
pokeWithDeliciousBone; no such method even exists, so in this case,
__super wouldn’t even be defined.
We can remedy this using this.poke.super, which is a strict reference
to the overridden poke method (in this case, LazyDog.poke):
    var AngryDog = Class( 'AngryDog' ).extend( LazyDog,
    {
        'public poke': function()
        {
            // ...
        },

        'public pokeWithDeliciousBone': function()
        {
            // invoke LazyDog.poke
            this.poke.super.call( this );
        }
    } );

    // poke a new AngryDog instance with a delicious bone
    AngryDog().pokeWithDeliciousBone();

    // Output:
    // Woof!
Figure 2.18: Using the method-supecific super reference
It is important to note that, in its current implementation, since
super is a reference to a function, its context must be provided
using the ECMAScript-native apply or call (the first argument
being the context); using this as the context (as shown above) will
invoke the method within the context of the calling
instance.6
Next: Visibility Escalation, Previous: Overriding Methods, Up: Inheritance [Contents]
2.2.5 Type Checks and Polymorphism
The fact that the API of the parent is inherited is a very important detail. If the API of subtypes is guaranteed to be at least that of the parent, then this means that a function expecting a certain type can also work with any subtypes. This concept is referred to as polymorphism, and is a very powerful aspect of Object-Oriented programming.
Let’s consider a dog trainer. A dog trainer can generally train any type of dog (technicalities aside), so it would stand to reason that we would want our dog trainer to be able to train LazyDog, AngryDog, TwoLeggedDog, or any other type of Dog that we may throw at him/her.

Type checks are traditionally performed in JavaScript using the
instanceOf operator. While this can be used in most inheritance cases
with ease.js, it is not recommended. Rather, you are encouraged to use
ease.js’s own methods for determining instance type7. Support for the
instanceOf operator is not guaranteed.
Instead, you have two choices with ease.js:
Class.isInstanceOf( type, instance );Returns
trueif instance is of type type. Otherwise, returnsfalse.Class.isA( type, instance );Alias for
Class.isInstanceOf(). Permits code that may read better depending on circumstance and helps to convey the “is a” relationship that inheritance creates.
For example:
    var dog   = Dog()
        lazy  = LazyDog(),
        angry = AngryDog();

    Class.isInstanceOf( Dog, dog ); // true
    Class.isA( Dog, dog );          // true
    Class.isA( LazyDog, dog );      // false
    Class.isA( Dog, lazy );         // true
    Class.isA( Dog, angry );        // true

    // we must check an instance
    Class.isA( Dog, LazyDog ); // false; instance expected, class given
Figure 2.20: Using ease.js to determine instance type
It is important to note that, as demonstrated in Figure 2.20 above, an instance must be passed as a second argument, not a class.
Using this method, we can ensure that the DogTrainer may only be used with an instance of Dog. It doesn’t matter what instance of Dog - be it a LazyDog or otherwise. All that matters is that we are given a Dog.
    var DogTrainer = Class( 'DogTrainer',
    {
        'public __construct': function( dog )
        {
            // ensure that we are given an instance of Dog
            if ( Class.isA( Dog, dog ) === false )
            {
                throw TypeError( "Expected instance of Dog" );
            }
        }
    } );

    // these are all fine
    DogTrainer( Dog() );
    DogTrainer( LazyDog() );
    DogTrainer( AngryDog() );
    DogTrainer( TwoLeggedDog() );

    // this is not fine; we're passing the class itself
    DogTrainer( LazyDog );

    // nor is this fine, as it is not a dog
    DogTrainer( {} );
Figure 2.21: Polymorphism in ease.js
It is very important that you use only the API of the type that you
are expecting. For example, only LazyDog and AngryDog implement
a poke() method. It is not a part of Dog’s API.
Therefore, it should not be used in the DogTrainer class. Instead, if
you wished to use the poke() method, you should require that an
instance of LazyDog be passed in, which would also permit
AngryDog (since it is a subtype of LazyDog).
Currently, it is necessary to perform this type check yourself. In future versions, ease.js will allow for argument type hinting/strict typing, which will automate this check for you.
Next: Error Subtypes, Previous: Type Checks and Polymorphism, Up: Inheritance [Contents]
2.2.6 Visibility Escalation
Let a\_n denote a numeric level of visibility for dfn\_n\^C such
that the access modifiers (see Access Modifiers) private,
protected and public are associated with the values 1,
2 and 3 respectively. Let a’ represent a in
regards to C’ (see Inheritance).
For any member n of dfn, the following must be true:
- a’\_n ≥ a\_n.
- dfn\_n\^C’ cannot be redeclared without providing a new definition (value).
2.2.6.1 Discussion
Visibility escalation is the act of increasing the visibility of a
member. Since private members cannot be inherited, this would then imply
that the only act to be considered "escallation" would be increasing the
level of visibility from protected to private.
Many follow the convention of prefixing private members with an underscore but leaving omitting such a prefix from protected members. This is to permit visibility escalation without renaming the member. Alternatively, a new member can be defined without the prefix that will simply call the overridden member (although this would then not be considered an escalation, since the member name varies).
In order to increase the visibility, you must override the member; you cannot simply redeclare it, leaving the parent definition in tact. For properties, this has no discernible effect unless the value changes, as you are simply redefining it. For methods, this means that you are overriding the entire value. Therefore, you will either have to provide an alternate implementation or call ‘this.__super()’ to invoke the original method.
Note that you cannot de-escalate from public to protected; this will result in an error. This ensures that once a class defines an API, subclasses cannot alter it. That API must be forever for all subtypes to ensure that it remains polymorphic.
Let’s take a look at an example.
    var Foo = Class(
        {
            'virtual protected canEscalate': 'baz',

            'virtual protected escalateMe': function( arg )
            {
                console.log( 'In escalateMe' );
            },

            'virtual public cannotMakeProtected': function()
            {
            }
        } ),

        SubFoo = Foo.extend(
        {
            /**
             * Escalating a property means redefining it
             */
            'public canEscalate': 'baz',

            /**
             * We can go protected -> public
             */
            'public escalateMe': function( arg )
            {
                // simply call the parent method
                this.__super( arg );
            }
        } );
Figure 2.22: Visibility can be escalated
Note that, in the above example, making the public cannotMakeProtected method protected would throw an error.
Next: Final Classes, Previous: Visibility Escalation, Up: Inheritance [Contents]
2.2.7 Error Subtypes
Extending ECMAScript’s built-in Error type is a bit cumbersome (to say the least)—it involves not only the traditional prototype chain, but also setting specific properties within the constructor. Further, different environments support different features (e.g. stack traces and column numbers), and values are relative to the stack frame of the Error subtype constructor itself.
With GNU ease.js, error subtyping is transparent:
    var MyError = Class( 'MyError' )
        .extend( Error, {} );

    var e = MyError( 'Foo' );
    e.message;  // Foo
    e.name;     // MyError

    // -- if supported by environment --
    e.stack;         // stack beginning at caller
    e.fileName;      // caller filename
    e.lineNumber;    // caller line number
    e.columnNumber;  // caller column number

    // general case
    throw MyError( 'Foo' );
Figure 2.23: Transparent Error extending in ease.js
If ease.js detects that you are extending an Error object or any of its subtypes, it will handle a number of things for you, depending on environment:
- Produce a default constructor method (see Constructors) that assigns the error message to the string passed as the first argument;
- Sets the error name to the class name;
- Provides a stack trace via stack, if supported by the environment, stripping itself from the head of the stack; and
- Sets any of fileName, lineNumber, and/or columnNumber when supported by the environment.
If a constructor method is provided in the class definition (see Constructors), then it will be invoked immediately after the error object is initialized by the aforementioned default constructor.8 this.__super in that context refers to the constructor of the supertype (as would be expected), not the default error constructor.
ease.js will automatically detect what features are supported by the current environment, and will only set respective values if the environment itself would normally set them. For example, if ease.js can determine a column number from the stack trace, but the environment does not normally set columnNumber on Error objects, then neither will ease.js; this leads to predictable and consistent behavior.
ease.js makes its best attempt to strip itself from the head of the stack trace. To see why this is important, consider the generally recommended way of creating an Error subtype in ECMAScript:
    function ErrorSubtype( message )
    {
        var err = new Error();

        this.name         = 'ErrorSubtype';
        this.message      = message || 'Error';
        this.stack        = err.stack;
        this.lineNumber   = err.lineNumber;
        this.columnNumber = err.columnNumber;
        this.fileName     = err.fileName;
    }

    ErrorSubtype.prototype             = new Error();
    ErrorSubtype.prototype.constructor = ErrorSubtype;
Figure 2.24: Error subtyping in plain ECMAScript 3
Not only is Figure 2.24 all boilerplate and messy, but it’s not entirely truthful: To get a stack trace, Error is instantiated within the constructor ErrorSubtype; this ensures that the stack trace will actually include the caller. Unfortunately, it also includes the current frame; the topmost frame in the stack trace will be ErrorSubtype itself. To make matters worse, all of lineNumber, columNumber, and fileName (if defined) will be set to the stack frame of our constructor, not the caller.
ease.js will set each of those values to represent the caller. To do so, it parses common stack trace formats. Should it fail, it simply falls back to the default behavior of including itself in the stack frame.
The end result of all of this is—hopefully—concise Error subtypes that actually function as you would expect of an Error, without any boilerplate at all. The Error subtypes created with ease.js can be extended like the built-ins, and may extend any of the built-in error types (e.g. TypeError and SyntaxError).
Previous: Error Subtypes, Up: Inheritance [Contents]
2.2.8 Final Classes
F = FinalClass( string name, Object dfn )Define final named class C identified by name described by dfn.
F = FinalClass( string name ).extend( Object dfn )Define final named class C identified by name described by dfn.
F = FinalClass( Object dfn )Define anonymous final class C as described by dfn.
F = FinalClass.extend( Object dfn )Define anonymous final class C as described by dfn.
Final classes operate exactly as “normal” classes do (see Defining Classes), with the exception that they cannot be inherited from.
Next: Abstract Members, Previous: Inheritance, Up: Classes [Contents]
2.3 Static Members
Static members do not require instantiation of the containing class in order to be used, but may also be called by instances. They are attached to the class itself rather than an instance. Static members provide convenience under certain circumstances where class instantiation is unnecessary and permit sharing data between instances of a class. However, static members, when used improperly, can produce poorly designed classes and tightly coupled code that is also difficult to test. Static properties also introduce problems very similar to global variables.
Let us consider an implementation of the factory pattern. Class
BigBang will declare two static methods in order to satisfy different
means of instantiation: fromBraneCollision() and
fromBigCrunch() (for the sake of the example, we’re not going to
address every theory). Let us also consider that we want to keep track of
the number of big bangs in our universe (perhaps to study whether or not a
"Big Crunch" could have potentially happened in the past) by incrementing a
counter each time a new big bang occurs. Because we are using a static
method, we cannot use a property of an instance in order to store this data.
Therefore, we will use a static property of class BigBang.
    var BigBang = Class( 'BigBang',
    {
        /**
         * Number of big bangs that has occurred
         * @type {number}
         */
        'private static _count': 0,

        /**
         * String representing the type of big bang
         * @type {string}
         */
        'private _type': '',


        /**
         * Create a new big bang from the collision of two membranes
         *
         * @return  {BraneSet}  the set of branes that collided
         *
         * @return  {BigBang}  new big bang
         */
        'public static fromBraneCollision': function( brane_set )
        {
            // do initialization tasks...

            return BigBang( 'brane', brane_set.getData() );
        },


        /**
         * Create a new big bang following a "Big Crunch"
         *
         * @param  {BigCrunch}  prior crunch
         *
         * @return  {BigBang}  new big bang
         */
        'public static fromBigCrunch': function( crunch )
        {
            // do initialization tasks...

            return BigBang( 'crunch', crunch.getData() );
        },


        /**
         * Returns the total number of big bangs that have occurred
         *
         * @return  {number}  total number of big bangs
         */
        'public static getTotalCount': function()
        {
            return this.$('_count');
        }


        /**
         * Construct a new big bang
         *
         * @param  {string}  type  big bang type
         * @param  {object}  data  initialization data
         *
         * @return  {undefined}
         */
        __construct: function( type, data )
        {
            this._type = type;

            // do complicated stuff with data

            // increment big bang count
            this.__self.$( '_count',
                this.__self.$('count') + 1
            );
        },
    } );

    // create one of each
    var brane_bang  = BigBang.fromBraneCollision( branes ),
        crunch_bang = BigBang.fromBigCrunch( crunch_incident );

    console.log( "Total number of big bangs: %d", BigBang.getTotalCount() );
    // Total number of big bangs: 2
Figure 2.25: Static member example using the factory pattern
Due to limitations of pre-ECMAScript 5 implementations, ease.js’s static implementation must be broken into two separate parts: properties and methods.
| • Static Methods: | ||
| • Static Properties: | ||
| • Constants: | Immutable static properties |
Next: Static Properties, Up: Static Members [Contents]
2.3.1 Static Methods
In Figure 2.25, we implemented three static methods: two factory
methods, fromBraneCollision() and FromBigCrunch(), and one
getter method to retrieve the total number of big bangs,
getTotalCount(). These methods are very similar to instance methods
we are already used to, with a few important differences:
- Static methods are declared with the
statickeyword. - In the body,
thisis bound to the class itself, rather than the instance. - Static methods cannot call any non-static methods of the same class without first instantiating it.
The final rule above is not true when the situation is reversed. Non-static
methods can call static methods through use of the __self
object, which is a reference to the class itself. That is, this in a
static method is the same object as this.__self in a non-static
method. This is demonstrated by getTotalCount()
this.$('_count')
and __construct().
this.__self.$('_count')
To help remember __self, consider what the name states. A class is a definition used to create an object. The body of a method is a definition, which is defined on the class. Therefore, even though the body of a method may be called in the context of an instance, it is still part of the class. As such, __self refers to the class.
Next: Constants, Previous: Static Methods, Up: Static Members [Contents]
2.3.2 Static Properties
You have likely noticed by now that static properties are handled a bit differently than both static methods and non-static properties. This difference is due to pre-ECMAScript 5 limitations and is discussed at length in the Static Implementation section.
Static properties are read from and written to using the static
accessor method $(). This method name was chosen because the
$ prefix is common in scripting languages such as BASH, Perl (for
scalars) and PHP. The accessor method accepts two arguments, the second
being optional. If only the first argument is provided, the accessor method
acts as a getter, as in Figure 2.25’s getTotalCount():
return this.$('_count');
If the second argument is provided, it acts as a setter, as in
__construct():
    this.__self.$( '_count',
        this.__self.$('count') + 1
    );
Setting undefined values is supported. The delete operator is
not supported, as its use is both restricted by the language itself and
doesn’t make sense to use in this context. As hinted by the example above,
the increment and decrement operators (++ and --) are not
supported because JavaScript does not permit returning values by reference.
It is important to understand that, currently, the accessor method cannot be omitted. Consider the following example:
    var Foo = Class( 'Foo',
        {
            'public static bar': 'baz',
        },

        SubFoo = Class( 'SubFoo' ).extend( Foo, {} )
    ;

    // correct
    Foo.$( 'bar, 'baz2' );
    Foo.$('bar');               // baz2
    SubFoo.$('bar');            // baz2
    SubFoo.$( 'bar', 'baz3' );
    Foo.$('bar');               // baz3

    // INCORRECT
    Foo.bar = 'baz2';
    Foo.bar;                    // baz2
    SubFoo.bar;                 // undefined
Figure 2.26: Static accessor method cannot be omitted
Previous: Static Properties, Up: Static Members [Contents]
2.3.3 Constants
Constants, in terms of classes, are immutable static properties. This means that, once defined, a constant cannot be modified. Since the value is immutable, it does not make sense to create instances of the property. As such, constant values are implicitly static. This ensures that each instance, as well as any static access, references the exact same value. This is especially important for objects and arrays.
One important difference between other languages, such as PHP, is that
ease.js supports the visibility modifiers in
conjunction with the const keyword. That is, you can have public,
protected and private constants. Constants are public by default, like every
other type of member. This feature permits encapsulating constant values,
which is important if you want an immutable value that shouldn’t be exposed
to the rest of the world (e.g. a service URL, file path, etc). Consider the
following example in which we have a class responsible for reading mount
mounts from /etc/fstab:
    Class( 'MountPointIterator',
    {
        'private const _PATH': '/etc/fstab',

        'private _mountPoints': [],


        __construct: function()
        {
            var data = fs.readFileSync( this.$('_PATH') );
            this._parseMountPoints( data );
        },

        // ...
    } );
Figure 2.27: Using the const keyword
In the above example, attempting to access the _PATH constant from
outside the class would return undefined. Had the constant been
declared as public, or had the visibility modifier omitted, it could have
been accessed just like any other static property:
    // if PATH were a public constant value
    MountPointIterator.$('PATH');
Any attempts to modify the value of a constant will result in an exception.
This will also work in pre-ES5 engines due to use of the static accessor method ($()).
It is important to note that constants prevent the value of the property from being reassigned. It does not prevent modification of the value that is referenced by the property. For example, if we had a constant foo, which references an object, such that
'const foo': { a: 'b' }
it is perfectly legal to alter the object:
MyClass.$('foo').a = 'c';
Next: Method Proxies, Previous: Static Members, Up: Classes [Contents]
2.4 Abstract Members
'abstract [keywords] name': paramsDeclare an abstract method name as having params parameters, having optional additional keywords keywords.
Abstract members permit declaring an API, deferring the implementation to a subtype. Abstract methods are declared as an array of string parameter names params.
    // declares abstract method 'connect' expecting the two parameters,
    // 'host' and 'path'
    { 'abstract connect': [ 'host', 'path' ] }
- Abstract members are defined using the
abstractkeyword.- Except in interfaces (see Interfaces), where the
abstractkeyword is implicit.
- Except in interfaces (see Interfaces), where the
- Currently, only methods may be declared abstract.
- The subtype must implement at least the number of parameters declared in
params, but the names needn’t match.
- Each name in params must be a valid variable name, as satisfied by
the regular expression
/^[a-z_][a-z0-9_]*$/i. - The names are use purely for documentation and are not semantic.
- Each name in params must be a valid variable name, as satisfied by
the regular expression
Abstract members may only be a part of one of the following:
| • Interfaces: | ||
| • Abstract Classes: |
Next: Abstract Classes, Up: Abstract Members [Contents]
2.4.1 Interfaces
I = Interface( string name, Object dfn )Define named interface I identified by name described by dfn.
I = Interface( string name ).extend( Object dfn )Define named interface I identified by name described by dfn.
I = Interface( Object dfn )Define anonymous interface I as described by dfn.
I = Interface.extend( Object dfn )Define anonymous interface I as described by dfn.
Interfaces are defined with a syntax much like classes (see Defining Classes) with the following properties:
- Interface I cannot be instantiated.
- Every member of dfn of I is implicitly
abstract.- Consequently, dfn of I may contain only abstract methods.
- Interfaces may only extend other interfaces (see Inheritance).
Interface must be imported (see Including) from
easejs.Interface; it is not available in the global scope.
2.4.1.1 Implementing Interfaces
C = Class( name ).implement( I\_0[, ...I\_n]).extend( dfn ) Define named class C identified by name implementing all interfaces I, described by dfn.
C = Class.implement( I\_0[, ...I\_n ).extend( dfn )Define anonymous class C implementing all interfaces I, described by dfn.
Any class C may implement any interface I, inheriting its API. Unlike class inheritance, any class C may implement one or more interfaces.
- Class C implementing interfaces I will be considered a subtype of every I.
- Class C must either:
- Provide a concrete definition for every member of dfn of I,
- or be declared as an
AbstractClass(see Abstract Classes)- C may be declared as an
AbstractClasswhile still providing a concrete definition for some of dfn of I.
- C may be declared as an
2.4.1.2 Discussion
Consider a library that provides a websocket abstraction. Not all environments support web sockets, so an implementation may need to fall back on long polling via AJAX, Flash sockets, etc. If websocket support is available, one would want to use that. Furthermore, an environment may provide its own type of socket that our library does not include support for. Therefore, we would want to provide developers for that environment the ability to define their own type of socket implementation to be used in our library.
This type of abstraction can be solved simply by providing a generic API
that any operation on websockets may use. For example, this API may provide
connect(), onReceive() and send() operations, among
others. We could define this API in a Socket interface:
var Socket = Interface( 'Socket',
{
    'public connect': [ 'host', 'port' ],

    'public send': [ 'data' ],

    'public onReceive': [ 'callback' ],

    'public close': [],
} );
Figure 2.28: Defining an interface
We can then provide any number of Socket implementations:
var WebSocket = Class( 'WebSocket' ).implement( Socket ).extend(
    {
        'public connect': function( host, port )
        {
            // ...
        },

        // ...
    } ),

    SomeCustomSocket = Class.implement( Socket ).extend(
    {
        // ...
    } );
Figure f:interface-impl: Implementing an interface
Anything wishing to use sockets can work with this interface polymorphically:
var ChatClient = Class(
{
    'private _socket': null,

    __construct: function( socket )
    {
        // only allow sockets
        if ( !( Class.isA( Socket, socket ) ) )
        {
            throw TypeError( 'Expected socket' );
        }

        this._socket = socket;
    },

    'public sendMessage': function( channel, message )
    {
        this._socket.send( {
            channel: channel,
            message: message,
        } );
    },
} );
Figure 2.29: Polymorphism with interfaces
We could now use ChatClient with any of our Socket
implementations:
    ChatClient( WebSocket() ).sendMessage( '#lobby', "Sweet! WebSockets!" );
    ChatClient( SomeCustomSocket() )
        .sendMessage( '#lobby', "I can chat too!" );
Figure 2.30: Obtaining flexibility via dependency injection
The use of the Socket interface allowed us to create a powerful
abstraction that will allow our library to work across any range of systems.
The use of an interface allows us to define a common API through which all
of our various components may interact without having to worry about the
implementation details - something we couldn’t worry about even if we tried,
due to the fact that we want developers to support whatever environment they
are developing for.
Let’s make a further consideration. Above, we defined a onReceive()
method which accepts a callback to be called when data is received. What if
our library wished to use an Event interface as well, which would
allow us to do something like ‘some_socket.on( 'receive', function()
{} )’?
var AnotherSocket = Class.implement( Socket, Event ).extend(
{
    'public connect': // ...

    'public on': // ... part of Event
} );
Figure 2.31: Implementing multiple interfaces
Any class may implement any number of interfaces. In the above example,
AnotherSocket implemented both Socket and Event,
allowing it to be used wherever either type is expected. Let’s take a look:
    Class.isA( Socket, AnotherSocket() );  // true
    Class.isA( Event, AnotherSocket() );   // true
Figure 2.32: Implementors of interfaces are considered subtypes of each implemented interface
Interfaces do not suffer from the same problems as multiple inheritance, because we are not providing any sort of implementation that may cause conflicts.
One might then ask - why interfaces instead of abstract classes
(see Abstract Classes)? Abstract classes require subclassing, which
tightly couples the subtype with its parent. One may also only inherit from
a single supertype (see Inheritance), which may cause a problem in our
library if we used an abstract class for Socket, but a developer had
to inherit from another class and still have that subtype act as a
Socket.
Interfaces have no such problem. Implementors are free to use interfaces wherever they wish and use as many as they wish; they needn’t worry that they may be unable to use the interface due to inheritance or coupling issues. However, although interfaces facilitate API reuse, they do not aid in code reuse as abstract classes do9.
Previous: Interfaces, Up: Abstract Members [Contents]
2.4.2 Abstract Classes
A = AbstractClass( string name, Object dfn )Define named abstract class A identified by name described by dfn.
A = AbstractClass( string name ).extend( Object dfn )Define named abstract class A identified by name described by dfn.
A = AbstractClass( Object dfn )Define anonymous abstract class A as described by dfn.
A = AbstractClass.extend( Object dfn )Define anonymous abstract class A as described by dfn.
Abstract classes are defined with a syntax much like classes (see Defining Classes). They act just as classes do, except with the following additional properties:
- Abstract class A cannot be instantiated.
- Abstract class A must contain at least one member of dfn that is
explicitly declared as
abstract. - Abstract classes may extend both concrete and abstract classes
An abstract class must be used if any member of dfn is declared as abstract. This serves as a form of self-documenting code, as it would otherwise not be immediately clear whether or not a class was abstract (one would have to look through every member of dfn to make that determination).
AbstractClass must be imported (see Including) from
easejs.AbstractClass; it is not available in the global scope.
2.4.2.1 Discussion
Abstract classes allow the partial implementation of an API, deferring portions of the implementation to subtypes (see Inheritance). As an example, let’s consider an implementation of the Abstract Factory pattern10) which is responsible for the instantiation and initialization of an object without knowing its concrete type.
Our hypothetical library will be a widget abstraction. For this example, let
us consider that we need a system that will work with any number of
frameworks, including jQuery UI, Dojo, YUI and others. A particular dialog
needs to render a simple Button widget so that the user may click
"OK" when they have finished reading. We cannot instantiate the widget from
within the dialog itself, as that would tightly couple the chosen widget
subsystem (jQuery UI, etc) to the dialog, preventing us from changing it in
the future. Alternatively, we could have something akin to a switch
statement in order to choose which type of widget to instantiate, but that
would drastically inflate maintenance costs should we ever need to add or
remove support for other widget system in the future.
We can solve this problem by allowing another object, a
WidgetFactory, to perform that instantiation for us. The dialog could
accept the factory in its constructor, like so:
Class( 'Dialog',
{
    'private _factory': null,

    __construct: function( factory )
    {
        if ( !( Class.isA( WidgetFactory, factory ) ) )
        {
            throw TypeError( 'Expected WidgetFactory' );
        }

        this._factory = factory;
    },

    'public open': function()
    {
        // before we open the dialog, we need to create and add the widgets
        var btn = this._factory.createButtonWidget( 'btn_ok', "OK" );

        // ...
    },
} );
Figure 2.33: Hypothetical use case for our Abstract Factory
We now have some other important considerations. As was previously
mentioned, Dialog itself could have determined which widget to
instantiate. By using a factory instead, we are moving that logic to the
factory, but we are now presented with a similar issue. If we use something
like a switch statement to decide what class should be instantiated, we are
stuck with modifying the factory each and every time we add or remove
support for another widget library.
This is where an abstract class could be of some benefit. Let’s consider the
above call to createButtonWidget(), which accepted two arguments: an
id for the generated DOM element and a label for the button. Clearly, there
is some common initialization logic that can occur between each of the
widgets. However, we do not want to muddy the factory up with log to
determine what widget can be instantiated. The solution is to define the
common logic, but defer the actual instantiation of the Widget to
subtypes:
AbstractClass( 'WidgetFactory',
{
    'public createButtonWidget': function( id, label )
    {
        // note that this is a call to an abstract method; the
        // implementation is not yet defined
        var widget = this.getNewButtonWidget();

        // perform common initialization tasks
        widget.setId( id );
        widget.setLabel( label );

        // return the completed widget
        return widget;
    },


    // declared with an empty array because it has no parameters
    'abstract protected getNewButtonWidget': [],
} );
Figure 2.34: Defining our Abstract Factory
As demonstrated in Figure 2.34 above, we can see a very
interesting aspect of abstract classes: we are making a call to a method
that is not yet defined (getNewButtonWidget()11). Instead, by
declaring it abstract, we are stating that we want
to call this method, but it is up to a subtype to actually define it. It is
for this reason that abstract classes cannot be instantiated - they cannot
be used until each of the abstract methods have a defined implementation.
We can now define a concrete widget factory (see Inheritance) for each of the available widget libraries12:
Class( 'JqueryUiWidgetFactory' )
    .extend( WidgetFactory,
{
    // concrete method
    'protected getNewButtonWidget': function()
    {
        // ...
    },
} );

Class( 'DojoWidgetFactory' )
    .extend( WidgetFactory,
{
    // ...
} );

// ...
Figure 2.35: Defining our concrete factories
With that, we have solved our problem. Rather than using a simple switch statement, we opted for a polymorphic solution:
    // we can use whatever widget library we wish by injecting it into
    // Dialog
    Dialog( JqueryUiWidgetFactory() ).show();
    Dialog( DojoWidgetFactory() ).show();
    Dialog( YuiWidgetFactory() ).show();
Figure 2.36: Using our abstract factory WidgetFactory via dependency
injection
Now, adding or removing libraries is as simple as defining or removing a
WidgetFactory class.
Another noteworthy mention is that this solution could have just as easily
used an interface instead of an abstract class (see Interfaces). The
reason we opted for an abstract class in this scenario is due to code reuse
(the common initialization code), but in doing so, we have tightly coupled
each subtype with the supertype WidgetFactory. There are a number of
trade-offs with each implementation; choose the one that best fits your
particular problem.
Previous: Abstract Members, Up: Classes [Contents]
2.5 Method Proxies
'proxy [keywords] name': destmemberDeclare a proxy method name, having optional additional keywords keywords, that invokes a method of the same name on object destmember and returns its result.
Method proxies help to eliminate boilerplate code for calling methods on an encapsulated object—a task that is very common with proxy and decorator design patterns.
var Pidgin = Class( 'Pidgin',
{
    'private _name': 'Flutter',

    'public cheep': function( chirp )
    {
        return this._name + ": cheep " + chirp;
    }

    'public rename': function( name )
    {
        this._name = ''+name;
        return this;
    }
} );

var IratePidginCheep = Class( 'IratePidginCheep',
{
    'private _pidgin': null,

    __construct: function( pidgin )
    {
        this._pidgin = pidgin;
    }

    // add our own method
    'public irateCheep': function( chirp )
    {
        return this._pidgin.cheep( chirp ).toUpperCase();
    },

    // retain original methods
    'proxy cheep':  '_pidgin',
    'proxy rename': '_pidgin',
} );

var irate = IratePidginCheep( Pidgin() );

irate.cheep( 'chirp' );
// "Flutter: cheep chirp"
irate.setName( 'Butter' ).cheep( 'chirp' );
// "Butter: cheep chirp"
irate.irateCheep( 'chop' );
// "BUTTER: CHEEP CHOP"
Figure 2.37: Using the proxy keyword to proxy cheep and
rename method calls to the object stored in property _pidgin.
Consider some object O whoose class uses method proxies.
- All arguments of proxy method
O.nameare forwarded todestmember.nameuntouched. - The return value provided by
destmember.nameis returned to the caller ofO.nameuntouched, except that- If
destmember.namereturnsdestmember(that is, returnsthis), it will be replaced withO; this ensures thatdestmemberremains encapsulated and preserves method chaining.
- If
- If
destmemberis not an object, calls toO.namewill immediately fail in error. - If
destmember.nameis not a function, calls toO.namewill immediately fail in error. - N.B.: Static method proxies are not yet supported.
Next: Interoperability, Previous: Classes, Up: Top [Contents]
3 Member Keywords
Keywords are defined within the context of the definition object (see Definition Object). In the sections that follow, let C denote a class that contains the definition object dfn, which in turn contains keywords within the declaration of method name, whose definition is denoted by value.
The table below summarizes the available keywords accepted by keywords.
| Keyword | Description |
|---|---|
public | Places member name into the public API for C (see Access Modifiers); this is the default visibility. |
protected | Places member name into the protected API for C (see Access Modifiers). |
private | Places member name into the private API for C (see Access Modifiers); this is done implicitly if the member name is prefixed with an underscore, unless another access modifier is explicitly provided. |
static | Binds member name to class C rather than instance of C. Member data shared with each instance of type C. See Static Members. |
abstract | Declares member name and defers definition to subtype.
value is interpreted as an argument list and must be of type
array. May only be used with methods. Member name must be part
of dfn of either an
Interface or AbstractClass. See Abstract Members. |
const | Defines an immutable property name. May not be used with methods or getters/setters. See Constants. |
virtual | Declares that method name may be overridden by subtypes. Methods without this keyword may not be overridden. May only be used with methods. See Inheritance. |
override | Overrides method name of supertype of C with value. May only override virtual methods. May only be used with methods. See Inheritance. |
proxy | Proxies calls to method name to the object stored in property value. |
Table 3.1: Supported keywords
Not all keywords are supported by each member and some keywords conflict with each other. More information can be found in the appropriate sections as mentioned above in Table 3.1.
| • Access Modifiers: | Control the context in which members may be accessed |
Up: Member Keywords [Contents]
3.1 Access Modifiers
Access modifiers, when provided in keywords, alter the interface into which the definition of member name is placed. There are three interfaces, or levels of visibility, that dictate the context from which a member may be accessed, listed here from the most permissive to the least:
- public
Accessible outside of C or any instance of C (e.g. ‘foo.publicProp’). Inherited by subtypes of C.
- protected
Not accessible outside of C or an instance of C (e.g. ‘this.protectedProp’ within context of C). Inherited by subtypes of C.
- private
Not accessible outside of C or any instance of C. Not inherited by subtypes of C.
| Keyword | Description |
|---|---|
public | Places member name in public interface (accessible outside of C
or instance of C; accessible by subtypes). Implied if no other access
modifier is provided (but see private); |
protected | Places member name in protected interface (accessible only within C or instance of C; accessible by subtypes). |
private | Places member name in private interface (accessible only within C or instance of C; not accessible by subtypes); implicit if the member name is prefixed with an underscore, unless another access modifier is explicitly provided. |
Table 3.2: Access modifiers
Access modifiers have the following properties:
- Only one access modifier may appear in keywords for any given name.
- If no access modifier is provided in keywords for any member
name, member name is implicitly
public, unless the member name is prefixed with an underscore, in which case it is implicitlyprivate.
| • Discussion: | Uses and rationale | |
| • Example: | Demonstrating access modifiers |
Next: Access Modifiers Example, Up: Access Modifiers [Contents]
3.1.1 Discussion
One of the major hurdles ease.js aimed to address (indeed, one of the core reasons for its creation) was that of encapsulation. JavaScript’s prototypal model provides limited means of encapsulating data. Since functions limit scope, they may be used to mimic private members; these are often referred to as privileged members. However, declaring classes in this manner tends be messy, which has the consequence of increasing maintenance costs and reducing the benefit of the implementation. ease.js aims to provide an elegant implementation that is both a pleasure to work with and able to support protected members.
By default, all members are public. This means that the members can be accessed and modified from within an instance as well as from outside of it. Subtypes (classes that inherit from it; see Inheritance) will inherit public members. Public methods expose an API by which users may use your class. Public properties, however, should be less common in practice for a very important reason, which is explored throughout the remainder of this section.
Following common conventions in modern object-oriented languages, members
with an underscore prefix (e.g. _foo) are implicitly private; this
behavior can be overridden by explicitly specifying an access modifier. This
convention allows for more concise member definitions and is more natural to
those who use JavaScript’s native prototype model.
3.1.1.1 Encapsulation
Encapsulation is the act of hiding information within a class or instance. Classes should be thought of black boxes; we want them to do their job, but we should not concern ourselves with how they do their job. Encapsulation takes a great deal of complexity out of an implementation and allows the developer to focus on accomplishing the task by focusing on the implementing in terms of the problem domain.
For example - consider a class named Dog which has a method
walk(). To walk a dog, we simply call Dog().walk(). The
walk() method could be doing anything. In the case of a real dog,
perhaps it will send a message to the dog’s brain, perform the necessary
processing to determine how that command should be handled and communicate
the result to the limbs. The limbs will communicate back the information
they receive from their nerves, which will be processed by the brain to
determine when they hit the ground, thereby triggering additional actions
and the further movement of the other legs. This could be a terribly
complicated implementation if we had to worry about how all of this was
done.
In addition to the actual walking algorithm, we have the state of each of the legs - their current position, their velocity, the state of each of the muscles, etc. This state pertains only to the operations performed by the dog. Exposing this state to everyone wouldn’t be terribly useful. Indeed, if this information was exposed, it would complicate the implementation. What if someone decided to alter this state in the middle of a walking operation? Or what if the developer implementing Dog relied on this state in order to determine when the leg reached a certain position, but later versions of Dog decided to alter the algorithm, thereby changing those properties?
By preventing these details from being exposed, we present the developer with a very simple interface13. Rather than the developer having to be concerned with moving each of the dog’s legs, all they have to do is understand that the dog is being walked.
When developing your classes, the following best practices should be kept in mind:
- When attempting to determine the best access modifier (see Access Modifiers) to use for a member, start with the least level of visibility
(
private) and work your way up if necessary. - If your member is not private, be sure that you can justify your choice.
- If protected - why do subclasses need access to that data? Is there a better way to accomplish the same task without breaking encapsulation?
- If public - is this member necessary to use the class externally? In the case of a method - does it make sense to be part of a public API? If a property - why is that data not encapsulated? Should you consider an accessor method?
Previous: Access Modifiers Discussion, Up: Access Modifiers [Contents]
3.1.2 Example
Let’s consider our Dog class in more detail. We will not go so far as to implement an entire nervous system in our example. Instead, let’s think of our Dog similar to a wind-up toy:
Class( 'Dog',
{
    'private _legs': {},

    'private _body': {},

    // ...


    'public walk': function()
    {
        this.stand();
        this._moveFrontLeg( 0 );
        this._moveBackLeg( 1 );
        this._moveFrontLeg( 1 );
        this._moveBackLeg( 0 );
    },

    'protected stand': function()
    {
        if ( this.isSitting() )
        {
            // ...
        }
    },

    'public rollOver': function()
    {
        this._body.roll();
    },

    'private _moveFrontLeg': function( leg )
    {
        this._legs.front[ leg ].move();
    },

    'private _moveBackLeg': function( leg )
    {
        this._legs.back[ leg ].move();
    },

    // ...
} );
Figure 3.1: Encapsulating behavior of a class
As you can see above, the act of making the dog move forward is a bit more complicated than the developer may have originally expected. The dog has four separate legs that need to be moved individually. The dog must also first stand before it can be walked, but it can only stand if it’s sitting. Detailed tasks such as these occur all the time in classes, but they are hidden from the developer using the public API. The developer should not be concerned with all of the legs. Worrying about such details brings the developer outside of the problem domain and into a new problem domain - how to get the dog to walk.
3.1.3 Private Members
Let’s first explore private members. The majority of the members in the Dog class (see Figure 3.1) are private. This is the lowest level of visibility (and consequently the highest level of encapsulation). By convention, we prefix private members with an underscore. Private members are available only to the class that defined it and are not available outside the class.
    var dog = Dog();
    dog._moveFrontLeg( 1 );

    // TypeError: Object #<Dog> has no method '_moveFrontLeg'
Figure 3.2: Cannot access private members outside the class
You will notice that the dog’s legs are declared private as well (see Figure 3.1). This is to ensure we look at the dog as a whole; we don’t care about what the dog is made up of. Legs, fur, tail, teeth, tongue, etc - they are all irrelevant to our purpose. We just want to walk the dog. Encapsulating those details also ensures that they will not be tampered with, which will keep the dog in a consistent, predictable state.
Private members cannot be inherited. Let’s say we want to make a class called TwoLeggedDog to represent a dog that was trained to walk only on two feet. We could approach this in a couple different ways. The first way would be to prevent the front legs from moving. What happens when we explore that approach:
    var two_legged_dog = Class( 'TwoLeggedDog' ).extend( Dog,
    {
        /**
         * This won't override the parent method.
         */
        'private _moveFrontLeg': function( leg )
        {
            // don't do anything
            return;
        },
    } )();

    two_legged_dog.walk();
Figure 3.3: Cannot override private members of supertype
If you were to attempt to walk a TwoLeggedDog, you would find that the dog’s front legs still move! This is because, as mentioned before, private methods are not inherited. Rather than overriding the parent’s _moveFrontLeg method, you are instead defining a new method, with the name _moveFrontLeg. The old method will still be called. Instead, we would have to override the public walk method to prevent our dog from moving his front feet.
Note that GNU ease.js is optimized for private member access; see Property Proxies and Method Wrapping for additional details.
3.1.4 Protected Members
Protected members are often misunderstood. Many developers will declare all of their members as either public or protected under the misconception that they may as well allow subclasses to override whatever functionality they want. This makes the class more flexible.
While it is true that the class becomes more flexible to work with for subtypes, this is a dangerous practice. In fact, doing so violates encapsulation. Let’s reconsider the levels of visibility in this manner:
- public
Provides an API for users of the class.
- protected
Provides an API for subclasses.
- private
Provides an API for the class itself.
Just as we want to hide data from the public API, we want to do the same for subtypes. If we simply expose all members to any subclass that comes by, that acts as a peephole in our black box. We don’t want people spying into our internals. Subtypes shouldn’t care about the dog’s implementation either.
Private members should be used whenever possible, unless you are looking to provide subtypes with the ability to access or override methods. In that case, we can move up to try protected members. Remember not to make a member public unless you wish it to be accessible to the entire world.
Dog (see Figure 3.1) defined a single method as protected -
stand(). Because the method is protected, it can be inherited by
subtypes. Since it is inherited, it may also be overridden. Let’s define
another subtype, LazyDog, which refuses to stand.
    var lazy_dog = Class( 'LazyDog' ).extend( Dog,
    {
        /**
         * Overrides parent method
         */
         'protected stand': function()
         {
            // nope!
            this.rollOver();
            return false;
         },
    } )();

    lazy_dog.walk();
Figure 3.4: Protected members are inherited by subtypes
There are a couple important things to be noted from the above example.
Firstly, we are able to override the walk() method, because it was
inherited. Secondly, since rollOver() was also inherited from the
parent, we are able to call that method, resulting in an upside-down dog
that refuses to stand up, just moving his feet.
Another important detail to notice is that Dog.rollOver() accesses a
private property of Dog – _body. Our subclass does not have
access to that variable. Since it is private, it was not inherited. However,
since the rollOver() method is called within the context of the
Dog class, the method has access to the private member,
allowing our dog to successfully roll over. If, on the other hand, we were
to override rollOver(), our code would not have access to that
private object. Calling ‘this.__super()’ from within the overridden
method would, however, call the parent method, which would again have access
to its parent’s private members.
Next: Source Tree, Previous: Member Keywords, Up: Top [Contents]
4 Interoperability
GNU ease.js is not for everyone, so it is important to play nicely with vanilla ECMAScript so that prototypes and objects can be integrated with the strict restrictions of ease.js (imposed by classical OOP). In general, you should not have to worry about this: everything is designed to work fairly transparently. This chapter will go over what ease.js intentionally supports and some interesting concepts that may even be useful even if you have adopted ease.js for your own projects.
| • Using GNU ease.js Classes Outside of ease.js: | ||
| • Prototypally Extending Classes: | ||
| • Interoperable Polymorphism: |
Next: Prototypally Extending Classes, Up: Interoperability [Contents]
4.1 Using GNU ease.js Classes Outside of ease.js
GNU ease.js is a prototype generator—it takes the class definition,
applies its validations and conveniences, and generates a prototype and
constructor that can be instantiated and used just as any other ECMAScript
constructor/prototype. One thing to note immediately, as mentioned in
the section Defining Classes, is that constructors
generated by ease.js may be instantiated either with or without the
new keyword:
  var Foo = Class( { /*...*/ } );

  // both of these are equivalent
  Foo();
  new Foo();
Figure 4.1: Constructors generated by ease.js may omit the new keyword
ease.js convention is to omit the keyword for more concise code that is more easily chained, but you should follow the coding conventions of the project that you are working on.
Next: Interoperable Polymorphism, Previous: Using GNU ease.js Classes Outside of ease.js, Up: Interoperability [Contents]
4.2 Prototypally Extending Classes
Since classes are also constructors with prototypes, they may be used as part of a prototype chain. There are, however, some important considerations when using any sort of constructor as part of a prototype chain.
Conventionally, prototypes are subtyped by using a new instance as the prototype of the subtype’s constructor, as so:
  var Foo = Class( { /*...*/ } );

  // extending class as a prototype
  function SubFoo() {};
  SubFoo.prototype = Foo();  // INCORRECT
  SubFoo.prototype.constructor = SubFoo;
Figure 4.2: Incorrectly prototypally extending GNU ease.js classes
The problem with this approach is that constructors may perform validations
on their arguments to ensure that the instance is in a consistent state. GNU
ease.js solves this problem by introducing an asPrototype method on
all classes:
  var Foo = Class( { /*...*/ } );

  // extending class as a prototype
  function SubFoo()
  {
      // it is important to call the constructor ourselves; this is a
      // generic method that should work for all subtypes, even if SubFoo
      // implements its own __construct method
      this.constructor.prototype.__construct.apply( this, arguments );

      // OR, if SubFoo does not define its own __construct method, you can
      // alternatively do this:
      this.__construct();
  };
  SubFoo.prototype = Foo.asPrototype();  // Correct
  SubFoo.prototype.constructor = SubFoo;
Figure 4.3: Correctly prototypally extending GNU ease.js classes
The asPrototype method instantiates the class, but does not execute
the constructor. This allows it to be used as the prototype without any
issues, but it is important that the constructor of the subtype invokes the
constructor of the class, as in Figure 4.3. Otherwise, the
state of the subtype is undefined.
Keep in mind the following when using classes as part of the prototype chain:
- GNU ease.js member validations are not enforced; you will not be warned if an abstract method remains unimplemented or if you override a non-virtual method, for example. Please exercise diligence.
- It is not wise to override non-virtual methods, because the class designer may not have exposed a proper API for accessing and manipulating internal state, and may not provide proper protections to ensure consistent state after the method call.
- Note the Private Member Dilemma to ensure that your prototype works properly in pre-ES5 environments and with potential future ease.js optimizations for production environments: you should not define or manipulate properties on the prototype that would conflict with private members of the subtype. This is an awkward situation, since private members are unlikely to be included in API documentation for a class; ease.js normally prevents this from happening automatically.
Previous: Prototypally Extending Classes, Up: Interoperability [Contents]
4.3 Interoperable Polymorphism
GNU ease.js encourages polymorphism through type checking. In the case of prototypal subtyping, type checks will work as expected:
  var Foo = Class( {} );

  function SubFoo() {};
  SubFoo.prototype = Foo.asPrototype();
  SubFoo.constructor = Foo;

  var SubSubFoo = Class.extend( SubFoo, {} );

  // vanilla ECMAScript
  ( new Foo() ) instanceof Foo;           // true
  ( new Subfoo() ) instanceof Foo;        // true
  ( new SubSubFoo() ) instanceof Foo;     // true
  ( new SubSubFoo() ) instanceof SubFoo;  // true

  // GNU ease.js
  Class.isA( Foo, ( new Foo() ) );           // true
  Class.isA( Foo, ( new SubFoo() ) );        // true
  Class.isA( Foo, ( new SubSubFoo() ) );     // true
  Class.isA( SubFoo, ( new SubSubFoo() ) );  // true
Figure 4.4: Type checking with prototypal subtypes of GNU ease.js classes
Plainly—this means that prototypes that perform type checking for polymorphism will accept GNU ease.js classes and vice versa. But this is not the only form of type checking that ease.js supports.
This is the simplest type of polymorphism and is directly compatible with ECMAScript’s prototypal mode. However, GNU ease.js offers other features that are alien to ECMAScript on its own.
| • Interface Interop: | Using GNU ease.js interfaces in conjunction with vanilla ECMAScript |
4.3.1 Interface Interop
Interfaces, when used within the bounds of GNU ease.js, allow for
strong typing of objects. Further, two interfaces that share the same API
are not equivalent; this permits conveying intent: Consider two interfaces
Enemy and Toad, each defining a method croak. The
method for Enemy results in its death, whereas the method for
Toad produces a bellowing call. Clearly classes implementing these
interfaces will have different actions associated with them; we would
probably not want an invincible enemy that croaks like a toad any time you
try to kill it (although that’d make for amusing gameplay).
  var Enemy = Interface( { croak: [] } ),
      Toad  = Interface( { croak: [] } ),

      AnEnemy = Class.implement( Enemy ).extend( /*...*/ ),
      AToad   = Class.implement( Toad ).extend( /*...*/ );

  // GNU ease.js does not consider these interfaces to be equivalent
  Class.isA( Enemy, AnEnemy() );  // true
  Class.isA( Toad, AnEnemy() );   // false
  Class.isA( Enemy, AToad() );    // false
  Class.isA( Toad, AToad() );     // true

  defeatEnemy( AnEnemy() );  // okay; is an enemy
  defeatEnemy( AToad() );    // error; is a toad

  function defeatEnemy( enemy )
  {
      if ( !( Class.isA( Enemy, enemy ) ) ) {
          throw TypeError( "Expecting enemy" );
      }

      enemy.croak();
  }
figure 4.1: Croak like an enemy or a toad?
In JavaScript, it is common convention to instead use duck typing,
which does not care what the intent of the interface is—it merely cares
whether the method being invoked actually exists.14 So, in the case of the
above example, it is not a problem that an toad may be used in place of an
enemy—they both implement croak and so something will
happen. This is most often exemplified by the use of object literals to
create ad-hoc instances of sorts:
  var enemy = { croak: function() { /* ... */ ) },
      toad  = { croak: function() { /* ... */ ) };

  defeatEnemy( enemy );  // okay; duck typing
  defeatEnemy( toad );   // okay; duck typing

  // TypeError: object has no method 'croak'
  defeatEnemy( { moo: function() { /*...*/ } } );

  function defeatEnemy( enemy )
  {
      enemy.croak();
  }
figure 4.2: Duck typing with object literals
Duck typing has the benefit of being ad-hoc and concise, but places the onus on the developer to realize the interface and ensure that it is properly implemented. Therefore, there are two situations to address for GNU ease.js users that prefer strongly typed interfaces:
- Ensure that non-ease.js users can create objects acceptable to the strongly-typed API; and
- Allow ease.js classes to require a strong API for existing objects.
These two are closely related and rely on the same underlying concepts.
| • Object Interface Compatibility: | Using vanilla ECMAScript objects where type checking is performed on GNU ease.js interfaces | |
| • Building Interfaces Around Objects: | Using interfaces to validate APIs of ECMAScript objects |
Next: Building Interfaces Around Objects, Up: Interface Interop [Contents]
4.3.1.1 Object Interface Compatibility
It is clear that GNU ease.js’ distinction between two separate interfaces that share the same API is not useful for vanilla ECMAScript objects, because those objects do not have an API for implementing interfaces (and if they did, they wouldn’t be ease.js’ interfaces). Therefore, in order to design a transparently interoperable system, this distinction must be removed (but will be retained within ease.js’ system).
The core purpose of an interface is to declare an expected API, providing preemptive warnings and reducing the risk of runtime error. This is in contrast with duck typing, which favors recovering from errors when (and if) they occur. Since an ECMAScript object cannot implement an ease.js interface (if it did, it’d be using ease.js), the conclusion is that ease.js should fall back to scanning the object to ensure that it is compatible with a given interface.
A vanilla ECMAScript object is compatible with an ease.js interface if it defines all interface members and meets the parameter count requirements of those members.
  var Duck = Interface( {
    quack: [ 'str' ],
    waddle: [],
  } );

  // false; no quack
  Class.isA( Duck, { waddle: function() {} } );

  // false; quack requires one parameter
  Class.isA( Duck, {
    quack: function() {},
    waddle: function() {},
  } );

  // true
  Class.isA( Duck, {
    quack: function( str ) {},
    waddle: function() {},
  } );

  // true
  function ADuck() {};
  ADuck.prototype = {
    quack: function( str ) {},
    waddle: function() {},
  };
  Class.isA( Duck, ( new ADuck() ) );
Figure 4.5: Vanilla ECMAScript object interface compatibility
Previous: Object Interface Compatibility, Up: Interface Interop [Contents]
4.3.1.2 Building Interfaces Around Objects
A consequence of the previous section
is that users of GNU ease.js can continue to use strongly typed interfaces
even if the objects they are interfacing with do not support ease.js’
interfaces. Consider, for example, a system that uses XMLHttpRequest:
  // modeled around XMLHttpRequest
  var HttpRequest = Interface(
  {
      abort: [],
      open: [ 'method', 'url', 'async', 'user', 'password' ],
      send: [],
  } );

  var FooApi = Class(
  {
      __construct: function( httpreq )
      {
          if ( !( Class.isA( HttpRequest, httpreq ) ) )
          {
              throw TypeError( "Expecting HttpRequest" );
          }

          // ...
      }
  } );

  FooApi( new XMLHttpRequest() );  // okay
Figure 4.6: Building an interface around needed functionality of XMLHttpRequest
This feature permits runtime polymorphism with preemptive failure instead of inconsistently requiring duck typing for external objects, but interfaces for objects handled through ease.js.
Next: Implementation Details, Previous: Interoperability, Up: Top [Contents]
Appendix A Source Tree
You should already have gotten a hold of the source tree (see Getting GNU ease.js). If not, please do so first and feel free to follow along.
  $ cd easejs
  $ ls -d */
  doc/  lib/  test/  tools/
The project contains four main directories in addition to the root directory:
- ./
The root directory contains basic project files, such as README, Makefile and index.js.
- doc/
Contains documentation source files (you are currently reading part of it - the manual).
- lib/
Contains the actual source code for the various modules.
- test/
Contains unit and performance tests.
- tools/
Various tools used during build process.
Let’s take a look at each directory in more detail.
| • Root Directory: | Contains basic project files | |
| • Doc Directory: | Contains source documentation files (manual) | |
| • Lib Directory: | Contains project source files (modules) | |
| • Test Directory: | Contains unit and performance tests | |
| • Tools Directory: | Contains build tools |
Next: Doc Directory, Up: Source Tree [Contents]
A.1 Root Directory
The root directory contains basic project files for common operations.
- index.js
This file is loaded automatically when ‘require( 'easejs' )’ is used.
- LICENSE
Contains the project license.
- Makefile
Invoked by the
makecommand. Used for building ease.js.- package.json
Used by
npm, a package manager for Node.js, to automate installation.- README.hacking
Useful information for those looking to modify/contribute to the project.
- README.md
Serves as a quick reference for the project, in markdown15 format. This format was chosen because it is displayed nicely on GitHub.
- README.todo
Incomplete tasks. Future direction of the project. If you’re looking to help out, take a look at this file to see what needs to be done. (See also the bug tracker at http://easejs.org/bugs).
These files will be discussed in further detail when they are actually used.
Next: Lib Directory, Previous: Root Directory, Up: Source Tree [Contents]
A.2 Doc Directory
The doc/ directory contains the source files for the manual. The source files are in Texinfo16 format. Instructions for compiling the documentation are included later in this chapter.
API documentation is not included in this directory. It is generated from the source code.
Next: Test Directory, Previous: Doc Directory, Up: Source Tree [Contents]
A.3 Lib Directory
The lib/ directory contains the source code for the project. Each source file represents a single CommonJS module, often containing a prototype, and is written in JavaScript. Additional information about each of the modules can be found in the header of each file.
Unless you are developing for ease.js, you needn’t concern yourself with these files. index.js, in the root directory, contains mappings to these files where necessary, exposing the useful portions of the API for general use. You can use ease.js without even recognizing that the lib/ directory even exists.
Next: Tools Directory, Previous: Lib Directory, Up: Source Tree [Contents]
A.4 Test Directory
The test/ directory contains all the unit tests for the project. ease.js follows a test-driven development model; every single aspect of the framework is tested to ensure that features work as intended both server-side and across all supported web browsers. The tests also serve as regression tests, ensuring that bugs are not introduced for anything that has been covered. These tests should also give outside developers confidence; if a developer makes a modification to ease.js and does not cause any failing tests, it’s likely that their change didn’t have negative consequences on the integrity of the framework.
ease.js is currently in a transition period in regards to the style of the test cases. Tests written in the original format are prefixed with ‘test-’, followed by the name of the module, followed optionally by the specific part of the module that is being tested. Newer test cases are prefixed with the prototype name of the unit being tested, followed by ‘Test.js’. If there are a number of test cases for a given prototype, any number of tests will be included (with the same suffix) in a directory with the same name as the prototype. The tests are written in JavaScript and use Node.js’s assert module. Newer tests use a test case system that was developed to suit the needs of the project (still using the assert module). They may be run individually or all at once during the build process.
Developers interested in contributing to ease.js can aid in this transition process by helping to move all test-* tests over to the new test case format.
In addition, there exists a test/perf/ directory that contains performance tests used for benchmarking.
Previous: Test Directory, Up: Source Tree [Contents]
A.5 Tools Directory
The tools/ directory contains scripts and data necessary for the build process. The tools are shell scripts that may be run independently of the build process if you find them to be useful. The remaining files are data to accompany those tools.
- combine
Concatenates all the modules and wraps them for client-side deployment. If requested, the tests are also wrapped and concatenated so that they may be run in the web browser. The contents are stripped of trailing commas using the
rmtrailtool. The resulting file is not minified; the user can use whatever process he/she wishes to do so. In the future, minification will be part of the build script.- rmtrail
Removes trailing commas from object and array definitions. Reads from standard in. This script is not intelligent. It was designed to work with ease.js. It does not, for example, check to ensure that it is not removing commas from within strings. This would not be a difficult addition, but is currently unnecessary. Use caution when using this tool outside of ease.js.
- minify.js
Responsible for receiving input from stdin and writing minified output to stdout. This script uses UglifyJS to minify source files for distribution, improving download times.
- browser-test.html
Skeleton page to be used after the build process. Runs ease.js unit tests in the web browser and reports any failures. This is very important to ensure that ease.js operates consistently between all supported browsers. The tests that are run are the same exact tests that are run server-side.
- combine-test.tpl
Contains a client-side implementation of any modules required for testing. This file contains mainly assertions. It is included by the
combinescript when tests are requested.- combine.tpl
Contains the basic functionality required to get CommonJS modules working client-side. This is a very basic implementation, only doing what is necessary for ease.js to work properly. It is not meant to be a solution for all of your client-side CommonJS problems.
- license.tpl
Contains the license that is to appear atop every combined file, including minified. The original text must remain in tact. If you make changes to the source code, you are welcome to add additional text. See the LICENSE file in the root directory for more information on what is permitted.
While the tools may be useful outside of ease.js in some regard, please note that they have been tailored especially for ease.js. They do not contain unnecessary features that ease.js does not need to make use of. Therefore, you may need to adapt them to your own project and individual needs should you decide to use them in your own projects.
Next: License, Previous: Source Tree, Up: Top [Contents]
Appendix B Implementation Details / Rationale
The majority of the development time spent on ease.js was not hacking away at the source code. Rather, it was spent with pen and paper. Every aspect of ease.js was heavily planned from the start. Every detail was important to ensure a consistent implementation that worked, was fast and that developers would enjoy working with. Failures upfront or alterations to the design in later versions would break backwards compatibility unnecessarily and damage the reputation of the project.
When using ease.js, developers may wonder why things were implemented in the manner that they were. Perhaps they have a problem with the implementation, or just want to learn how the project works. This project was an excellent learning experience that deals very closely with the power and flexibility of prototypal programming. In an attempt to appease both parties, this appendix is provided to provide some details and rationale behind ease.js.
| • Class Module Design: | ||
| • Visibility Implementation: | ||
| • Internal Methods/Objects: |
Next: Visibility Implementation, Up: Implementation Details [Contents]
B.1 Class Module Design
The Class module, which is accessible via ‘require( 'easejs').Class’, is the backbone of the entire project. In a class-based Object-Oriented model, as one could guess by the name, the class is the star player. When the project began, this was the only initial implementation detail. Everything else was later layered atop of it.
As such, developing the Class module took the most thought and presented the largest challenge throughout the project. Every detail of its implementation exists for a reason. Nothing was put in place because the author simply “felt like it”. The project aims to exist as a strong, reliable standard for the development of JavaScript-based applications. If such a goal is to be attained, the feature set and implementation details would have to be strongly functional, easy to use and make sense to the Object-Oriented developer community.
The design also requires a strong understanding of Object-Oriented development. Attention was paid to the nuances that could otherwise introduce bugs or an inconsistent implementation.
| • Class Declaration Syntax: | ||
| • Class Storage: | ||
| • Constructor Implementation: | ||
| • Static Implementation: |
Next: Class Storage, Up: Class Module Design [Contents]
B.1.1 Class Declaration Syntax
Much thought was put into how a class should be declared. The chosen style serves as syntatic sugar, making the declarations appear very similar to classes in other Object-Oriented languages.
The original style was based on John Resig’s blog post about a basic means
of extending class-like objects (see About). That style was
‘Class.extend()’ to declare a new class and ‘Foo.extend()’ to
extend an existing class. This implementation is still supported for
creating anonymous classes. However, a means needed to be provided to create
named classes. In addition, invoking extend() on an empty class
seemed unnecessary.
The next incarnation made the Class module invokable. Anonymous classes could be defined using ‘Class( {} )’ and named classes could be defined by passing in a string as the first argument: ‘Class( 'Foo', {} )’. Classes could still be extended using the previously mentioned syntax, but that did no justice if we need to provide a class name. Therefore, the ‘Class( 'SubFoo' ).extend( Supertype, {} )’ syntax was also adopted.
JavaScript’s use of curly braces to represent objects provides a very convenient means of making class definitions look like actual class definitions. By convention, the opening brace for the declaration object is on its own line, to make it look like an opening block.
    Class( 'Foo' )
        .implement( Bar )
        .extend(
    {
        'public foo': function()
        {
        }
    } );
Figure B.1: Syntax and style of class definition
Syntax for implementing interfaces and extending classes was another consideration. The implementation shown above was chosen for a couple of reasons. Firstly, verbs were chosen in order to (a) prevent the use of reserved words and (b) to represent that the process was taking place at runtime, as the code was being executed. Unlike a language like C++ or Java, the classes are not prepared at compile-time.
Next: Constructor Implementation, Previous: Class Declaration Syntax, Up: Class Module Design [Contents]
B.1.2 Class Storage
One of the more powerful features of ease.js is how classes (and other objects, such as Interfaces) are stored. Rather than adopting its own model, the decision was instead to blend into how JavaScript already structures its data. Everything in JavaScript can be assigned to a variable, including functions. Classes are no different.
One decision was whether or not to store classes internally by name, then permit accessing it globally (wherever ease.js is available). This is how most Object-Oriented languages work. If the file in which the class is defined is available, the class can generally be referenced by name. This may seem natural to developers coming from other Object-Oriented languages. The decision was to not adopt this model.
By storing classes only in variables, we have fine control over the
scope and permit the developer to adopt their own mechanism for organizing
their classes. For example, if the developer wishes to use namespacing, then
he/she is free to assign the class to a namespace (e.g.
‘org.foo.my.ns.Foo = Class( {} )’). More importantly, we can take
advantage of the CommonJS format that ease.js was initially built for by
assigning the class to module.exports. This permits ‘require(
'filename' )’ to return the class.
This method also permits defining anonymous classes (while not necessarily recommended, they have their uses just as anonymous functions do), mimic the concept of Java’s inner classes and create temporary classes (see Temporary Classes). Indeed, we can do whatever scoping that JavaScript permits.
B.1.2.1 Memory Management
Memory management is perhaps one of the most important considerations. Initially, ease.js encapsulated class metadata and visibility structures (see Hacking Around the Issue of Encapsulation). However, it quickly became apparent that this method of storing data, although excellent for protecting it from being manipulated, caused what appeared to be memory leaks in long-running software. These were in fact not memory leaks, but ease.js keeping references to class data with no idea when to free them.
To solve this issue, all class data is stored within the class itself (that is, the constructor in JavaScript terms). They are stored in obscure variables that are non-enumerable and subject to change in future releases. This ensures that developers cannot rely on using them for reflection purposes or for manipulating class data during runtime. This is important, since looking at such members can give access to protected and private instance data. In the future, the names may be randomly chosen at runtime to further mitigate exploits. Until that time, developers should be aware of potential security issues.
If the globally accessible model would have been adopted (storing classes internally by class name rather than in variables), classes would not have been freed from memory when they went out of scope. This raises the memory footprint unnecessarily, especially for temporary classes. It would make sense that, after a temporary class is done being used, that the class be freed from memory.
Given this fact alone, the author firmly believes that the model that was chosen was the best choice.
Next: Static Implementation, Previous: Class Storage, Up: Class Module Design [Contents]
B.1.3 Constructor Implementation
ease.js uses a PHP-style constructor. Rather than using the class name as
the constructor, a __construct() method is used. This was chosen
primarily because ease.js does not always know the name of the class. In
fact, in the early stages of development, named classes were unsupported.
With the PHP-style constructor, the class name does not need to be known,
allowing constructors to be written for anonymous and named classes alike.
In addition, the PHP-style constructor is consistent between class
definitions. To look up a constructor, one need only search for
“__construct”, rather than the class name. This makes certain operations,
such as global searching (using grep or any other utility), much
simpler.
One difference from PHP is the means of preventing instantiation. In PHP, if the constructor is declared as non-public, then an error will be raised when the developer attempts to instantiate the class. ease.js did not go this route, as the method seems cryptic. Instead, an exception should be thrown in the constructor if the developer doesn’t wish the class to be instantiated. In the future, a common method may be added for consistency/convenience.
The constructor is optional. If one is not provided, nothing is done after the class is instantiated (aside from the internal ease.js initialization tasks).
The constructor is called after all initialization tasks have been completed.
Previous: Constructor Implementation, Up: Class Module Design [Contents]
B.1.4 Static Implementation
The decisions behind ease.js’s static implementation were very difficult. More thought and time was spent on paper designing how the static implementation should be represented than most other features in the project. The reason for this is not because the concept of static members is complicated. Rather, it is due to limitations of pre-ECMAScript 5 engines.
B.1.4.1 How Static Members Are Supposed To Work
The first insight into the problems a static implementation would present was the concept itself. Take any common Object-Oriented language such as C++, Java, or even PHP. Static members are inherited by subtypes by reference. What does this mean? Consider two classes: Foo and SubFoo, the latter of which inherits from the former. Foo defines a static property count to be incremented each time the class is instantiated. The subtype SubFoo, when instantiated (assuming the constructor is not overridden), would increment that very same count. Therefore, we can represent this by stating that ‘Foo.count === SubFoo.count’. In the example below, we demonstrate this concept in pseudocode:
    let Foo = Class
        public static count = 0
    let SubFoo extend from Foo

    Foo.count = 5
    SubFoo.count === 5 // true
    SubFoo.count = 6
    Foo.count === 6 // true
Figure B.2: Representing static properties in pseudocode
As you may imagine, this is a problem. The above example does not look very JS-like. That is because it isn’t. JS does not provide a means for variables to share references to the same primitive. In fact, even Objects are passed by value in the sense that, if the variable is reassigned, the other variable remains unaffected. The concept we are looking to support is similar to a pointer in C/C++, or a reference in PHP.
We have no such luxury.
B.1.4.2 Emulating References
Fortunately, ECMAScript 5 provides a means to emulate references – getters and setters. Taking a look at Figure B.2, we can clearly see that Foo and SubFoo are completely separate objects. They do not share any values by references. We shouldn’t share primitives by reference even if we wanted to. This issue can be resolved by using getters/setters on SubFoo and forwarding gets/sets to the supertype:
    var obj1 = { val: 1 },
        obj2 = {
            get val()
            {
                return obj1.val;
            },

            set val( value )
            {
                obj1.val = value;
            },
        }
    ;

    obj2.val; // 1
    obj2.val = 5;
    obj1.val; // 5

    obj1.val = 6;
    obj2.val // 6
Figure B.3: Emulating references with getters/setters (proxy)
This comes with considerable overhead when compared to accessing the properties directly (in fact, at the time of writing this, V8 doesn’t even attempt to optimize calls to getters/setters, so it is even slower than invoking accessor methods). That point aside, it works well and accomplishes what we need it to.
There’s just one problem. This does not work in pre-ES5 environments! ease.js needs to support older environments, falling back to ensure that everything operates the same (even though features such as visibility aren’t present).
This means that we cannot use this proxy implementation. It is used for visibility in class instances, but that is because a fallback is possible. It is not possible to provide a fallback that works with two separate objects. If there were, we wouldn’t have this problem in the first place.
B.1.4.3 Deciding On a Compromise
A number of options were available regarding how static properties should be implemented. Methods are not a problem – they are only accessed by reference, never written to. Therefore, they can keep their convenient ‘Foo.method()’ syntax. Unfortunately, that cannot be the case for properties without the ability to implement a proxy through the use of getters/setters (which, as aforementioned, requires the services of ECMAScript 5, which is not available in older environments).
The choices were has follows:
- Add another object to be shared between classes (e.g. ‘Foo.$’).
- Do not inherit by reference. Each subtype would have their own distinct value.
- Access properties via an accessor method (e.g. ‘Foo.$('var')’), allowing us to properly proxy much like a getter/setter.
There are problems with all of the above options. The first option, which involves sharing an object, would cause awkward inheritance in the case of a fallback. Subtypes would set their static properties on the object, which would make that property available to the supertype! That is tolerable in the case of a fallback. However, the real problem lies in two other concepts: when a class has two subtypes that attempt to define a property with the same name, or when a subtype attempts to override a property. The former would cause both subtypes (which are entirely separate from one-another, with the exception of sharing the same parent) to share the same values, which is unacceptable. The latter case can be circumvented by simply preventing overriding of static properties, but the former just blows this idea out of the water entirely.
The second option is to not inherit by reference. This was the initial implementation (due to JavaScript limitations) until it was realized that this caused far too many inconsistencies between other Object-Oriented languages. There is no use in introducing a different implementation when we are attempting to mirror classic Object-Oriented principals to present a familiar paradigm to developers. Given this inconsistency alone, this option simply will not work.
The final option is to provide an accessor method, much like the style of jQuery. This would serve as an ugly alternative for getters/setters. It would operate as follows:
    // external
    Foo.$('var'); // getter
    Foo.$( 'var, 'foo' ); // setter

    // internal
    this.__self.$('var'); // getter
    this.__self.$( 'var', 'foo' ); // setter
Figure B.4: Accessor implementation for static properties
Obviously, this is highly inconsistent with the rest of the framework, which permits accessing properties in the conventional manner. However, this implementation does provide a number key benefits:
- It provides an implementation that is consistent with other Object-Oriented languages. This is the most important point.
- The accessor method parameter style is common in other frameworks like jQuery.
- The method name ($) is commonly used to denote a variable in scripting languages (such as PHP and shells, or to denote a scalar in Perl).
- It works consistently in ES5 and pre-ES5 environments alike.
So, although the syntax is inconsistent with the rest of the framework, it does address all of our key requirements. This makes it a viable option for our implementation.
B.1.4.4 Appeasing ES5-Only Developers
There is another argument to be had. ease.js is designed to operate across all major browsers for all major versions, no matter how ridiculous (e.g. Internet Explorer 5.5), so long as it does not require unreasonable development effort. That is great and all, but what about those developers who are developing only for an ECMAScript 5 environment? This includes developers leveraging modern HTML 5 features and those using Node.js who do not intend to share code with pre-ES5 clients. Why should they suffer from an ugly, unnecessary syntax when a beautiful, natural [and elegant] implementation is available using proxies via getters/setters?
There are certainly two sides to this argument. On one hand, it is perfectly acceptable to request a natural syntax if it is supported. On the other hand, this introduces a number of problems:
- This may make libraries written using ease.js unportable (to older environments). If written using an ES5-only syntax, they would have no way to fall back for static properties.
- The syntax differences could be very confusing, especially to those beginning to learn ease.js. They may not clearly understand the differences, or may go to use a library in their own code, and find that things do not work as intended. Code examples would also have to make clear note of what static syntax they decided to use. It adds a layer of complexity.
Now, those arguing for the cleaner syntax can also argue that all newer environments moving forward will support the clean, ES5-only syntax, therefore it would be beneficial to have. Especially when used for web applications that can fall back to an entirely different implementation or refuse service entirely to older browsers. Why hold ease.js back for those stragglers if there’s no intent on ever supporting them?
Both arguments are solid. Ultimately, ease.js will likely favor the argument of implementing the cleaner syntax by providing a runtime flag. If enabled, static members will be set using proxies. If not, it will fall back to the uglier implementation using the accessor method. If the environment doesn’t support the flag when set, ease.js will throw an error and refuse to run, or will invoke a fallback specified by the developer to run an alternative code base that uses the portable, pre-ES5 syntax.
This decision will ultimately be made in the future. For the time being, ease.js will support and encourage use of the portable static property syntax.
Next: Internal Methods/Objects, Previous: Class Module Design, Up: Implementation Details [Contents]
B.2 Visibility Implementation
One of the major distinguishing factors of ease.js is its full visibility support (see Access Modifiers). This feature was the main motivator behind the project. Before we can understand the use of this feature, we have to understand certain limitations of JavaScript and how we may be able to work around them.
| • Encapsulation In JavaScript: | ||
| • Hacking Around the Issue of Encapsulation: | ||
| • The Visibility Object: | ||
| • Method Wrapping: | ||
| • Pre-ES5 Fallback: |
B.2.1 Encapsulation In JavaScript
Encapsulation is a cornerstone of many strong software development paradigms (see Encapsulation). This concept is relatively simply to achieve using closures in JavaScript, as shown in the following example stack implementation:
var stack = {};

( function( exports )
{
    var data = [];

    exports.push = function( data )
    {
        data.push( data );
    };

    exports.pop = function()
    {
        return data.pop();
    };
} )( stack );

stack.push( 'foo' );
stack.pop(); // foo
Figure B.5: Encapsulation example using closures in JavaScript
Because functions introduce scope in JavaScript, data can be hidden within them. In Figure B.5 above, a self-executing function is used to encapsulate the actual data in the stack (data). The function accepts a single argument, which will hold the functions used to push and pop values to/from the stack respectively. These functions are closures that have access to the data variable, allowing them to alter its data. However, nothing outside of the self-executing function has access to the data. Therefore, we present the user with an API that allows them to push/pop from the stack, but never allows them to see what data is actually in the stack17.
Let’s translate some of the above into Object-Oriented terms:
- push and pop are public members of stack.
- data is a private member of stack.
- stack is a Singleton.
We can take this a bit further by defining a Stack prototype so that
we can create multiple instances of our stack implementation. A single
instance hardly seems useful for reuse. However, in attempting to do so, we
run into a bit of a problem:
var Stack = function()
{
    this._data = [];
};

Stack.prototype = {
    push: function( val )
    {
        this._data.push( val );
    },

    pop: function()
    {
        return this._data.pop();
    },
};

// create a new instance of our Stack object
var inst = new Stack();

// what's this?
inst.push( 'foo' );
console.log( inst._data ); // [ 'foo' ]

// uh oh.
inst.pop(); // foo
console.log( inst._data ); // []
Figure B.6: Working easily with instance members in JavaScript breaks encapsulation
By defining our methods on the prototype and our data in the constructor, we have created a bit of a problem. Although the data is easy to work with, it is no longer encapsulated. The _data property is now public, accessible for the entire work to inspect and modify. As such, a common practice in JavaScript is to simply declare members that are "supposed to be" private with an underscore prefix, as we have done above, and then trust that nobody will make use of them. Not a great solution.
Another solution is to use a concept called privileged members, which uses closures defined in the constructor rather than functions defined in the prototype:
var Stack = function()
{
    var data = [];

    this.push = function( data )
    {
        data.push( data );
    };

    this.pop = function()
    {
        return data.pop();
    };
};

// create a new instance of our Stack object
var inst = new Stack();

// can no longer access "privileged" member _data
inst.push( 'foo' );
console.log( inst._data ); // undefined
Figure B.7: Privileged members in JavaScript
You may notice a strong similarity between Figure B.5 and Figure B.7. They are doing essentially the same thing, the only difference being that Figure B.5 is returning a single object and Figure B.7 represents a constructor that may be instantiated.
When using privileged members, one would define all members that need access to such members in the constructor and define all remaining members in the prototype. However, this introduces a rather large problem that makes this design decision a poor one in practice: Each time Stack is instantiated, push and pop have to be redefined, taking up additional memory and CPU cycles. Those methods will be kept in memory until the instance of Stack is garbage collected.
In Figure B.7, these considerations may not seem like much of an issue. However, consider a constructor that defines tens of methods and could potentially have hundreds of instances. For this reason, you will often see the concepts demonstrated in Figure B.6 used more frequently in libraries that have even modest performance requirements.
Next: The Visibility Object, Previous: Encapsulation In JavaScript, Up: Visibility Implementation [Contents]
B.2.2 Hacking Around the Issue of Encapsulation
Since neither Figure B.5 nor Figure B.7 are acceptable implementations for strong Classical Object-Oriented code, another solution is needed. Based on what we have seen thus far, let’s consider our requirements:
- Our implementation must not break encapsulation. That is—we should be enforcing encapsulation, not simply trusting our users not to touch.
- We must be gentle with our memory allocations and processing. This means placing all methods within the prototype.
- We should not require any changes to how the developer uses the constructor/object. It should operate just like any other construct in JavaScript.
We can accomplish the above by using the encapsulation concepts from Figure B.5 and the same prototype model demonstrated in Figure B.6. The problem with Figure B.5, which provided proper encapsulation, was that it acted as a Singleton. We could not create multiple instances of it and, even if we could, they would end up sharing the same data. To solve this problem, we need a means of distinguishing between each of the instances so that we can access the data of each separately:
var Stack = ( function()
{
    var idata = [],
        iid   = 0;

    var S = function()
    {
        // set the instance id of this instance, then increment it to ensure
        // the value is unique for the next instance
        this.__iid = iid++;

        // initialize our data for this instance
        idata[ this.__iid ] = {
            stack: [],
        };
    }:

    S.prototype = {
        push: function( val )
        {
            idata[ this.__iid ].stack.push( val );
        },

        pop: function()
        {
            return idata[ this.__iid ].stack.pop();
        }
    };

    return S;
} )();

var stack1 = new Stack();
var stack2 = new Stack();

stack1.push( 'foo' );
stack2.push( 'bar' );

stack1.pop(); // foo
stack2.pop(); // bar
Figure B.8: Encapsulating data per instance
This would seem to accomplish each of our above goals. Our implementation does not break encapsulation, as nobody can get at the data. Our methods are part of the Stack prototype, so we are not redefining it with each instance, eliminating our memory and processing issues. Finally, Stack instances can be instantiated and used just like any other object in JavaScript; the developer needn’t adhere to any obscure standards in order to emulate encapsulation.
Excellent! However, our implementation does introduce a number of issues that we hadn’t previously considered:
- Our implementation is hardly concise. Working with our “private” properties requires that we add ugly instance lookup code18, obscuring the actual domain logic.
- Most importantly: this implementation introduces memory leaks.
What do we mean by “memory leaks”? Consider the usage example in Figure B.8. What happens when were are done using stack1 and stack2 and they fall out of scope? They will be GC’d. However, take a look at our idata variable. The garbage collector will not know to free up the data for our particular instance. Indeed, it cannot, because we are still holding a reference to that data as a member of the idata array.
Now imagine that we have a long-running piece of software that makes heavy
use of Stack. This software will use thousands of instances throughout
its life, but they are used only briefly and then discarded. Let us also
imagine that the stacks are very large, perhaps holding hundreds of
elements, and that we do not necessarily pop() every element off of
the stack before we discard it.
Imagine that we examine the memory usage throughout the life of this
software. Each time a stack is used, additional memory will be allocated.
Each time we push() an element onto the stack, additional memory is
allocated for that element. Because our idata structure is not freed
when the Stack instance goes out of scope, we will see the memory
continue to rise. The memory would not drop until Stack itself falls
out of scope, which may not be until the user navigates away from the page.
From our perspective, this is not a memory leak. Our implementation is working exactly as it was developer. However, to the user of our stack implementation, this memory management is out of their control. From their perspective, this is indeed a memory leak that could have terrible consequences on their software.
This method of storing instance data was ease.js’s initial “proof-of-concept” implementation (see Class Storage). Clearly, this was not going to work; some changes to this implementation were needed.
B.2.2.1 Instance Memory Considerations
JavaScript does not provide destructors to let us know when an instance is about to be GC’d, so we unfortunately cannot know when to free instance data from memory in Figure B.8. We are also not provided with an API that can return the reference count for a given object. We could provide a method that the user could call when they were done with the object, but that is not natural to a JavaScript developer and they could easily forget to call the method.
As such, it seems that the only solution for this rather large issue is to store instance data on the instance itself so that it will be freed with the instance when it is garbage collected (remember, we decided that privileged members were not an option in the discussion of Figure B.7). Hold on - we already did that in Figure B.6; that caused our data to be available publicly. How do we approach this situation?
If we are adding data to an instance itself, there is no way to prevent it from being accessed in some manner, making true encapsulation impossible. The only options are to obscure it as best as possible, to make it too difficult to access in any sane implementation. For example:
- The property storing the private data could be made non-enumerable,
requiring the use of a debugger or looking at the source code to determine
the object name.
- This would work only with ECMAScript 5 and later environments.
- We could store all private data in an obscure property name, such as
___$$priv$$___, which would make it clear that it should not be
accessed.
- We could take that a step further and randomize the name, making it very difficult to discover at runtime, especially if it were non-enumerable19.
Regardless, it is clear that our data will only be “encapsulated” in the sense that it will not be available conveniently via a public API. Let’s take a look at how something like that may work:
var Stack = ( function()
{
    // implementation of getSomeRandomName() is left up to the reader
    var _privname = getSomeRandomName();

    var S = function()
    {
        // define a non-enumerable property to store our private data (will
        // only work in ES5+ environments)
        Object.defineProperty( this, _privname, {
            enumerable:   false,
            writable:     false,
            configurable: false,

            value: {
                stack: []
            }
        } );
    };

    S.prototype = {
        push: function( val )
        {
            this[ _privname ].stack.push( val );
        },

        pop: function()
        {
            return this[ _privname ].stack.pop();
        },
    };

    return S;
} );

var inst = new Stack();
inst.push( 'foo' );
inst.pop(); // foo
Figure B.9: Using a random, non-enumerable property name to store private members
Now we are really starting to hack around what JavaScript provides for us. We seem to be combining the encapsulation issues presented in Figure B.6 and the obscurity demonstrated in Figure B.8. In addition, we our implementation depends on ECMAScript 5 (ideally, we would detect that and fall back to normal, enumerable properties in pre-ES5 environments, which ease.js does indeed do). This seems to be a case of encapsulation through obscurity20. While our implementation certainly makes it difficult to get at the private member data, it is also very obscure and inconvenient to work with. Who wants to write Object-Oriented code like that?
B.2.2.2 Other Considerations
We have conveniently omitted a number of other important factors in our discussion thus far. Before continuing, they deserve some mention and careful consideration.
How would we implement private methods? We could add them to our private member object, just as we defined stack in Figure B.9, but that would cause it to be redefined with each instance, raising the same issues that were discussed with Figure B.7. Therefore, we would have to define them in a separate “prototype”, if you will, that only we have access to:
var Stack = ( function()
{
    // implementation of getSomeRandomName() is left up to the reader
    var _privname = getSomeRandomName();

    var S = function()
    {
        // define a non-enumerable property to store our private data (will
        // only work in ES5+ environments)
        Object.defineProperty( this, _privname, {
            // ... (see previous example)
        } );
    };

    // private methods that only we will have access to
    var priv_methods = {
        getStack: function()
        {
            // note that, in order for 'this' to be bound to our instance,
            // it must be passed as first argument to call() or apply()
            return this[ _privname ].stack;
        },
    };

    // public methods
    S.prototype = {
        push: function( val )
        {
            var stack = priv_methods.getStack.call( this );
            stack.push( val );
        },

        pop: function()
        {
            var stack = priv_methods.getStack.call( this );
            return stack.pop();
        },
    };

    return S;
} );

var inst = new Stack();
inst.push( 'foo' );
inst.pop(); // foo
Figure B.10: A possible private method implementation
While this does solve our problem, it further reduces code clarity. The implementation in Figure B.10 is certainly a far cry from something like ‘this._getStack()’, which is all you would need to do in ease.js.
Another consideration is a protected (see Access Modifiers) member implementation, the idea being that subtypes should inherit both public and protected members. Inheritance is not something that we had to worry about with private members, so this adds an entirely new layer of complexity to the implementation. This would mean somehow making a protected prototype available to subtypes through the public prototype. Given our implementation in the previous figures, this would likely mean an awkward call that somewhat resembles: ‘this[ _protname ].name’.
Although the implementations show in Figure B.9 and
Figure B.10 represent a creative hack, this is
precisely one of the reasons ease.js was created - to encapsulate such
atrocities that would make code that is difficult to use, hard to maintain
and easy to introduce bugs. One shouldn’t have to have a deep understanding
of JavaScript’s prototype model in order to write the most elementary of
Classical Object-Oriented code. For example, the constructors in the
aforementioned figures directly set up an object in which to store private
members. ease.js will do this for you before calling the
__construct() method. Furthermore, ease.js does not require
referencing that object directly, like we must do in our methods in
Figure B.9. Nor does ease.js have an awkward syntax for
invoking private methods. We will explore how this is handled in the
following section.
Next: Method Wrapping, Previous: Hacking Around the Issue of Encapsulation, Up: Visibility Implementation [Contents]
B.2.3 The Visibility Object
Let’s consider how we may rewrite Stack in Figure B.10 using ease.js:
var Stack = Class( 'Stack',
{
    'private _data': [],

    'public push': function( val )
    {
        this._data.push( val );
    },

    'public pop': function()
    {
        return this._data.pop();
    }
} );

var inst = Stack();
inst.push( 'foo' );
inst.pop(); // foo
Figure B.11: Stack implementation using ease.js
The above implementation is much less impressive looking than our prior examples. What we have done is encapsulate the excess logic needed to emulate a class and got right down to business. ease.js will take the class definition above and generate an object much like we had done in the prior examples, with a few improvements.
If you have not read over the previous sections, you are recommended to do so before continuing in order to better understand the rationale and finer implementation details.
The secret behind ease.js’s visibility implementation (see Access Modifiers) is referred to internally as the visibility object (or, in
older commits and some notes, the property object). Consider the
problem regarding the verbosity of our private property accessors and method
calls in Figure B.10. It would be much more
convenient if the properties and methods were bound to this so that
they can be accessed more naturally, as would be expected by a programmer
familiar with classes in other Classical Object-Oriented languages
(see Figure B.11). This can be done using call() or
apply():
function getName()
{
    return this.name;
}

var obj = { name: "foo" };
getName.call( obj ); // "foo"
Figure B.12: Calling a function within the context of a given object
Figure B.12 demonstrates the concept we are referring to. Given
an arbitrary object obj, we can call any given method (in this case,
getName(), binding this to that object. This is precisely what
ease.js does with each method call. To understand this process, we have to
explore two concepts: the visibility object itself and method wrapping. We
will start by discussing the visibility object in more detail and cover
method wrapping later on (see Method Wrapping).
| • Visibility Object Implementation: | Design of the visibility object | |
| • Property Proxies: | Overcoming prototype limitations |
Next: Property Proxies, Up: The Visibility Object [Contents]
B.2.3.1 Visibility Object Implementation
The visibility object is mostly simply represented in the following diagram:
Specifically, the visibility object is a prototype chain containing the private members of the class associated with the method currently being invoked on the current instance, its protected members (including those inherited from its supertype) and the public members (also including those inherited from the supertype). To accomplish this, the visibility object has the following properties:
- The private object is swappable - that is, it is the only portion of
the prototype chain that is replaced between calls to various methods.
- It is for this reason that the private object is placed atop the prototype
chain. This allows it to be swapped very cheaply by simply passing
different objects to be bound to
this.
- It is for this reason that the private object is placed atop the prototype
chain. This allows it to be swapped very cheaply by simply passing
different objects to be bound to
- Both the private and protected objects are initialized during instantiation
by the
__initProps()method attached byClassBuilderto each class during definition.- Properties are cloned to ensure references are not shared between instances.
- Methods are copied by reference, since their implementations are immutable.
- This must be done because neither protected nor private members may be
added to the prototype chain of a class.
- Doing so would effectively make them public.
- Doing so would also cause private members to be inherited by subtypes.
- Public members are a part of the class prototype chain as you would expect
in any conventional prototype.
- Public properties only are initialized by
__initProps(), just as private and protected properties, to ensure that no references are shared between instances.
- Public properties only are initialized by
As a consequence of the above, it is then clear that there must be a separate visibility object (prototype chain) for each supertype of each instance, because there must be a separate private object for each subtype of each instance. Let us consider for a moment why this is necessary with the following sample of code:
var C1 = Class(
    {
        'private _name': 'Foo',

        'public getName': function()
        {
            return this._name;
        },

        // ...
    } ),

    // note the naming convention using descending ids for the discussion
    // following this example
    C0 = C1.extend(
    {
        // ...
    } );

C1().getName(); // "Foo"
C0().getName(); // "Foo"
Figure B.14: Why private member swapping is necessary
Figure B.14 demonstrates why the private object swapping21 is indeed necessary. If a subtype does not override a super method that uses a private member, it is important that the private member be accessible to the method when it is called. In Figure B.14, if we did not swap out the object, _name would be undefined when invoked on C2.
Given this new information, the implementation would more formally be represented as a collection of objects V for class C and each of its supertypes as denoted by C\_n, with C\_0 representing the class having been instantiated and any integer n > 0 representing the closest supertype, such that each V\_n is associated with C\_n, V\_n\^x is the visibility object bound to any method associated with class C\_x and each V shares the same prototype chain P\_n for any given instance of C\_n:
Fortunately, as shown in Figure B.15, the majority of the prototype chain can be reused under various circumstances:
- For each instance of class C\_n, P\_n is re-used as the prototype of every V\_n.
- C\_n is re-used as the prototype for each P\_n.
Consequently, on instantiation of class C\_n, we incur a performance
hit from __initProps() for the initialization of each member of
V\_x and P\_x, as well as each property of C\_x,
recursively for each value of m ≥ x ≥ n (that is,
supertypes are initialized first), where m is equal to the number of
supertypes of class C\_n + 1.22
The instance stores a reference to each of the visibility objects V, indexed by an internal class identifier (which is simply incremented for each new class definition, much like we did with the instance id in Figure B.8). When a method is called, the visibility object that matches the class identifier associated with the invoked method is then passed as the context (bound to this) for that method (see Method Wrapping).
Previous: Visibility Object Implementation, Up: The Visibility Object [Contents]
B.2.3.2 Property Proxies
Astute readers may notice that the visibility implementation described in the previous section (see Visibility Object Implementation) has one critical flaw stemming from how prototypes in JavaScript are implemented: setting a property on the visibility object bound to the method will set the property on that object, but not necessarily on its correct object. The following example will demonstrate this issue:
var pub = {
        foo:    'bar',
        method: function()
        {
            return 'baz';
        },
    },

    // what will become our visibility object
    priv = function() {}
;

// set up our visibility object's prototype chain (we're leaving the
// protected layer out of the equation)
priv.prototype = pub;

// create our visibility object
var vis = new priv();

// retrieving properties works fine, as do method invocations
vis.foo;       // "bar"
vis.method();  // "baz"

// but when it comes to setting values...
vis.foo = 'newval';

// ...we stop short
vis.foo;  // "newval"
pub.foo;  // "bar"

vis.foo = undefined;
vis.foo;  // undefined
delete vis.foo;
vis.foo;  // "bar"
pub.foo;  // "bar"

pub.foo = 'moo';
vis.foo; // "moo"
Figure B.16: Demonstrating property set issues with prototype chains
Retrieving property values and invoking methods are not a problem. This is
because values further down the prototype chain peek through “holes” in
objects further up the chain. Since vis in Figure B.16 has
no value for property foo (note that a value of undefined is
still a value), it looks at its prototype, pub, and finds the value
there.
However, the story changes a bit when we try to set a value. When we assign a value to member foo of vis, we are in fact setting the property on vis itself, not pub. This fills that aforementioned “hole”, masking the value further down the prototype chain (our value in pub). This has the terrible consequence that if we were to set a public/protected property value from within a method, it would only be accessible from within that instance, for only that visibility object.
To summarize:
- Methods are never an issue, as they are immutable (in the sense of a class).
- Reading properties are never an issue; they properly “peek” through holes in the prototype chain.
- Writing private values are never an issue, as they will be properly set on that visibility object. The value needn’t be set on any other visibility objects, since private values are to remain exclusive to that instance within the context of that class only (it should not be available to methods of supertypes).
- We run into issues when setting public or protected values, as they are not set on their appropriate object.
This issue is huge. Before ECMAScript 5, it may have been a show-stopper,
preventing us from using a familiar this.prop syntax within classes
and making the framework more of a mess than an elegant implementation. It
is also likely that this is the reason that frameworks like ease.js did not
yet exist; ECMAScript 5 and browsers that actually implement it are still
relatively new.
Fortunately, ECMAScript 5 provides support for getters and setters. Using these, we can create a proxy from our visibility object to the appropriate members of the other layers (protected, public). Let us demonstrate this by building off of Figure B.16:
// proxy vis.foo to pub.foo using getters/setters
Object.defineProperty( vis, 'foo', {
    set: function( val )
    {
        pub.foo = val;
    },

    get: function()
    {
        return pub.foo;
    },
} );

vis.foo; // "moo"
pub.foo; // "moo"

vis.foo = "bar";
vis.foo; // "bar"
pub.foo; // "bar"

pub.foo = "changed";
vis.foo; // "changed"
Figure B.17: Using getters/setters to proxy values to the appropriate object
The implementation in Figure B.17 is precisely how ease.js implements and enforces the various levels of visibility.23 This is both fortunate and unfortunate; the project had been saved by getters/setters, but with a slight performance penalty. In order to implement this proxy, the following must be done:
- For each public property, proxy from the protected object to the public.
- For each protected property, proxy from the private object to the protected.24
Consequently, this means that accessing public properties from within the class will be slower than accessing the property outside of the class. Furthermore, accessing a protected property will always incur a performance hit25, because it is always hidden behind the provide object and it cannot be accessed from outside of the class. On the upside, accessing private members is fast (as in - “normal” speed). This has the benefit of encouraging proper OO practices by discouraging the use of public and protected properties. Note that methods, as they are not proxied, do not incur the same performance hit.
Given the above implementation details, it is clear that ease.js has been optimized for the most common use case, indicative of proper OO development - the access of private properties from within classes, for which there will be no performance penalty.
Next: Pre-ES5 Fallback, Previous: The Visibility Object, Up: Visibility Implementation [Contents]
B.2.4 Method Wrapping
The visibility object (see The Visibility Object) is a useful tool for
organizing the various members, but we still need some means of binding it
to a method call. This is accomplished by wrapping each method in a closure
that, among other things26, uses apply() to forward the
arguments to the method, binding this to the appropriate visibility
object. This is very similar to the ES5 Function.bind() call.
The following example demonstrates in an overly-simplistic way how ease.js handles class definitions and method wrapping.27
/**
 * Simple function that returns a prototype ("class"), generated from the
 * given definition and all methods bound to the provided visibility object
 */
function createClass( vis, dfn )
{
    var C      = function() {},
        hasOwn = Object.hasOwnProperty;

    for ( name in dfn )
    {
        // ignore any members that are not part of our object (further down
        // the chain)
        if ( hasOwn.call( dfn, name ) === false )
        {
            continue;
        }

        // simply property impl (WARNING: copies by ref)
        if ( typeof dfn[ name ] !== 'function' )
        {
            C.prototype[ name ] = dfn[ name ];
            continue;
        }

        // enclose name in a closure to preserve it (otherwise it'll contain
        // the name of the last member in the loop)
        C.prototype[ name ] = ( function( mname )
        {
            return function()
            {
                // call method with the given argments, bound to the given
                // visibility object
                dfn[ mname ].apply( vis, arguments );
            };
        } )( name );
    }

    return C;
};

var vis = { _data: "foo" },

    Foo = createClass( vis,
    {
        getData: function()
        {
            return this._data;
        },
    } );

var inst = new Foo();

// getData() will be bound to vis and should return its _data property
inst.getData(); // "foo"
Figure B.18: Basic "class" implementation with method binding
There are some important considerations with the implementation in Figure B.18, as well as ease.js’s implementation:
- Each method call, unless optimized away by the engine, is equivalent to two
function invocations, which cuts down on the available stack space.
- The method wrapping may complicate tail call optimization, depending on the JavaScript engine’s implementation and whether or not it will optimize across the stack, rather than just a single-depth recursive call.
- As such, for operations that are highly dependent on stack space, one may wish to avoid method calls and call functions directly.
- There is a very slight performance hit (though worrying about this is likely to be a micro-optimization in the majority of circumstances).
As mentioned previously, each visibility object is indexed by class identifier (see Visibility Object Implementation). The appropriate visibility object is bound dynamically on method invocation based on the matching class identifier. Previously in this discussion, it was not clear how this identifier was determined at runtime. Since methods are shared by reference between subtypes, we cannot store a class identifier on the function itself.
The closure that wraps the actual method references the arguments that were passed to the function that created it when the class was defined. Among these arguments are the class identifier and a lookup method used to determine the appropriate visibility object to use for binding.28 Therefore, the wrapper closure will always know the appropriate class identifier. The lookup method is also passed this, which is bound to the instance automatically by JavaScript for the method call. It is on this object that the visibility objects are stored (non-enumerable; see Instance Memory Considerations), indexed by class identifier. The appropriate is simply returned.
If no visibility object is found, null is returned by the lookup
function, which causes the wrapper function to default to this as
determined by JavaScript, which will be the instance that the method was
invoked on, or whatever was bound to the function via a call to
call() or apply(). This means that, currently, a visibility
object can be explicitly specified for any method by invoking the method in
the form of: ‘inst.methodName.apply( visobj, arguments )’, which is
consistent with how JavaScript is commonly used with other prototypes.
However, it should be noted that this behavior is undocumented and subject
to change in future releases unless it is decided that this implementation
is ideal. It is therefore recommended to avoid using this functionality for
the time being.29
B.2.4.1 Private Method Performance
A special exception to GNU ease.js’ method wrapping implementation is made for private methods. As mentioned above, there are a number of downsides to method wrapping, including effectively halving the remaining stack space for heavily recursive operations, overhead of closure invocation, and thwarting of tail call optimization. This situation is rather awkward, because it essentially tells users that ease.js should not be used for performance-critical invocations or heavily recursive algorithms, which is very inconvenient and unintuitive.
To eliminate this issue for the bulk of program logic, method wrapping does not occur on private methods. To see why it is not necessary, consider the purpose of the wrappers:
- All wrappers perform a context lookup, binding to the instance’s private visibility object of the class that defined that particular method.
- This context is restored upon returning from the call: if a method returns this, it is instead converted back to the context in which the method was invoked, which prevents the private member object from leaking out of a public interface.
- In the event of an override, this.__super is set up (and torn down).
There are other details (e.g. the method wrapper used for method proxies), but for the sake of this particular discussion, those are the only ones that really matter. Now, there are a couple of important details to consider about private members:
- Private members are only ever accessible from within the context of the private member object, which is always the context when executing a method.
- Private methods cannot be overridden, as they cannot be inherited.
Consequently:
- We do not need to perform a context lookup: we are already in the proper context.
- We do not need to restore the context, as we never needed to change it to begin with.
- this.__self is never applicable.
This is all the more motivation to use private members, which enforces encapsulation; keep in mind that, because use of private members is the ideal in well-encapsulated and well-factored code, ease.js has been designed to perform best under those circumstances.
Previous: Method Wrapping, Up: Visibility Implementation [Contents]
B.2.5 Pre-ES5 Fallback
For any system that is to remain functionally compatible across a number of environments, one must develop around the one with the least set of features. In the case of ease.js, this means designing around the fact that it must maintain support for older, often unsupported, environments.30 The line is drawn between ECMAScript 5 and its predecessors.
As mentioned when describing the proxy implementation (see Property Proxies), ease.js’s ability to create a framework that is unobtrusive and fairly easy to work with is attributed to features introduced in ECMAScript 5, primarily getters and setters. Without them, we cannot proxy between the different visibility layers (see Visibility Object Implementation). As a consequence, we cannot use visibility layers within a pre-ES5 environment.
This brings about the subject of graceful feature degradation. How do we fall back while still allowing ease.js to operate the same in both environments?
- Because getters/setters are unsupported, we cannot proxy (see Property Proxies) between visibility layers (see Visibility Object Implementation).
- Visibility support is enforced for development, but it is not necessary in
a production environment (unless that environment makes heavy use of 3rd
party libraries that may abuse the absence of the feature).
- Therefore, the feature can be safely dropped.
- It is important that the developer develops the software in an ECMAScript 5+ environment to ensure that the visibility constraints are properly enforced. The developer may then rest assured that their code will work properly in pre-ES5 environments (so long as they are not using ES5 features in their own code).
- Visibility support is enforced for development, but it is not necessary in
a production environment (unless that environment makes heavy use of 3rd
party libraries that may abuse the absence of the feature).
B.2.5.1 Visibility Fallback
Visibility fallback is handled fairly simply in ease.js polymorphically with
the FallbackVisibilityObjectFactory prototype (as opposed to
VisibilityObjectFactory which is used in ES5+ environments), which
does the following:
- Property proxies are unsupported. As such, rather than returning a proxy
object,
createPropProxy()will simply return the object that was originally passed to it. - This will ultimately result in each layer (public, protected and private)
referencing the same object (the class prototype, also known as the
“public” layer).
- Consequently, all members will be public, just as they would have been without visibility constraints.
Classical Object-Oriented programming has many rich features, but many of its “features” are simply restrictions it places on developers. This simple fact works to our benefit. However, in this case of a visibility implementation, we aren’t dealing only with restrictions. There is one exception.
Unfortunately, this necessary fallback introduces a startling limitation: Consider what might happen if a subtype defines a private member with the same name as the supertype. Generally, this is not an issue. Subtypes have no knowledge of supertypes’ private members, so there is no potential for conflict. Indeed, this is the case with our visibility implementation (see Visibility Object Implementation. Unfortunately, if we merge all those layers into one, we introduce a potential for conflict.
B.2.5.2 Private Member Dilemma
With public and protected members (see Access Modifiers), we don’t have to worry about conflicts because they are inherited by subtypes (see Inheritance). Private members are intended to remain distinct from any supertypes; only that specific class has access to its own private members. As such, inheritance cannot be permitted. However, by placing all values in the prototype chain (the public layer), we are permitting inheritance of every member. Under this circumstance, if a subtype were to define a member of the same name as a supertype, it would effectively be altering the value of its supertype. Furthermore, the supertype would have access to the same member, allowing it to modify the values of its subtypes, which does not make sense at all!
This means that we have to place a certain restriction on ease.js as a whole; we must prevent private member name conflicts even though they cannot occur in ES5 environments. This is unfortunate, but necessary in order to ensure feature compatibility across the board. This also has the consequence of allowing the system to fall back purely for performance benefits (no overhead of the visibility object).
B.2.5.3 Forefitting Fallbacks
Although ease.js allows flexibility in what environment one develops for, a developer may choose to support only ES5+ environments and make use of ES5 features. At this point, the developer may grow frustrated with ease.js limiting its implementation for pre-ES5 environments when their code will not even run in a pre-ES5 environment.
For this reason, ease.js may include a feature in the future to disable these limitations on a class-by-class31 basis in order to provide additional syntax benefits, such as omission of the static access modifiers (see Static Implementation) and removal of the private member conflict check.
Previous: Visibility Implementation, Up: Implementation Details [Contents]
B.3 Internal Methods/Objects
There are a number of internal methods/objects that may be useful to
developers who are looking to use some features of ease.js without using the
full class system. An API will be provided to many of these in the future,
once refactoring is complete. Until that time, it is not recommended that
you rely on any of the functionality that is not provided via the public API
(index.js or the global easejs object).
Previous: Implementation Details, Up: Top [Contents]
Appendix C GNU Free Documentation License
Copyright © 2000, 2001, 2002, 2007, 2008 Free Software
Foundation, Inc.  http://fsf.org/

Everyone is permitted to copy and distribute verbatim copies
of this license document, but changing it is not allowed.
- PREAMBLE
The purpose of this License is to make a manual, textbook, or other functional and useful document free in the sense of freedom: to assure everyone the effective freedom to copy and redistribute it, with or without modifying it, either commercially or noncommercially. Secondarily, this License preserves for the author and publisher a way to get credit for their work, while not being considered responsible for modifications made by others.
This License is a kind of “copyleft”, which means that derivative works of the document must themselves be free in the same sense. It complements the GNU General Public License, which is a copyleft license designed for free software.
We have designed this License in order to use it for manuals for free software, because free software needs free documentation: a free program should come with manuals providing the same freedoms that the software does. But this License is not limited to software manuals; it can be used for any textual work, regardless of subject matter or whether it is published as a printed book. We recommend this License principally for works whose purpose is instruction or reference.
- APPLICABILITY AND DEFINITIONS
This License applies to any manual or other work, in any medium, that contains a notice placed by the copyright holder saying it can be distributed under the terms of this License. Such a notice grants a world-wide, royalty-free license, unlimited in duration, to use that work under the conditions stated herein. The “Document”, below, refers to any such manual or work. Any member of the public is a licensee, and is addressed as “you”. You accept the license if you copy, modify or distribute the work in a way requiring permission under copyright law.
A “Modified Version” of the Document means any work containing the Document or a portion of it, either copied verbatim, or with modifications and/or translated into another language.
A “Secondary Section” is a named appendix or a front-matter section of the Document that deals exclusively with the relationship of the publishers or authors of the Document to the Document’s overall subject (or to related matters) and contains nothing that could fall directly within that overall subject. (Thus, if the Document is in part a textbook of mathematics, a Secondary Section may not explain any mathematics.) The relationship could be a matter of historical connection with the subject or with related matters, or of legal, commercial, philosophical, ethical or political position regarding them.
The “Invariant Sections” are certain Secondary Sections whose titles are designated, as being those of Invariant Sections, in the notice that says that the Document is released under this License. If a section does not fit the above definition of Secondary then it is not allowed to be designated as Invariant. The Document may contain zero Invariant Sections. If the Document does not identify any Invariant Sections then there are none.
The “Cover Texts” are certain short passages of text that are listed, as Front-Cover Texts or Back-Cover Texts, in the notice that says that the Document is released under this License. A Front-Cover Text may be at most 5 words, and a Back-Cover Text may be at most 25 words.
A “Transparent” copy of the Document means a machine-readable copy, represented in a format whose specification is available to the general public, that is suitable for revising the document straightforwardly with generic text editors or (for images composed of pixels) generic paint programs or (for drawings) some widely available drawing editor, and that is suitable for input to text formatters or for automatic translation to a variety of formats suitable for input to text formatters. A copy made in an otherwise Transparent file format whose markup, or absence of markup, has been arranged to thwart or discourage subsequent modification by readers is not Transparent. An image format is not Transparent if used for any substantial amount of text. A copy that is not “Transparent” is called “Opaque”.
Examples of suitable formats for Transparent copies include plain ASCII without markup, Texinfo input format, LaTeX input format, SGML or XML using a publicly available DTD, and standard-conforming simple HTML, PostScript or PDF designed for human modification. Examples of transparent image formats include PNG, XCF and JPG. Opaque formats include proprietary formats that can be read and edited only by proprietary word processors, SGML or XML for which the DTD and/or processing tools are not generally available, and the machine-generated HTML, PostScript or PDF produced by some word processors for output purposes only.
The “Title Page” means, for a printed book, the title page itself, plus such following pages as are needed to hold, legibly, the material this License requires to appear in the title page. For works in formats which do not have any title page as such, “Title Page” means the text near the most prominent appearance of the work’s title, preceding the beginning of the body of the text.
The “publisher” means any person or entity that distributes copies of the Document to the public.
A section “Entitled XYZ” means a named subunit of the Document whose title either is precisely XYZ or contains XYZ in parentheses following text that translates XYZ in another language. (Here XYZ stands for a specific section name mentioned below, such as “Acknowledgements”, “Dedications”, “Endorsements”, or “History”.) To “Preserve the Title” of such a section when you modify the Document means that it remains a section “Entitled XYZ” according to this definition.
The Document may include Warranty Disclaimers next to the notice which states that this License applies to the Document. These Warranty Disclaimers are considered to be included by reference in this License, but only as regards disclaiming warranties: any other implication that these Warranty Disclaimers may have is void and has no effect on the meaning of this License.
- VERBATIM COPYING
You may copy and distribute the Document in any medium, either commercially or noncommercially, provided that this License, the copyright notices, and the license notice saying this License applies to the Document are reproduced in all copies, and that you add no other conditions whatsoever to those of this License. You may not use technical measures to obstruct or control the reading or further copying of the copies you make or distribute. However, you may accept compensation in exchange for copies. If you distribute a large enough number of copies you must also follow the conditions in section 3.
You may also lend copies, under the same conditions stated above, and you may publicly display copies.
- COPYING IN QUANTITY
If you publish printed copies (or copies in media that commonly have printed covers) of the Document, numbering more than 100, and the Document’s license notice requires Cover Texts, you must enclose the copies in covers that carry, clearly and legibly, all these Cover Texts: Front-Cover Texts on the front cover, and Back-Cover Texts on the back cover. Both covers must also clearly and legibly identify you as the publisher of these copies. The front cover must present the full title with all words of the title equally prominent and visible. You may add other material on the covers in addition. Copying with changes limited to the covers, as long as they preserve the title of the Document and satisfy these conditions, can be treated as verbatim copying in other respects.
If the required texts for either cover are too voluminous to fit legibly, you should put the first ones listed (as many as fit reasonably) on the actual cover, and continue the rest onto adjacent pages.
If you publish or distribute Opaque copies of the Document numbering more than 100, you must either include a machine-readable Transparent copy along with each Opaque copy, or state in or with each Opaque copy a computer-network location from which the general network-using public has access to download using public-standard network protocols a complete Transparent copy of the Document, free of added material. If you use the latter option, you must take reasonably prudent steps, when you begin distribution of Opaque copies in quantity, to ensure that this Transparent copy will remain thus accessible at the stated location until at least one year after the last time you distribute an Opaque copy (directly or through your agents or retailers) of that edition to the public.
It is requested, but not required, that you contact the authors of the Document well before redistributing any large number of copies, to give them a chance to provide you with an updated version of the Document.
- MODIFICATIONS
You may copy and distribute a Modified Version of the Document under the conditions of sections 2 and 3 above, provided that you release the Modified Version under precisely this License, with the Modified Version filling the role of the Document, thus licensing distribution and modification of the Modified Version to whoever possesses a copy of it. In addition, you must do these things in the Modified Version:
- Use in the Title Page (and on the covers, if any) a title distinct from that of the Document, and from those of previous versions (which should, if there were any, be listed in the History section of the Document). You may use the same title as a previous version if the original publisher of that version gives permission.
- List on the Title Page, as authors, one or more persons or entities responsible for authorship of the modifications in the Modified Version, together with at least five of the principal authors of the Document (all of its principal authors, if it has fewer than five), unless they release you from this requirement.
- State on the Title page the name of the publisher of the Modified Version, as the publisher.
- Preserve all the copyright notices of the Document.
- Add an appropriate copyright notice for your modifications adjacent to the other copyright notices.
- Include, immediately after the copyright notices, a license notice giving the public permission to use the Modified Version under the terms of this License, in the form shown in the Addendum below.
- Preserve in that license notice the full lists of Invariant Sections and required Cover Texts given in the Document’s license notice.
- Include an unaltered copy of this License.
- Preserve the section Entitled “History”, Preserve its Title, and add to it an item stating at least the title, year, new authors, and publisher of the Modified Version as given on the Title Page. If there is no section Entitled “History” in the Document, create one stating the title, year, authors, and publisher of the Document as given on its Title Page, then add an item describing the Modified Version as stated in the previous sentence.
- Preserve the network location, if any, given in the Document for public access to a Transparent copy of the Document, and likewise the network locations given in the Document for previous versions it was based on. These may be placed in the “History” section. You may omit a network location for a work that was published at least four years before the Document itself, or if the original publisher of the version it refers to gives permission.
- For any section Entitled “Acknowledgements” or “Dedications”, Preserve the Title of the section, and preserve in the section all the substance and tone of each of the contributor acknowledgements and/or dedications given therein.
- Preserve all the Invariant Sections of the Document, unaltered in their text and in their titles. Section numbers or the equivalent are not considered part of the section titles.
- Delete any section Entitled “Endorsements”. Such a section may not be included in the Modified Version.
- Do not retitle any existing section to be Entitled “Endorsements” or to conflict in title with any Invariant Section.
- Preserve any Warranty Disclaimers.
If the Modified Version includes new front-matter sections or appendices that qualify as Secondary Sections and contain no material copied from the Document, you may at your option designate some or all of these sections as invariant. To do this, add their titles to the list of Invariant Sections in the Modified Version’s license notice. These titles must be distinct from any other section titles.
You may add a section Entitled “Endorsements”, provided it contains nothing but endorsements of your Modified Version by various parties—for example, statements of peer review or that the text has been approved by an organization as the authoritative definition of a standard.
You may add a passage of up to five words as a Front-Cover Text, and a passage of up to 25 words as a Back-Cover Text, to the end of the list of Cover Texts in the Modified Version. Only one passage of Front-Cover Text and one of Back-Cover Text may be added by (or through arrangements made by) any one entity. If the Document already includes a cover text for the same cover, previously added by you or by arrangement made by the same entity you are acting on behalf of, you may not add another; but you may replace the old one, on explicit permission from the previous publisher that added the old one.
The author(s) and publisher(s) of the Document do not by this License give permission to use their names for publicity for or to assert or imply endorsement of any Modified Version.
- COMBINING DOCUMENTS
You may combine the Document with other documents released under this License, under the terms defined in section 4 above for modified versions, provided that you include in the combination all of the Invariant Sections of all of the original documents, unmodified, and list them all as Invariant Sections of your combined work in its license notice, and that you preserve all their Warranty Disclaimers.
The combined work need only contain one copy of this License, and multiple identical Invariant Sections may be replaced with a single copy. If there are multiple Invariant Sections with the same name but different contents, make the title of each such section unique by adding at the end of it, in parentheses, the name of the original author or publisher of that section if known, or else a unique number. Make the same adjustment to the section titles in the list of Invariant Sections in the license notice of the combined work.
In the combination, you must combine any sections Entitled “History” in the various original documents, forming one section Entitled “History”; likewise combine any sections Entitled “Acknowledgements”, and any sections Entitled “Dedications”. You must delete all sections Entitled “Endorsements.”
- COLLECTIONS OF DOCUMENTS
You may make a collection consisting of the Document and other documents released under this License, and replace the individual copies of this License in the various documents with a single copy that is included in the collection, provided that you follow the rules of this License for verbatim copying of each of the documents in all other respects.
You may extract a single document from such a collection, and distribute it individually under this License, provided you insert a copy of this License into the extracted document, and follow this License in all other respects regarding verbatim copying of that document.
- AGGREGATION WITH INDEPENDENT WORKS
A compilation of the Document or its derivatives with other separate and independent documents or works, in or on a volume of a storage or distribution medium, is called an “aggregate” if the copyright resulting from the compilation is not used to limit the legal rights of the compilation’s users beyond what the individual works permit. When the Document is included in an aggregate, this License does not apply to the other works in the aggregate which are not themselves derivative works of the Document.
If the Cover Text requirement of section 3 is applicable to these copies of the Document, then if the Document is less than one half of the entire aggregate, the Document’s Cover Texts may be placed on covers that bracket the Document within the aggregate, or the electronic equivalent of covers if the Document is in electronic form. Otherwise they must appear on printed covers that bracket the whole aggregate.
- TRANSLATION
Translation is considered a kind of modification, so you may distribute translations of the Document under the terms of section 4. Replacing Invariant Sections with translations requires special permission from their copyright holders, but you may include translations of some or all Invariant Sections in addition to the original versions of these Invariant Sections. You may include a translation of this License, and all the license notices in the Document, and any Warranty Disclaimers, provided that you also include the original English version of this License and the original versions of those notices and disclaimers. In case of a disagreement between the translation and the original version of this License or a notice or disclaimer, the original version will prevail.
If a section in the Document is Entitled “Acknowledgements”, “Dedications”, or “History”, the requirement (section 4) to Preserve its Title (section 1) will typically require changing the actual title.
- TERMINATION
You may not copy, modify, sublicense, or distribute the Document except as expressly provided under this License. Any attempt otherwise to copy, modify, sublicense, or distribute it is void, and will automatically terminate your rights under this License.
However, if you cease all violation of this License, then your license from a particular copyright holder is reinstated (a) provisionally, unless and until the copyright holder explicitly and finally terminates your license, and (b) permanently, if the copyright holder fails to notify you of the violation by some reasonable means prior to 60 days after the cessation.
Moreover, your license from a particular copyright holder is reinstated permanently if the copyright holder notifies you of the violation by some reasonable means, this is the first time you have received notice of violation of this License (for any work) from that copyright holder, and you cure the violation prior to 30 days after your receipt of the notice.
Termination of your rights under this section does not terminate the licenses of parties who have received copies or rights from you under this License. If your rights have been terminated and not permanently reinstated, receipt of a copy of some or all of the same material does not give you any rights to use it.
- FUTURE REVISIONS OF THIS LICENSE
The Free Software Foundation may publish new, revised versions of the GNU Free Documentation License from time to time. Such new versions will be similar in spirit to the present version, but may differ in detail to address new problems or concerns. See http://www.gnu.org/copyleft/.
Each version of the License is given a distinguishing version number. If the Document specifies that a particular numbered version of this License “or any later version” applies to it, you have the option of following the terms and conditions either of that specified version or of any later version that has been published (not as a draft) by the Free Software Foundation. If the Document does not specify a version number of this License, you may choose any version ever published (not as a draft) by the Free Software Foundation. If the Document specifies that a proxy can decide which future versions of this License can be used, that proxy’s public statement of acceptance of a version permanently authorizes you to choose that version for the Document.
- RELICENSING
“Massive Multiauthor Collaboration Site” (or “MMC Site”) means any World Wide Web server that publishes copyrightable works and also provides prominent facilities for anybody to edit those works. A public wiki that anybody can edit is an example of such a server. A “Massive Multiauthor Collaboration” (or “MMC”) contained in the site means any set of copyrightable works thus published on the MMC site.
“CC-BY-SA” means the Creative Commons Attribution-Share Alike 3.0 license published by Creative Commons Corporation, a not-for-profit corporation with a principal place of business in San Francisco, California, as well as future copyleft versions of that license published by that same organization.
“Incorporate” means to publish or republish a Document, in whole or in part, as part of another Document.
An MMC is “eligible for relicensing” if it is licensed under this License, and if all works that were first published under this License somewhere other than this MMC, and subsequently incorporated in whole or in part into the MMC, (1) had no cover texts or invariant sections, and (2) were thus incorporated prior to November 1, 2008.
The operator of an MMC Site may republish an MMC contained in the site under CC-BY-SA on the same site at any time before August 1, 2009, provided the MMC is eligible for relicensing.
ADDENDUM: How to use this License for your documents
To use this License in a document you have written, include a copy of the License in the document and put the following copyright and license notices just after the title page:
  Copyright (C)  year  your name.
  Permission is granted to copy, distribute and/or modify this document
  under the terms of the GNU Free Documentation License, Version 1.3
  or any later version published by the Free Software Foundation;
  with no Invariant Sections, no Front-Cover Texts, and no Back-Cover
  Texts.  A copy of the license is included in the section entitled ``GNU
  Free Documentation License''.
If you have Invariant Sections, Front-Cover Texts and Back-Cover Texts, replace the “with…Texts.” line with this:
    with the Invariant Sections being list their titles, with
    the Front-Cover Texts being list, and with the Back-Cover Texts
    being list.
If you have Invariant Sections without Cover Texts, or some other combination of the three, merge those two alternatives to suit the situation.
If your document contains nontrivial examples of program code, we recommend releasing these examples in parallel under your choice of free software license, such as the GNU General Public License, to permit their use in free software.
Footnotes
(1)
John’s blog post is available at http://ejohn.org/blog/simple-javascript-inheritance/.
(2)
An interface that performs method chaining is less frequently referred to as a “fluent interface”. This manual does not use that terminology. Note also that method chaining implies that the class has state: consider making your objects immutable instead, which creates code that is easier to reason about.
(3)
This is true conceptually, but untrue in pre-ES5 environments where ease.js is forced to fall back (see Private Member Dilemma). As such, one should always develop in an ES5 or later environment to ensure visibility restrictions are properly enforced.
(4)
Due to an implementation detail, ‘this.__super’ may remain in scope after invoking a private method; this behavior is undefined and should not be relied on.
(5)
This statement is not to imply that inheritance is a case of copy-and-paste. There are slight variations, which are discussed in more detail in the Access Modifiers section (see Access Modifiers).
(6)
Specifically, it will invoke the method within the context of the calling instance’s private visibility object (see The Visibility Object). While this may seem like a bad idea—since it appears to give the supermethod access to our private state—note that the method wrapper for the overridden method will properly restore the private state of the supertype upon invocation.
(7)
The reason for this will become clear in future chapters. ease.js’s own methods permit checking for additional types, such as Interfaces.
(8)
The reason that ease.js does not permit overriding the generated constructor is an implementation detail: the generated constructor is not on the supertype, so there is not anything to actually override. Further, the generated constructor provides a sane default behavior that should be implicit in error classes anyway; that behavior can be overridden simply be re-assigning the values that are assigned for you (e.g. name or line number).
(9)
This is a problem that will eventually be solved by the introduction of traits/mixins.
(10)
See Abstract Factory, GoF
(11)
Note that we
declared this method as protected in order to
encapsulate which the widget creation logic (see Access Modifiers Discussion). Users of the class should not be concerned with how we
accomplish our job. Indeed, they should be concerned only with the fact that
we save them the trouble of determining which classes need to be
instantiated by providing them with a convenient API.
(12)
Of course, the Widget
itself would be its own abstraction, which may be best accomplished by the
Adapter pattern.
(13)
One would argue that this isn’t necessary a good thing. What if additional flexibility was needed? Dog, in the sense of this example, can be thought of as a Facade (GoF). One could provide more flexibility by composing Dog of, say, Leg instances, a Brain, etc. However, encapsulation still remains a factor. Each of those components would encapsulate their own data.
(14)
“When I see a bird that walks like a duck and swims like a duck and quacks like a duck, I call that bird a duck.” (James Whitcomb Riley).
(15)
See http://en.wikipedia.org/wiki/Markdown.
(16)
See http://www.gnu.org/software/texinfo/.
(17)
The pattern used in the stack implementation is commonly referred to as the module pattern and is the same concept used by CommonJS. Another common implementation is to return an object containing the functions from the self-executing function, rather than accepting an object to store the values in. We used the former implementation here for the sake of clarity and because it more closely represents the syntax used by CommonJS.
(18)
We could encapsulate this lookup code, but we would then have the overhead of an additional method call with very little benefit; we cannot do something like: ‘this.stack’.
(19)
Note that ease.js does not currently randomize its visibility object name.
(20)
A play on “security through obscurity”.
(21)
The term “swapping” can be a bit deceptive. While we are swapping in the sense that we are passing an entirely new private object as the context to a method, we are not removing an object from the prototype chain and adding another in place of it. They do, however, share the same prototype chain.
(22)
There is room for optimization in this implementation, which will be left for future versions of ease.js.
(23)
One may wonder why we implemented a getter in Figure B.17 when we had no trouble retrieving the value to begin with. In defining a setter for foo on object vis, we filled that “hole”, preventing us from “seeing through” into the prototype (pub). Unfortunately, that means that we must use a getter in order to provide the illusion of the “hole”.
(24)
One may also notice that we are not proxying public properties from the private member object to the public object. The reason for this is that getters/setters, being functions, are properly invoked when nestled within the prototype chain. The reader may then question why ease.js did not simply convert each property to a getter/setter, which would prevent the need for proxying. The reason for this was performance - with the current implementation, there is only a penalty for accessing public members from within an instance, for example. However, accessing public members outside of the class is as fast as normal property access. By converting all properties to getters/setters, we would cause a performance hit across the board, which is unnecessary.
(25)
How much of a performance hit are we talking? This will depend on environment. In the case of v8 (Node.js is used to run the performance tests currently), getters/setters are not yet optimized (converted to machine code), so they are considerably more slow than direct property access.
For example: on one system using v8, reading public properties externally took only 0.0000000060s (direct access), whereas accessing the same property internally took 0.0000001120s (through the proxy), which is a significant (18.6x) slow-down. Run that test 500,000 times, as the performance test does, and we’re looking at 0.005s for direct access vs 0.056s for proxy access.
(26)
The closure also sets the __super()
method reference, if a super method exists, and returns the instance if
this is returned from the method.
(27)
ease.js, of course, generates its own visibility objects internally. However, for the sake of brevity, we simply provide one in our example.
(28)
See
lib/MethodWrappers.js for the method wrappers and
ClassBuilder.getMethodInstance() for the lookup function.
(29)
One one hand, keeping this feature is excellent in the sense that it is predictable. If all other prototypes work this way, why not “classes” as created through ease.js? At the same time, this is not very class-like. It permits manipulating the internal state of the class, which is supposed to be encapsulated. It also allows bypassing constructor logic and replacing methods at runtime. This is useful for mocking, but a complete anti-pattern in terms of Classical Object-Oriented development.
(30)
ease.js was originally developed for use in software that would have to maintain compatibility as far back as IE6, while still operating on modern web browsers and within a server-side environment.
(31)
Will also include traits in the future.
