
This document is an introduction into using Guile, the GNU extension language and system. Guile is a dialect of the Scheme programming language, and I will assume you're at least confident about the very basics of Scheme or LISP in general. However, Guile also allows application developers to integrate it into their code to provide scripting capability to it and extend the main Guile language with primitives specific to the application being extended. Exactly this is what I want to give a brief introduction to.
If you want to develop and test the code presented here on-the-fly for yourself while working through the text (it is for sure a good idea and even better if you want to play around with certain stuff not literally presented inbetween), you need of course to install GNU Guile (including the appropriate development package containing header files, if necessary for your system) as well as Gnuplot, and have a UNIX-like environment and some C compiler (just use gcc). I worked on a GNU/Linux machine with Guile 1.8.7, Gnuplot 4.2 and gcc 4.3.1, but any recent Guile and Gnuplot should do it.
Guile is an implementation and dialect of the Scheme programming language (Scheme is a dialect of LISP itself). It is intended to be used as the extension language of the GNU project.
That means that Guile is designed as a library you can include into your own project and make the interpreter run code within it; additionally, you can provide special procedures in this Guile environment that interface to the core of your application. This way, Scheme scripts written by a user can manipulate stuff “within” your application.
The point of this all is to provide an easy way for you to make your application extensible and scriptable. For instance, if you need some sort of configuration files or even real scripting support for your application, you can use Guile instead of rolling your own “small” configuration or scripting language and interpreter; it already exists, so don't waste your time on yet another one but instead keep working on the new and exciting parts of your project! Having Guile as some “universal” scripting language (at least that's what the Guile people would like it to be, but I think it's suited to this goal) also means that a user does not have to learn different languages for each application she wants to configure or script. Instead she can do so on all her favourite software with just learning Scheme. Besides, at least my personal opinion is that Scheme is very nice and fun to program in, and very well suited to small pieces of code like scripts.
And the very best: The current development on Guile allows the core Guile “platform” to run not only Scheme code but support other languages as well on top of Guile. So you can just integrate Guile as scripting interpreter into your code, and have it also run scripts in ECMAScript, Emacs Lisp or any other language that Guile will implement in the future (like Perl, Tcl, Python or others) – and you don't have to think a single instant about this!
In concrete terms, installing Guile on your system provides basically two things for you:
First, you can use the guile command-line utility as a Scheme interpreter to write programs (or as a table-top calculator if you want to).
Second, use the libguile programming library to run applications using Guile as scripting extension; or write your own that can access the interpreter and make use of it to script your code.
“Why did you call him Tortoise, if he wasn't one?” Alice asked.“We called him Tortoise because he taught us,” said the Mock Turtle angrily.
(Lewis Carroll, Alice's Adventures in Wonderland)
As the project to demonstrate Guile, we're going to develop a very simple “Tortoise” graphics program. It will use Gnuplot for graphics output, but should be easy to adapt to any other graphics systems.
It will produce graphics output by assuming that there's a tortoise sitting in the middle of the screen; this tortoise is able to perform some basic instructions given by the user.
You can ask it to turn left by a certain number of degrees (or right by giving a negative number), or you can intstruct it to walk a certain number of steps forward. It has got a pen and you can ask it to carry it either in its paws or behind its ear, so that when it moves it will leave a mark on the ground or not.
Finally, if you got yourself and the poor tortoise completely confused, you can ask it to walk away to a fresh (empty) ground, sit in the middle and face right, just as at the very start.
Let's finally start and implement the core program that will keep track of the tortoise, its movements and the graphics output. This will be implemented in C. As mentioned before, I'm going to use Gnuplot for the graphics output (at first I wanted to use the Gtk+ toolkit, but there were some problems with this approach I will come back to later).
The idea is to start a Gnuplot process in the background and send it commands to draw the lines we want on the screen over a pipe. Here's the code for a program that will start up a Gnuplot process and keep connected to it via a pipe ready to get further plotting commands:
/* Simple backend for a Logo like tortoise drawer.  */

#include <stdlib.h>
#include <stdio.h>
#include <unistd.h>

static const int WIDTH = 10;
static const int HEIGHT = 10;

static FILE*
start_gnuplot ()
{
  FILE* output;
  int pipes[2];
  pid_t pid;

  pipe (pipes);
  pid = fork ();

  if (!pid)
    {
      dup2 (pipes[0], STDIN_FILENO);
      execlp ("gnuplot", NULL);
      return; /* Not reached.  */
    }

  output = fdopen (pipes[1], "w");

  fprintf (output, "set multiplot\n");
  fprintf (output, "set parametric\n");
  fprintf (output, "set xrange [-%d:%d]\n", WIDTH, WIDTH);
  fprintf (output, "set yrange [-%d:%d]\n", HEIGHT, HEIGHT);
  fprintf (output, "set size ratio -1\n");
  fprintf (output, "unset xtics\n");
  fprintf (output, "unset ytics\n");
  fflush (output);

  return output;
}

static FILE* global_output;

int
main (int argc, char* argv[])
{
  global_output = start_gnuplot ();

  return EXIT_SUCCESS;
}
Note that here we're not doing any error checks on the system routines; you shouldn't be doing this yourself, but it keeps this code as simple as possible. As that so far has nothing to do with what you want to read about in this tutorial, I think this should be the best way to go.
What we're doing here is starting a Gnuplot process with the start_gnuplot routine and opening a pipe that can feed commands to it into global_output, so that we are later able to plot lines.
Gnuplot is started with a fixed coordinate range (-10 to 10 in both x and y directions). We're going to use parametric mode so we won't get any problems drawing vertical lines, and multiplot mode in order to allow building the graphics incrementally by adding single lines each at a time.
Now, this code adds a routine for plotting a line from (x1, y1) to (x2, y2):
static void
draw_line (FILE* output, double x1, double y1, double x2, double y2)
{
  fprintf (output, "plot [0:1] %f + %f * t, %f + %f * t notitle\n",
           x1, x2 - x1, y1, y2 - y1);
  fflush (output);
}
(You may want to read up on parametric plotting in Gnuplot or on parametric equations for lines if you're not sure what's going on here. Or just believe me that this will do what we want for the moment.)
Finally, we can write the routines that will control the tortoise; here's some trigonometry involved, and you will need to #include <math.h>:
static double x, y;
static double direction;
static int pendown;

static void
tortoise_reset ()
{
  x = y = 0.0;
  direction = 0.0;
  pendown = 1;

  fprintf (global_output, "clear\n");
  fflush (global_output);
}

static void
tortoise_pendown ()
{
  pendown = 1;
}

static void
tortoise_penup ()
{
  pendown = 0;
}

static void
tortoise_turn (double degrees)
{
  direction += M_PI / 180.0 * degrees;
}

static void
tortoise_move (double length)
{
  double newX, newY;

  newX = x + length * cos (direction);
  newY = y + length * sin (direction);

  if (pendown)
    draw_line (global_output, x, y, newX, newY);

  x = newX;
  y = newY;
}
That's it, just add a tortoise_reset (); call to the main routine after starting Gnuplot, so that the tortoise starts at a well-defined position.
Of course you want to try it now, don't you? At least I'm burning with excitement... So, we're going to give the tortoise actually some instructions, directly via C code in the main routine:
{
  int i;
  tortoise_pendown (); /* This is unnecessary, but makes it clearer.  */
  for (i = 1; i <= 4; ++i)
    {
      tortoise_move (3.0);
      tortoise_turn (90.0);
    }
}
As a side-note: This program leaves the Gnuplot process alive when terminating; we could send it a quit command before finishing, but later on we won't be able to do so and instead of cooking up anything more complicated, I'll just leave it like that. It basically works this way and even has the advantage that the Gnuplot window stays open until you close it, despite the fact that our tortoise-program has already finished. And if you get worried about the processes, just do a killall gnuplot afterwards...
I don't know about you, but I myself like using Makefiles; so save the full code we've worked out to tortoise.c and this as Makefile:
# Basic Makefile for the tortoise package.

CFLAGS =
LIBS =

.PHONY: clean build run

build: tortoise

clean:
	rm -f tortoise tortoise.o

run: tortoise
	./tortoise

tortoise: tortoise.o
	gcc $< -o $@ $(LIBS)

tortoise.o: tortoise.c
	gcc -c $< -o $@ $(CFLAGS)
Of course, CFLAGS and LIBS are quite useless at the moment, but they will get some use later, so I just included them right away. Now, doing a make run should compile and run your code and open up a Gnuplot window with the resulting graphics; for me it looks like this:
Congratulations, you've just done your first tortoise-graphics! Still, we don't want to fix and compile the instructions directly with our C code as we just did; instead, the user should be able to interactively control the tortoise.
This is where Guile comes into play. Without it, we could write some additional code that reads, parses and interprets commands to the tortoise, calling the appropriate tortoise primitives as already defined.
Sounds not too bad? Well, probably it isn't. But in the C code we also used a loop to draw the square – otherwise we would have had to repeat the same two lines (movement and turn) four times. And what if we wanted to draw a polygon with, say, 1024 vertices? I hope you are convinced now that to make our tool really useful, we also needed to implement some means of looping.
Hm, while we're at it: Our tortoise-package can also be used to build up a Koch's curve quite elegantly using recursion (try a quick internet search if you can't wait until I'll come back to it in more detail later) – so want to implement some sort of procedures that can recursively call themselves?
All in all, we were probably going to implement a full-fledged tortoise programming language – but think about it: Has this anything to do with our original application and goal? I hate to spoil you all the fun (writing programming languages can be quite fun), but no, it hasn't.
Luckily, we need not go through all this effort; Guile already provides a perfectly good way of making our tortoise programmable. Scheme should be quite a good language to perform all we want (loops, procedures, recursion) – and much more. We just need to link our tortoise to the Guile-world, which will be the topic of the next sections.
First, let's add Guile to our code; you need to #include <libguile.h> as the “master header”. In our main routine, take out again the temporary test code we used to produce the first output, and replace it instead by these lines:
scm_with_guile (®ister_functions, NULL); scm_shell (argc, argv);
scm_with_guile may be a bit weird at first glance; what it does is calling the provided routine (register_functions – we'll create it in a few moments). Additionally, it also “activates” Guile during this call, so that other Guile library functions can be called from within register_functions. Don't worry about what exactly goes on there, you just need to remember that this indirection is necessary if you want to work with Guile.
(As a side-note: There's also a scm_init_guile method that does this “activation” directly and without this peculiar call-back; it may seem more reasonable and easy-to-understand to you, and you can well use that one instead. However, Guile recommends using scm_with_guile for better portability where possible.)
The call to scm_shell actually runs the Guile REPL (Read-Evaluate-Print Loop, that shell-like command prompt for interactive Scheme evaluation you also get when starting up guile directly) – the idea is to do all the initialization we need for our application, and finally run the REPL, where the user can then enter her commands in Scheme code. Actually, this routine does a little more: It also processes the command-line arguments given to our tortoise-program in the way guile handles its arguments; for instance, you can then do tortoise -s foobar.scm and have your commands read from foobar.scm. That's why we need to pass it argc and argv, in case you were interested.
scm_shell does not return, but rather keep on until the user closes the REPL; then our tortoise-program will also finish as a whole. Do you remember that I still owe you an explanation why using the Gtk+ toolkit for graphics would have been more complicated than Gnuplot? The reason I decided against Gtk+ is that for the Gtk+ toolkit you do something similar: After your program's initialization, you call out to a Gtk+ main loop that will process incoming events and also never fully return control to your program – but in this case, we can't run both Gtk+'s main loop and the Guile REPL; at least not without writing a multi-threaded application. That would have been again some unnecessary complication; I hope you agree with me now... But if not, just go ahead and try converting our package to Gtk+! I guess that's an interesting exercise.
Finally, we still have to create register_functions:
static void*
register_functions (void* data)
{
  return NULL;
}
You're right, it's not really interesting or even useful for now, but we'll fill it in later. Notice the two void*? The argument data gets passed whatever we want from scm_with_guile – that's why there's NULL as second argument in the call, but we could make it a pointer to an integer or even a large struct in case we needed to pass some data to register_functions. In turn, the return value of register_functions, which is also NULL in this case but could be anything as complex as you want, is returned from scm_with_guile – something we also don't need.
Once again, we'll try to compile and run what we have so far. To do so, we have to tell the compiler where to look for libguile.h as well as the linker to include libguile. You can work out the appropriate flags for yourself, but the utility guile-config that comes with Guile can do it for you.
So all we need to do is update the Makefile like this (and now the variables get some meaning!):
CFLAGS = `guile-config compile`
LIBS = `guile-config link`
With these adaptions, you should be able to compile and run the program again. This time, the Gnuplot window that pops up should just be empty (and stay so), but on the command-line a Guile REPL will be available just as if you had started guile yourself.
You can do some Scheme programming, but so far nothing to use our little tortoise at all:
guile> (define (foobar a b) (+ a b))
guile> (foobar (* 2 3) 4)
10
guile> (map foobar '(1 2 3) '(4 5 6))
(5 7 9)
guile> (tortoise-reset)

Backtrace:
In current input:
   1: 0* (tortoise-reset)

<unnamed port>:1:1: In expression (tortoise-reset):
<unnamed port>:1:1: Unbound variable: tortoise-reset
ABORT: (unbound-variable)
That's quite nice, isn't it? Still, without control over the tortoise, it does not make sense at all; you can just use guile directly without all the effort we went through if you want to program in Scheme. But we can fix this easily.
As I've promised, we'll integrate the tortoise into the Guile environment now. We can simply tell Guile to make our tortoise-procedures available from Scheme with scm_c_define_gsubr; these need to be called from within the activated “Guile mode”, so we add the calls to register_functions:
scm_c_define_gsubr ("tortoise-reset", 0, 0, 0, &tortoise_reset);
scm_c_define_gsubr ("tortoise-penup", 0, 0, 0, &tortoise_penup);
scm_c_define_gsubr ("tortoise-pendown", 0, 0, 0, &tortoise_pendown);
scm_c_define_gsubr ("tortoise-turn", 1, 0, 0, &tortoise_turn);
scm_c_define_gsubr ("tortoise-move", 1, 0, 0, &tortoise_move);
The first arguments are the Scheme-names for the procedures we're going to register, the last arguments pointers to the C functions that implement them. The numbers inbetween define the number of arguments the procedures take, namely required, optional and whether there's a rest-list argument nor not – in our case, there are neither optional arguments nor rest-lists, but tortoise-turn and tortoise-move take one required argument (the angle or distance, respectively).
Unfortunatly, this is only one half of the changes needed; Guile represents all Scheme values with the SCM type, and thus both the return values and argument-types of the C procedures need to be SCM's. In order to get the double values out, we need some Guile API functions; our tortoise procedures become:
static SCM
tortoise_reset ()
{
  x = y = 0.0;
  direction = 0.0;
  pendown = 1;

  fprintf (global_output, "clear\n");
  fflush (global_output);

  return SCM_UNSPECIFIED;
}

static SCM
tortoise_pendown ()
{
  SCM result = scm_from_bool (pendown);
  pendown = 1;
  return result;
}

static SCM
tortoise_penup ()
{
  SCM result = scm_from_bool (pendown);
  pendown = 0;
  return result;
}

static SCM
tortoise_turn (SCM degrees)
{
  const double value = scm_to_double (degrees);
  direction += M_PI / 180.0 * value;
  return scm_from_double (direction * 180.0 / M_PI);
}

static SCM
tortoise_move (SCM length)
{
  const double value = scm_to_double (length);
  double newX, newY;

  newX = x + value * cos (direction);
  newY = y + value * sin (direction);

  if (pendown)
    draw_line (global_output, x, y, newX, newY);

  x = newX;
  y = newY;

  return scm_list_2 (scm_from_double (x), scm_from_double (y));
}
You've already guessed it, scm_to_double gets the value “out of” a Scheme number (if it is a number at all, but we won't care about this and assume we're only fed correct arguments).
You also noticed for sure that I made our procedures return some “reasonable” values, using some other Guile API stuff: SCM_UNSPECIFIED means just that there's no return value (like void in C). If you define a procedure that has no meaningful result, you at least need to return SCM_UNSPECIFIED from it to make Guile happy (and assert this fact).
The penup and pendown commands return (as a Scheme boolean, created by scm_from_bool) the state of the pen before the requested change.
turn and move return the new direction and coordinate (as a Scheme list with two entries), respectively – of course, you already know what scm_from_double and scm_list_2 do, right?
Congratulations, now we've managed to build the whole tortoise package with Guile! And left is all the fun working with it...
Recompile the program (should be easy thanks to our neat Makefile) and run it. Once again, you should get the Guile (Tortoise!) REPL, but now our procedures should really be available. Try out all of the functionality with a session like this:
guile> (tortoise-move 1)
(1.0 0.0)
guile> (tortoise-turn 90)
90.0
guile> (tortoise-penup)
#t
guile> (tortoise-move 5)
(1.0 5.0)
guile> (tortoise-pendown)
#f
guile> (tortoise-move 1)
(1.0 6.0)
guile> (tortoise-reset)
guile> (tortoise-move (sqrt 2))
(1.4142135623731 0.0)
guile> (quit)
(I won't include the expected graphics output, just see for yourself...) I hope everything works for you, too. If not, it's the perfect time to go back to the code and try to find what's going wrong... Otherwise, let's have some fun and do real programming with our tortoise!
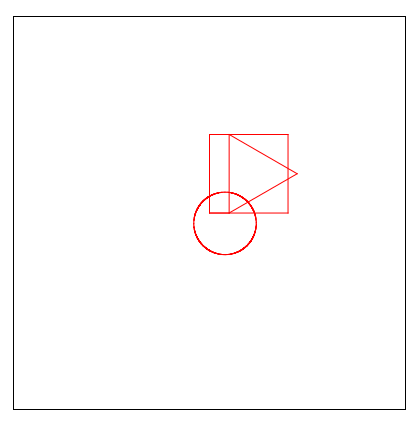
For instance, we can automate the task of drawing polygons with a Scheme function; try out this code:
     (define (draw-polygon! circumference vertices)
       (let ((side (/ circumference vertices))
             (angle (/ 360 vertices)))
         (let iterate ((i 1))
           (if (<= i vertices)
             (begin
               (tortoise-move side)
               (tortoise-turn angle)
               (iterate (1+ i)))))))

     (draw-polygon! 16 4)

     (tortoise-penup)
     (tortoise-move 1)
     (tortoise-turn 30)
     (tortoise-pendown)
     (draw-polygon! 12 3)

     (tortoise-penup)
     (tortoise-move -2)
     (tortoise-turn -100)
     (tortoise-pendown)
     (draw-polygon! 10 64)
This is what I get, but try for yourself:
Remember that I promised you something about Koch's curve? Now we're going to construct it, using a recursive function. See for instance http://en.wikipedia.org/wiki/Koch_curve for details about what Koch's curve is. Anyways, here comes the code; try to find out how it works, if you want:
     (define (koch-line length depth)
       (if (zero? depth)
         (tortoise-move length)
         (let ((sub-length (/ length 3))
               (sub-depth (1- depth)))
           (for-each (lambda (angle)
                       (koch-line sub-length sub-depth)
                       (tortoise-turn angle))
                     '(60 -120 60 0)))))

     (define (snowflake length depth sign)
       (let iterate ((i 1))
         (if (<= i 3)
           (begin
             (koch-line length depth)
             (tortoise-turn (* sign -120))
             (iterate (1+ i))))))

     (snowflake 8 3 1)
     (tortoise-turn 180)
     (snowflake 8 3 -1)
Are you impressed? I hope at least a little so... Unfortunatly, the Gnuplot-over-a-pipe approach is quite slow (at least on my system), so you could probably have been even more impressed if the graphics would have been there more quickly; but anyways, at least I like this very much! Regarding the Scheme code, I won't comment it further, as not to spoil all your fun thinking about it. I encourage you to do so, I like this recursive construction very much. Oh, and here's my resulting plot:
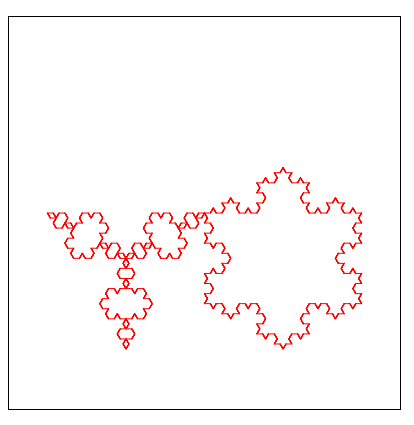
Looks quite interesting, doesn't it? By the way, this is also for me the first time I constructed the “inverse” snowflake with “negative sign” – I don't know if that's done in general, but I just wanted to know the result, so here it is (the left half of the image, which got constructed by the second call).
I hope this introduction so far gave you an idea about what Guile can do for you and how it basically works. For what I needed with my first Guile project, the stuff so far was nearly enough; however, that was of course only the tip of the iceberg, and there's a lot of things you could still learn.
For instance, there are of course a whole lot of other functions in the Guile library to work with Scheme objects; nearly any primitive that is accessible from Scheme can be used from within a C procedure, also – there's even a routine to capture continuations!
Starting up a REPL as we did is nice, but if you just want to run a user's configuration script at start-up of your application and then continue with your code, there are also routines that evaluate single Scheme commands or even run a file and return afterwards.
And if you decided that one tortoise is not enough, you could introduce some sort of “tortoise object” that can be created and passed to the various routines. This would allow a user to control as many tortoises in parallel as she wants – such a user-defined Scheme object is called a SMOB in Guile and is of course also easy to realize.
If you ever really need any of the stuff I mentioned or are just curious about what else you can do, I strongly suggest you browse the Guile Reference Manual. Surely you can find all you need (and much more) there! And if you need further help, try asking on the Mailing Lists.
I want to thank David Drysdale for his own “Tutorial Introduction to Guile”, upon which this document is largly based (in fact, mostly a rewrite of with some updates and – as I see it, of course – improvements).
Finally, I hope my write-up was useful to you; in case you have any comments, suggestions, tips or just want to drop me some note whatsoever, I look forward to receiving a message. You can contact me as Daniel Kraft, d@domob.eu. Good luck with Guile and hopefully you also enjoyed reading through this tutorial a little bit!