Liquid War 6, a unique multiplayer wargame.
| • Introduction: | What’s all this about. | |
| • User's manual: | README! | |
| • Hacker's guide: | How to hack the game and make it better. | |
| • Reference: | Command line options, configuration file entries. | |
| • C API: | Internal C functions documentation. | |
Introduction | ||
|---|---|---|
| • In a nutshell: | Quick introduction to Liquid War 6. | |
| • Project status: | Where we are, where we are heading. | |
| • How you can help: | How you can help Liquid War 6 and the GNU Project. | |
User’s manual | ||
| • Mailing lists: | Mailing lists related to Liquid War 6. | |
| • Getting the game: | Get the latest version. | |
| • Installation: | How to install Liquid War 6. | |
| • Extra maps: | More and more maps. | |
| • Troubleshooting: | Problems running the game? | |
| • Quick start: | Ready, set, go! | |
| • Strategy tips: | Keep this under your pillow. | |
| • User interface: | How to control the game. | |
| • Solo game: | Playing alone. | |
| • Network games: | Set up and run network games. | |
| • Graphics: | 3D-acceleration issues. | |
| • Sound & music: | Let’s get noisy. | |
| • Config file: | How to use the config file. | |
| • Logs: | Log file contains valuable information. | |
| • Report bugs: | How to report bugs. | |
Hacker’s guide | ||
| • Designing levels: | How to draw new maps. | |
| • Translating: | Translation HOWTO. | |
| • Architecture: | C, Scheme, modules and the rest. | |
| • Graphics backends: | How gfx modules work, how to write them. | |
| • Core algorithm: | About shortest path & moving fighters. | |
| • Compilation tips: | Advice for developpers and packagers. | |
| • Coding guidelines: | Ensure code remains maintainable. | |
| • Using the console: | How to interact with the game. | |
| • Advanced tweaking: | Do this at your own risk. | |
| • Writing modules: | How to develop your own extensions. | |
| • Use as a library: | Liquid War 6 can be embedded in your own programs. | |
| • Network protocol: | How the game communicates with others. | |
| • Technical HOWTOs: | Recipes for the maintainer(s). | |
| • Using GNU Arch: | A quick tla survival guide. | |
| • Using GIT: | GIT is used to handle source code. | |
| • Jenkins builds: | Continuous integration with Jenkins. | |
Reference | ||
| • Basic options: | Basic command-line parameters. | |
| • Doc options: | Liquid War 6 is self-documented. | |
| • Show options: | Show informations about the program. | |
| • Path options: | Change default paths. | |
| • Players options: | Define local players. | |
| • Input options: | Customize input. | |
| • Graphics options: | Change display settings. | |
| • Sound options: | Change audio settings. | |
| • Network options: | Tweak network parameters. | |
| • Map parameters: | Global map parameters. | |
| • Map rules.xml: | Change game rules. | |
| • Map hints.xml: | Tune map loader. | |
| • Map style.xml: | Modify map appearance. | |
| • Map teams.xml: | Per map teams and bots settings. | |
| • Advanced settings: | You probably don’t want to change these. | |
| • C to Guile: | C functions exported to Guile. | |
| • Script hooks: | Available script hooks. | |
C API | ||
| • libliquidwar6: | Top-level functions. | |
| • libbot: | Bot algorithms. | |
| • mod-brute: | Brute-force bot. | |
| • mod-follow: | A bot that follows others. | |
| • mod-idiot: | Basic idiot bot. | |
| • mod-random: | Totally random bot. | |
| • libcfg: | Loading and saving config files. | |
| • libcli: | Network clients. | |
| • mod-http: | Web client. | |
| • mod-tcp: | Tcp client using native protocol. | |
| • mod-udp: | Udp client using native protocol. | |
| • libcns: | Console handling. | |
| • libcnx: | Connection common code. | |
| • libdat: | Storing network data. | |
| • libdef: | Keywords definitions. | |
| • libdsp: | Threaded display. | |
| • libdyn: | Dynamic module loading. | |
| • libgen: | Pseudo-random map generation. | |
| • libgfx: | Graphics. | |
| • mod-gl1: | Initial 3D graphics backend. | |
| • mod-gles2: | Embedded 3D graphics backend. | |
| • mod-soft: | Software only graphics backend. | |
| • shared-sdl: | SDL utils shared in some graphics backends. | |
| • mod-caca: | TTY/xterm text graphics backend. | |
| • libglb: | Gnulib embedded routines. | |
| • libgui: | GUI utilities. | |
| • libhlp: | Built-in help system. | |
| • libimg: | Generating screenshots. | |
| • libker: | Main kernel module (core algorithm). | |
| • libldr: | Loading maps. | |
| • libmap: | Map, AKA levels. | |
| • libmat: | Math and matrix utilities. | |
| • libmsg: | Network messages. | |
| • libnet: | Low-level network routines. | |
| • libnod: | Manipulating node data. | |
| • libp2p: | A la peer to peer network system. | |
| • libpil: | Dealing with game lag. | |
| • libscm: | Guile wrapper. | |
| • libsim: | Simulating fights. | |
| • libsnd: | Sound. | |
| • mod-csound: | Csound sound backend (vaporware). | |
| • mod-ogg: | Ogg/libSDL default sound backend. | |
| • libsrv: | Network servers. | |
| • mod-httpd: | Embedded web server. | |
| • mod-tcpd: | Tcp server using native protocol. | |
| • mod-udpd: | Udp server using native protocol. | |
| • libsys: | Low-level system utilities. | |
| • libtsk: | Asynchronous loading. | |
| • libvox: | Voxel-based 3D rendering. | |
Appendices | ||
| • Authors: | List of contributors. | |
| • 2005 .plan: | This is how it started. | |
| • Fanfic: | A historical Liquid War fanfic. | |
| • Links: | Liquid War on the web | |
| • Copying: | GNU General Public License version 3. | |
| • GNU Free Documentation License: | The license for this documentation. | |
| • Indexes: | Concept, function and keyword indexes. | |
Next: User's manual, Up: Top [Contents][Index]
Read this chapter to discover Liquid War 6.
| • In a nutshell: | Quick introduction to Liquid War 6. | |
| • Project status: | Where we are, where we are heading. | |
| • How you can help: | How you can help Liquid War 6 and the GNU Project. |
Next: Project status, Up: Introduction [Contents][Index]
Liquid War 6 is a unique multiplayer wargame. Your army is a blob of liquid and you have to try and eat your opponents. Rules are very simple yet original, they have been invented by Thomas Colcombet. It is possible to play alone against the computer but the game is really designed to be played with friends, on a single computer, on a LAN, or on Internet.
An older version, Liquid War 5, is available, but is not part of the GNU Project. Only Liquid War 6 is part of the GNU Project, it is a complete rewrite.
The official page of Liquid War 6 is http://www.gnu.org/software/liquidwar6/. For more information, you can read the Wikipedia article about Liquid War.
Next: How you can help, Previous: In a nutshell, Up: Introduction [Contents][Index]
As of today, the game is in beta state. It can be installed, and you can toy arround with. You can even play with. It is still far from being complete as some key features are still missing.
What works:
In the near future:
In the long run:
You might be interested in checking the following URLs, which give a view on opened tasks and bugs:
Liquid War 6 is a complete rewrite of Liquid War 5. The rewrite started in 2005. So a good question is “was the rewrite worth it?”...
Here’s a list of key improvements:
The most interesting change is still to come, and concerns network games.
Stay tuned.
Liquid War 6 releases are “codenamed” after famous, historical,
real or mythical characters. Here is a short revision history.
For details, see the ChangeLog
and NEWS files distributed with the game. Additionnally, there’s
an ever-increasing “stamp” number which is incremented each time
a build is done with a different source. Latest versions use the stamp
as the revision number (the version 3rd number).
The game will probably be labelled “6.0.0” when network mode is up and running. Until then there will probably be other improvements concerning gameplay and appearance (“eye candy”). There’s a balance to keep between the major goals such as “make that network thingy work” and the very real fact that “hacking must be fun”.
Previous: Project status, Up: Introduction [Contents][Index]
Please remember that development of Liquid War 6 is a volunteer effort, and you can also contribute to its development. For information about contributing to the GNU Project, please read How to help GNU.
Here’s a short list of todo items. It is probably too early to start hacking the core engine itself, for it is still under heavy development, might undergo major rewrites, and it’s hard for documentation to keep up with the reality of the code. However, there are still many things to do.
Feel free to join the mailing-lists, this is clearly the best place to start with.
There’s also a list of opened tasks on Savannah at http://savannah.gnu.org/task/?group=liquidwar6 which you can browse online. Maybe there’s some task for you!
Alternatively, you can contact Christian Mauduit.
Next: Hacker's guide, Previous: Introduction, Up: Top [Contents][Index]
The Liquid War 6 user’s manual hopefully contains any usefull information to install the program and play the game. If you just want to enjoy Liquid War 6 without diving into map creation and programming, this is just for you.
| • Mailing lists: | Mailing lists related to Liquid War 6. | |
| • Getting the game: | Get the latest version. | |
| • Installation: | How to install Liquid War 6. | |
| • Extra maps: | More and more maps. | |
| • Troubleshooting: | Problems running the game? | |
| • Quick start: | Ready, set, go! | |
| • Strategy tips: | Keep this under your pillow. | |
| • User interface: | How to control the game. | |
| • Solo game: | Playing alone. | |
| • Network games: | Set up and run network games. | |
| • Graphics: | 3D-acceleration issues. | |
| • Sound & music: | Let’s get noisy. | |
| • Config file: | How to use the config file. | |
| • Logs: | Log file contains valuable information. | |
| • Report bugs: | How to report bugs. |
Next: Getting the game, Up: User's manual [Contents][Index]
The main discussion list is <help-liquidwar6@gnu.org>, and is used to discuss all aspects of Liquid War 6, including installation, development, game strategies, and whatever subject players and hackers might want to talk about, provided it is Liquid War 6 related. If you don’t know on which list to subscribe, this is the one.
To subscribe to it, please send an empty mail with a Subject: header line of just "subscribe" to the -request list, that is
<help-liquidwar6-request@gnu.org>.
You can also subscribe to the list using the Mailman web interface for help-liquidwar6 and consult help-liquidwar6 archives.
Announcements about LiquidWar 6 are made on <info-liquidwar6@gnu.org>. Subscribe to it to be informed of major releases, and other significant news.
To subscribe to it, please send an empty mail with a Subject: header line of just "subscribe" to the -request list, that is
<info-liquidwar6-request@gnu.org>.
You can also subscribe to the list using the Mailman web interface for info-liquidwar6 and consult info-liquidwar6 archives.
Please also consider reading the latest news on Savannah.
There is also a special list used for reporting bugs, <bug-liquidwar6@gnu.org>. Please try and describe the bug as precisely as possible. The more accurate the description, the more chances it will get to be fixed.
While this is the standard GNU way of reporting bugs, modern SPAM standards make it very hard to filter real bug reports from junk on this list. It is more convenient to use a web interface, the URL is: http://savannah.gnu.org/bugs/?func=additem&group=liquidwar6 and you’re really encouraged to use it instead of sending emails.
Please take a look at the bug list before submitting new bugs.
IRC can be an interesting alternative to mailing-lists.
There’s an open channel dedicated to Liquid War on freenode.net,
you can access it on irc://irc.freenode.net/liquidwar that is,
channel #liquidwar on irc.freenode.net.
Next: Installation, Previous: Mailing lists, Up: User's manual [Contents][Index]
Liquid War 6 can be found on:
Downloading the latest file from this place, and compile
it yourself on your computer with a classical
./configure && make && make install is the recommended
way to install Liquid War 6.
Some binary packages might be available. Your mileage may vary.
GNU/Linux based systems are supported, through
Debian .deb and
Red Hat RPM packages.
There is also a Microsoft Windows installer.
However these binaries are not necessarly available for every single version of the game.
Latest work in progress versions can be obtained with GIT. Here’s the typicall command which will fetch the latest version:
git clone git://git.sv.gnu.org/liquidwar6.git
If you are behing a firewall and can’t use the native GIT protocol, you can rely on the (slower) http protocol:
git clone http://git.sv.gnu.org/r/liquidwar6.git
You can browse the code online, consult log summary, and in a general manner “follow” the project on http://git.savannah.gnu.org/gitweb/?p=liquidwar6.git and http://git.savannah.gnu.org/cgit/liquidwar6.git.
Beware, git does not contain all the files included in the official source tarball.
For instance, the ./configure script is not present. You need to run :
autoreconf
./configure
make
make install
The autoreconf call is really mandatory the first time, autoconf
is not enough. You will also need all the prerequisites needed to build the docs,
generally speaking, getting the source from git requires more tools to build the
package than picking a ready-to-use tarball.
Alternatively, you can download daily snapshots on
http://www.ufoot.org/liquidwar/v6/snapshots/
These files used to be built every day, now they are generated
by Jenkins whenever there’s a source change (commit).
A simple make is done before generating source tarballs however
a make distcheck is performed before generating binaries, therefore sometimes
you can have the source but no associated tarballs.
Beware of revision numbers, snapshots can make you believe version X.Y is out when it’s only a release candidate at best, and most of the time just a work-in-progress.
Still, if you want bleeding edge versions, this is the way to go.
Documentation is automatically updated as well, and available on http://www.ufoot.org/liquidwar/v6/doc/.
Most binary packages (at least .deb and RPM GNU/Linux binaries) should
be signed using GnuPG. The following keys are used when
generating upstream/vendor packages:
-----BEGIN PGP PUBLIC KEY BLOCK-----
Version: GnuPG v1.4.12 (GNU/Linux)

mQGiBDxZRPIRBACxPI8ZYEtkIGUliwLanAlZbIqVCI38d/SONo8MS3VUZkO82XRo
EAoj4KwX39fbUM3knpLK6SijzxKef/7Mw0w3W7lnQ/NegqSelTxiHmJxEQmeLulk
drP89CpXQPdir8ediZseR9/BAroiWgckDJK8YgMKsmBCjE62xfPrtxM2nwCghH0X
JAT/iD2uP0FdLpQGbM1dCnMD/jM3OcWIqQ1uGO8gp/lKTb7Kv7vEFQX0waLaIWOk
KJ45kx4guYuT7u4dVg1Y01PCbtnWTYJ9t1SW6GHhpNsdGybrw8izRk6zXE5TYFtN
9LN0kYYx5V+/Szjl4z5JabdEAt2OXZ9/N8Pb4PYInmG1jRr5fl78IO4SC1Gy03vK
9rL7A/9iXSGnN77/aNJ2qN3btTagwdLv4AYbk0ySneIpzKT9nmnM6MYs+seOwYeS
8e7i/SPISqblS5G10WZ4o/j5te0jotT7QFZdT3diO2NuUQXqqXIvRNxBGVKfX7Sg
TqvjZWlXMNAvH5KiuZ8vqgfEMqLS0hwjpJNVaZIPF4cifFgPFbQsQ2hyaXN0aWFu
IE1hdWR1aXQgKFUtRm9vdCkgPHVmb290QHVmb290Lm9yZz6IVwQTEQIAFwUCPFlE
8gULBwoDBAMVAwIDFgIBAheAAAoJEN4/K839QJ6Uk+YAnRuBRpn/rdD/JZNGHz0w
bJaVon9eAJ0YEdl0agCwJaWjKeZGWJl/f8TZqYhXBBMRAgAXBQI8WUTzBQsHCgME
AxUDAgMWAgECF4AACgkQ3j8rzf1AnpS+kgCeNl528f7waryDPBnEGJ0FjevrdNMA
oIDB+UCj1U65teCEbA3sEPyfkndFuQENBDxZRPUQBAD/PoWU0T2R4p0Fft5WQvCE
RqFSk+QZl0YXZCtwW59/v3ai0xEYzv193kjhojHqcDifoeHbO7bkEU5ZrbtwDt33
++/LZ4JqCi8wBXH2I+2msau/92Vn+WGZZf1fFRYJiputKyQrDnd05q41FvPI3knP
FBIMV/eKu0twqgGkLfHntwADBQP+PE4YN1NU01bScHiwkz62E5Xf/MwgOkBPFJ+D
L1o18xaUaNwrHSaI+nJc04de6QzxNrVfDdREwdjIm+M7CkK+ru4agmECyE3Ek3YL
76dFkE9geeOZTQ9A6MY9u/D1h+QHODg1r2sNfqoMnsFaNWOLXtivjjH4XWMN6Qze
N9H8UUqIRgQYEQIABgUCPFlE9QAKCRDePyvN/UCelJT4AJ94wSFLzyLxZLT29cBW
xybTpyt/jQCZAXEQi6LWVEo5jt/99FWRwDVNHK4=
=fcJV
-----END PGP PUBLIC KEY BLOCK-----
Next: Extra maps, Previous: Getting the game, Up: User's manual [Contents][Index]
This section covers installation from source. Other ways of installing the program are not described here.
All these libraries are mandatory to compile the game. Liquid War 6 won’t compile, let alone run, without them. Some of them could probably be replaced by equivalent tools, but this would certainly require a programming effort and some changes in Liquid War 6 source code.
#pragma directives, this should help the game
run faster on SMP systems.
snprintf...)
and Liquid War 6 might use them. In a general manner, Liquid War 6
is part of and designed for GNU. You might however manage to compile
it with limited libc support, this is the case with mingw32 for instance
but, do it at your own risk.
dlopen and dlclose. Check
that you have a /usr/include/ltdl.h file, or install
the corresponding package.
While all these libraries are theorically optional (the game will successfully compile without them), you’ll obviously need, for instance, one graphics backend. Otherwise, you’ll simply have no display. This is not acceptable. As of today, one can reasonnably consider all SDL-related libraries are required. The rest is truely optional.
OGG/Vorbis
file renderer.
Those tools are used upstream to maintain the game, you normally do not need them to build the game “as is” but if you modify the source code and hack the game, you might be interested in installing them.
src/indent.sh which
calls indent automatically and recursively on the whole source tree.
You might find it convenient not to install all the requirements from source, but use your favorite GNU/Linux distribution packages.
On an RPM based GNU/Linux system, a typical command (tested with Fedora 15 “Lovelock”) could be:
yum install \
make gcc glibc glibc-devel binutils \
libgomp \
guile guile-devel gmp gmp-devel libgc1c2 libgc-dev \
libtool libtool-ltdl libtool-ltdl-devel \
zlib zlib-devel expat expat-devel \
libpng libpng-devel libjpeg libjpeg-devel \
sqlite sqlite-devel \
ncurses ncurses-devel readline readline-devel \
libGL libGL-devel libGLU libGLU-devel \
SDL SDL-devel SDL_image SDL_image-devel \
SDL_mixer SDL_mixer-devel \
freetype freetype-devel SDL_ttf SDL_ttf-devel \
libcaca libcaca-devel \
libcurl libcurl-devel \
gtk2-devel \
perl lcov global valgrind graphviz gv ImageMagick \
texinfo-tex \
indent emacs doxygen libxml \
CUnit CUnit-devel \
rpm-build
On a DEB package based GNU/Linux system this command (tested with Debian 6.0 “squeeze”) would be:
apt-get install \
make autoconf automake \
gcc libc6 libc6-dev binutils \
libgomp1 \
guile-2.0 guile-2.0-dev guile-2.0-libs libgmp10 libgmp3-dev \
libtool libltdl7 libltdl-dev \
zlib1g zlib1g-dev libexpat1 libexpat1-dev \
libpng12-0 libpng12-dev libjpeg8 libjpeg-dev \
libsqlite3-0 libsqlite3-dev \
libncurses5 libncurses5-dev libreadline6 libreadline6-dev \
libgl1-mesa-glx libgl1-mesa-dri libgl1-mesa-dev libglu1-mesa libglu1-mesa-dev \
libgles2-mesa libgles2-mesa-dev \
libsdl1.2debian libsdl1.2-dev libsdl-image1.2 libsdl-image1.2-dev \
libsdl-mixer1.2 libsdl-mixer1.2-dev \
libfreetype6 libfreetype6-dev libsdl-ttf2.0-0 libsdl-ttf2.0-dev \
libcaca0 caca-utils libcaca-dev \
libcurl4-gnutls-dev \
libgtk2.0-dev \
perl lcov global valgrind graphviz gv imagemagick \
texinfo texlive-base texlive-generic-extra \
texlive-fonts-recommended texlive-latex-extra \
indent emacs doxygen xsltproc pmccabe \
libcunit1-ncurses libcunit1-ncurses-dev \
google-perftools libgoogle-perftools-dev \
git git2cl \
zip nsis \
debhelper devscripts
Note that those requirements really depend on the exact distribution you have, package names may vary from one to another.
Liquid War 6 uses GNU Automake, Autoconf and GNU Libtool.
Once all the requirements are installed, run:
./configure
make
make install
Liquid War 6 supports the standard ./configure --prefix=/my/path option
(in fact, it supports much more than that) so you can install the game
in any directory. You do not need to be root to install Liquid War 6.
Next: Troubleshooting, Previous: Installation, Up: User's manual [Contents][Index]
The main package contains some maps so that you can try out
the game. Still, an additionnal package, called extra-maps
or liquidwar6-extra-maps is available, containing more maps.
It really does contain many of them, including most Liquid War 3
and Liquid War 5 legacy maps, plus new Liquid War 6 maps.
On GNU/Linux systems (and possibly any POSIX unixish system) running:
./configure
make
make install
will install the extra maps on your system automatically,
they will then be available in the extra/ sub-directory
when browsing maps.
The ./configure script has a --enable-liquidwar6 switch
which will try and find automatically if there’s an existing liquidwar6
binary in the path. If there’s such a binary, it will run it and
ask for its map-path and use this value automatically.
Another solution, which works on all platforms including Microsoft Windows and Mac OS X
but also works on GNU/Linux, is to simply unpack the extra-maps
package (unzip or untar) in your custom map directory, or in the
system map directory. There’s nothing else to do to install these maps
but simply put them on your hard drive in the right directory.
Typically on an Microsoft Windows system, you would unpack the extra maps in
C:\Program Files\Liquid War 6\map\ (system directory)
and on a Mac OS X system you would unpack the extra maps in
Liquid War 6.app/Contents/Resources/map/ (system directory)
or $HOME/Library/Application Support/Liquid War 6/map (user directory).
On a GNU/Linux or POSIX system
you would unpack them in $HOME/.liquidwar6/map/ (user directory).
Next time you run the game, the maps should be browsable.
If you can’t see them, run liquidwar6 --audit and check that
the place where you unpacked the files is actually searched by the binary.
Next: Quick start, Previous: Extra maps, Up: User's manual [Contents][Index]
A quick survival guide:
./configure. Running ./configure > configure.log 2> configure.err does help.
/etc/ld.so.conf and running ldconfig as root
can help if some dependencies are installed in exotic places.
CFLAGS, LDFLAGS and LD_LIBRARY_PATH.
./configure --enable-allinone, this will disable
some fancy but somewhat complicated dynamic .so file support,
it can help if shared libraries are handled differently on your system
than on a plain GNU/Linux box.
If none of these help, consider reporting a bug, or search the mailing-lists for help.
Here’s a check-list to ensure that your installation is correct:
make install? make check?
liquidwar6 binary in your PATH environment variable?
It might be in /usr/games.
liquidwar6 --pedigree. Look at the output. Check the
compilation date & time, the version number.
liquidwar6 --audit. What do these paths look like?
Are they absolute paths? Do they exist? What’s there?
Normally, once the game is installed, all of them should exist,
and be populated with sub-directories and files.
liquidwar6 --modules, to know which modules where compiled.
You need at least one graphical module, for instance mod-gl1,
else the game won’t run.
liquidwar6 --host, this displays informations about
the host system the binary has been built for.
Now, game looks correctly installed, but you have problems running it.
$HOME/.liquidwar6/ directory, you’ll find some files, the main log file log.csv and maybe dump.txt or backtrace.txt. They might contain valuable information, read them. Note that while log.csv is overwritten each time you start the game, dump.txt or backtrace.txt are conserved until a new problem arises. So check the date of these files to be sure you’re analyzing the right ones.
Note that byt default on Microsoft Windows $HOME/.liquidwar6/ is replaced by
C:\Documents and Settings\<username>\Liquid War 6 and on Mac OS X it is
in /Users/<username>/Library/Application Support/Liquid War 6/.
liquidwar6 --defaults. This will reset all options to defaults.
You might need to run this when upgrading from a version to another, since
some options might appear, disappear, or defaults values can change.
liquidwar6 --test. This should run a complete test suite, many functions in the game will be tested automatically, and errors reported.
liquidwar6 --show-script-file. Are you really running the right code?
make uninstall && make clean && make && make install.
Many problems can come from using a wrong shared module. You can also launch
the game with the --trap-errors=false switch, this will disable the custom
popup window and allow you to get the real error.
gdb liquidwar6. Type run --trap-errors=false and watch output.
stdout or stderr.
You can change this
by modifying some environment variables: export LD_DEBUG=all.
This is very verbose but does help finding bugs.
./configure --enable-valgrind and
then run it using Valgrind.
find / -type d -a -name "liquidwar6*" 2> /dev/null to ensure you don’t
have an old version of Liquid War 6 somewhere else...
Next: Strategy tips, Previous: Troubleshooting, Up: User's manual [Contents][Index]
Once the game is installed, run it,
click on Quick start with the mouse, and control
the red 'a' cursor with the mouse, or keyboard, both work.
Try and surround the green team, it’s a stupid bot, you should win ;)
You army is formed by all the red pixels on the screen, they should
try and rejoin the cursor (the blinking 'a' letter) using the
shortest path. When red and green meet, they fight. Try it, toy arround.
The Quick start button will always make you play red against
a green stupid bot, whatever other options you have set up.
Todo...
Next: User interface, Previous: Quick start, Up: User's manual [Contents][Index]
Next: Solo game, Previous: Strategy tips, Up: User's manual [Contents][Index]
Liquid War 6 can be controlled using a reduced set of keys. This is to make the game more portable and allow possible ports to platforms where a full keyboard is not available. Depending on the graphics backend, exact mapping might change, they should hopefully be obvious and intuitive.
Those keys are:
up : the arrow up key
down : the down arrow key
left : the left arrow key
right : the right arrow key
enter : the enter / return key
esc : the escape key
ctrl : the control key
alt : the alt / meta key
pgup : the page up key
pgdown : the page down key
Basically,
It’s also possible to control the game with the mouse only, or with a joystick. By default the interface will trap all events and respond on any of these possible devices.
| Keyboard | Mouse | Joystick | Menu action | In-game |
|---|---|---|---|---|
up | mouse pointer | stick | previous menu item | move cursor up |
down | mouse pointer | stick | next menu item | move cursor down |
left | mouse pointer | stick | change menu item value | move cursor left |
right | mouse pointer | stick | change menu item value | move cursor right |
enter | left-click | button A | validate menu | validate chat line |
esc | right-click | button B | back to previous menu | quit game |
ctrl | right-click or double-click on any button | button C | N/A | fire |
alt | middle-click or triple-click on any button | button D | N/A | alternate fire |
pgup | wheel up | button E | previous menu item | zoom in |
pgdown | wheel down | button F | next menu item | zoom out |
A final word about joystick buttons: there’s no such thing as standard
joystick buttons, some will come with A,B,C,D, others will
have A,B,start,select,L,R, there’s no way to know. By default,
the game will use the buttons with the lowest indexes (returned by
your driver) for the most usefull functions. Validate menu entries is
the most usefull action, zooming in and out the one you can live without.
There’s also an (almost) hardcoded shortcut which will quit the game immediately, or at least as quickly as possible, without any prompt or warning.
It is the F10 key.
Think of this feature as the procastinator’s “whoops, here comes my boss!!!” emergency function.
Next: Network games, Previous: User interface, Up: User's manual [Contents][Index]
As of today, Liquid War 6 is essentially a solo game since network is not working. It allows you to toy arround in arcade mode on any map you wish.
A real solo mode with campaign and goals to reach is planned, how it will be implemented is yet to be defined.
By default, teams behave differently, some of them move more rapidly,
some are more aggressive but vulnerable, some are more defensive but
do not attack as strong as others. This aspect of the game is under
active tuning, things might be unfair by now, you can toy arround
with the various team-profile-... options, any report is
appreciated.
Note that this is very different from Liquid War 5, and can give very different gaming experiences, you can artificially set up arbitrary strong bots, for instance.
Here’s a description of the default color settings:
blue:
has a strong attack but is slow
cyan:
has an extremely good defense but is slow
green:
has a better defense than the average
lightblue:
has an extremely strong attack but is very slow
magenta:
is extremely fast but also very vulnerable
orange:
is fast, but has a very weak attack
pink:
has a very strong attack, but is also very vulnerable
purple:
has a very good defense but a weak attack
red:
moves faster than the average
yellow:
has a strong attack
Additionnally, when profiles are used, each team has two weapons, a primary weapon and an alternate one. Think of weapons as special (usually nasty) tricks you can play on your opponents.
Here’s a description of available weapons:
atomic:
nuclear explosion, all fighters arround your cursor are about to die
attract:
all fighters from all teams are packed near your cursor
berzerk:
super-strong attack for a limited time, crush your enemies
control:
you take the control of all other teams while your cursor stays in place
crazy:
all your opponents go crazy for some time, acting with no logic
disappear:
you disappear for some time from the battlefield, to reappear later, somewhere
else
escape:
fighters placed as far as possible from cursor, magically escape from any grip
fix:
all other teams are freezed, you can move but not attack them
invincible:
no damage for a limited time, move untouched
kamikaze:
you die along with the strongest team on the battlefield, requires at least 3
teams
mix:
fighters exchange position, their properties being preserved
permutation:
will exchange colors, randomly, requires at least 3 teams (double edged
weapon)
plague:
general disease, all fighters mysteriously loose health
reverse:
fighters continue to move normally, but attacks are done in reverse mode,
backwards
rewind:
make the battlefield be like it was a few seconds ago
scatter:
every fighters of every team scattered in random places
shrink:
reduces the number of fighters on the map
steal:
steals some fighters to other teams
teleport:
fighters placed as close as possible to cursor
turbo:
move faster for a limited time
Note that this is in progress, some of them are NOT IMPLEMENTED YET.
Next: Graphics, Previous: Solo game, Up: User's manual [Contents][Index]
Liquid War 6 needs to name your “node” (you can think as your server instance of the game) and have a unique URL (address) to publish and give to other nodes.
If only one network adapter is attached to your computer and
your address IP is A.B.C.D then by default the game will
pick automatically the address http://A.B.C.D:8056/ and
it should work flawlessly.
Problems can arise if you have a peculiar network configuration,
if you have multiple non-loopback network interfaces, if you use
NAT to protect yourself from intruders and/or if your
context forces you to do so.
In that case, Liquid War won’t be able to guess a correct URL
automatically. So you need to set it up manually either
by editing the public-url entry in the config file,
changing environment variable LW6_PUBLIC_URL or
passing the --public-url=http://<host>:<port>/ argument
when running the game. Typically, if you are behind a firewall
which does NAT, use the firewall address. The right address is
the address which, given to remote hosts, will allow them
to connect on your game instance.
A node is started automatically when you run the game. Even if you don’t start to play, node starts in the background and exchanges data with other nodes, mostly to discover them and maintain its internal map of existing nodes and games.
So even without starting a network game, you should be able
to point a web browser on your node and see a web page
describing it. Your node address is displayed on stdout
(console) when starting the game. If in doubt, try http://localhost:8056/
which should work unless you modified defaults settings.
When you start a network game, the program simply changes your node state from “idle” to “accepting connections”.
The interface should show you the list of available nodes, just pick one and try and connect to it.
Note that once you’re connected on a remote node, you’re still acting as an independant node, and other nodes might connect to your node as well as to the other nodes. In short, there’s no real server or client, everyone is a client for someone, and can act as a server.
Nodes connected together form a “community”, which can disband, accept new nodes, and in a general manner has its own immaterial life, the first node which created the game might disappear, game can continue without it.
This is why the main network module is called libp2p,
this is a reference to the term “peer to peer”.
Once a node is connected to another one, they’ve started a “community”. Formally, a stand-alone node accepting for connection is already a community, even if it has only one member, but the only really interesting communities are those formed with several nodes.
A community can’t be reached through a given server, to connect to one you just need to connect on one of its member nodes. All nodes are equivalent, there’s no master, no root node, nodes collaborate to share the same real-time information and maintaine an up-to-date game state.
Of course, conflicts can arise, and in that case nodes need to agree on an acceptable solution. Normally, the program takes decisions automatically (for instance, it could decide to “kick” a node out of the community) so the player does not have to care about this, but this is expected to be one of the most tricky (and passionating) part of Liquid War 6 hacking.
By default, Liquid War 6 will communicate on port 8056, in both TCP and UDP, and in both ways too (in/out). It’s possible to play with partial connectivity, in extreme case, you can even play without direct internet access, using only a mere web proxy.
However, things will go faster and be much easier if the program can use its default native protocol.
Here’s an example of a typicall iptables configuration which allows you to play the game full-featured. It’s assumed that by default all packets are dropped, this configuration will just open the necessary ports.
# outgoing TCP on port 8056 (liquidwar6)
iptables -A OUTPUT -p tcp --dport 8056 -m state --state NEW,ESTABLISHED -j ACCEPT
iptables -A INPUT -p tcp --sport 8056 -m state --state ESTABLISHED -j ACCEPT
# incoming TCP on port 8056 (liquidwar6)
iptables -A INPUT -p tcp --dport 8056 -m state --state NEW,ESTABLISHED -j ACCEPT
iptables -A OUTPUT -p tcp --sport 8056 -m state --state ESTABLISHED -j ACCEPT
# outgoing UDP on port 8056 (liquidwar6)
iptables -A OUTPUT -p udp --dport 8056 --sport 1024:65535 -j ACCEPT
iptables -A INPUT -p udp --sport 8056 --dport 1024:65535 -j ACCEPT
# incoming UDP on port 8056 (liquidwar6)
iptables -A INPUT -p udp --dport 8056 --sport 1024:65535 -j ACCEPT
iptables -A OUTPUT -p udp --sport 8056 --dport 1024:65535 -j ACCEPT
If you can’t change firewall settings and only have access to the web
through a web proxy, it can still be possible to play (with some restrictions
such as your node not being seen by others) if mod-http is available.
This in turn depends on wether libcurl support was
activated when compiling the game. To use the proxy, you can set
the http_proxy environment variable. For detailed informations,
please refer to libcurl doccumentation.
As stated in the license, the program comes with NO WARRANTY. Period.
However, an important effort has been made so that it can reasonnably be used online, exposed to various “common” attacks.
As far as security is concerned, there are two different issues:
Here’s a list of various steps which have been taken to make the program more secure:
--skip-network option is here if you really do
not want to be bothered by networking risks;
strcpy,
equivalents such as strncpy are used;
This being said, Liquid War 6 does not use any strong encryption library to protect the data it sends. All the checksum machinery might be vulnerable to a brute-force and/or strong cryptographic attack, so in theory it’s possible to fool the program.
In practise, if you want real privacy, play over a VPN (Virtual Private Network).
Next: Sound & music, Previous: Network games, Up: User's manual [Contents][Index]
Liquid War 6 will try and pick up a default resolution when the game is launched the first time. It won’t use your maximum screen resolution but will instead list all available fullscreen modes, and pick up one which is usually something like two thirds of the highest mode. This is to allow switching back and forth between fullscreen and windowed mode using the same settings. This automatically picked-up resolution really depends on your hardware and driver. It is called “standard” in the graphics options menu.
Then it is possible to automatically select the minimum and maximum resolution
your hardware allows in fullscreen mode. These are called “low” and “high”
in the graphics options menu. Just click on the button that display the
resolution, it will change and use the next setting. In windowed mode, the game
won’t accept the highest available mode but will instead use a percentage of it,
defined by the --windowed-mode-limit parameter.
You might still be in a case where this is not enough. For instance your maximum resolution is 1600x1200, Liquid War 6 picks a default mode of 1280x960 for you but for some reason you want to play in 800x600, fullscreen. In this case, simply switch to windowed mode, resize the window with the mouse (the resolution button will show you the current resolution) and just choose a resolution near 800x600. It does not even need to be exactly 800x600, 798x603 would probably fit. Then when switching back to fullscreen, you’ll be in 800x600, the game will automatically pick up the fullscreen mode which is closest to the current windowed mode resolution.
By default the game will try and run at 60 frames per second. Given the nature of Liquid War 6, this is probably enough. Higher values will maybe give a slightly smoother display, but barely noticeable.
You can activate the display of frames per seconds (aka “fps”) through the menu (“options -> system”) or with the command line (“–display-fps”).
On a single processor system, reducing the number of frames per second might
allow the rest of the game run faster. So if you notice the game is really
slow, in terms of “fighters move slowly” then you might be happy reducing
the display rate and therefore giving power back to the other parts of the
program. On a dual-core (or more) or on a multi-processor system, this is
probably useless since the game is threaded and has a dedicated thread for
display purposes. The command line option to reduce the number of frames
per second is --target-fps.
Additionnally, the parameter --gfx-cpu-usage allows you to force
the display thread to “take a rest” and go idle for some time. This is
advanced settings, most users won’t touch this.
Next: Config file, Previous: Graphics, Up: User's manual [Contents][Index]
As of today, the game is capable of playing Ogg Vorbis audio files. That’s it.
In the long run, what is planned is to support Csound which would allow very cool effects, such as dynamically changing the music while the game is running, typically following the action. If there’s a lot of fight, the music could reflect this.
For now this is only vaporware, just a nice idea among others, nothing implmented yet.
Next: Logs, Previous: Sound & music, Up: User's manual [Contents][Index]
The config file is a simple XML file. It uses XML only to benefit standard parsing tools, but it’s not a structured XML file, in the sense that the tree is so simple that all items are at the same level. It is just a simple key-value binding.
This file is in $HOME/.liquidwar6/config.xml on GNU/Linux and POSIX
systems, in C:\Documents and Settings\<username>\Liquid War 6\config.xml
on Microsoft Windows and in /Users/<username>/Library/Application Support/Liquid War 6/config.xml on Mac OS X.
You’re free to edit it manually, but all parameters are changeable with command line options. The program will overwrite this file each time it exits, so if you put comments in it, they will disappear. The advantage of this is that if you mispell something, or if for some reason the game does not understand a value, then when rewriting the file, it will show you it just did not get it.
The file embeds the documentation for all its entries,
it is therefore rather verbose. The documentation is the same you will
find online or by quering the game with the --about option,
also the same you would get reading this manual.
Next: Report bugs, Previous: Config file, Up: User's manual [Contents][Index]
Liquid War 6 uses stdout to output important messages,
and stderr to log warnings and errors.
It will also use syslog if available.
Additionnally, a verbose log is available in $HOME/.liquidwar6/log.csv
on GNU/Linux and POSIX
systems, in C:\Documents and Settings\<username>\Liquid War 6\log.csv
on Microsoft Windows and in /Users/<username>/Library/Application Support/Liquid War 6/log.csv on Mac OS X.
You can read this using any spreadsheet software capable of reading
csv file. It uses the tab (\t) character as a separator.
It contains valuable informations including version and most default
values for the game, and for each line logged, it says where in the
code the log function was called. A must-have for debugging.
Previous: Logs, Up: User's manual [Contents][Index]
There are two ways to report bugs:
The latter (Savannah) is much preferred, because the mailing-list is bloated with spam... It also offers a list of bugs which you should read before submitting a new one.
Next: Reference, Previous: User's manual, Up: Top [Contents][Index]
This hacker’s guide is for anyone who is curious about the game, and wants to know how it works. It covers many aspects from simple map creation to technical program internals. A great effort has been done in Liquid War 6 so that it should be much more hackable than previous versions. Any feedback is welcome.
| • Designing levels: | How to draw new maps. | |
| • Translating: | Translation HOWTO. | |
| • Architecture: | C, Scheme, modules and the rest. | |
| • Graphics backends: | How gfx modules work, how to write them. | |
| • Core algorithm: | About shortest path & moving fighters. | |
| • Compilation tips: | Advice for developpers and packagers. | |
| • Coding guidelines: | Ensure code remains maintainable. | |
| • Using the console: | How to interact with the game. | |
| • Advanced tweaking: | Do this at your own risk. | |
| • Writing modules: | How to develop your own extensions. | |
| • Use as a library: | Liquid War 6 can be embedded in your own programs. | |
| • Network protocol: | How the game communicates with others. | |
| • Technical HOWTOs: | Recipes for the maintainer(s). | |
| • Using GNU Arch: | A quick tla survival guide. | |
| • Using GIT: | GIT is used to handle source code. | |
| • Jenkins builds: | Continuous integration with Jenkins |
Next: Translating, Up: Hacker's guide [Contents][Index]
As of Liquid War 5, most levels have been contributed by players. While the maintainer of Liquid War 6 has technical knowledge to develop the game, artistic talent and taste might not be his domain of excellence 8-)
Therefore contribution are truely welcomed when they take the form of a new, original, fun and good looking level. It’s believed the levels often make the game much more than its engine. This is true for any type of game, and Liquid War is no exception.
So this section is here to help players understand how to hack existing levels, and create new ones, in the hope that 1) they can enjoy their own creations and 2) possibly share their work with others.
Note that this manual might refer to levels and maps: they are just two different names to describe the very same thing. It’s an alias.
Liquid War 6 stores level information in a plain directory.
There is no such thing as an opaque .dat binary file.
The name of the level is the name of the directory itself,
and its elements are the files contained in it.
Files must follow a precise naming scheme. For instance
Liquid War 6 expects a map.png file to be present
in each map directory.
All image files in a level use the
Portable Network Graphics
or JPEG format.
It is possible that in the long term, Liquid War 6 will
be able to handle levels as .tar.gz or .zip
files. In that case these files will only be a compressed
image of the actual level directory.
See the ./map/ directory of the source Liquid War 6
distribution to see example of maps.
Liquid War 6 does enforce a limit on map size. This is not to frustrate map designers and/or players, simply, it would be a lie to pretend the game can handle arbitrary big maps.
They might look great on your computer but will become unplayable soon on an older machine. And most of the time they don’t look that great, carefully crafted 1280Ã720 just looks awesome and can represent a great level complexity.
Here are the technical limits:
| Type | Max width | Max height | Max surface |
|---|---|---|---|
| Texture | 3 000 | 2 000 | 6 000 000 |
| Logical map | 1 500 | 1 000 | 1 000 000 |
The texture can be somewhat bigger than the logical map, this allows
for pretty levels while limiting the horsepower needed to move
the fighters and animate everything. Note that you could technically
feed the game with a map.png that is bigger than the logical map
limit, only it will be downscaled when being loaded.
The texture limits are generous enough to accept a full-HD 1920x1080 image, or a 4/3 1600x1200 image, while the “one million pixels” logical map limit is enough to store a 16/9 1280x720 map or a 4/3 1024x768.
Keep in mind that the logical map (map.png) will probably be
scaled whatsoever, even if it’s within the absolute limits
(the game adapts the resolution to your computer speed)
and your texture will rarely appear in its native
resolution, will probably be distorted, and so on.
Older versions of Liquid War 6 used to load a plain README file
and use this as metadata. Title was take from map directory name. This is
still supported, but it now also supports the addition of a metadata.xml file
in which you can describe your map.
The following files can be defined:
title: map title, what will appear in the menus
author: map author
description: description of the map, to help players when browsing folders
license: map license (short version, just a simple one-liner, don’t use lenghtly copyright
notices here, the README file would be the file to put long legal sections)
This is the only required file in a level.
In fact, the existence of map.png makes a
directory a level. When checking wether a directory
is a correct level, Liquid War 6 simply tests the
existence and validity of map.png.
This image is a simple black & white area, where white zones are the background, the sea, the places where fighters can move, and black zones are the foreground, the walls, the places where fighters can’t go.
This informations can be stored in a 2-color indexed file, or in a grayscaled or even truecolor RGB file, but color information won’t be used. Internally, Liquid War 6 will read the color of every point. If it is over 127 on a 0 to 255 scale, it will be considered as background, if it is below 127, it will be considered as foreground.
Liquid War 6 can handle mutiple layer maps. Think of a pile of maps, one being on top of the other. This allows you to create a volume, the game considers every layer has two axis x and y, and the z axis is to travel through layers. First layer corresponds to z=0, second layer to z=1, and so on.
Here are the files you can use to define layers:
map.png this one is on top, it’s always defined (z=0)
layer2.png (z=1)
layer3.png (z=2)
layer4.png (z=3)
layer5.png (z=4)
layer6.png (z=5)
layer7.png (z=6)
A layerX.png file should be designed exactly like map.png.
In fact, map.png could simply have been called layer1.png.
Up to 6 extra layers can be defined
(from layer2.png to layer7.png).
This is a hardcoded limit.
It allows you to define 7 different layers, including
the top map.png layer.
Keep in mind this layer system is not real 3D,
it’s more a “2D and a half”
model. Adding layers can considerably slow down the game, so it’s
wise to try and use as few layers as possible. Technically, 3 layers
will allow you to build bridges and tunnels, which is probably
the most usefull construction using layers. Fighters can also
have difficulties navigating through layers so piling up layers
in narrow “vertical” z-axis based tunnels is probably not a
great idea.
The ufoot/concept/pass map of the liquidwar6-extra-maps
demonstrates basic layer usage.
It is possible to define a texture for the map by
putting a texture.png or texture.jpeg file.
It does not need to have the
same dimensions as the map itself. Indeed, textures can
be much more precise than the actual logical map.
There’s no theorical limit on how big a texture can be, more precisely, it can be much bigger than any hardware/driver maximum texture size. In practice, a too big texture will waste your video card RAM, and slow everything down. Sizes ranging from 640x480 to 1600x1200 are reasonable texture sizes.
If you don’t define this, the map.png file will
be used as the texture, and also import colors from
style.xml if defined.
Note that the shape of the texture defines the shape of the map, that is, the ratio with which it will appear on the screen.
The PNG alpha layer will be used for transparency.
But to save disk space, it can be convienient to prefer the JPEG
format, use texture.jpeg instead of texture.png
and store the alpha layer in a separated file,
called texture-alpha.jpeg. This avoids handling heavy
PNG files, PNG compression not being performant on most textures.
In texture-alpha.jpeg, black is considered opaque,
and white is transparent. Different levels of gray correspond to
different levels of opacity. Previous versions of the game
used the other way of doing things (black is transparent) because
this is technically, the most obvious way to do things. Black is 0
and transparent is 0. But for a human “reader” of the map
this does not make sense. One generally expects white to be the
equivalent of “undrawn” or “blank”, well, if it’s undecided,
void, transparent, whatever, it’s white. When the Gimp
flattens an image, it becomes white, not black.
So white is transparent. Period.
If there’s a glue.png or boost.png file in the map directory
(you can use one of them or both) then they will be interpreted as follow:
glue.png and boost.png are white, nothing special
happens, fighters follow their default behavior
glue.png is black, fighters will be slowed down. How
slowish they will be depends on the ’glue-power’ parameter. If ’glue-power’ is
3 then fighters will move three times slower.
boost.png is black, fighters will behave faster. How
fast they will be depends on the ’boost-power’ parameter. If ’boost-power’ is
2 then fighters will move two times faster.
glue.png or boost.png are gray, they will
be slowed down less or speeded up less depending on how dark the grey is.
There can be, at the same place, some gray or black in both boost.png
and glue.png. How this will behave exactly is not really clear at this
stage, the recommendation is not to do this (it does not really make sense
anyway) but if you do it, game won’t complain.
It’s also wise not to abuse of boost.png for obviously, a map
filled with “boosted” zones at a X10 pace will require much more CPU
than the same map with no such setting. This might fool the automatic
resampling algorithm and lead to maps that are unplayable. The spirit of
boost.png is just to make a few spots go faster.
It’s also important to note that behaving faster or slower means moving faster or slower but also attacking faster or slower, and, in a general manner doing any action with a different pace.
If there’s a danger.png or medicine.png file in the map directory
(you can use one of them or both) then they will be interpreted as follow:
danger.png and medicine.png are white, nothing special
happens, fighters follow their default behavior
danger.png is black, fighters die automatically, that is,
they become black and loose health. How dangerous these zones are depends
on the ’danger-power’ parameter.
medicine.png is black, fighters regenerate faster, they
become bright and shiny as if auto-healing. How efficient this medicine is
depends on the ’medicine-power’ parameter.
danger.png or medicine.png are gray, well,
it’s in between, the “danger” and “medicine” effect will be proportional
to the level of gray.
There can be, at the same place, some gray or black in both medicine.png
and danger.png. How this will behave exactly is not really clear at this
stage, the recommendation is not to do this (it does not really make sense
anyway) but if you do it, game won’t complain.
The four files:
one-way-north.png (AKA “up”)
one-way-east.png (AKA “right”)
one-way-south.png (AKA “down”)
one-way-west.png (AKA “left”)
can be used to force the fighters to go in one given direction, on some parts of
the map. If an area is black on one of this meta-layers, then fighters will go
in the given direction. For instance, a black zone in one-way-north will
make fighters go to the north (AKA “up” direction) regardless of the cursor
position. The fact that this is a one-way path is understood by fighters and they
will take this in account when choosing the shortest path to go somewhere.
You can combine vertical and horizontal one-way informations, making diagonal
one-way paths.
By default, a simple cursor will be displayed, but you can use a custom per-map cursor. Cursors are defined by two 64x64 bitmaps:
cursor.png is a PNG file, very likely to use transparency, which will
be default be colorized according to the map colors. You can draw it any color,
only greyscale informations will be used. You can keep the original colors if
you really want to by setting colorize-cursor to false, but the default
is to ignore the hue.
cursor-color.png is another PNG file, very likely to use transparency too,
which will always be colorized, replacing white by the team color, and black by the
“dead” color, which by default is black and is usually a dark color. This colorization
is a way to recognize your cursor and know which team it belongs to.
You can define only one of those bitmaps, if doing so, then the other layer will be empty, and won’t be filled with the default cursor data. Note that additionnally, a little letter (single character) will be displayed using the team color, so that’s yet another way to identify which teams the cursor belongs too. The PNG files really need to be PNG (JPEG won’t work) and need to be 64x64, any other size will be ignored.
Whereas style.xml is only about the appearance
of the map, rules.xml allows the map designer
to change pretty much any parameter.
Ultimately, the player can still ignore these settings and overide them with its own values, but the idea is: most game options are only pertinent in a given context. For instance, on some maps it’s interesting to move slowly, on some other it’s interesting to move fast. Some maps might be playable packed with fighters everywhere, some other might be much more fun with almost nobody on them.
The approach in Liquid War 5 was to make the options available, but let the player himself find the right settings for the right map. The consequence is that no one ever used all those cryptic options in the advanced options menu, and probably 99% of the players ended up playing with default settings. This is not that bad, but given the fact that changing a few parameters one can totally transform the gameplay, it has decided been that in Liquid War 6, the map designer suggests the right options that matches his map.
This does not prevent the player from toying with options himself, he can still do it.
There’s also one important point to note: all these options are
technically implemented as integer parameters. We certainly do not
want any float here, since, and it is a Liquid War specific behavior,
the game must be 100,00% predictable and behave the same on every platform.
As there is nothing like exactness when speaking of floats, those are
forbidden here. As for strings, we are dealing here with low-level
internals, and this section is not about telling a story. They
are technical options only. Booleans are implemented with the usual
false = 0 and true = 1 convention. Note that other
config files in Liquid War 6 might rely on floats, strings, and
booleans with conventionnal true and false values,
but not this one. rules.xml is special.
This rules.xml file is a direct image of the internal
“rules” structure, so it contains technical, sometimes not very
user-friendly parameters. While hacking rules.xml directly
is a good way to test things, most of the time, the other file
hints.xml contains more high-level informations that do
the job the right way. A typicall example is speed.
See rules.xml reference.
This parameter is only used by the map loader. The map itself contains none of these parameters, they are only clues (hints, in fact..) on “how to load the map” which are passed to the loader.
Let’s take an example : speed. This rules.xml file has
a (rather) easy to use “speed” parameter, which will do all the job
of finding the right resolution for your map, the right “rounds-per-sec”
and “moves-per-round” parameters, in short, it will set many
other parameters to fit your needs.
As far as the map designer is concerned, rules.xml and hints.xml
could have been merged (but so would have style.xml) but internally
they are very different: rules.xml contains the real parameters,
the one used by the algorithm whereas hints.xml contains only instructions
which are used once when loading the map and then disappear. The core algorithm
has no idea of what was in hints.xml, once it’s loaded.
See hints.xml reference.
This is a simple XML file defining various appearance parameters. It has absolutely no effect on gameplay. These settings can ultimately be overriden by the player, but the idea is that if the map designer thinks this level looks better with this or that option, let him say it in this file.
See style.xml reference.
In this file one can specify per-map team settings. In short, this is where you can say how many bots you want, which color, and so on. This can be on a per-map basis, so that each map has different customized settings, some maps might be fun with only one bot, some other maps might be fun packed with 8 opponents.
Technically, teams.xml will allow you to define up to
4 players and 9 bots. This is an awfull lot considering there are
only 10 colors. Basically, it’s OK to simply define:
player1 and player2)
bot1 and bot2)
It might also be a clever idea to just set up player2 and bot1 being
the same color, in case of a conflict the game will pick up another color, but
in practice those two entries often correspond to “the second player, bot or human,
coming on the battlefield”.
All in all, this represents 5 entries to set up (main player, other player or first bot which can be the same, then 3 more bots), it’s OK to have the rest undefined or set to defaults.
Note that this can also simply be unset, and in that case the game defaults will apply, and the user will be able to change them, whereas if you set these up, the player will somewhat force to used the map settings.
See teams.xml reference.
This is a very important point. Liquid War almost *always* resamples maps, unless you ask it not to do it. This is not recommended, it is believed in the general case, letting the internal algorithm make its own decisions is better than trying to figure out oneself “which is the best resolution”.
The reason is, the right resolution (we’re talking here of the logical resolution, how many fighters wide is the battlefield) often depends on the speed and general ressources the of the computer the program is running on. The map designer does not have this information. The program does. It runs a bench at startup. So this way it can choose, at runtime, the resolution which fits best.
The recommended way of doing things is not to try to be too picky about
rules.xml parameters related to speed and also let the default
map size limits in hints.xml to their defaults. Do not use them
unless debugging stuff.
Then the program will resample the map so that the player can play
on it at a reasonnable speed.
If map is too big, and it’s often the case, then it will downsize it until
there are sufficiently few fighters so that the CPU can handle the job.
This, of course, is not rocket science. The bench calculation is a
somewhat brute-force approach of doing things. Formally, we would have
to run the map for good to figure out what is the right speed. Still,
this bench gives good approximations.
Previous versions of the game relied heavily on ’fighter-scale’ to resample maps, but this is not the case anymore. The ’fighter-scale’ is now a minor parameter which is used to upsize maps if they are too small. In 99.9% of the cases, the map is first upsized by ’fighter-scale’ for this parameter is by default set low (1.0) then downsized by ’bench-value’ for real-life personnal computers can’t handle 1600x1200 maps in real-time. Not yet.
There are a bazillion options to control map size, including ’min-map-surface’. They are here because it’s important that, ultimately, people can do whatever they want with the game. But for map design, this is another story. Don’t use them. Rely on ’bench-value’ and just care about game speed. This is achieved by changing the “speed” parameter.
It is possible to store your own custom music file within the map directory.
You can call it whatever you want (you can keep its original name, which is
something music authors usually appreciate, even if there’s no strong
“attribution” clause on the license, it can be considered fair use not
to fiddle to much with the name) you just have to place it in the same
directory than the other files like map.png or texture.jpeg.
The following formats are known to work with the default
SDL_mixer based mod_ogg
backend:
ogg (Ogg Vorbis files)
wav
midi (extensions .mid and .midi should both work)
mod, s3m and xm files, AKA “modules”.
To be more precise, here’s how things work:
music-file (parameter taken
from style.xml or defined/overriden by player) in the current map
directory;
step 2: if not found, it will try every path in music-path to find
this file. This includes the “system” music directory with musics that
ship with the game, but also the ./music subfolder in the user
directory;
step 3: if still not found, it will try to play a random file, relying
on music-filter to ignore some files.
In rules.xml you can set a special parameter which is exp
and allows you to tell “a player can’t load this map if he doesn’t have
at least N at his/her exp rating”. Gaining exp (stands
for “experience”) isn’t hard, you just need to win a level with exp=N
to gain exp=N+1.
By default, the player’s exp is 0 and levels default to 1, so this means
only levels with exp set explicitely to 0 in rules.xml might be
used. Then player wins that level and is given access to all maps by default,
unless these are explicitely set with exp greater than 1.
In solo game, when a player wins a level, he’s automatically redirected
to the map which is in the same directory and has exactly the exp
he just gain. For instance, if you win a map with exp=5 then you’re
chained to the first map (in alphabetical order) which has exp=6.
By setting up the exp parameter the right way, with a map for each
exp level one can transform a simple map directory in a scenario
that player will automatically follow.
Last, but not least, the game, at startup, only allows you to play red, green, blue and yellow. Other colors are unlocked as you progress among levels. Same things with weapons, there are “liberated” continuously through the game.
This mechanics allows the following behavior:
extra package.
As a final word, yes, it’s possible to cheat, fool the exp system, but it’s believed this is moot and lame.
Next: Architecture, Previous: Designing levels, Up: Hacker's guide [Contents][Index]
Liquid War 6 uses GNU gettext for all
its messages. There’s an online manual
about this tool. In practice, what you have to do as a translator is to
edit the po/xx.po file with xx being your language / country code.
For instance, to translate the game in French, one needs to edit po/fr.po.
This is very important, you might already be aware of it if you are familiar
with gettext, but still it’s worth mentionning : when a string contains special
characters such as %d or %s (in a general manner, anything with
a % it’s important that all translations contain exactly the same number
of %ds and %ss than the original.
For instance:
"foo has %d bars (%s)"
can be translated to:
"ziblug zdonc %d zuc - %s - tac"
The number, order and type of % entries is preserved. To learn more
about these formats, use info printf or man 3 printf. In a
general manner, get informations about printf.
Additionnally, some strings are used by Scheme (Guile) code and not
by C code. Thus, they don’t use the standard C/printf convention.
In these strings, what you must preserve and be aware of is the tilde
character ~. Very often you’ll see ~a in a string. As
with the printf %, you must preserve the number, order and type
of those. There is a complete
online reference
about this way of formatting strings.
Liquid War 6 has thousands and thousands of messages which could theorically be translated. In practise it’s counter-productive to spend time to translate those, as the game is still evolving constantly, and as most of these messages are technical messages which inform about rare bugs and strange conditions. All sort of informations which, while valuable, are not intented for end-users and are more destinated to be reported in bug reports. To select only the interesting messages to translate, the current gettext configuration only uses a reduced set of files.
src/scriptpo.c : the most important file. It contains the definitions used
by all the Guile code, this is where you’ll find all the menu labels.
src/lib/sys/sys-log.c : log messages and keywords. These are not the log
messages themselves, it only concerns the log engine. One can for instance
replace WARNING by ATTENTION.
src/lib/hlp/hlp-credits.c : the credits, which are
displayed at game startup in the splash screen.
src/lib/lw6-print.c : contains some messages printed on the console.
As a side note, the file src/lib/hlp/hlp-reference.c contains all the
entries for the various configuration options, anything that can be queried
by liquidwar6 --about=<keyword>. This is several hundred messages. It
might be interesting to translate them some day, but it’s obviously not a
priority today.
Next: Graphics backends, Previous: Translating, Up: Hacker's guide [Contents][Index]
Technically, Liquid War 6 is a collection of C functions which are exported to Guile. The main binary embeds a Guile interpreter, which will run a Guile script. This script calls the exported C functions, and glues them together.
It should be possible to implement the game without using Guile at all, using C code to make the various modules communicate together. This might seem an easier way to go, not involving several languages. However, using this script level is a good way to achieve several important goals:
Having Guile to implement high-level stuff also decreases, to some extent, the need for object-oriented features of C++. The big picture is : low level code that require speed, optimized data processing, is written in C. Code which is more high level and requires abstraction is written in scheme.
Liquid War 6 makes a heavy usage of threads. Early versions of the game did not have this feature but starting with 0.0.7beta, one can really consider the game is heavily threaded.
There’s basically:
So globally, if you have an SMP system, the game will be happy with it. It will also run on a single processor, as the program uses POSIX pthreads it’s capable to run on any computer which has pthreads implemented for it.
But, and this is a strong limitation, without pthreads, the game won’t run. At all. Or at least, not unless it’s almost completely rewritten.
The C code is splitted into several internal libraries. This allow independant testing of various game modules.
The main module, the most important one, is libker, (stands for “kernel”).
This is were the core algorithm is. To some extent, the rest of the code is
just about how to provide this module with the right data and environment.
Logically, if you profle the game, you should find out that a great part
of the CPU time is spent here. Code here is about spreading gradients, moving
fighters and cursors.
The libmap module is here to handle maps, it contains the code to manipulate
maps in memory. But it does not know how to load them from disk. This is the
responsability of another module, libldr, which is linked against libraries
such as libpng or
libjpeg and does the job of transforming those
standard formats into a usable in-memory structure. The libgen module
also works the same way, creating pseudo-random maps. There’s still a another
moduled involved in map handling, it’s libtsk, whose job is to load a
level in the background. It has a 2-steps asynchronous loading system which allows
the game to load maps while the user interface is still responsive, and give
a preview of the map as soon as possible, when loading continues in the background,
building optimizing structures which are usefull when playing but not mandatory
just to show the map.
At the other end of the algorithm-chain, the libpil module will “pilot”
things. It’s this module which will translate text readable orders (typically
adapted for network usage) into function calls. It has event lists, keeps
them in the right order, and will also permanently maintain
three different states of the game. A backup state which can be used any time
to go back in time and get the game in a stable 100% sure state. A reference state which
is correct but ever changing. Basically backup plus all the orders received
between backup and reference gives reference. And finally a draft state which
is as up to date as possible but might be wrong. This is typically interesting
in network game, where we want to show something moving, something fast, even
if there’s lag on the network and other computers fail to send information in time.
In this case we display draft while still keeping reference and updating it
when we finally receive valid informations. Backup would be used to send
bootstrap information when people are joining a new game, or to check up if
things are going right.
A special libbot module is here to handle bot algorithms. A bot is just
a simple move function which takes a game state as an input, and returns
an x,y position, just the way a mouse handler would. How complex a
bot is “under the hood” depends on the type of bot. Current bots are really
basic. Additionnally, libsim will run dummy fight simulations to find
out wether some team has a real advantage on another one, speaking of team
profiles depending on colors.
The libgfx module handles all the graphics stuff. It is itself splitted
in several sub-modules, that is, it does not do anything but load a module
such as mod-gl1 which will actually contain the implementation. In an
object-oriented language, it would be an abstract class, an inteface. The
implementation does not need to be thread-safe. It’s better if it is, for
theorically it could be possible to fire Liquid War 6 with two display
backends running at the same time on the same game instance, but this code
has yet to be written, and it’s a rare dual headed configuration which
probably has no real-life usage. If only one graphics backend is activated
at a time, the rest of the implementation garantees there will never
be two concurrent calls to a function is this module. It is the
libdsp (“display”) which handles this. It fires a thread for
rendering purposes, and sends information to this thread, detecting
automatically if it’s necessary to acquire a mutex and update rendering
informations. For the caller, this is transparent, one just has to
call an update function from time to time. The module will even perform
“dirty-reads” on a game state being calculated, to render things
in real time, as soon as possible.
An experimental libvox module is under design/development and
might, in the future, provide a real-time voxel renderer. Still pre-alpha
stage.
To ease up the implementation of different graphics backends, a libgui
module contains code which is meant to be used by any graphics backend.
It’s just a factorisation module, containing common code and interfaces,
related to displaying things. This is where, for instance, one can find
a high level menu object. In the same spirit, libmat contains
generic math, vector and matrix code, which is commonly used in 3D interfaces.
The libsnd module handles sound. It’s also an abstract class, an interface,
which uses dynamic backends as implementations.
The libnet module is a wrapper over different network APIs, it
handles Winsock and POSIX sockets in a uniform manner.
The libcli and libsrv contain network client and server code,
implementing the various protocols in dynamically loadable sub-modules.
It’s the role of libp2p to glue this together, handle the list
of available servers, the message queue, verifying nobody is cheating,
and so on. All this modules share information about current game
state using code & structures defined in libnod,use message
utilities (format, parse) defined in libmsg and share code concerning connections in libcnx. Additionnally, libdat
provides facilities to store old network messages and sort them.
The libsys module contains most system and convenience functions, it handles
logs, type conversions, timer, memory allocation, it’s the fundamental
module every other module depends on. It has a compation libglb
module with all the Gnulib shared code.
The libhlp is used to handle keywords and internal self-documentation
(this is what is used by --list and --about), libcfg
knows how to read and save config files, libcns handles the console,
and libdyn can load .so shared files dynamically.
To glue all this, there are some Guile bindings with helper functions
available in libscm which fills two needs, one being an easy way
to check if Guile linking is working correctly without requiring all other
modules to be available, and also performing automatic checks on some actions
such as registering or executing a function.
Finally there are small modules like libimg (to make screenshots of the game)
which
have been separated because they required special libraries to link with
and/or did not really fit in existing modules for dependencies reasons.
So well, this is a lot of modules. The list might move a bit, but the big picture is here. Each module is testable separately.
Below is a Graphviz diagram, which shows the modules dependencies.
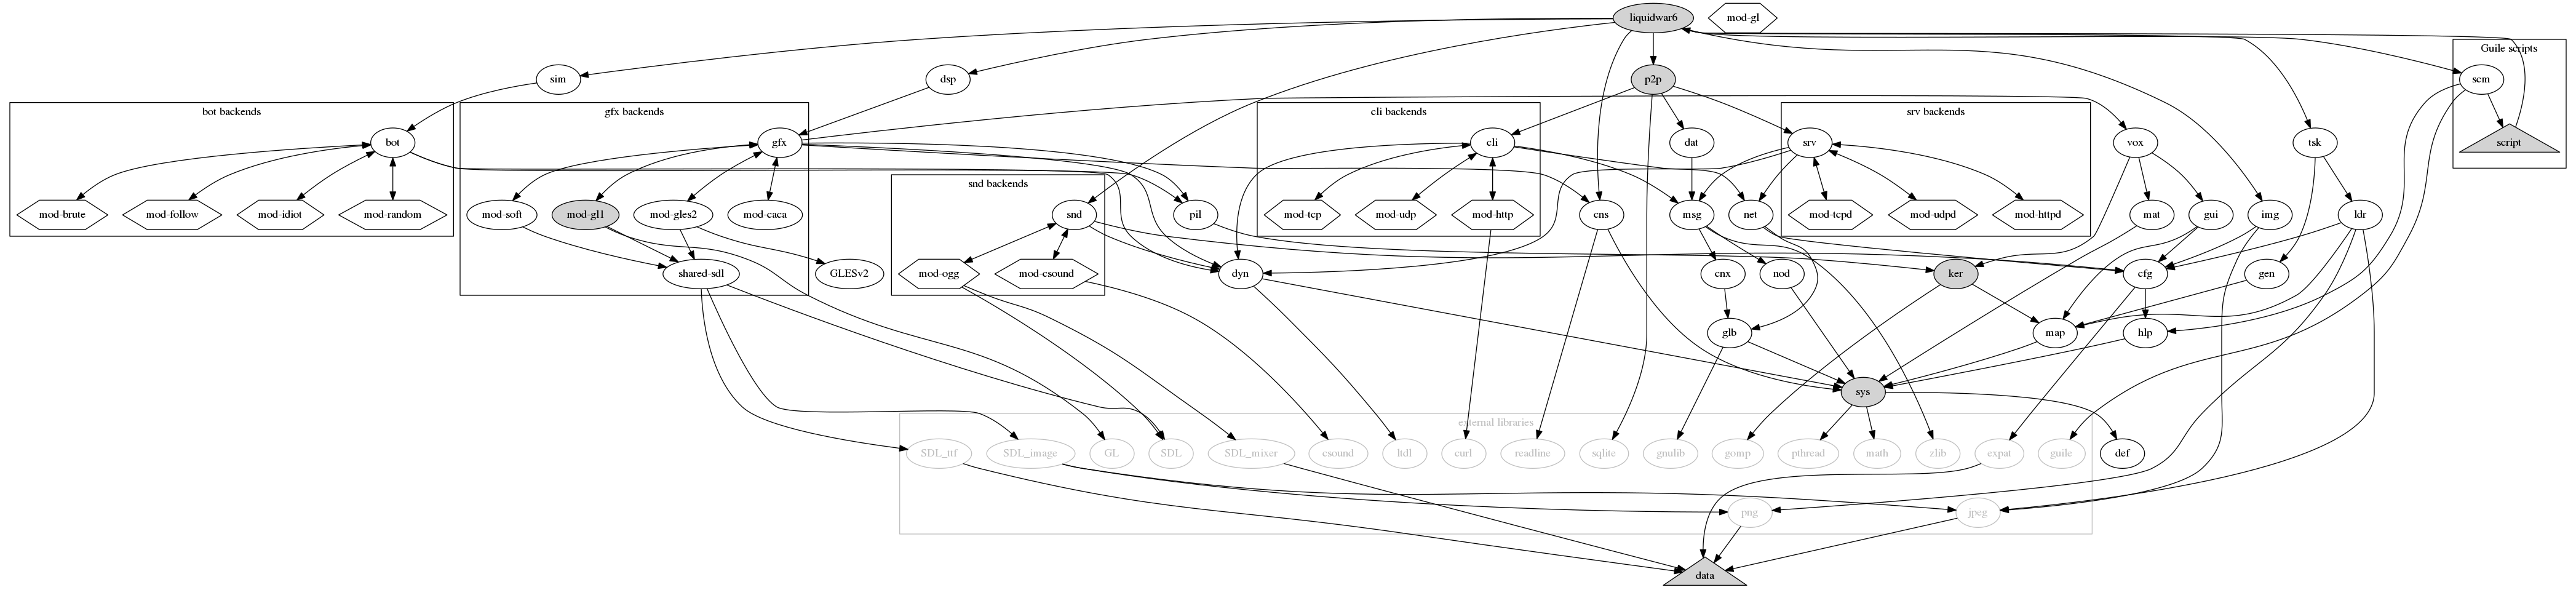
The most important memory structures in Liquid War 6 are:
lw6map_level_t) : this contain the map immutable informations.
This is what resides in memory after a map has been loaded from the disk.
It contains all the various .png and .jpeg files stored
as pixel arrays, resampled if need, and also contains the various map
attributes. Once this structure is ready, the game is capable of displaying
the map on the screen, but it can not do anything with it yet.
lw6ker_game_struct_t) : this one contains the same informations
as the previous structure, only the information has been post-treated so that it’s
ready for use by the core algorithm. It will, for instance, contain the famous
mesh structure, which groups squares by packets of 1, 4, 16, 64 or more. The reason
it’s been separated from the level is that operations such as creating the mesh
might require a lot of time. So to allow players to see the level while black magic
is still running in the background, it was required to make a difference between
what is required to view the map (“level”) and what is required to play on
it (“game_struct”).
lw6ker_game_state_t) : contains all the variable, ever
changing game data. This is where the position of fighters is stored, their
health, and such things. It is designed to be synchronizable by using mostly
simple calls to memcpy. It heavily relies on the previous structures,
the idea is that one can have several “game_state” plugged on a
single “game_struct”.
All these structures are defined in the ker/ker.h header.
The core Liquid War 6 algorithm is 100% predictable, that is to say, given the same input, it will produce the same results, on any computer. Previous versions of the game also had this property. This is very important for network games, since in a network only informations such as “cursor A is at position x,y” are transmitted. Every node maintains its own internal game state, so it’s very important that every node comes with the same output given the same input.
For this reason Liquid War 6 never uses floating point numbers for its core algorithm, it uses fixed point numbers instead. It also never relies on a real “random” function but fakes random behavior by using predictable pseudo-random sources, implementation independant, such as checksums, or modulos.
There are also some optimizations which are not possible because of the predictability requirement, for instance one can not spread a gradient and move the fighters in concurrent threads, or move fighters from different teams in different threads.
If you read the code, you’ll find lots of checksums here and there, a global checksum not being enough for you never know where the problem happened. The test suite uses those facilities to garantee that the game will run the same on any platform.
Not being able to rely on a predictable algorithm would require to send whole game states on the network, and this is certainly way too much data to transmit. A moderate 200x200 map has a memory footprint of possibly several megabytes, so serializing this and sending it to multiple computers at a fast-paced rate is very hard, if possible at all, even with a high bandwidth. We’re talking about Internet play here.
Next: Core algorithm, Previous: Architecture, Up: Hacker's guide [Contents][Index]
Liquid War 6 has a modular architecture which allows the programmer (and the player) to plug pretty much any rendering/graphics backend, provided this one is... developped.
As of 2009 the only available backend was mod-gl1, it would
display the game using 3D acceleration, if available, through the
SDL library, using its GL bindings.
As of 2012, other backends are begin developped, the idea is that each backend can provide the user with enough visual feedback to play, and convey input informations to the core engine.
The rest of the game is exactly the same, this means playing with
mod-gl1 you can do exactly the same things than with mod-caca.
Liquid War 6 has a modular architecture which allows the programmer (and the player) to plug pretty much any rendering/graphics backend, provided this one is... developped.
As of 2009 the only available backend is still mod-gl1, it will
display the game using 3D acceleration, if available, through the
SDL library, using its GL bindings.
Additionnally, versions available for Microsoft Windows and Mac OS X will
probably never any other backends available. For technical reasons, those
platforms do not have the flexibility of GNU/Linux and do not allow
graphical libraries to be loaded dynamically. In practice, both of them
require hacks that override the standard main function. Microsoft Windows
has its WinMain instead, and Mac OS X is even more pedantic,
requiring graphical functions to be executed in the main thread.
So mod-gl1 is just linked statically in those versions, and
the modularity of the game is purely theorical on these platforms.
This mod-gl1 module is really one of the key stones of
Liquid War 6, and if you want to change graphical things, it’s definitely
the place to hack on. The source is in src/lib/gfx/mod-gl1.
The mod-gl1 backend requires “moderate” hardware, but it
still does require hardware acceleration. Pure software rendering
through mesa for instance, won’t
be enough.
So if you’re running Xorg on GNU/Linux and there’s a DRI driver for your card, the game should run fine.
On the programmer side, the counterpart is that one should not rely
on fancy OpenGL features. Textures have a maximum size of 512x512
for instance. Of course some maps are bigger than this but this
means that internally, mod-gl1 splits them into smaller tiles,
and displays those tiles one by one.
Inside the mod-gl1 backend, the src/lib/gfx/mod-gl1/gl-utils
directory contains lots of common structures, factorized functions which
can (and should, if appliable) be used.
This is under development, the idea is to provide an alternative renderer based on OpenGL ES 2, which could be used on standard computers but also on mobile platforms.
Work in progress, don’t hold your breath.
This is under development, the idea is to provide a very basic rendered which can be compiled pretty much anywhere as long as SDL is available, since it does use software rendering only.
Work in progress, don’t hold your breath.
This is under heavy development, the idea is to provide a basic yet surprising alternative text-based renderer, using libcaca.
The starting point for any hack are the files src/lib/gfx/gfx.h.
This is where the API is defined.
Basically, the type lw6gfx_backend_t contains all the required
callbacks. You must provide an implementation for each function.
Let’s take an example, taken from mod-gl1. When calling
lw6gfx_get_video_mode and passing it a first argument which
is a valid mod-gl1 backend, the function
mod_gl1_utils_get_video_mode will be called. How this is done
is a little C casting wizardry.
To understand how this works, read the files:
src/lib/gfx/gfx-api.c: contains all the functions which
are part of the API and can be called elsewhere in the code.
src/lib/gfx/gfx-register.c: contains the code that allows
a module to be loaded/unloaded at runtime. Will act differently
if the games is compile with the --allinone flag, but
for the caller this is transparent, just create and destroy
backend, period.
src/lib/gfx/mod-gl1/mod-gl1-backend.c: this is where the
module actually binds its internal functions with the callbacks
defined in the lw6gfx_backend_s struct. None of these
internal functions should be called directly, code in
libdsp for instance should only refer to the lw6gfx_...
bindings. Reading the code in src/lib/gfx/gfx-test.c
shows how these functions can be called, and in which order.
All the functions should be defined, but some of them are obviously more important. The two most critical functions are:
pump_events
This is used to process inputs. The function should update
a lw6gui_input_s struct and return it to the caller.
How this done is really up to the backend, it happens that
all SDL based backends (mod-gl1, mod-gles2 and mod-soft)
share the same code for this, but another backend could
do this differently, there’s no real need to use SDL.
Only, the returned input should behave correctly when queried
with function from libgui. As a consequence, one needs
to have a look at libgui to understand how input works.
A look at src/lib/gfx/shared-sdl/shared-sdl-event.c is a good example
of this, as this file contains the implementation for SDL-based input.
See libgfx reference. See libgui reference.
display
By far the most complicated function, this one is called
on each display loop to render the game. It’s always used in the
same thread, so need not be reentrant,
and on some platforms (eg Mac OS X) it will even be
called in the main thread (this can be of some importance regarding
some libraries such as SDL).
Still, beware, the game_state object it uses can change
on the fly while rendering. In that case “changing” means that
fighters can move and gradients be updated but the global structure
won’t change. So any pointer on a fighter will still be valid after
it’s been obtained, but the renderer should not expect the game
to be static. In practice this is not really a problem. If you are
curious, you can look in libdsp how and when this function
is called.
A very important parameter is mask, depending on its value,
the backend should, or not, display the menu, or the map, or both, etc.
The reference for this are the LW6GUI_DISPLAY_... constants
in src/lib/gui/gui.h.
As a starting point, implementing menu display before anything else is probably the best bet, since without menus it’s hard to do anything within the game.
To test out a backend, one can either launch the full game using
the “under development” backend, or launch the test suite by
typing ./liquidwar6gfx-test 1 in ./src/lib/gfx.
See libdsp reference.
Next: Compilation tips, Previous: Graphics backends, Up: Hacker's guide [Contents][Index]
Since Liquid War 3 the algorithm to power Liquid War is pretty much unchanged, at least, there has been no revolution, the basic principles remain the same. This has been explained in Liquid War 5 doc, but is repeated here, along with the specific Liquid War 6 stuff.
The very important things to remember are:
rand / random functions, it also does not use
any float value either, since different type of processors/contexts might give slightly different
results because of rounding problems.
N of the cursor, then in the worst case, all adjacent places are at distance N+1.
As of Liquid War 6, the corresponding code is in src/lib/ker/ker-spread.c. The second
step is to move the fighters, make them act. In Liquid War 6, the corresponding code is in
src/lib/ker/ker-move.c. One can have a look at the code source for the
function lw6ker_game_state_do_round in src/lib/ker/ker-gamestate.c to see
how these are called.
Most of the algorithm code has something to do with the following types (which are structs):
lw6map_level_t defined in which is used to store the level data.
lw6ker_game_struct_t defined in src/lib/map/map.h which is used to store the memory data required by the
algorithm, but which are immutable. There’s a difference between those data and the ones stored in the level
struct. For instance, those data are “private” since lw6ker_game_struct_t is opaque, while
everything is lw6map_level_t is “public”. Also, data in lw6ker_game_struct_t might be
highly redundant for performance issues and is optimized for speed while data in lw6map_level_t is
just plain data and won’t change if the algorithm is updated.
lw6ker_game_state_t defined in src/lib/ker/ker.h which is used to store the level data required by the
algorithm, and which changes during the game. This is typically where an information such as “there’s a red
fighter in slot (3,23,1)” will be stored.
lw6pil_pilot_t defined in src/lib/pil/pil.h which is used to handle all the threading issues. It keeps
a track of 3 game states. A “reference” state which is the state of the game considering all input has been received
from the network, and is validated. A “draft” state which might be anticipated and updated “as if the
players we did not get input from did not move there cursors”. This can give the illusion that the game
is running smoothly while in reality input from other players on the network is choppy. In a local game,
“draft” and “reference” are equivalent, since there’s no doubt about what’s on the network. And finally,
a “backup” state which can be pulled in case of a serious flaw and is a good way to solve the “hey, someone
untrusted is throwing garbage on the net”. One can always pull a backup.
Most of the time, hacking on the algorithm, changing the gameplay, does not require
to touch anything but the code in src/lib/ker.
See See libmap. See See libker. See See libpil.
One of the key functions is lw6ker_game_state_get_fighter_id, which will return
the id of a fighter at a given position.
Then its companion function lw6ker_game_state_get_fighter_by_id can be called,
it will return a lw6ker_fighter_t, which contains the real data.
The type lw6ker_fighter_t is not opaque and can be freely accessed by the caller,
which, typically, is a graphics backend trying to display informations. Try and grep
for the string “lw6ker_game_state_get_fighter_id” withing the src/lib/gfx source tree
for examples.
One thing that is very important when hacking on libker: you should always
leave the lw6ker_game_state_t struct in a state that is compatible with a
correct usage of public “getters” in src/lib/ker/ker.h. The reason is that
this code can be executed by separate threads, more precisely, in “dirty read” mode,
the rendering thread will try and display a “game state” while this very “game state” is
being updated by another thread.
Next: Coding guidelines, Previous: Core algorithm, Up: Hacker's guide [Contents][Index]
In addition to all the common
Autoconf switches
such as --prefix, Liquid War 6 has some custom switches:
--disable-console: allows you to turn on/off console support.
Normally this is detected automatically but in case you really want
to disable it on platforms which support it, you can. This will cause
the program no to link against libreadline, among other things.
--disable-gtk: allows you to turn on/off gtk support.
Normally this is detected automatically but in case you really want
to disable it on platforms which support it, you can. This will cause
the program not to link against GTK libs.
--disable-cunit: allows you to turn on/off
CUnit
support.
Normally this is detected automatically but in case you really want
to disable it on platforms which support it, you can. This will cause
the program not to link against CUnit libs.
--enable-optimize: will turn on optimizations. This will
turn on compiler options such as -fomit-frame-pointer
but also disable some code in the program. Indeed, most of
the advanced memory checking in the game - which ensures it
does not leak - will be turned of. This will certainly speed up
things, however, it’s not recommended to turn this on until
program is not stable enough so that memory leaks and other
problems can be declared ’impossible’. Turn this on if you
really have some speed problem, otherwise it’s safer to use
the full-featured ’slow’ version of the game.
--enable-paranoid: will turn on very picky and pedantic
checks in the code, try this when you suspect a serious memory
bug, a race condition whatsoever, and want to track it down.
Useless for players.
--enable-headless: will allow compilation without any
graphics backend. The game is unplayable in that state but one
can still wish to compile what is compilable, for testing purposes.
--enable-silent: will allow compilation without any
sound backend. The game won’t play any music in that state but one
can still wish to compile what is compilable, for testing purposes.
--enable-allinone: will stuff all the internal libraries
into one big executable.
Very convenient for profiling. The major drawback is that
you need to have all the optional libraries installed
to compile all the optional modules. Another side effect is that
with this option there’s no more dynamic loading of binary modules,
so if your platform has a strange or buggy support for .so
files, this option can help.
--enable-fullstatic: will build a totally static
binary, that is using the --static option
for gcc and the -all-static option
for libtool. Currently broken, this option could
in the future allow for building binaries that run
pretty much everywhere, without requiring any dependency
but a Kernel.
--enable-gprof: will enable profiling informations.
This will activate --enable-allinone, else you would
only track the time spent in functions
in the main liquidwar6 executable, and exclude lots
of interesting code contained in dynamic libraries.
--enable-instrument: will instrument functions for
profiling. This will turn on the -finstrument-functions
switch when compiling, so that the hooks
__cyg_profile_func_enter and __cyg_profile_func_exit
are called automatically. Then you can link against tools like
cprof or
FunctionCheck.
--enable-profiler: will enable
Google Performance Tools
support. Basically, this means linking against libtcmalloc
and libprofiler. You could activate those by using
LD_PRELOAD or by using your own LDFLAGS but
using this option will also make the game tell you if
CPUPROFILE or HEAPPROFILE are set
when it starts. The pprof -gv output is very handy.
Note that on some systems pprof is renamed google-pprof.
--enable-gcov: will enable coverage informations,
to use with gcov
and lcov.
This is for developpers only. It will activate --enable-allinone,
else there would be some link errors when opening dynamic libraries.
The obtained information is available online:
coverage.
and
GNU global.
--enable-valgrind: will enable some CFLAGS
options which are suitable for the use of
Valgrind, to track
down memory leaks and other common programming errors.
Use for debugging only, usually together with
--enable-allinone.
Liquid War 6 does have a ./debian in both main and extra maps packages,
so it’s “debianized”.
To build the main .deb package, untar the main source tarball, then:
make dist
cd pkg
cp ../liquidwar6-X.Y.Z.tar.gz . # X.Y.Z is the version
make deb
Note that you have to copy the source tarball to ./pkg and move
to this directory before typing make deb. This is, among other things,
to simplify the main Makefile.
To build the extra maps .deb package, untar the extra maps tarball, then:
make deb
Liquid War 6 does have a .spec files in both main and extra maps packages.
To build the main .rpm package, untar the main source tarball, then:
make dist
cd pkg
cp ../liquidwar6-X.Y.Z.tar.gz . # X.Y.Z is the version
make rpm
Note that you have to copy the source tarball to ./pkg and move
to this directory before typing make rpm. This is, among other things,
to simplify the main Makefile.
To build the extra maps .rpm package, untar the extra maps tarball, then:
make rpm
This section describes how to compile the game from source under Microsoft Windows. Note that players are encouraged to use a free system such as GNU/Linux, which is the platform Liquid War 6 is being hacked on by default. If you encounter problems with this port, you’ll probably save time by installing a double-boot with GNU/Linux coexisting with your previous Microsoft Windows install.
Basically, Liquid War 6 requires
MinGW.
More precisely, it requires MSYS.
A standard Cygwin installation won’t
work, because it is too UNIXish to allow third party libraries
like SDL to compile natively.
You might argue that SDL is available for Cygwin, but in reality,
the Cygwin port of SDL is a MinGW port. Indeed, Cygwin brings
all standard POSIX functions including the use of main
instead of WinMain and I suspect this is a problem for
graphical libraries like SDL which do require some sort of direct
access to the OS low-level functions. Therefore, MinGW is more
adapted for it does not define all these functions, and
allows any library to hook on Microsoft Windows internals directly.
Point is then, you also loose the cool effect of Cygwin which
is to have a complete glibc
available,
including network functions like select defined the
POSIX way, and not the WinSock way. If you ever ported code from
POSIX sockets to WinSock 2, you know what I mean. Using MinGW
is also embarassing for some libraries won’t compile easily, and
for instance programs which heavily rely on a real TTY
interface to work are usually hard to port. This includes
ncurses
and
GNU readline.
Liquid War 6 tries to have workarrounds for all this, and in
some cases the workarround is simply that embarassing code
is not compiled on Microsoft Windows. For this reason, some
features are not available on this platform. Period.
Now the reason you need MSYS and not only MinGW is that MSYS
will allow ./configure scripts to run, and this eases
up the porting process a lot. MinGW and MSYS packages are
downloadable on the
SourceForge MinGW download page. Alternatively, there is a
mirror on ufoot.org,
but files might be outdated.
To compile Liquid War 6, first download and unzip all the
following files in
the same directory, for instance C:\MSYS.
If you do not have any tool to handle .tar.gz and .tar.bz2
files under Microsoft Windows, which is likely to be the case
when MSYS is not installed yet, you can untar these on any GNU/Linux box,
then upload the whole directory to the target Windows host.
This file list might contain file which are not absolutely mandatory for Liquid War 6, for instance the Fortran 77 compiler is absolutely useless, but installing it won’t harm either. Some packages might unzip things the right way, but some do it in a subfolder. You might need to run commands like:
cp -r coreutils*/* .
rm -rf coreutils*
Get rid of useless files:
rm ._.DS_Store .DS_Store
It’s also mandatory to move everything that has been installed in
/usr or /usr/local to / since MSYS has some
builtin wizardry which maps /usr on /.
You need to do this if you don’t unzip files from a MinGW shell,
which is obviously the case when you first install it. Usefull command
can be:
mv usr/* .
rmdir usr
Next, libintl is not correctly handled/detected by LW6,
and can raise an error like
"gcc.exe: C:/msys/local/lib/.libs/libintl.dll.a: No such file or directory"
so one needs to copy some libraries in /usr/local/lib/.libs/:
mkdir local/lib/.libs
cp local/lib/libintl.* local/lib/.libs/
Another step is to edit /etc/profile and add lines like:
export CFLAGS="-g -I/usr/local/include"
export LDFLAGS="-L/usr/local/lib"
export GUILE_LOAD_PATH="C:\\MSYS\\local\\share\\guile\\1.8\\"
Close and re-launch your msys shell (rxvt) so that these changes take effect. Check that those values are correctly set:
env | grep FLAGS
env | grep GUILE
Finally, your MSYS environment is (hopefully...) working.
Now you need to compile the following programs, from source.
Files are mirrored on ufoot.org for your convenience, however these might be outdated.
Still, there are known to work.
Proceed like if you were under a POSIX system.
Some packages use the --disable-rpath swith, there are various
reasons for which rpath is an issue.
In the same manner, --disable-nls when linking against libintl
or libiconv was painful.
make clean GC; cp pthread.h sched.h /usr/local/include/; cp pthreadGC2.dll /usr/local/bin/; cp libpthreadGC2.a /usr/local/lib/
gmp-4.2.2.tar.gz
then ./configure && make && make install
guile-1.8.5.tar.gz.
Edit libguile/guile.c
and insert #undef SCM_IMPORT
just before #include <libguile.h>.
Edit ./libguile/threads.c and place struct timespec { long tv_sec; long tv_nsec; }; just before #include "libguile/_scm.h".
Then ./configure --disable-nls --disable-rpath --disable-error-on-warning --without-threads && make && make install. The GUILE_LOAD_PATH value must be correctly
set for guile-config to work. For unknown reasons, running guile
can throw a stack overflow error. Don’t panic.
See bug 2007506 on SourceForge.net for an explanation on
why the Guile binary shipped with MSYS is not suitable for Liquid War 6.
expat-2.0.1.tar.gz
then ./configure && make && make install
sqlite-amalgamation-3.5.9.tar.gz
then ./configure && make && make install
libpng-1.2.29.tar.gz
then ./configure && make && make install
jpegsrc.v6b.tar.gz
then ./configure && make && make install && make install-lib
curl-7.18.1.tar.gz
then ./configure --without-ssl && make && make install
freetype-2.3.5.tar.gz
then ./configure && make && make install
libogg-1.1.3.tar.gz
then ./configure && make && make install
libvorbis-1.2.0.tar.gz
then LDFLAGS="$LDFLAGS -logg" && ./configure && make && make install
SDL-1.2.13.tar.gz
then ./configure && make && make install
SDL_image-1.2.6.tar.gz
then ./configure && make && make install
SDL_mixer-1.2.8.tar.gz
then ./configure && make && make install
SDL_ttf-2.0.9.tar.gz
then ./configure && make && make install
For your convenience, a zip file containing a complete MSYS "Liquid War 6 ready"
environment is available. It is simply the result of all the operations
described above.
Simply unzip msys-for-liquidwar6-20080819.zip
(about 240 megs) in C:\MSYS\.
All dependencies compiled in /local have been generated
using the command:
cd /usr/local/src
./msys-for-liquidwar6-build.sh > ./msys-for-liquidwar6-build.log 2>&1
Note that this script does’t do everything, you’ll still need to edit Guile source code and patch it manually.
It might even be possible to use this MSYS environment
under Wine.
Simply unzip it under $HOME/.wine/drive_c, and run
wine "$HOME/.wine/drive_c/windows/system32/cmd.exe" /c "c:\\msys\\msys.bat" and with
luck, you’ll get a working shell. Note that this might allow you to compile
the game, but running it is another story. Consider this MSYS over Wine trick
as a hack enabling the use of free software only when compiling for
Microsoft proprietary platform. It is not a reasonnable way to run the game.
If running under a UNIXish platform, or better, GNU, simply run native code.
Use the Windows 32-bit port only if you are jailed on a Microsoft system.
Now, let’s come to the real meat, untar the Liquid War 6 source tarball, launch your MSYS shell, and:
./configure
make
make install
Now the binary is in src/.libs/liquidwar6.exe
(beware, src/liquidwar6.exe is only a wrapper).
This binary is an MSYS/MinGW binary, so it read paths “Ã la”
Microsoft, that is, it has no knowledge of what /usr is,
for instance. It requires paths starting by C:\.
This is still experimental. Basically, install MacPorts, and most dependencies with,
except for SDL which you compile from source. The idea is to compile SDL using
the native OS X bindings (and not some other GL files you could have in /opt/local
installed by MacPorts), then compile the game and other SDL dependencies
against this SDL.
The SDL_mixer library might need to be told to compile itself without dynamic ogg support.
By default it seems that it tries to load libvorbisfile.dylib at runtime, and it can fail.
To disable this dynamic loading, use for instance :
/configure --prefix=/opt/extra --enable-music-ogg --disable-music-ogg-shared
Also, it might seem obvious for Mac OS X users, but there are some important issues related to compiling options and handling dynamic libraries at runtime.
ldd does not exist, run otool -L instead.
LD_LIBRARY_PATH is DYLD_LIBRARY_PATH.
.dylib and not .so.
OBJCFLAGS environment variable along with CFLAGS
because the Mac OS X port uses some Objective-C code.
It is very important to have the right SDL flags when linking the Liquid War 6 binaries. For instance it could be:
-I/opt/extra/include -I/opt/local/include -Wl,-framework -Wl,CoreFoundation -I/opt/local/include -D_THREAD_SAFE -Wl,-framework -Wl,Cocoa -Wl,-framework -Wl,OpenGL -Wl,-framework -Wl,Cocoa
The point is to have Cocoa and OpenGL support. Depending on the way you installed SDL,
you might also need to include an SDL framework support, this is mostly if you installed SDL from
.dmg binary images, and not from source with the command line. A typical output of sdl-config --libs is:
-L/opt/extra/lib -lSDLmain -lSDL -Wl,-framework,Cocoa
Another important issue is to include SDL.h, which in turn includes SDLmain.h, in
all the .c source files defining the standard main function. This is done in liquidwar6 but
should you try to link yourself on liquidwar6 libraries and/or hack code, you must do this or
you’ll get errors when running the game. Such errors look like:
*** _NSAutoreleaseNoPool(): Object 0x420c90 of class NSCFNumber autoreleased with no pool in place - just leaking
The reason is that SDL replaces your main with its own version of it. One strong implication
is that all the dynamic loading of SDL, which works on sandard GNU/Linux boxes, won’t work under
Mac OS X, since SDL hard codes itself by patching main with #define C-preprocessor commands.
A .dmg file (disk image) containing a Liquid War 6.app folder (OS X application)
is available for your convenience. It might work or not. In doubt, compile from source. The complicated part about this package (a “bundle” is OS X language) is that
it needs to embed various libraries which are typically installed in /opt
by MacPorts on a developper’s machine. So to build this package a heavy use
of the utilility install_name_tool is required, normally all libraries
needed ship with the binary, remaining depedencies concern frameworks which
should be present on any working Mac OS X install. Still, this is only theory.
Needs to be widely tested.
The layout of the bundle follows:
./Contents/Info.plist: metadata, bundle description file
./Contents/MacOS: contains the main binary liquidwar6 as well as all specific low-level libraries
./Contents/Resources/data: general game data, does not contain maps.
./Contents/Resources/music: music for the game.
./Contents/Resources/map: system maps, you can put your own maps (or “extra” maps) here if you want all users to share them.
./Contents/Resources/script: Liquid War 6 specific scripts, the scheme scripted part of the program.
./Contents/Resources/guile: common shared Guile scripts, part of Guile distribution.
./Contents/Resources/doc: documentation in HTML and PDF formats.
Additionnally, the Mac OS X port uses /Users/<username>/Library/Application Support/Liquid War 6/ to store
configuration file, logs, etc. It does not use $HOME/.liquidwar6 like the default UNIX port.
The Mac OS X port also has a special behavior, in order to load some libraries with dlopen
(SDL_image does this with libpng and libjpeg) it needs to set DYLD_FALLBACK_LIBARY_PATH to a
value that contains these libraries. This is typically in the bundle distributed on the disk image.
On a developper’s computer this problem does not appear for those libs are often in places like:
/usr/local/lib
/usr/X11/lib
/opt/local/lib
So the program sets DYLD_FALLBACK_LIBARY_PATH (but not DYLD_LIBRARY_PATH else
it breaks internal OS X stuff which relies, for instance, on libjpeg library that has the
same name but different contents) but it needs to do it before it is even run, else
the various dyld functions do not acknowledge the change. That is, calling the C
function setenv(), even before dlopen(), has no effect. So the program
calls exec() to re-run itself with the right environment variable. This is why,
on Mac OS X, there are two lines (exactly the same ones) displaying the program description
when it is started in a terminal.
This is not working yet, but there are good hopes that some day, Liquid War 6 can run on a GP2X console. This handled gaming device uses a Linux kernel on an ARM processor, does support most GNU packages through cross-compilation, and has basic SDL support.
To compile Liquid War 6 for GP2X, you first need to set up a working “toolchain”. It’s suggested you do this on a working GNU/Linux box. There are several solutions, the recommended one being Open2x. Read the online documentation on how to install Open2x.
Basically, the following should work:
mkdir /opt/open2x # check that you can write here
svn co https://open2x.svn.sourceforge.net/svnroot/open2x/trunk/toolchain-new open2x-toolchain
./open2x-gp2x-apps.sh
cd open2x-toolchain
Then, for your environment to be complete, you need to set up some environment variables. For instance:
export OPEN2X_SYSTEM_PREFIX=/opt/open2x/gcc-4.1.1-glibc-2.3.6/arm-open2x-linux
export GP2X_USER_PREFIX=$HOME/gp2x

export CC=${OPEN2X_SYSTEM_PREFIX}/bin/arm-open2x-linux-gcc
export CPP=${OPEN2X_SYSTEM_PREFIX}/bin/arm-open2x-linux-cpp
export CXX=${OPEN2X_SYSTEM_PREFIX}/bin/arm-open2x-linux-g++
export AS=${OPEN2X_SYSTEM_PREFIX}/bin/arm-open2x-linux-as

export CFLAGS=''-I${OPEN2X_PREFIX}/include -I${GP2X_USER_PREFIX}/include''
export CPPFLAGS=''-I${OPEN2X_PREFIX}/include -I${GP2X_USER_PREFIX}/include''
export CXXFLAGS=''-I${OPEN2X_PREFIX}/include -I${GP2X_USER_PREFIX}/include''
export LDFLAGS=''-L${OPEN2X_PREFIX}/lib -L${GP2X_USER_PREFIX}/lib''

export PATH=''${GP2X_USER_PREFIX}/bin:${OPEN2X_SYSTEM_PREFIX}/bin:$PATH''
In this setting, there’s a user $HOME/gp2x directory which will
contain all the Liquid War 6 related libraries while the /opt/open2x
remains untouched.
Then you need to install the requirements. All these packages need to
be cross-compiled. To make things clear and non-ambiguous, even if you
have CC set up in your environment variables, pass --build
and --host arguments to the ./configure script of all these
packages. A typical command is:
./configure --build=i686-pc-linux-gnu --host=arm-open2x-linux --prefix=${GP2X_USER_PREFIX}
Here’s the list of the requirements:
./configure --prefix=$GP2X_USER_PREFIX --build=x86_64-pc-linux-gnu --host=arm-open2x-linux --disable-pulseaudio --disable-video-directfb
--witout-threads switch to the ./configure
script else it will try (and fail!) to run a test program. Liquid War 6 does
not use Guile threads, it does use threads but uses them “directly” outside
the Guile layer.
--build and --host for this one, they are
unsupported. Package compiles fine anyway.
Next, one needs to install a special version of SDL, which targets the GP2X specifically. This is not a generic SDL, and it does have limitations, which are related to the GP2X peculiar hardware. There are installation instructions about how to do this. The following should work:
cvs -d :pserver:anonymous@cvs.sourceforge.net:/cvsroot/open2x login # blank password
cvs -d :pserver:anonymous@cvs.sourceforge.net:/cvsroot/open2x co libs-gp2x
Next: Using the console, Previous: Compilation tips, Up: Hacker's guide [Contents][Index]
One of the purposes of Liquid War 6 is to make a cleaner implementation of Liquid War than the previous one, namely Liquid War 5. While the latter has achieved the practical goal of providing a playable implementation of the game, it failed at providing an evolutive platform. Network capabilities where finally added to Liquid War 5, but anyone who played on Internet with someone a few hundreds of milliseconds away would agree that it’s far from being perfect. The main reason for this is that it is really had to hack on Liquid War 5, especially when you are not the core developper. The core developper himself, even knowing all the various hacks in the game, is very quickly lost when trying to implement major changes.
To put it short, Liquid War 5 is a global variable hell, a pile of hacks on top of a quick and dirty implementation. Still, it works.
With Liquid War 6, the idea is to take the time to make something stable, something nice which will enable developpers to implement the cool features, and have fun along the way. Of course, this is only a dream, and in the (hopefully "very") long run, Liquid War 6 will also end up as a big unmaintainable mess, like any real-life program, until then, it should remain hackable.
Here are a few guidelines which I think are common sense advice, but they are still worth mentionning:
strcpy or sprintf anywhere in the code.
Nowhere. Use their equivalent strncpy and snprintf systematically,
as they are part of the glibc and are an order of magnitude safer.
Moreover, Liquid War 6 provides wrappers, such as lw6sys_new_sprintf
which handles all the nasty dirty memory allocation stuff for you;
Each of the internal libraries in Liquid War has a “test” program
associated with it. For instance liquidwar6sys-test is
associated to libliquidwar6sys, and its purpose is to
test the features of this library.
While it is fairly easy to test out unitary functions which require no peculiar context, testing high-level functions which requires files, graphical and possibly network contexts to exist is obviously harder to achieve. There’s no easy way to draw the line, but the idea is to put in these test executables as many features as possible, to be sure that what is tested in them is rock solid, bullet proof, and that one can safely rely on it and trust that code when running it in a more complex environnement.
These test executables are also very good places to see a library API in action, find code fragments, and make experiments.
Liquid War 6 provides macros to allocate and free memory. One should use them systematically, except when trying to free something allocated by another library, and in very special cases, mostly concerning low-low level operations which are seldom hacked on.
Usage of macros LW6SYS_MALLOC,
LW6SYS_CALLOC and LW6SYS_FREE is straightforward,
read any random chunk of code, for instance ./src/lib/sys/sys-test.c
to see them in action. They are defined in sys/sys.h.
Once used, these macros will track every single call to malloc and free,
and if there’s a difference, it will report it. It will also help you by
showing what’s in the non-freed memory area, at which line of code
it has been allocated, and when. This is very usefull to track down memory leaks.
Of course a debugger could tell you some of these informations, but experience
shows than when you encounter a memory bug, it’s very often impossible to
reproduce it. So you one wastes time trying to reproduce the bug, whereas
with this tool you have the information reported just when the problem happens.
Each library exports a public interface and hides its internal.
Since Liquid War 6 uses standard C and no C++, there’s no
real standard way to handle public/private features. The
convention used in Liquid War 6 is to show internal structures
as opaque pointers (void *) whenever some function needs
to operate on a structure which has possibly private fields.
This way the caller function has no way to access the internals,
and we are sure that no reference to any internal implementation
specific feature will appear.
Here’s a code excerpt from src/gfx/setup.c:
void _lw6gfx_quit(_LW6GFX_CONTEXT *context) {
  /*
   * Implementation here.
   */
[...]
}

void lw6gfx_quit(void *context) {
  _lw6gfx_quit((_LW6GFX_CONTEXT *) context);
}
The function _lw6gfx_quit (note the “_”) is internal,
declared in internal.h whereas the function lw6gfx_quit
is public, and is therefore exported in gfx.h.
This way, functions in the program using lw6gfx_quit
do not know what is in the _LW6GFX_CONTEXT structure,
and they need not know it.
This does not mean it is not possible to have public structures, only these structures must reflect some truely public, accessible and safe to access structures.
Basic rules :
To check that a commit does not break everything, a good practice is to
run a make check before committing / submitting anything.
Then, once it’s within the main GIT repository, check the Jenkins builds to see if the program still builds correctly.
Liquid War 6 is regularly audited with automated tools. You might
need to pass --enable-gcov to --configure if you want
to use thes tools yourself. More precisely:
liquidwar6ker-test or liquidwar6ker-pil.
Bits of code which depend on other libraries are a different story, for
some projects on which Liquid War 6 depends might, for some reason, raise
warnings. But as far as Liquid War 6 is concerned, the goal is simple: zero leak.
Those tools certainly don’t garantee the code is perfect, but they do help improving the quality of the program. If you hack, it’s recommended you give them a try.
Next: Advanced tweaking, Previous: Coding guidelines, Up: Hacker's guide [Contents][Index]
The console can be activated by passing --display-console when starting
the game or by using the system options menu.
When the console is activated, a lw6> prompt should appear in the
terminal which launched the program. If you started Liquid War 6 by clicking
on an icon, console probably won’t work at all since stdout and
stdin won’t be attached to anything.
The console allows you to type arbitray Scheme/Guile code.
Try, for instance:
(+ 1 2)
(display "foo\n")
You can really break things with this console, it gives you a direct access to all the program internals. At least, all the values which are accessible through the script interface, that is, many of them.
You can call any internal C function which has been exported to Guile, here are some examples:
(c-lw6sys-timestamp)
(c-lw6bot-get-backends)
(c-lw6sys-sleep 2.0)
(lw6-config-get-number "zoom")
(lw6-config-set-number! "zoom" 0.9)
(lw6-config-get-number "zoom")
While syntax (and possibly other) errors will be trapped by the interpreter, note that if you break things inside the game by, say, changing some global value, or in a general manner cause an error elsewhere in the code, the game will really raise a fatal error and stop. That’s how you can “break things”.
Still, this console is a very powerfull tool, very usefull for debugging but also for tweaking the game without restarting it and/or navigating through the menu interface.
Next: Writing modules, Previous: Using the console, Up: Hacker's guide [Contents][Index]
Liquid War 6 tries to have as few hardcoded data as possible. So many
constants, and pretty much all the image files, are accessible in the
data directory. You can know where it is by launching
liquidwar6 --show-data-dir. If you look in this directory
you’ll find different files, among
them XML files.
Let’s take an example. Try and find the file gfx/gl/hud/floating/gl-floating-const.xml.
Edit the line with the clock-y1 entry. Change the number after "value".
Re-run the program. Play a game. What happens? Logically you should see that
“something” is not displayed at the same place than before.
You could also modify the textures (JPEG and PNG files). In a general manner it’s more cautious to keep them the same size but it depends, sometimes other sizes will work as well.
Many of these parameters are really too technical and obscure to have their place in the main config file (which is already rather big). Use at your own risks, you can really break things touching this, but you can also find out lots of things can be tuned.
Todo...
Next: Use as a library, Previous: Advanced tweaking, Up: Hacker's guide [Contents][Index]
Todo...
Next: Network protocol, Previous: Writing modules, Up: Hacker's guide [Contents][Index]
Todo...
Next: Technical HOWTOs, Previous: Use as a library, Up: Hacker's guide [Contents][Index]
This section describes how Liquid War 6 handles network messages. Note that for now this is purely theorical, more of a draft, a plan, it might change before being implemented.
Liquid War 6 does not really have the notion of server or client, any instance of the program can act as both server and client, therefore we use the term node.
A node listens on a given port, in both TCP and UDP, and can
connect to other nodes on the same port. The main identifier
of a node is its public url, which is typically of the
form http://<ip-address>:<port>/. This url is very important
for it is (or at least should be) a unique identifier of the
node over the network.
Liquid War has 3 ways to communicate:
mod-tcp and mod-tcpd.
mod-httpd and client part requires mod-http which might or
not be available, depending on how the game was compiled.
mod-udp and mod-udpd
to work. Using UDP only was not an option when conceiving Liquid War since
it’s interesting to have other solutions if, for instance, a firewall
does not allow you to use UDP the way you want.
On each of these channels, messages can be exchanged in two modes, an “out of band” mode (AKA “oob”), and a regular message oriented, here we speak of “connection”.
There are only 3 out of band messages:
PING:
requests for a simple PONG http://server:port/ answer, this is just to
check if a server is a valid server, and if the URL we used to connect on it
is the correct one.
INFO:
requests for a list of key/attributes pairs, which describe the node, telling
for instance its version, its uptime, and so on.
LIST:
requests for a list of other nodess this node is aware of.
You can test out of band messages by simply connecting on your server with a command like:
telnet localhost 8056
At the telnet prompt, simply type:
INFO
and press return, and you should have a description of your node.
The complete syntax of OOB messages is:
<COMMAND> [password] [url]
The password and url parameters are optionnal. password can contain either the plain text password or a checksum calculated from the password which is, for security reasons, seeded with the public url of the node we’re connecting to, so that this password can’t be re-used on another node. url is simply a clue we give to the other node to help find us, the other node will automatically try to detect our IP address and use standard LW6 port 8056, but if for some reason we use a different setting, this is a good way to pass the hint.
Here are examples of valid messages:
LIST
PING http://myhost.mydomain:1234/
INFO secret http://myhost.mydomain:1234/
LIST 12ab34cd
If there’s only one argument, the parser will first try and interpret it as a URL. If it’s not parseable that way, it will consider it’s a password. The password, in turn, may be specified as clear text or as a 32-bit checksum.
As far as OOB is concerned, TCP and UDP work almost the same, HTTP is a bit different, the OOB commands are accessed through the following URLs:
/ping.txt
/info.txt
/list.txt
OOB messages are usually sent many times in redundant mode on the network, as there’s no tracking of them, sending them through multiple channels ensures they make their way to the right place.
The parser for these messages is located in src/lib/msg/msg-oob.c.
All messages that are non-OOB share a common syntax. This is called the “envelope” of messages.
The general syntax is:
LW6 <VERSION> <PASSWORD_CHECKSUM> <PHYSICAL_TICKET_SIG> <LOGICAL_TICKET_SIG> <PHYSICAL_FROM_ID> <PHYSICAL_TO_ID> <LOGICAL_FROM_ID> <LOGICAL_TO_ID> <MSG>
Here’s an example:
LW6 0.1.3485 - 2d1dbed7 - 3003300330033003 2002200220022002 - - DATA 8 0 1 1000000035005 3003300330033003 SET 3001 11 1 1 0
In this example, the messages carried is DATA 8 0 1 1000000035005 3003300330033003 SET 3001 11 1 1 0, the
rest is part of the envelope protocol.
Here’s what those fields mean:
LW6: should always be LW6, this is a marker to make sure we’re speaking the right protocol.
<VERSION>: the version of the program sending the message, the receiver of the message should check this version
is compatible.
<PASSWORD_CHECKSUM>: the password checksum, while a clear password should still be correctly interpreted,
as for OOB messages, there’s no reason to send the cleartext password, so the checksum is just fine.
Note that the checksum is short, and vulnerable to brute-force attacks. If you want strong protection,
the general advice is to tunnel your connections through SSL or TLS, use a VPN, LW6 won’t implement
“fortress mode”, third party tools should do this much better. If undefined, should be replaced by the
dash character -.
<PHYSICAL_TICKET_SIG>: a signature done by the sender, which is unique for the combination message+from+to.
This means two different messages will generate two differents signatures, but different senders and/or
receivers will also change this, so it’s not possible, unless one has the “ticket” to fake a message.
This is clearly not bullet-proof, and more specifically, brute-force attacks and/or network listening
could break the protocol and/or reveal the ticket, still, this is a good way to make sure that if
something is inconsistent, someone is trying to cheat. As every node maintain its own game state,
a cheater can “only” be a nuisance by sending wrong key presses, but in the long run it will
be defeated by the fact that an attacker should intercept and modify all messages on all
channels (tcp, udp, http ...) and make sure the official, real informations,
never makes its way to the right node. This is quite hard to achieve, very likely, an inconsistency
will be detected, nodes concerned should be disconnected, period.
When sending the first messages, ticket might not be exchanged yet, so there’s no way to
calculate this, during this period, ffffffff is sent, and checksum errors are ignored.
<LOGICAL_TICKET_SIG>: another signature, but this one concerns the physical sender/receiver.
If the physical sender is the logical sender, and the physical receiver is the logical receiver,
that is, if physical and logical nodes are the same pair of nodes, then it need not be defined
and can be replaced by the dash character -. In fact, in that case, the physical
and logical signatures are obviously the same.
However (not implemented yet) the protocol is designed so that nodes can act as messages
forwarders, in that case they have no knowledge of the secret ticket to use, so this ticket
is here to ensure message consistency for the final, real (logical) receiver of the message.
<PHYSICAL_FROM_ID>: the id of the physical sender, the node that created the message.
<PHYSICAL_TO_ID>: the id of the physical receiver, the node that should receive the message.
<LOGICAL_FROM_ID>: the id of the logical sender, if it’s the same than the physical sender, can be replaced
by the dash character -.
<LOGICAL_TO_ID>: the id of the logical receiver, if it’s the same than the physical receiver, can be replaced
by the dash character -.
<MSG>: the message itself, it might in turn be separated by spaces, or whatever the message delimiter
is. It should not be too long, as it must be sendable on the network by UDP, so it must fit within
the MTU (about 1.4 kb) with all the protocol (envelope) stuff before it. In practice, it’s cut into 1.2 kb parts
by libdat, the constant _LW6DAT_ATOM_MAX_SIZE is used to split big messages in smaller parts.
It’s implemented in src/lib/msg/msg-envelope.c.
To establish a connection, maintain it, and do the OOB job, a set of control message is used. Those messages carry a bunch of informations about who is sending them, in fact, they just contain the informations that would otherwise be handled by out-of-band messages, but it’s convenient to have the information first-hand rather than relying on the other protocol.
The syntax is:
LW6 <VERSION> <PASSWORD_CHECKSUM> <PHYSICAL_TICKET_SIG> <LOGICAL_TICKET_SIG> <PHYSICAL_FROM_ID> <PHYSICAL_TO_ID> <LOGICAL_FROM_ID> <LOGICAL_TO_ID> <COMMAND> <PROGRAM> <VERSION> <CODENAME> <STAMP> <ID> <URL> <TITLE> <DESCRIPTION> <HAS_PASSWORD> <BENCH> <OPEN_RELAY> <UPTIME> <COMMUNITY_ID> <ROUND> <LEVEL> <REQUIRED_BENCH> <NB_COLORS> <MAX_NB_COLORS> <NB_CURSORS> <MAX_NB_CURSORS> <NB_NODES> <MAX_NB_NODES> <PEER_LIST> <COMMAND_ARGS>
Example:
LW6 0.1.3485 - ffffffff - 1001100110011001 2002200220022002 - - HELLO liquidwar6 0.1.3485 "Davy Crockett" 3485 1001100110011001 http://localhost:8057/ cGF0 RHVtbXkgdGVzdCBub2RlIEE= 0 10 0 5 372057f45b3d2ba5 10005 "Default map" 5 4 10 4 26 1 12 ""
The fields, starting from LW6 up to (and including) <LOGICAL_TO_ID> are part of the envelope, described previously.
The message fields are:
<COMMAMD>: described below, the main command,
<PROGRAM>: should be liquidwar6
<VERSION>: the version of the program. Yes, this is also in the envelope, but one could think
of instances relaying informations for other peers, in that case this could prove useful.
<CODENAME>: the code name of the program.
<STAMP>: the stamp, it’s normally contained within the version, but this avoids parsing issues.
<ID>: the node id (could be inferred from envelope, but repeated here).
<URL>: the node url (could be inferred from envelope, but repeated here).
<TITLE>: the readable title of the node, base64 encrypted.
<DESCRIPTION>: the readable description of the node, base64 encrypted.
<HAS_PASSWORD>: wether it’s protected by a password or not, 0 if not, 1 if protected.
<BENCH>: the bench of the node, giving its CPU strength in an arbitrary unit.
<OPEN_RELAY>: wether the node act as an open relay, 0 if not, 1 if in relaying.
<UPTIME>: node uptime, in seconds.
<COMMUNITY_ID>: the community id, a unique id shared by all nodes connected to a game session.
<ROUND>: the current round id.
<REQUIRED_BENCH>: the minimum bench required to connect to this node (used to avoid slow nodes connecting
to way-too-fast games).
<NB_COLORS>: number of colors playing.
<MAX_NB_COLORS>: maximum number of colors allowed on this node.
<NB_CURSORS>: number of cursors playing.
<MAX_NB_CURSORS>: maximum number of cursors allowed on this node.
<NB_NODES>: number of nodes connected.
<MAX_NB_NODES>: maximum number of nodes allowed on this node.
<PEER_LIST>: list of peers connected to this node.
<COMMAND_ARGS>: command-specific arguments
Here are the different possibilities for the <COMMAND> field.
HELLO: is used when connecting, this should be the first message sent. In itself, the message
means pretty much noting, it just says “I’m here” which could be infered from any other
message. No command args.
TICKET <ticket>: is used to inform the caller of the ticket we use. The ticket sent from A to B is
ised by B to sign messages for A. A node typically sents a different ticket to all its peers
so when sending the same message to A and C, B will typically use two different tickets,
thus generating two different signatures, and if sending the exact same string to C, A
generate yet another signature as it will have sent another ticket. There’s one optional
argument, which is the ticket itself, a 64-bit hexa integer.
FOO <key> <serial>: is sent on a regular basis, it’s really the replacement of the OOB
PING message,
it will update the peer status and maintain consistent informations.
It has two arguments, the first one is key, a 32-bit hexa integer, which will,
upon BAR message reception, used to figure out “OK, this is the BAR
message associated to this FOO message I sent before”.
The second one, serial, is used to inform the peer that, possibly, there are new messages
to fetch from us. The peer, in turn, might fire MISS messages, but without
this feature, peers could “fall asleep” and forget to pump messages, especially on
non-reliable connections.
BAR <key> <serial>: is the response to FOO which is received on a regular basis,
it’s really the replacement of the OOB PONG message,
it will update the peer status and maintain consistent informations.
It has two arguments, the first one is key, a 32-bit hexa integer, which will,
upon reception, ne matched against a corresponding FOO messaged,
used to figure out “OK, this is the BAR
message associated to this FOO message I sent before”.
The second one, serial, is used to inform the peer that, possibly, there are new messages
to fetch from us. The peer, in turn, might fire MISS messages, but without
this feature, peers could “fall asleep” and forget to pump messages, especially on
non-reliable connections.
JOIN <seq> <serial>: Used to join a game. In fact, having said HELLO
and exchanged FOO and BAR messages does not mean one has joined the game
for real. The reason for this is that those messages help establishing a stable
communication channel, then one needs to come in with the right seq and serial.
There are basically two cases. First case, seq can be zero, in that case it means
we’re trying to connect on an existing server, which will in turn send a JOIN
message with a non-zero value, giving the current seq. Second case, seq is non-zero,
in that case it means we’re answering a connection request. In both cases,
serial is a serial number other peers should use as a minimum limit, and never
ask for messages with a serial lower than that.
GOODBYE: symetric of HELLO, should be called on disconnection, however,
the peers should handle the case when no GOODBYE message is sent, this is
just about being polite. No command args.
It’s implemented in src/lib/msg/msg-cmd.c.
Todo...
Todo...
Todo...
TCP messages:
LW6 [<passwd>] <version> <client-id>
<from-id> <to-id> <serial> <i> <n> <sig> MSG1
<from-id> <to-id> <serial> <i> <n> <sig> MSG2
TCP oobs:
<return> # only works anonymous, same as INFO
INFO [<passwd>] [<public-url>]
LIST [<passwd>] [<public-url>]
PING [<passwd>] [<public-url>]
UDP messages:
LW6 [<passwd>] <version> <client-id> <from-id> <to-id> <serial> <i> <n> <sig> MSG1
LW6 [<passwd>] <version> <client-id> <from-id> <to-id> <serial> <i> <n> <sig> MSG2
UDP oobs:
INFO [<passwd>] [<public-url>]
LIST [<passwd>] [<public-url>]
PING [<passwd>] [<public-url>]
HTTP messages:
client id & password passed in HTTP headers
/lw6/version/<from-id>/<to-id>/<serial>/<i>/<n>/sig/MSG1
/lw6/version/<from-id>/<to-id>/<serial>/<i>/<n>/sig/MSG2
HTTP public URLs:
/ -> index.html
/index.html
/favicon.ico
/screenshot.jpeg
/robots.txt
/gpl.txt
/info.txt
/list.txt
/ping.txt
MSG syntax:
<round> <server-id> <command> <arg1> ... <argN>
COMMAND examples:
2 1234abcd1234abcd REGISTER
3 1234abcd1234abcd ADD 5678 YELLOW
4 1234abcd1234abcd SET 5678 20 5
10 1234abcd1234abcd NOP
400 1234abcd1234abcd REMOVE 5678
1000 1234abcd1234abcd UNREGISTER
Sig is a checksum on string:
<from-id> <to-id> <serial> <i> <n> MSG
Next: Using GNU Arch, Previous: Network protocol, Up: Hacker's guide [Contents][Index]
Summary off all operations required for a release:
LW6MAP_RULES_DEFAULT_EXP and default for --skip-network, which might have been changed will developping.
./src, run ./indent.sh.
./doc, run ./gdoc-update.sh, ./doxygen-update.sh and ./perf-update.sh.
NEWS file, in both liquidwar6 and liquidwar6-extra-maps. Check ChangeLog is OK.
doc/liquidwar6.texi.
debian/changelog files in both main and extra maps packages.
make distcheck... (at least!)
RPM package (make -C pkg rpm), check yum install produces a working installation, also check the rpm -e command to verify uninstalling is OK too.
.exe main binary on Microsoft Windows then go back to GNU/Linux and build .exe installer (make -C pkg installer), go back to Microsoft Windows and test the installer (there are often problems at this stage because of missing libraries or other files...).
.dmg Mac OS X disk image, check it works even when /opt and /usr/local or (re)moved, this is important, else execution might rely on binaries which are only on the development machine and do not ship with game.
rsync --rsh=ssh --recursive --verbose --progress ./X.Y.Z/ login@dl.sv.nongnu.org:/releases/liquidwar6/X.Y.Z/. Each file must have its .sig corresponding file.
gendocs.sh, carefull, liquidwar6.html is suppressed by this, need to re-create it from previous version and/or index.html which is the same.
index.html, liquidwar6.html and liquidwar6.fr.html so that they reflect the latest release. Check download links are OK.
gnupload --to ftp.gnu.org:liquidwar6 liquidwar6-X.Y.Z.tar.gz.
This describes how to add a new option to the game.
src/lib/def/def-list.txt
src/lib/def/def-update.py run ./def-update.py. This will automatically fill src/lib/def/def.h and script/def.scm. In the code, you should always use LW6DEF_<OPTION> in C and lw6def-<option> in scheme to refer to the option. This does help avoiding typesetting errors.
src/lib/hlp/hlp-list.c, choose a category for it
src/lib/hlp/hlp-reference.c, give it a type, documentation string and default values if needed
src/lib/def/def-list.txt a common practice is to fill it with the output of liquidwar6 --list once the program has been compiled and is aware of the new option.
Unless this is done, program won’t accept the option.
Some options need more work, for instance:
src/lib/lw6-options.c.
src/lib/sys-build.c and also src/lw6-funcssys.c to be callable from scripts.
src/lib/map/map-test.c, src/lib/ker/ker-test.c, src/lib/pil/pil-test.c and src/lib/pil/pil-suite.c.
This describes how to add a new libxyz internal library:
src/lib/xyz directory. The convention is to use 3 letters names and prefix every global identifier with lw6xyz.
Makefile.am, xyz.h, xyz-test.c and xyz-testmain.c from an existing internal library (libnod is a good source, it does not have complex dependencies).
Makefile.am to fill requirements, make necessary adjustments to other files (many string replaces to make, both lowercase and uppercase).
SUBDIRS and LW6_LIBS sections of src/lib/Makefile.am
AC_CONFIG_FILES of ./configure.ac.
automake and autoconf.
src/lib/lw6-options.c and add a call to lw6xyz_test() for both “check” and “test” cases.
src/lib/lw6-test.c and add a reference to the lw6xzy_test() function.
abc library that depends on xyz, edit the lw6abc_test function so that it contains a reference to lw6xzy_test.
abc library that depends on xyz/xyz.h, edit the abc/abc.h header so that it includes xzy/xyz.h. Also edit src/lib/liquidwar6.h.in.
abc library that depends on libxyz, add a reference to ../xyz/libxyz.la inf the _LDADD section.
src/lib/lw6-funcsxyz.c file which declares Guile bindings for this lib, if needed
doc/gdoc-update.sh and add the entry for xyz.
doc/Makefile.am and add xyz-gdoc.texi in gdoc_TEXINFOS.
doc/doxygen-update.sh and add the entry for xyz.
doc/Makefile.am and add xyz-doxygen.texi in doxygen_TEXINFOS.
doc/perf-update.sh and add the entry for xyz.
./doc, run ./gdoc-update.sh, ./doxygen-update.sh and ./perf-update.sh.
doc/doxygen/Makefile.am and add the dependency on src/lib/xyz/xyz.h.
doc/liquidwar6.texi to and a new node/section for this internal library.
doc/deps.dot to update dependencies.
./configure && make, fix code if needed.
This describes how to add a new mod-ab module, for instance a new bot, but gfx, snd, cli or srv backends should work pretty much the same:
src/lib/bot/Makefile.am
src/lib/bot/mod-ab, with its Makefile.am (inspired from other existing modules)
configure.ac so that src/lib/bot/mod-ab/Makefile is generated.
doc/gdoc-update.sh and add an entry for mod-ab
doc/Makefile.am and add mod-ab-gdoc.texi in gdoc_TEXINFOS.
doc/doxygen-update.sh and add an entry for mod-ab
doc/Makefile.am and add mod-ab-doxygen.texi in doxygen_TEXINFOS.
touch doc/mod-ab-gdoc.texi doc/mod-ab-doxygen.texi else dependencies checking will fail.
./doc, run ./gdoc-update.sh and ./doxygen-update.sh.
doc/liquidwar6.texi to add a new node/section for this module.
doc/deps.dot to update dependencies.
src/lib/bot/bot-test.c, change the value of TEST_NB_BACKENDS and modify the code so that the new ab module is tested too.
src/lib/bot/bot-register.c, the code must updated pretty much in every place with the conditionnal LW6_ALLINONE, you need to add the new module.
automake, autoconf, ./configure and make.
Next: Using GIT, Previous: Technical HOWTOs, Up: Hacker's guide [Contents][Index]
Since March, 4th 2010, Liquid War 6 uses GIT to handle source code, track changes, branches, and the rest. It replaces the GNU Arch repository. This old repository contains all sources up to version 0.0.7beta, following versions, including 0.0.8beta, must be retrieved from GIT.
So the following informations only concern those who are interested in previous versions of the game. Anybody else - probably you - should use GIT instead.
See Using GIT.
Still, this quick Arch survival guide is kept in the documentation.
Read the GNU Arch tutorial to learn how Arch works. Note that there are many other source control managers available, some of which provide functionnalities similar to GNU Arch / tla. GNU Arch has been chosen for Liquid War 6 because:
The repository for Liquid War 6 is accessible on http://arch.savannah.gnu.org/archives/liquidwar6. This is a read-only access, but with the distributed nature of GNU Arch, it still allows you to keep track of your own changes, and submit patches. Accessing it in read/write mode with sftp requires a Savannah account and special rights on the Liquid War 6 project.
Here are typicall commands one can use to get Liquid War 6 source from the GNU Arch repository:
tla register-archive http://arch.savannah.gnu.org/archives/liquidwar6
tla get -A liquidwar6@sv.gnu.org liquidwar6--beta
All the patches in the archive are signed with GnuPG, so you can check their authenticity with my public key.
You might need to edit your $HOME/.arch-params/signing/=default.check
file and put the following text in it:
tla-gpg-check gpg_command="gpg --verify-files -"
This section is for those who want to hack the game and set up their own repositories. This will enable you to keep track of your patches, package them, and help the core maintainer merging them in the main repository.
You can introduce yourself and create a repository by issuing commands like:
You can introduce yourself and create a repository by issuing commands like:
tla my-id me@home.net
tla register-archive me@home.net--2008 /home/me/tla-archives
Then, you can get create your own repository, with a command like:
tla tag -S liquidwar6@sv.gnu.org/liquidwar6--beta--0.1 me@home.net--2008/liquidwar6--beta--0.4
The idea is that you create, locally, a depot which has a name that matches the name on savannah (this is for convenience, you could technically give it any name...) and indicate that they represent, today, the same thing.
You can get a working copy of your depot with the command:
tla get me@home.net--2008/liquidwar6--beta--0.4
This will create a complete source tree, which you are free to modify, this is where you should hack.
To synchronize yourself with upstream developments, go into
your copy (the directory created by tla get) and type:
tla star-merge liquidwar6@sv.gnu.org/liquidwar6--beta--0.1
This will apply locally all the changes that happened since the
last synchronization. Of course this is one way to work, you
can decide to cherry pick patches and such stuff, but for most
dayly uses, a good’ol star-merge is fine.
Not that star-merge will only apply patches on your
working copy, not on your repository. The only way to actually
commit the modifications on the repository is to use the
commit command.
When using Arch, you can of course still send patches created
with diff, or even send updated files directly, the way
you would without revision control.
But it can be more convenient to either
/home/me/tla-archives
in our example).
tla mkpatch.
Here’s an example of an mkpatch command, and which will
compute the differences between a previous
liquidwar6--beta--0.4--patch-2 snapshot and a not yet
commited latest version:
tla mkpatch {arch}/++pristine-trees/unlocked/liquidwar6/liquidwar6--beta/liquidwar6--beta--0.4/me@home.net--2006/liquidwar6--beta--0.4--patch-2 . my-patch
This will create a my-patch directory, which can be gzipped
and sent by mail.
Sometimes, when signing a patch, you might enter the wrong passphrase several times, or you might press CTRL+D inadvertantly. In that case, tla will be in a half-broken state, telling you it can’t acquire revision lock... A quick workarround for this is to go to the depot, find the latest patch, and in this repository, create the following folders:
++revision-lock/+contents
Both are directories, note the two ++ and the single +. the +contents
directory can be empty. Once you’ve done this, try to re-commit.
Next: Jenkins builds, Previous: Using GNU Arch, Up: Hacker's guide [Contents][Index]
There’s no CVS or Subversion (AKA “SVN”) source depot for Liquid War 6. Instead, a GIT depot is used. GIT has many advantages over other source control managers (SCM), among them, it’s distributed, like GNU Arch.
You can find interesting informations on GIT here:
Simply install git and run the following command:
git clone git://git.sv.gnu.org/liquidwar6.git
If you are behing a firewall and can’t have direct TCP/IP access:
git clone http://git.sv.gnu.org/r/liquidwar6.git
Additionnally, source can be browsed online here: http://git.savannah.gnu.org/cgit/liquidwar6.git
You need an ssh access on Savannah and appropriate rights on the project, then you can type:
git clone login@git.sv.gnu.org:/srv/git/liquidwar6.git
If you have developper access to the project, then a simply git push
will commit your changes.
If not (that is, if you checked out anonymously using
git clone git://git.sv.gnu.org/liquidwar6.git for instance, you
can still submit patches. Follow these steps:
git format-patch -p origin this command will generate .patch files, one for each of you commits, which you can send by email. They can be easily integrated in the main source tree by using git apply <file.patch>.
Note that you can need to run git format-patch -p master (with master instead of origin) it not using a fresh checkout. Also consider adding the --stdout switch, eg git format-patch -p master --stdout > my-changes.patch if you’re not using a fresh checkout.
Previous: Using GIT, Up: Hacker's guide [Contents][Index]
Liquid War 6 uses Jenkins for continuous integration.
Each time a commit is done on the main GIT source tree, a build is triggered. The list of builds, their status, is available on:
It’s interesting, among other things, to look at the log produced when the game is built, as it contains the test suite output, and can provide usefull informations of what is supposed to happen when the game is built correctly, and what happens when things go wrong.
Next: C API, Previous: Hacker's guide, Up: Top [Contents][Index]
This chapter is a technical reference. Most of its content
is self-generated by the program itself. That is to say, most
if its content is already available to you if you have the game
installed. Running liquidwar6 --list
and liquidwar6 --about=<keyword> is very likely to give
you the very same informations, the advantage being that you’ll
be sure the information is up-to-date and corresponds to the exact
version of the program you have. However, publishing this in
a reader-friendly way is convenient, plus it enables web search
engines to harvest the content.
| • Basic options: | Basic command-line parameters. | |
| • Doc options: | Liquid War 6 is self-documented. | |
| • Show options: | Show informations about the program. | |
| • Path options: | Change default paths. | |
| • Players options: | Define local players. | |
| • Input options: | Customize input. | |
| • Graphics options: | Change display settings. | |
| • Sound options: | Change audio settings. | |
| • Network options: | Tweak network parameters. | |
| • Map parameters: | Global map parameters. | |
| • Map rules.xml: | Change game rules. | |
| • Map hints.xml: | Tune map loader. | |
| • Map style.xml: | Modify map appearance. | |
| • Map teams.xml: | Per map teams and bots settings. | |
| • Advanced settings: | You probably don’t want to change these. | |
| • C to Guile: | C functions exported to Guile. | |
| • Script hooks: | Available script hooks. |
Next: Doc options, Up: Reference [Contents][Index]
--about=<value>Type: string
Will allow you to get informations about a given keyword. Let’s say that, for instance, you want informations about the keyword ’map-path’. Simply run ’liquidwar6 –about=map-path’. Note that this internal self-documentation system can describe command line switches as well as XML config file parameters or environment variables, and even some Guile script functions. The ’–list’ command line switch will give you the list of all available keywords.
--auditDisplay all path values, defaults and current settings. This output is very usefull to track down problems such as missing directories, broken installations. If you get an error message that suggests some file is missing, then give this option a try.
--copyrightReturns the copyright notice for the program.
--creditsGives hopefully extensive information on who contributed to the game.
--debugEnables debug mode. This will turn on maximum log information, and display everything on stderr, even messages which are normally only stored in the log file.
--defaultsClears the config file and run the game with default settings. Use this if you suspect you have broken something by tweaking user settings, or when upgrading the game to a new version.
--helpReturns a short help for the program.
--hostDisplay all known system host properties, including os and cpu informations.
--listReturns the list of all keywords which can be queried for information. This includes command-line options, environment variables, and so on. This is the companion option of ’–about’. Results obtained with ’–list’ can be passed to ’–about’.
--modulesTells which modules have been enabled when the game was compiled. It’s still possible to add or remove modules afterwards, but this option allows you to know how things were at first.
--pedigreeDisplay all build values, these are general constants which can help debugging, tracing what binary you are running, and so on. It’s a good idea to take a look at the output of ’pedigree’ if you have problems running the game.
--testRuns a (hopefully) complete test suite which will call most internal Liquid War 6 functions and check out wether they work, in a simple context, without any game interference. Usefull for troubleshooting.
--versionReturns the version of the program, as defined by the GNU Coding Standards.
Next: Show options, Previous: Basic options, Up: Reference [Contents][Index]
--example-hints-xmlDumps on stdout an example hints.xml file. Such a file is normally shipped with the game. It is indeed generated using this command.
--example-rules-xmlDumps on stdout an example options.xml file. Such a file is normally shipped with the game. It is indeed generated using this command.
--example-style-xmlDumps on stdout an example style.xml file. Such a file is normally shipped with the game. It is indeed generated using this command.
--example-teams-xmlDumps on stdout an example teams.xml file. Such a file is normally shipped with the game. It is indeed generated using this command.
--list-advancedList advanced options which can be used for fine-tuning the game.
--list-aliasesList the keyword aliases. These are here for convenience.
--list-docList documentation-related command line options. These commands allow you to list all the keywords related to a given domain.
--list-funcsList the C-functions which are exported to Guile, thus usable in scripts.
--list-graphicsList graphics options (resolution, fullscreen...).
--list-hooksList user-modifiable hooks.
--list-inputList input (AKA controls) related options. Use these to change keyboard, joystick and mouse settingds.
--list-mapList map-related entries, excluding rules.xml, hints.xml and style.xml entries.
--list-map-hintsList ’hints.xml’ entries. These parameters enable you to modify the behavior of the map loader.
--list-map-rulesList ’options.xml’ entries. These parameters enable you to modify the gameplay.
--list-map-styleList ’style.xml’ entries. These parameters enable you to modify the aspect of the game.
--list-map-teamsList ’teams.xml’ entries. These parameters enable you to specify which teams should play on the map.
--list-networkList network options.
--list-pathList parameters which allow you to override the defaults of the game, and force the game your own file paths and directories.
--list-playersList player-related entries, that is to say ’who plays’.
--list-quickList quick help entries, this includes the GNU standard options and a few troubleshooting tools.
--list-showList command-line options which begin with ’–show-...’. These will display on the console many internal parameters. Usefull when debugging.
--list-soundList sound options (volume...).
--list-team-colorsList the team colors, there should be 10 of them
--list-weaponsList the available weapons.
Next: Path options, Previous: Doc options, Up: Reference [Contents][Index]
--show-build-abs-srcdirShows the top source directory on the machine where the binary was compiled, as an absolute path.
--show-build-bin-idShows the internal ’bin-id’ value. This value does not mean anything in itself but it’s supposed to change each time you compile the game.
--show-build-bugs-urlShows the URL to make bug reports.
--show-build-cflagsShows what value you should put in ’CFLAGS’ (environment variable) if you want to compile programs that use Liquid War 6 as a library, and include ’liquidwar6.h’.
--show-build-codenameShows the codename associated with this version, generally the name of someone famous who is war-related (a general, an emperor...).
--show-build-configure-argsShows the arguments that have been passed to the GNU Autoconf ’./configure’ script when building the program. This can be very usefull if you want to know how the program has been built.
--show-build-copyrightShows a very short copyright notice.
--show-build-datadirShows the ’datadir’ value as passed to the GNU Autoconf ’./configure’ script when compiling the program. Default is ’/usr/local/share’. This is the generic, non Liquid War 6 specific data directory. Liquid War 6 related data is stored elsewhere (usually in a sub-directory) see the ’data-dir’ switch for more information. ’datadir’ is not ’data-dir’. That’s the point.
--show-build-dateShows the date when the binary was compiled.
--show-build-docdirShows the ’docdir’ value as passed to the GNU Autoconf ’./configure’ script when compiling the program. Default is ’/usr/local/share/doc/liquidwar6’.
--show-build-enable-allinoneShows wether the ’allinone’ option has been chosen when building the game. This depends on parameters passed to ’./configure’.
--show-build-enable-consoleShows wether the console has been enabled when building the game. This depends on parameters passed to ’./configure’ and also on the presence of ncurses and readline.
--show-build-enable-fullstaticShows wether the ’fullstatic’ option has been chosen when building the game. This depends on parameters passed to ’./configure’.
--show-build-enable-gcovShows wether the game was build with suitable informations for gcov. This depends on parameters passed to ’./configure’.
--show-build-enable-gprofShows wether the game was build with suitable informations for gprof. This depends on parameters passed to ’./configure’.
--show-build-enable-gtkShows wether GTK+ support has been enabled when building the game. This depends on parameters passed to ’./configure’ and also on the presence of GTK+ headers and libs. It uses pkg-config to detect it.
--show-build-enable-instrumentShows wether the game was build with the ’-finstrument-functions’ GCC switch. This depends on parameters passed to ’./configure’.
--show-build-enable-mod-cacaShows wether the mod-caca graphical backend has been enabled when building the game. This depends on parameters passed to ’./configure’ and also on the presence of libcaca related libraries.
--show-build-enable-mod-csoundShows wether the mod-csound audio backend has been enabled when building the game. This depends on parameters passed to ’./configure’ and also on the presence of the csound library.
--show-build-enable-mod-gl1Shows wether the mod-gl1 graphical backend has been enabled when building the game. This depends on parameters passed to ’./configure’ and also on the presence of SDL and OpenGL related libraries.
--show-build-enable-mod-gles2Shows wether the mod-gles2 graphical backend has been enabled when building the game. This depends on parameters passed to ’./configure’ and also on the presence of SDL and OpenGL ES related libraries.
--show-build-enable-mod-httpShows wether the mod-http network backend has been enabled when building the game. This depends on parameters passed to ’./configure’ and also on the presence of libCurl.
--show-build-enable-mod-oggShows wether the mod-ogg audio backend has been enabled when building the game. This depends on parameters passed to ’./configure’ and also on the presence of SDL and related libraries.
--show-build-enable-mod-softShows wether the mod-soft graphical backend has been enabled when building the game. This depends on parameters passed to ’./configure’ and also on the presence of SDL related libraries.
--show-build-enable-openmpShows wether the program was built with OpenMP support. This depends on parameters passed to ’./configure’.
--show-build-enable-optimizeShows wether the ’optimize’ option has been chosen when building the game. This depends on parameters passed to ’./configure’.
--show-build-enable-paranoidShows wether the game was build with paranoid memory management. This is for debugging purposes, the default already includes some controls, with turned it’s really... paranoid.
--show-build-enable-profilerShows wether the game was build with Google Profiler support. This depends on parameters passed to ’./configure’.
--show-build-enable-valgrindShows wether the game was build with valgrind later use in mind. This depends on parameters passed to ’./configure’.
--show-build-endiannessReturns the endianness. ’little’ corresponds to x86-like systems, ’big’ to ppc-like systems.
--show-build-gcc-versionReturns the version of the GNU C compiler which was used to compile the program.
--show-build-gnuReturns 1 (true) if host OS is a GNU system, or at least has been considered as such when compiling, 0 (false) if not.
--show-build-gp2xReturns 1 (true) if host is a GP2X, 0 (false) if not.
--show-build-home-urlShows the URL of the program, its homepage.
--show-build-host-cpuShows the host CPU, as defined by ’host_cpu’ in GNU Autoconf.
--show-build-host-osShows the host OS, as defined by ’host_os’ in GNU Autoconf.
--show-build-hostnameShows the name of the host where the binary was compiled.
--show-build-includedirShows the ’includedir’ value as passed to the GNU Autoconf ’./configure’ script when compiling the program. Default is ’/usr/local/include’.
--show-build-ldflagsShows what value you should put in ’LDFLAGS’ (environment variable) if you want to link programs against libliquidwar6.
--show-build-libdirShows the ’libdir’ value as passed to the GNU Autoconf ’./configure’ script when compiling the program. Default is ’/usr/local/lib’. This is the generic, non Liquid War 6 specific library directory. Dedicated Liquid War 6 modules are stored elsewhere (usually in a sub-directory) see the ’mod-dir’ switch for more information.
--show-build-licenseShows the license of the program (GNU GPL v3 or later).
--show-build-localedirShows the ’localedir’ value as passed to the GNU Autoconf ’./configure’ script when compiling the program. Default is ’/usr/local/share/locale’.
--show-build-mac-os-xReturns 1 (true) if host OS is Mac OS X, 0 (false) if not.
--show-build-md5sumShows the MD5 checksum, which has been calculated from the C source files. Complementary with ’show-build-stamp’.
--show-build-ms-windowsReturns 1 (true) if host OS is Microsoft Windows, 0 (false) if not.
--show-build-package-idShows the package tarname with its version, that is, ’liquidwar6-<version>
--show-build-package-nameShows the package name, that is, ’Liquid War 6’.
--show-build-package-stringShows the package string, that is, ’Liquid War 6 <version>
--show-build-package-tarnameShows the package tarname, that is, liquidwar6.
--show-build-pointer-sizeReturns the pointer size, in bytes. Should be 4 on 32-bit systems and 8 on 64-bit systems.
--show-build-prefixShows the ’prefix’ value as passed to the GNU Autoconf ’./configure’ script when compiling the program. Default is ’/usr/local’.
--show-build-stampShows the build stamp. A very usefull value, more precise than the version to track down binaries. It is incremented each time the core C code is updated. It won’t reflect all the programs for it does not take scripts in account, but if you are running a work-in-progress version, it might be very convenient to use this to know what your are running exactly. It’s also used as the revision number (the third number afer MAJOR.MINOR).
--show-build-timeShows the time when the binary was compiled.
--show-build-top-srcdirShows the top source directory on the machine where the binary was compiled, as a (possibly) relative path.
--show-build-unixReturns 1 (true) if host OS is a UNIX system, or at least has been considered as such when compiling, 0 (false) if not.
--show-build-versionShows the version. Note that this is different from the standard GNU ’version’ command line option which shows a complete message with a short copyright notice. This one will just return the version, without the package tarname or anything else.
--show-build-version-baseShows the version base. This is basically MAJOR.MINOR and determines the level of compatibility of the program. Two programs with the same base version should be able to communicate on the network, share data files and even binary modules if on the same platform.
--show-build-version-majorShows the major version number. This is just used to differenciate alpha/beta releases (using 0) from stable releases (using 6).
--show-build-version-minorShows the minor version number. This is manually increased at each significant, public release of the game.
--show-build-x86Tells wether the CPU belongs to the x86 family.
--show-config-fileShows the config file path. Default is ’$HOME/.liquidwar6/config.xml’.
--show-cwdShows the current working directory, the value that the pwd command would return.
--show-data-dirShows the data directory path. This is where the games searches for most of its data,the most important exception being maps, which are stored elsewhere. Default is ’/usr/local/share/liquidwar6-<version>/data’.
--show-default-config-fileShows the default config file path. Default is ’$HOME/.liquidwar6/config.xml’.
--show-default-data-dirShows the default data directory path. This is where the games searches for most of its data,the most important exception being maps, which are stored elsewhere. Default is ’/usr/local/share/liquidwar6-<version>/data’.
--show-default-log-fileShows the default log file path. Default is ’$HOME/.liquidwar6/log.csv’.
--show-default-map-dirShows the default map directory. This is where builtin maps are stored. Default is ’/usr/local/share/liquidwar6-<version>/map’.
--show-default-map-pathShows the default map search path. This is where the game searches for maps. It’s the combination of command-line arguments and builtin paths. Might return more directories than the one specified in a single ’map-path=dir1:dir2’ argument.
--show-default-mod-dirShows the default module directory path. This is where all dynamically loaded modules are stored. Default is ’/usr/local/lib/liquidwar6-<version>’.
--show-default-music-dirShows the default music directory. This is where builtin musics are stored. Default is ’/usr/local/share/liquidwar6-<version>/music’.
--show-default-music-pathShows the default music search path. This is where the game searches for musics. It’s the combination of command-line arguments and builtin paths. Might return more directories than the one specified in a single ’music-path=dir1:dir2’ argument.
--show-default-prefixShows the default prefix used. This should logically be the value passed to the GNU Autoconf ./configure script when building the game. Most other path are deduced from this one. Default is ’/usr/local’.
--show-default-script-fileShows the default main script file path. This file is very important, since the program is more or less a hudge scheme interpreter, and this file is the file loaded by Guile. In short, it is the main program. Default is ’/usr/local/share/liquidwar6-<version>/script/liquidwar6.scm’.
--show-default-user-dirShows the default user directory path. This is where run-time data, config files, log files, are stored. Default is ’$HOME/.liquidwar6/’.
--show-log-fileShows the log file path. Default is ’$HOME/.liquidwar6/log.csv’.
--show-map-dirShows the map directory. This is where builtin maps are stored. Default is ’/usr/local/share/liquidwar6-<version>/map’.
--show-map-pathShows the map search path. This is where the game searches for maps. It’s the combination of command-line arguments and builtin paths. Might return more directories than the one specified in a single ’map-path=dir1:dir2’ argument.
--show-mod-dirShows the module directory path. This is where all dynamically loaded modules are stored. Default is ’/usr/local/lib/liquidwar6-<version>’.
--show-music-dirShows the music directory. This is where builtin maps are stored. Default is ’/usr/local/share/liquidwar6-<version>/music’.
--show-music-pathShows the music search path. This is where the game searches for musics. It’s the combination of command-line arguments and builtin paths. Might return more directories than the one specified in a single ’music-path=dir1:dir2’ argument.
--show-prefixShows the prefix used. This should logically be the value passed to the GNU Autoconf ./configure script when building the game. Most other path are deduced from this one. Default is ’/usr/local’.
--show-run-dirShows the run directory, usually the path where the binary is. It depends on how and where the program is launched. It is guessed from the argc/argv values at runtime.
--show-script-fileShows the main script file path. This file is very important, since the program is more or less a hudge scheme interpreter, and this file is the file loaded by Guile. In short, it is the main program. Default is ’/usr/local/share/liquidwar6-<version>/script/liquidwar6.scm’.
--show-user-dirShows the user directory path. This is where run-time data, config files, log files, are stored. Default is ’$HOME/.liquidwar6/’.
Next: Players options, Previous: Show options, Up: Reference [Contents][Index]
--config-fileType: string
Default value: $HOME/.liquidwar6/config.xml
Set the config file path. This enables you to use whatever config file you like, keeping all other informations in the same place.
--data-dirType: string
Default value: /usr/local/share/liquidwar6-<version>/data
Set the data directory. By changing ths value you’ll be able to use an alternative data directory.
--log-file=<value>LW6_LOG_FILElog-fileType: string
Default value: $HOME/.liquidwar6/log.csv
Set the log file path. This enables you to use whatever log file you like, keeping all other informations in the same place.
--map-dirType: string
Default value: /usr/local/share/liquidwar6-<version>/map
Set the map directory path. By changing this value you’ll be able to play with your own maps in your own directory. Note that there are other ways to achieve that, but using this option will work. However, a side effect is that you might not see builtin maps anymore.
--map-path=<value>LW6_MAP_PATHmap-pathType: string
Default value: $HOME/.liquidwar6/map:/usr/local/share/liquidwar6-<version>/map
Set the map search path. By changing this value you’ll be able to play with your own maps in your own directory. This is different from ’map-dir’, since it includes ’map-dir’, plus it adds a number of other search paths. Unlike most other parameters, the values given from the command-line, from the environment variables, or from the config file, are not overwritten, but appended. That is to say if you specify a ’map-path’ with the command-line argument ’map-path=path’, but also define the ’LW6_MAP_PATH’ value and finally edit ’config.xml’ to change the ’map-path’ entry in it, you’ll end up with the game searching for maps in all these directories. Additionnally, ’map-dir’ and ’<user-dir>/map’ will always be in the list. Any given value can itself include several pathes, separated by the path separator. This separator is ’:’ on GNU/Linux, and ’;’ on Microsoft Windows. For instance, on a GNU/Linux box, you could use the command-line argument ’map-path=/foo/bar/map:/home/user/map/:/map’.
--mod-dirType: string
Default value: /usr/local/lib/liquidwar6-<version>
Set the module directory path. By changing this you will load dynamic shared libraries (game specific modules such as the graphical backend) from an alternative place. Use this at your own risks, for there can always be a binary incompatibility. You’ve been warned.
--music-dir=<value>LW6_MUSIC_DIRmusic-dirType: string
Default value: /usr/local/share/liquidwar6-<version>/music
Set the music directory path. By changing this value you’ll be able to use your own musics in your own directory. Note that there are other ways to achieve that, but using this option will work. The major side effect is that using this option, you really replace the existing builtin musics by your own. If you simply want to add musics you can store them in $HOME/.liquidwar6/music or in the map directory itself.
--music-path=<value>LW6_MUSIC_PATHmusic-pathType: string
Default value: $HOME/.liquidwar6/music:/usr/local/share/liquidwar6-<version>/music
Set the music search path. By changing this value you’ll be able to play with your own musics in your own directory. This is different from ’music-dir’, since it includes ’music-dir’, plus it adds a number of other search paths. Unlike most other parameters, the values given from the command-line, from the environment variables, or from the config file, are not overwritten, but appended. That is to say if you specify a ’music-path’ with the command-line argument ’music-path=path’, but also define the ’LW6_MUSIC_PATH’ value and finally edit ’config.xml’ to change the ’music-path’ entry in it, you’ll end up with the game searching for musics in all these directories. Additionnally, ’music-dir’ and ’<user-dir>/music’ will always be in the list. Any given value can itself include several pathes, separated by the path separator. This separator is ’:’ on GNU/Linux, and ’;’ on Microsoft Windows. For instance, on a GNU/Linux box, you could use the command-line argument ’music-path=/foo/bar/music:/home/user/music/:/music’.
--prefixType: string
Default value: /usr/local
Override the prefix value given to the GNU Autoconf ./configure script when building the game. Not all path will be changed, some of them might remain the same, for instance message translations (localedir). But most game-specific data including maps, graphics, sounds, will be searched according to the new given parameter.
--script-fileType: string
Default value: /usr/local/share/liquidwar6-<version>/script/liquidwar6.scm
Set the main script file path. This file is very important, since the program is more or less a hudge scheme interpreter, and this file is the file loaded by Guile. In short, it is the main program.
--user-dir=<value>LW6_USER_DIRuser-dirType: string
Default value: $HOME/.liquidwar6
Set the user directory path. This is where run-time data, config files, log files, are stored. If you override this value, other parameters such as where the config and log files reside, will change.
Next: Input options, Previous: Path options, Up: Reference [Contents][Index]
--player1-control=<value>LW6_PLAYER1_CONTROLplayer1-controlType: string
Default value: mouse
Control for the first player, must be mouse, keyboard, joystick1, joystick2 or custom.
--player1-name=<value>LW6_PLAYER1_NAMEplayer1-nameType: string
Default value: <username>
Name of the first player, the player used by default. A default value is provided, you can of course, change it at will.
--player1-status=<value>LW6_PLAYER1_STATUSplayer1-statusType: boolean
Default value: true
Status of the first player, true if player is activated, false if idle.
--player2-control=<value>LW6_PLAYER2_CONTROLplayer2-controlType: string
Default value: keyboard
Control for the second player, must be mouse, keyboard, joystick1, joystick2 or custom.
--player2-name=<value>LW6_PLAYER2_NAMEplayer2-nameType: string
Default value: player2-<hostname>
Name of the second player. A default value is provided, you’ll certainly want to change it.
--player2-status=<value>LW6_PLAYER2_STATUSplayer2-statusType: boolean
Default value: true
Status of the second player, true if player is activated, false if idle.
--player3-control=<value>LW6_PLAYER3_CONTROLplayer3-controlType: string
Default value: joystick1
Control for the third player, must be mouse, keyboard, joystick1, joystick2 or custom.
--player3-name=<value>LW6_PLAYER3_NAMEplayer3-nameType: string
Default value: player3-<hostname>
Name of the third player. A default value is provided, you’ll certainly want to change it.
--player3-status=<value>LW6_PLAYER3_STATUSplayer3-statusType: boolean
Default value: false
Status of the third player, true if player is activated, false if idle.
--player4-control=<value>LW6_PLAYER4_CONTROLplayer4-controlType: string
Default value: joystick2
Control for the fourth player, must be mouse, keyboard, joystick1, joystick2 or custom.
--player4-name=<value>LW6_PLAYER4_NAMEplayer4-nameType: string
Default value: player4-<hostname>
Name of the fourth player. A default value is provided, you’ll certainly want to change it.
--player4-status=<value>LW6_PLAYER4_STATUSplayer4-statusType: boolean
Default value: false
Status of the fourth player, true if player is activated, false if idle.
Next: Graphics options, Previous: Players options, Up: Reference [Contents][Index]
--auto-release-delay=<value>LW6_AUTO_RELEASE_DELAYauto-release-delayType: integer
Default value: 250
Time, in milliseconds, before which a key is automatically released. This might or might not be used by the graphics backend, it’s typically used by backends which don’t always handle key releases events the right way, that is, don’t fire them. Libcaca is a good example of such a case.
--click-to-focus=<value>LW6_CLICK_TO_FOCUSclick-to-focusType: boolean
Default value: false
If set to true, you’ll need to click with the mouse to select a menuitem or move the cursor in the game. If not, some actions will be taken automatically without the need to click.
--cursor-sensitivity=<value>LW6_CURSOR_SENSITIVITYcursor-sensitivityType: float
Default value: 1.0
Keyboard and joystick sensitivity while moving the cursor. 1.0 is the default, 0.1 is slow, 10 is reponsive. This is used for moving the cursor during the game only, the option has no impact on menu navigation.
--custom-alt=<value>LW6_CUSTOM_ALTcustom-altType: string
Default value: (c-lw6gui-keyboard-is-pressed 110) ; SDLK_n
Guile custom code associated to the ALT key equivalent.
--custom-ctrl=<value>LW6_CUSTOM_CTRLcustom-ctrlType: string
Default value: (c-lw6gui-keyboard-is-pressed 98) ; SDLK_b
Guile custom code associated to the CTRL key equivalent.
--custom-down=<value>LW6_CUSTOM_DOWNcustom-downType: string
Default value: (c-lw6gui-keyboard-is-pressed 100) ; SDLK_d
Guile custom code associated to the DOWN key equivalent.
--custom-enter=<value>LW6_CUSTOM_ENTERcustom-enterType: string
Default value: (c-lw6gui-keyboard-is-pressed 103) ; SDLK_g
Guile custom code associated to the ENTER key equivalent.
--custom-esc=<value>LW6_CUSTOM_ESCcustom-escType: string
Default value: (c-lw6gui-keyboard-is-pressed 102) ; SDLK_f
Guile custom code associated to the ESC key equivalent.
--custom-left=<value>LW6_CUSTOM_LEFTcustom-leftType: string
Default value: (c-lw6gui-keyboard-is-pressed 99) ; SDLK_c
Guile custom code associated to the LEFT key equivalent.
--custom-pgdown=<value>LW6_CUSTOM_PGDOWNcustom-pgdownType: string
Default value: (c-lw6gui-keyboard-is-pressed 115) ; SDLK_s
Guile custom code associated to the PGDOWN key equivalent.
--custom-pgup=<value>LW6_CUSTOM_PGUPcustom-pgupType: string
Default value: (c-lw6gui-keyboard-is-pressed 119) ; SDLK_w
Guile custom code associated to the PGUP key equivalent.
--custom-right=<value>LW6_CUSTOM_RIGHTcustom-rightType: string
Default value: (c-lw6gui-keyboard-is-pressed 118) ; SDLK_v
Guile custom code associated to the RIGHT key equivalent.
--custom-up=<value>LW6_CUSTOM_UPcustom-upType: string
Default value: (c-lw6gui-keyboard-is-pressed 101) ; SDLK_e
Custom keycode to be used as the UP key equivalent.
--double-click-delay=<value>LW6_DOUBLE_CLICK_DELAYdouble-click-delayType: integer
Default value: 333
Time, in milliseconds, determining wether two consecutive clicks make a double-click or not.
--max-cursor-speed=<value>LW6_MAX_CURSOR_SPEEDmax-cursor-speedType: float
Default value: 10.0
Maximum cursor speed when cursor is controlled with keyboard or joystick joystick 1. Consider using cursor-sensitivity too.
--mouse-sensitivity=<value>LW6_MOUSE_SENSITIVITYmouse-sensitivityType: float
Default value: 1.0
Mouse sensitivity, 1.0 is the default, 0.1 is slow, 10 is reponsive. This is used for moving the cursor during the game only, the option has no impact on menu navigation.
--repeat-delay=<value>LW6_REPEAT_DELAYrepeat-delayType: integer
Default value: 500
Time, in milliseconds, before key repeat will start, use 0 to disable.
--repeat-interval=<value>LW6_REPEAT_INTERVALrepeat-intervalType: integer
Default value: 100
Time, in milliseconds, between two repeats, once repeat has started, use 0 to disable.
--use-double-click=<value>LW6_USE_DOUBLE_CLICKuse-double-clickType: boolean
Default value: false
Wether to use double-click feature, mostly usefull if running on a system that has only one button (such as a tablet-PC or anything with a tactile screen), if your mouse has three buttons, disabling this might avoid some confusion. Basically, if enabled, double-click is equivalent to right-click (fire) and triple-click is equivalent to middle-click (alternate fire).
--use-esc-button=<value>LW6_USE_ESC_BUTTONuse-esc-buttonType: boolean
Default value: true
Decides wether to display an ’esc’ (escape) button in the interface. This is usefull for people who control the game with the mouse only, and have a single buttons, or on a touchscreen.
--zoom-step=<value>LW6_ZOOM_STEPzoom-stepType: float
Default value: 1.1
A value, strictly greater than 1, which will be used when zooming. The greater it is, the more sensible the zoom is.
--zoom-stick-delay=<value>LW6_ZOOM_STICK_DELAYzoom-stick-delayType: float
Default value: 1000
How long, in msec, the zoom will stick to its default value.
Next: Sound options, Previous: Input options, Up: Reference [Contents][Index]
--capture=<value>LW6_CAPTUREcaptureType: boolean
Default value: false
Enables capture mode, in which a BMP file is dumped on the disk (in your user directory, search for a ’capture’ sub-directory).
--fullscreen=<value>LW6_FULLSCREENfullscreenType: boolean
Default value: false
Force the game to fun fullscreen. Note that the graphics backend might ignore this hint.
--gfx-backend=<value>LW6_GFX_BACKENDgfx-backendType: string
Default value: gl1
Sets the graphics backend AKA ’gfx’ to use. For now the only reasonnable choice is ’gl1’ and will use an OpenGL v1 / SDL 3D-accelerated driver.
--gfx-quality=<value>LW6_GFX_QUALITYgfx-qualityType: integer
Default value: 1 Min value: 0 Max value: 2
Sets the overall quality of the graphics backend. Depending on the backend, this can mean different things. For instance for the ’gl’ backend, this can change texture filtering (nearest, linear, bilinear...). This is not the same as ’pixelize’ which is a per-map option and emulates an old school appearance.
--height=<value>LW6_HEIGHTheightType: integer
Default value: -1
Run the game with the given screen height.Note that the graphics backend might ignore this hint. Use with its companion option ’width’. A negative value will force the use of a default value.
--width=<value>LW6_WIDTHwidthType: integer
Default value: -1
Run the game with the given screen width. Note that the graphics backend might ignore this hint. Use with its companion option ’height’.A negative value will force the use of a default value.
--windowed-mode-limit=<value>LW6_WINDOWED_MODE_LIMITwindowed-mode-limitType: float
Default value: 0.95
When switching back from fullscreen mode to windowed mode, if we’re in maximum resolution, then this coefficient will be applied before resizing the window. The idea is that (obviously) a windowed mode is prefered when a little smaller that totally fullscreen. So set this to a value just below 1.0.
Next: Network options, Previous: Graphics options, Up: Reference [Contents][Index]
--ambiance-exclude=<value>LW6_AMBIANCE_EXCLUDEambiance-excludeType: string
Default value:
If this string is present in a music file name, this file won’t be played during the menus, it will be excluded from the list.
--ambiance-file=<value>LW6_AMBIANCE_FILEambiance-fileType: string
Default value:
A music file which will be used to be played during the menus. If not found, game will fallback on random files.
--ambiance-filter=<value>LW6_AMBIANCE_FILTERambiance-filterType: string
Default value: Chadburn
A music filter, used to select the files which are played while navigating in the menus. It works like ’music-filter’ except this one is not related to a peculiar map. This is not a complex regex-enabled filter, just a plain string search. Even the ’*’ wildcard won’t work.
--fx-volume=<value>LW6_FX_VOLUMEfx-volumeType: float
Default value: 0.3 Min value: 0 Max value: 1
Set the sound effects volume. This is a floating point value. 0 is mute. Maximum value is 1.
--music-volume=<value>LW6_MUSIC_VOLUMEmusic-volumeType: float
Default value: 0.6 Min value: 0 Max value: 1
Set the music volume.This is a floating point value. 0 is mute. Maximum value is 1.
--snd-backend=<value>LW6_SND_BACKENDsnd-backendType: string
Default value: ogg
Sets the sound backend AKA ’snd’ to use. Can be ’ogg’ or ’csound’ but only ’ogg’ will produce sound in the current release.
--water-volume=<value>LW6_WATER_VOLUMEwater-volumeType: float
Default value: 0.2 Min value: 0 Max value: 1
Set the volume for water sounds. This is a floating point value. 0 is mute. Maximum value is 1.
Next: Map parameters, Previous: Sound options, Up: Reference [Contents][Index]
--bind-ip=<value>LW6_BIND_IPbind-ipType: string
Default value: 0.0.0.0
The IP address to bind on when listening to network messages. You can use this to specifically use a given network interface, the default will listen on any available interface.
--bind-port=<value>LW6_BIND_PORTbind-portType: integer
Default value: 8056 Min value: 1 Max value: 65535
The IP port to bind on when listening to network messages. The default should work out of the box, and will ease up the discovery process. That is, if you use your own settings, automatic detection of your server by other servers might not work so well.
--broadcast=<value>LW6_BROADCASTbroadcastType: boolean
Default value: true
Allows the program to send broadcast messages on the network. It can be usefull to disable those if you don’t use UDP node discovery and/or if there’s a sysadmin arround who does not enjoy permanent broadcasts on his LAN.
--cli-backends=<value>LW6_CLI_BACKENDScli-backendsType: string
Default value: tcp,udp,http
The client backends to use. Most of the time the default is fine, change it only if you specifically want to disactivate some protocol, or if you want to activate a custom-made client backend. It’s a comma separated list.
--known-nodes=<value>LW6_KNOWN_NODESknown-nodesType: string
Default value: http://ufoot.org:8056/,http://ufoot.hd.free.fr:8056/
List of known nodes, nodes which the program will try to contact first to get the list of other nodes. This is mostly usefull when program is launched for the first time, after this it should keep an up-to-date list of known servers in its internal database and automatically reconnect to them next time it starts. You might want to change this if you really want to connect to a given server which is not publically listed. The list is comma separated.
--node-description=<value>LW6_NODE_DESCRIPTIONnode-descriptionType: string
Default value: No description.
The description of your node, that is a text that describes your server. This will typically appear when pointing a web client on the public server URL, it is for general information, so if there’s something special about your server, say it here.
--node-title=<value>LW6_NODE_TITLEnode-titleType: string
Default value:
The title of your node, that is the name which will be displayed when listing servers. This is different from player name, for there can be several players on a single computer. By default this will be set to hostname.
--password=<value>LW6_PASSWORDpasswordType: string
Default value:
The password to use for network games. Do not use a valuable password, as this is stored as clear text on your hard drive. Still, the game will only send a hash/checksum of the password on the network so eavesdropper won’t be able to read it. They can see the hash/checksum and use it if clever, but they can’t guess the real password. A blank password means anyone can join your games when you act like a server.
--public-url=<value>LW6_PUBLIC_URLpublic-urlType: string
Default value:
The public URL of your server. By default the game will pick up one for you. In fact, the clients discovering your server should guess the public URL, probably http://<your-ip>:<your-port>/ but you might need to use your own settings if you are using NAT or an Apache reverse-proxy to rewrite HTTP requests.
--skip-network=<value>LW6_SKIP_NETWORKskip-networkType: boolean
Default value: false
If set, then game won’t do anything network related. No listen, no connect, no nothing. You are playing locally.
--srv-backends=<value>LW6_SRV_BACKENDSsrv-backendsType: string
Default value: tcpd,udpd,httpd
The server backends to use. Most of the time the default is fine, change it only if you specifically want to disactivate some protocol, or if you want to activate a custom-made server backend. It’s a comma separated list.
Next: Map rules.xml, Previous: Network options, Up: Reference [Contents][Index]
--chosen-map=<value>LW6_CHOSEN_MAPchosen-mapType: string
Default value: subflower
The last map chosen by the player, locally. This is the map which will be used for a quick-start game, a local game, or a game started as a server.
--force=<value>LW6_FORCEforceType: string
Default value: respawn-team,color-conflict-mode
A comma separated list of options which should be ignored when reading map XML files. For instance, if this contains ’rounds-per-sec,moves-per-round’ then whatever values were defined for this in ’rules.xml’, then game will ignore them and use the user’s values, stored in ’config.xml’, running the game at the requested speed. This ultimately allows the player to control everything despite the values set by the map designer.
--use-cursor-texture=<value>LW6_USE_CURSOR_TEXTUREuse-cursor-textureType: boolean
Default value: true
Defines wether the cursor textures should be used. If unset, then the default builtin cursor texture will be used instead of the map specific one.
--use-hints-xml=<value>LW6_USE_HINTS_XMLuse-hints-xmlType: boolean
Default value: true
If set, then hints will be picked up from the map defined hints.xml, if it exists. This is the default.
--use-music-file=<value>LW6_USE_MUSIC_FILEuse-music-fileType: boolean
Default value: true
If set, then the program will use the ’music-file’ attribute to choose the music to play. If unset, then a random builtin music will be picked up, regardless of what is specified in ’music-file’.
--use-rules-xml=<value>LW6_USE_RULES_XMLuse-rules-xmlType: boolean
Default value: true
If set, then rules will be picked up from the map defined rules.xml, if it exists. This is the default. Use force-time and force-size to override this and use user-defined values anyway.
--use-style-xml=<value>LW6_USE_STYLE_XMLuse-style-xmlType: boolean
Default value: true
If set, then style will be picked up from the map defined style.xml, if it exists. This is the default. Use force-time and force-background to override this and use user-defined values anyway.
--use-teams-xml=<value>LW6_USE_TEAMS_XMLuse-teams-xmlType: boolean
Default value: true
If set, then teams will be picked up from the map defined teams.xml, if it exists. This is the default. Use force-time and force-background to override this and use user-defined values anyway.
--use-texture=<value>LW6_USE_TEXTUREuse-textureType: boolean
Default value: true
Defines wether the map texture should be used. Of course if there’s no map texture, the texture... won’t be used. But if there is one, this parameter will force the game to ignore it and play with solid colors. This probably won’t look as nice as the textured map in most cases, but some players might find it more readable and confortable to play when throwing eye candy away.
Next: Map hints.xml, Previous: Map parameters, Up: Reference [Contents][Index]
--boost-power=<value>LW6_BOOST_POWERboost-powerType: integer
Default value: 3 Min value: 1 Max value: 10
Defines how fast and powerfull the boost is. That is, if on ’boost.png’ it’s pitch black and this parameter is set to 3, then fighters will move and act 3 times than what they would do normally.
--color-conflict-mode=<value>LW6_COLOR_CONFLICT_MODEcolor-conflict-modeType: integer
Default value: 1 Min value: 0 Max value: 2
How to handle color conflicts, that is, when a player requests a color, but this color is already used, what should be done? If 0, wether a color already exists won’t affect the color of a new cursor. If 1, then two players on the same computer will be allowed to share the same color/team, but if another computer is already playing with a color, any new computer will need to use another team. If 2, then it’s impossible for a new cursor to use a pre-existing color, any new cursor will require a new color, if that color is already used, a new color will be picked randomly.
--cursor-pot-init=<value>LW6_CURSOR_POT_INITcursor-pot-initType: integer
Default value: 100000 Min value: 5000 Max value: 500000
Defines the cursor potential at startup. Not really any reason to change it. Theorically, there could be maps where the default value doesn’t fit, but none has been seen yet.
--danger-power=<value>LW6_DANGER_POWERdanger-powerType: integer
Default value: 200 Min value: 0 Max value: 10000
Defines how dangerous are the black zones defined in ’danger.png’. The value is used to decrease the fighter health at each move, so you should compare its value to something like ’fighter-attack’. Being on a dangerous zone is a bit like being attacked by an invisible and unknown ennemy.
--exp=<value>LW6_EXPexpType: integer
Default value: 1 Min value: 0 Max value: 99
Level of experience (AKA exp) required to play the current level. If this level is validated (that is, won) then player will be granted with a level of exp+1 and be able to play all the next levels. An exp of 0 means the level is playable by a pure beginner.
--fighter-attack=<value>LW6_FIGHTER_ATTACKfighter-attackType: integer
Default value: 500 Min value: 1 Max value: 10000
Defines how hard fighters will attack others, that is, in one attack, how many life-points the attacked fighter will loose. Increasing this will cause your opponents to melt faster when you attack them. With a low value, it will take ages to take on your opponents. Different styles of game. Can radically change the gameplay.
--fighter-defense=<value>LW6_FIGHTER_DEFENSEfighter-defenseType: integer
Default value: 50 Min value: 0 Max value: 10000
Defines how fast fighters will regenerate after an attack. When this parameter is set low, an attacked fighter, which is very dark and almost dead will take a very long time to regain energy. If the parameter is set high, it can almost instantaneously regain energy.
--fighter-new-health=<value>LW6_FIGHTER_NEW_HEALTHfighter-new-healthType: integer
Default value: 5000 Min value: 1 Max value: 10000
Defines how healthy fighters will be when they appear on the map. This can be either at the beginning of the game of when a fighter changes team. Setting this low will allow battefields to switch from one side to another very fast, for freshly gained fighters will be feeble and very likely to return to their original camp. To calibrate this parameter, keep in mind that the absolute maximum health a fighter can have is always 10000 (ten-thousands).
--fighter-regenerate=<value>LW6_FIGHTER_REGENERATEfighter-regenerateType: integer
Default value: 5 Min value: 0 Max value: 10000
Defines at which speed fighters will self-regenerate, without even begin packed together. This will allow lone fighters to regenerate a bit by hiding somewhere in the map. This is typically a low value, might even be 0.
--frags-fade-out=<value>LW6_FRAGS_FADE_OUTfrags-fade-outType: integer
Default value: 100 Min value: 10 Max value: 100
When a player looses (in deathmatch mode) all player points will be multiplicated by this percentage, for instance if it’s 90 and player had 50 points, then player will only have 45 points, then points corresponding to the new death will be added/substrated to its total. This is to avoid players with thousands of points in advance, and keep everyone in the race. A low value will minimize the importance of game start. This is only used in modes where frags are distributed in a proportional way.
--frags-mode=<value>LW6_FRAGS_MODEfrags-modeType: integer
Default value: 2 Min value: 0 Max value: 3
Defines how points are calculated in deathmatch mode, 0 is old school simple mode. 1 is in a mode in which 1 point is attributed to every winner, and looser looses all the corresponding points (total is always 0). 2 isproportional mode, with a total of 0 kept constant, that is, loosers loose as many points as attributed to winners. 3 is a mode in which at each death, winners are attributed a number of points proportional to their fighters, and loosers scores remain untouched.
--frags-to-distribute=<value>LW6_FRAGS_TO_DISTRIBUTEfrags-to-distributeType: integer
Default value: 100 Min value: 10 Max value: 1000
Defines how many points will be distributed when in deathmatch mode. When a player looses, this amont of points will be substracted to its total, and the same amount of points will be distributed to other live players, proportionnally to how many fighters they have on the battlefield.
--glue-power=<value>LW6_GLUE_POWERglue-powerType: integer
Default value: 20 Min value: 1 Max value: 100
Defines how sticky and powerfull the glue is. That is, if on ’glue.png’ it’s pitch black and this parameter is set to 3, then fighters will take 3 steps to do what would normally take only one step.
--highest-team-color-allowed=<value>LW6_HIGHEST_TEAM_COLOR_ALLOWEDhighest-team-color-allowedType: integer
Default value: 9 Min value: 3 Max value: 9
Id of the greatest/highest color one can use. Normally, you can leave this untouched, the program will automatically fit this according to your exp. Setting an artificially low value will just cause normally available colors to disappear, setting it to a high value does nothing, if you still don’t have access to some colors, you still don’t, period.
--highest-weapon-allowed=<value>LW6_HIGHEST_WEAPON_ALLOWEDhighest-weapon-allowedType: integer
Default value: 19 Min value: 7 Max value: 19
Id of the greatest/highest weapon one can use. Normally, you can leave this untouched, the program will automatically fit this according to your exp. Setting an artificially low value will just cause normally available weapons to disappear, setting it to a high value does nothing, if you still don’t have access to some weapons, you still don’t, period.
--max-cursor-pot=<value>LW6_MAX_CURSOR_POTmax-cursor-potType: integer
Default value: 1000000 Min value: 50000 Max value: 5000000
Defines the maximum cursor potential. Not really any reason to change it. Any high value should produce the same results. Low values might reveal algorithm bugs and inconsistencies.
--max-cursor-pot-offset=<value>LW6_MAX_CURSOR_POT_OFFSETmax-cursor-pot-offsetType: integer
Default value: 100 Min value: 1 Max value: 10000
Defines the maximum cursor potential offset. The idea is that in some cases, the potential of a cursor can increase in burst mode, for instance to make this cursor more important than others, so that fighters rally to it, neglecting other cursors (talking about a multi-cursor controlled team). This parameter is here to limit this burst effect and avoid bugs.
--max-nb-cursors=<value>LW6_MAX_NB_CURSORSmax-nb-cursorsType: integer
Default value: 26 Min value: 2 Max value: 26
Defines the maximum number of cursors who can enter the game. Really makes sense in network games. Default value is 26, the maximum.
--max-nb-nodes=<value>LW6_MAX_NB_NODESmax-nb-nodesType: integer
Default value: 12 Min value: 2 Max value: 15
Defines the maximum number of servers who can enter the game. Really makes sense in network games. Default value is 10, and should fit in most cases. Can be raised up to 26.
--max-nb-teams=<value>LW6_MAX_NB_TEAMSmax-nb-teamsType: integer
Default value: 10 Min value: 2 Max value: 10
Defines the maximum number of teams who can enter the game. Really makes sense in network games. Default value is 10, the maximum.
--max-round-delta=<value>LW6_MAX_ROUND_DELTAmax-round-deltaType: integer
Default value: 1000 Min value: 1 Max value: 10000
This is the companion value of ’round-delta’. Will put an absolute limit to the delta, which (what did you think?) is of course incremented in some cases by the core algorithm. If in doubt, don’t touch.
--max-zone-size=<value>LW6_MAX_ZONE_SIZEmax-zone-sizeType: integer
Default value: 8 Min value: 1 Max value: 64
Defines the maximum zone size, which is an internal and rather technical parameter. The idea is that to optimize things, Liquid War 6 divides the battlefield in squares, where it can, and tries to make these squares as big as possible, the idea being that everywhere in this square, fighters follow the same intructions. Just a technical optimization. The problem is that setting it too high will reveal the optimization and its tradeoffs to the player, who will see the fighter behave strangely, following invisible paths. Plus, it’s ugly. Depending on your tastes (speed, look’n’feel) you’ll prefer something nice or something fast. Note that anyways passed a certain value, this does not optimize anything anymore. In doubt, don’t touch it.
--medicine-power=<value>LW6_MEDICINE_POWERmedicine-powerType: integer
Default value: 100 Min value: 0 Max value: 10000
Defines how fast fighter will automatically regenerate on black zones defined in ’medicine.png’. The value is used to decrease the fighter health at each move, so you should compare its value to something like ’fighter-defense’. Being on a medicined zone is a bit like being defended by an invisible and unknown friend.
--moves-per-round=<value>LW6_MOVES_PER_ROUNDmoves-per-roundType: integer
Default value: 2 Min value: 1 Max value: 50
Defines how many times fighters move per round. Increasing this will just make fighters move faster, but won’t change anything for the rest, that is keyboard and mouse responsivity, and network traffic will stay the same. Multiplying the number of moves per round by the number of rounds per second will give the number of moves per second, which is, in fact, how fast fighters move on the screen.
--nb-attack-tries=<value>LW6_NB_ATTACK_TRIESnb-attack-triesType: integer
Default value: 3 Min value: 1 Max value: 7
Defines how many tries a fighter will do before giving-up attacking and choosing another behvior (defense). By tries we mean: how many directions it will try. Going North? Going North-West? Setting this to a low value will make fighters somewhat less aggressive. This idea is that they’ll prefer to switch to the next option, that is, defense/regeneration, if there’s no opponent right in front of them.
--nb-defense-tries=<value>LW6_NB_DEFENSE_TRIESnb-defense-triesType: integer
Default value: 1 Min value: 1 Max value: 7
Defines how many tries a fighter will do before giving-up attacking and choosing another behavior (do nothing). By tries we mean: how many directions it will try. Going North? Going North-West? Setting this to a low value, you’ll need a very compact pack of fighters for regeneration to operate, else fighters will hang arround unhealthy.
--nb-move-tries=<value>LW6_NB_MOVE_TRIESnb-move-triesType: integer
Default value: 5 Min value: 3 Max value: 7
Defines how many tries a fighter will do before giving-up moving and choosing another behvior (attack or defense). By tries we mean: how many directions it will try. Going North? Going North-West? Setting this to a low value, your fighters will look very stubborn and always try to move in one direction, neglecting the fact that they could dodge. This can lead to queues of fighters and other strange behaviors. On the other hand, setting it too high will cause fighter to always avoid the enemy, and groups of fighters will just pass each other without any fight. Matter of taste.
--respawn-delay=<value>LW6_RESPAWN_DELAYrespawn-delayType: integer
Default value: 3 Min value: 0 Max value: 30
Delay, in seconds, after which teams reappear on the battlefield, when in deathmatch mode. 0 means team right away.
--respawn-position-mode=<value>LW6_RESPAWN_POSITION_MODErespawn-position-modeType: integer
Default value: 1 Min value: 0 Max value: 2
Defines how teams are set up on the map when respawning. 0 means teams respect the pre-defined start positions. 1 means that a random position will be picked, among the existing positions. That is, red could take green’s place. 2 means total randomness, teams can appear anywhere.
--respawn-team=<value>LW6_RESPAWN_TEAMrespawn-teamType: integer
Default value: 1 Min value: 0 Max value: 1
Defines what to do when a team dies. If set to 0, team disappears forever, if set to 1, team reappears automatically with fresh fighters. It’s a deathmatch mode, where the winner is not the one who stays alive the longest time, since it makes no real sens in this case, but the one who has died less often than others.
--round-delta=<value>LW6_ROUND_DELTAround-deltaType: integer
Default value: 1 Min value: 0 Max value: 100
Conditions by how much the cursor potential will be incremented each time gradient is spreaded. Sounds cryptic? It is. The idea is that at each time you move your cursor of 1 pixel, theorically, you’ll need in the worst case to move of 1 more pixel to reach any point on the map. Of course this is not true but this is the default asumption, and gradient spread will fix that. Only in Liquid War 6 this is not even the worst case, for you can control your cursor with the mouse and cross walls. Whenever you cross a wall, you might have done a great distance from the fighters’ point of view, if the map is a maze. Thus this parameter, which corrects things, experience shows it does give acceptable results to increase the cursor potential by more than one at each turn. Toy arround with this if you find fighters take wrong paths on some given map. If in doubt, don’t touch.
--rounds-per-sec=<value>LW6_ROUNDS_PER_SECrounds-per-secType: integer
Default value: 50 Min value: 1 Max value: 200
Defines the overall speed of the game. All other settings being equal, raising this value will cause the game to behave faster. Everything will be faster, except probably the display since your computer will calculate more game positions in a given time and spend more CPU time. It will also increase network traffic. Values between 10 and 50 really make sense.
--side-attack-factor=<value>LW6_SIDE_ATTACK_FACTORside-attack-factorType: integer
Default value: 20 Min value: 0 Max value: 100
Defines how hard fighters will attack sideways. It’s an algorithm trick, fighters attack by default the opponent right in front, but if there’s no fighter there, they will still try to attack someone else, maybe sideways. But doing this their attack is not as strong. This parameter enables you to tune this. This is a percentage.
--side-defense-factor=<value>LW6_SIDE_DEFENSE_FACTORside-defense-factorType: integer
Default value: 20 Min value: 0 Max value: 100
Defines how fast fighters will regenerate, when being side by side instead of being right in front of the other. This is a percentage.
--single-army-size=<value>LW6_SINGLE_ARMY_SIZEsingle-army-sizeType: integer
Default value: 30 Min value: 1 Max value: 95
Defines the proportion of the whole available space, which will be occupied by an army at the beginning of the game. You can either imagine playing with almost empty maps, or play very crowded with almost no space left. This is a percentage, but will be multiplied by itself to get the actual surface. That is, 50 means 50%*50%, that is, a square of 1/2 the size of a square map, so it represents 25% (1/4) of the total surface.
--spread-mode=<value>LW6_SPREAD_MODEspread-modeType: integer
Default value: 1 Min value: 0 Max value: 2
If set to 1, then gradient spread will be slower but gain in terms of homogeneity and consistency. You could consider setting this to 0 on very very big maps to save CPU cycles, else the default should work fine.
--spread-thread=<value>LW6_SPREAD_THREADspread-threadType: integer
Default value: 0 Min value: 0 Max value: 1
If set to 1, the core algorithm with fire a separate thread to spread the gradient. By default this is turned off (set to 0). Consider this as an experimental feature, the program is already rather heavily threaded, turning this on will probably not offer any significant performance gain, even on SMP systems. This might change in the future.
--spreads-per-round=<value>LW6_SPREADS_PER_ROUNDspreads-per-roundType: integer
Default value: 5 Min value: 1 Max value: 100
Defines how many times the gradient is spread per round. Gradient spread is a very Liquid War 6 specific feature, just remember that the more often you do it, the more accurately fighters will move. That is, you will be sure they really take the shortest path. Usually this does not have much effect, the default value should fit in most cases, but you might want to decrease it on very simple maps where the gradient is obvious, or increase it on complex maps where you want fighters to be real smart.
--start-blue-x=<value>LW6_START_BLUE_Xstart-blue-xType: integer
Default value: 90 Min value: 0 Max value: 100
X start position for the blue team. This is a percentage of map width, value between 0 and 100.
--start-blue-y=<value>LW6_START_BLUE_Ystart-blue-yType: integer
Default value: 10 Min value: 0 Max value: 100
Y start position for the blue team. This is a percentage of map height, value between 0 and 100.
--start-cyan-x=<value>LW6_START_CYAN_Xstart-cyan-xType: integer
Default value: 35 Min value: 0 Max value: 100
X start position for the cyan team. This is a percentage of map width, value between 0 and 100.
--start-cyan-y=<value>LW6_START_CYAN_Ystart-cyan-yType: integer
Default value: 10 Min value: 0 Max value: 100
Y start position for the cyan team. This is a percentage of map height, value between 0 and 100.
--start-green-x=<value>LW6_START_GREEN_Xstart-green-xType: integer
Default value: 90 Min value: 0 Max value: 100
X start position for the green team. This is a percentage of map width, value between 0 and 100.
--start-green-y=<value>LW6_START_GREEN_Ystart-green-yType: integer
Default value: 90 Min value: 0 Max value: 100
Y start position for the green team. This is a percentage of map height, value between 0 and 100.
--start-lightblue-x=<value>LW6_START_LIGHTBLUE_Xstart-lightblue-xType: integer
Default value: 35 Min value: 0 Max value: 100
X start position for the lightblue team. This is a percentage of map width, value between 0 and 100.
--start-lightblue-y=<value>LW6_START_LIGHTBLUE_Ystart-lightblue-yType: integer
Default value: 90 Min value: 0 Max value: 100
Y start position for the lightblue team. This is a percentage of map height, value between 0 and 100.
--start-magenta-x=<value>LW6_START_MAGENTA_Xstart-magenta-xType: integer
Default value: 65 Min value: 0 Max value: 100
X start position for the magenta team. This is a percentage of map width, value between 0 and 100.
--start-magenta-y=<value>LW6_START_MAGENTA_Ystart-magenta-yType: integer
Default value: 90 Min value: 0 Max value: 100
Y start position for the magenta team. This is a percentage of map height, value between 0 and 100.
--start-orange-x=<value>LW6_START_ORANGE_Xstart-orange-xType: integer
Default value: 65 Min value: 0 Max value: 100
X start position for the orange team. This is a percentage of map width, value between 0 and 100.
--start-orange-y=<value>LW6_START_ORANGE_Ystart-orange-yType: integer
Default value: 10 Min value: 0 Max value: 100
Y start position for the orange team. This is a percentage of map height, value between 0 and 100.
--start-pink-x=<value>LW6_START_PINK_Xstart-pink-xType: integer
Default value: 10 Min value: 0 Max value: 100
X start position for the pink team. This is a percentage of map width, value between 0 and 100.
--start-pink-y=<value>LW6_START_PINK_Ystart-pink-yType: integer
Default value: 50 Min value: 0 Max value: 100
Y start position for the pink team. This is a percentage of map height, value between 0 and 100.
--start-position-mode=<value>LW6_START_POSITION_MODEstart-position-modeType: integer
Default value: 0 Min value: 0 Max value: 2
Defines how teams are set up on the map at game startup. 0 means teams respect the pre-defined start positions. 1 means that a random position will be picked, among the existing positions. That is, red could take green’s place. 2 means total randomness, teams can appear anywhere.
--start-purple-x=<value>LW6_START_PURPLE_Xstart-purple-xType: integer
Default value: 90 Min value: 0 Max value: 100
X start position for the purple team. This is a percentage of map width, value between 0 and 100.
--start-purple-y=<value>LW6_START_PURPLE_Ystart-purple-yType: integer
Default value: 50 Min value: 0 Max value: 100
Y start position for the purple team. This is a percentage of map height, value between 0 and 100.
--start-red-x=<value>LW6_START_RED_Xstart-red-xType: integer
Default value: 10 Min value: 0 Max value: 100
X start position for the red team. This is a percentage of map width, value between 0 and 100.
--start-red-y=<value>LW6_START_RED_Ystart-red-yType: integer
Default value: 10 Min value: 0 Max value: 100
Y start position for the red team. This is a percentage of map height, value between 0 and 100.
--start-yellow-x=<value>LW6_START_YELLOW_Xstart-yellow-xType: integer
Default value: 10 Min value: 0 Max value: 100
X start position for the yellow team. This is a percentage of map width, value between 0 and 100.
--start-yellow-y=<value>LW6_START_YELLOW_Ystart-yellow-yType: integer
Default value: 90 Min value: 0 Max value: 100
Y start position for the yellow team. This is a percentage of map height, value between 0 and 100.
--team-profile-blue-aggressive=<value>LW6_TEAM_PROFILE_BLUE_AGGRESSIVEteam-profile-blue-aggressiveType: integer
Default value: 150 Min value: 5 Max value: 2000
Defines how aggressive the blue team is. This is a percentage, if set to 200 then team will attack twice as much as any other team with the default value. Setting this to a high value clearly advantages this team.
--team-profile-blue-fast=<value>LW6_TEAM_PROFILE_BLUE_FASTteam-profile-blue-fastType: integer
Default value: 50 Min value: 5 Max value: 2000
Changes the speed of the blue team. This is a percentage, if set to 50, then team will move twice slower than other teams with the default parameter. Setting this high is very likely to advantage the team.
--team-profile-blue-handicap=<value>LW6_TEAM_PROFILE_BLUE_HANDICAPteam-profile-blue-handicapType: integer
Default value: 100 Min value: 10 Max value: 1000
Defines the handicap for the blue team.
--team-profile-blue-mobile=<value>LW6_TEAM_PROFILE_BLUE_MOBILEteam-profile-blue-mobileType: integer
Default value: 0 Min value: -3 Max value: 3
Increases (or decreases if negative) the number of move/attack/defense tries for the blue team. If set to a high value team will appear more mobile and do more things, but it won’t change its cruising speed. It’s not obvious to tell wether this is an advantage or not, but it clearly changes the behavior.
--team-profile-blue-vulnerable=<value>LW6_TEAM_PROFILE_BLUE_VULNERABLEteam-profile-blue-vulnerableType: integer
Default value: 60 Min value: 5 Max value: 2000
Defines how vulnerable the blue team is. This is a percentage, if set to 200 then team will be attacked twice as much as any other team with the default value. Setting this to a high value clearly disadvantages this team.
--team-profile-blue-weapon-alternate-id=<value>LW6_TEAM_PROFILE_BLUE_WEAPON_ALTERNATE_IDteam-profile-blue-weapon-alternate-idType: integer
Default value: 8 Min value: 0 Max value: 19
Id of the default alternate weapon for the blue team, see the documentation about weapons to know what these ids mean.
--team-profile-blue-weapon-id=<value>LW6_TEAM_PROFILE_BLUE_WEAPON_IDteam-profile-blue-weapon-idType: integer
Default value: 14 Min value: 0 Max value: 19
Id of the default weapon for the blue team, see the documentation about weapons to know what these ids mean.
--team-profile-blue-weapon-mode=<value>LW6_TEAM_PROFILE_BLUE_WEAPON_MODEteam-profile-blue-weapon-modeType: integer
Default value: 1 Min value: 0 Max value: 2
Weapon mode for blue team. 0 means there’s no weapon, 1 means one weapon per team, defined by the weapon-id parameter, 2 means random weapon.
--team-profile-cyan-aggressive=<value>LW6_TEAM_PROFILE_CYAN_AGGRESSIVEteam-profile-cyan-aggressiveType: integer
Default value: 44 Min value: 5 Max value: 2000
Defines how aggressive the cyan team is. This is a percentage, if set to 200 then team will attack twice as much as any other team with the default value. Setting this to a high value clearly advantages this team.
--team-profile-cyan-fast=<value>LW6_TEAM_PROFILE_CYAN_FASTteam-profile-cyan-fastType: integer
Default value: 40 Min value: 5 Max value: 2000
Changes the speed of the cyan team. This is a percentage, if set to 50, then team will move twice slower than other teams with the default parameter. Setting this high is very likely to advantage the team.
--team-profile-cyan-handicap=<value>LW6_TEAM_PROFILE_CYAN_HANDICAPteam-profile-cyan-handicapType: integer
Default value: 100 Min value: 10 Max value: 1000
Defines the handicap for the cyan team.
--team-profile-cyan-mobile=<value>LW6_TEAM_PROFILE_CYAN_MOBILEteam-profile-cyan-mobileType: integer
Default value: 0 Min value: -3 Max value: 3
Increases (or decreases if negative) the number of move/attack/defense tries for the cyan team. If set to a high value team will appear more mobile and do more things, but it won’t change its cruising speed. It’s not obvious to tell wether this is an advantage or not, but it clearly changes the behavior.
--team-profile-cyan-vulnerable=<value>LW6_TEAM_PROFILE_CYAN_VULNERABLEteam-profile-cyan-vulnerableType: integer
Default value: 12 Min value: 5 Max value: 2000
Defines how vulnerable the cyan team is. This is a percentage, if set to 200 then team will be attacked twice as much as any other team with the default value. Setting this to a high value clearly disadvantages this team.
--team-profile-cyan-weapon-alternate-id=<value>LW6_TEAM_PROFILE_CYAN_WEAPON_ALTERNATE_IDteam-profile-cyan-weapon-alternate-idType: integer
Default value: 12 Min value: 0 Max value: 19
Id of the default alternate weapon for the cyan team, see the documentation about weapons to know what these ids mean.
--team-profile-cyan-weapon-id=<value>LW6_TEAM_PROFILE_CYAN_WEAPON_IDteam-profile-cyan-weapon-idType: integer
Default value: 3 Min value: 0 Max value: 19
Id of the default weapon for the cyan team, see the documentation about weapons to know what these ids mean.
--team-profile-cyan-weapon-mode=<value>LW6_TEAM_PROFILE_CYAN_WEAPON_MODEteam-profile-cyan-weapon-modeType: integer
Default value: 1 Min value: 0 Max value: 2
Weapon mode for cyan team. 0 means there’s no weapon, 1 means one weapon per team, defined by the weapon-id parameter, 2 means random weapon.
--team-profile-green-aggressive=<value>LW6_TEAM_PROFILE_GREEN_AGGRESSIVEteam-profile-green-aggressiveType: integer
Default value: 70 Min value: 5 Max value: 2000
Defines how aggressive the green team is. This is a percentage, if set to 200 then team will attack twice as much as any other team with the default value. Setting this to a high value clearly advantages this team.
--team-profile-green-fast=<value>LW6_TEAM_PROFILE_GREEN_FASTteam-profile-green-fastType: integer
Default value: 70 Min value: 5 Max value: 2000
Changes the speed of the green team. This is a percentage, if set to 50, then team will move twice slower than other teams with the default parameter. Setting this high is very likely to advantage the team.
--team-profile-green-handicap=<value>LW6_TEAM_PROFILE_GREEN_HANDICAPteam-profile-green-handicapType: integer
Default value: 100 Min value: 10 Max value: 1000
Defines the handicap for the green team.
--team-profile-green-mobile=<value>LW6_TEAM_PROFILE_GREEN_MOBILEteam-profile-green-mobileType: integer
Default value: 0 Min value: -3 Max value: 3
Increases (or decreases if negative) the number of move/attack/defense tries for the green team. If set to a high value team will appear more mobile and do more things, but it won’t change its cruising speed. It’s not obvious to tell wether this is an advantage or not, but it clearly changes the behavior.
--team-profile-green-vulnerable=<value>LW6_TEAM_PROFILE_GREEN_VULNERABLEteam-profile-green-vulnerableType: integer
Default value: 30 Min value: 5 Max value: 2000
Defines how vulnerable the green team is. This is a percentage, if set to 200 then team will be attacked twice as much as any other team with the default value. Setting this to a high value clearly disadvantages this team.
--team-profile-green-weapon-alternate-id=<value>LW6_TEAM_PROFILE_GREEN_WEAPON_ALTERNATE_IDteam-profile-green-weapon-alternate-idType: integer
Default value: 7 Min value: 0 Max value: 19
Id of the default alternate weapon for the green team, see the documentation about weapons to know what these ids mean.
--team-profile-green-weapon-id=<value>LW6_TEAM_PROFILE_GREEN_WEAPON_IDteam-profile-green-weapon-idType: integer
Default value: 13 Min value: 0 Max value: 19
Id of the default weapon for the green team, see the documentation about weapons to know what these ids mean.
--team-profile-green-weapon-mode=<value>LW6_TEAM_PROFILE_GREEN_WEAPON_MODEteam-profile-green-weapon-modeType: integer
Default value: 1 Min value: 0 Max value: 2
Weapon mode for green team. 0 means there’s no weapon, 1 means one weapon per team, defined by the weapon-id parameter, 2 means random weapon.
--team-profile-lightblue-aggressive=<value>LW6_TEAM_PROFILE_LIGHTBLUE_AGGRESSIVEteam-profile-lightblue-aggressiveType: integer
Default value: 200 Min value: 5 Max value: 2000
Defines how aggressive the lightblue team is. This is a percentage, if set to 200 then team will attack twice as much as any other team with the default value. Setting this to a high value clearly advantages this team.
--team-profile-lightblue-fast=<value>LW6_TEAM_PROFILE_LIGHTBLUE_FASTteam-profile-lightblue-fastType: integer
Default value: 20 Min value: 5 Max value: 2000
Changes the speed of the lightblue team. This is a percentage, if set to 50, then team will move twice slower than other teams with the default parameter. Setting this high is very likely to advantage the team.
--team-profile-lightblue-handicap=<value>LW6_TEAM_PROFILE_LIGHTBLUE_HANDICAPteam-profile-lightblue-handicapType: integer
Default value: 100 Min value: 10 Max value: 1000
Defines the handicap for the lightblue team.
--team-profile-lightblue-mobile=<value>LW6_TEAM_PROFILE_LIGHTBLUE_MOBILEteam-profile-lightblue-mobileType: integer
Default value: 0 Min value: -3 Max value: 3
Increases (or decreases if negative) the number of move/attack/defense tries for the lightblue team. If set to a high value team will appear more mobile and do more things, but it won’t change its cruising speed. It’s not obvious to tell wether this is an advantage or not, but it clearly changes the behavior.
--team-profile-lightblue-vulnerable=<value>LW6_TEAM_PROFILE_LIGHTBLUE_VULNERABLEteam-profile-lightblue-vulnerableType: integer
Default value: 8 Min value: 5 Max value: 2000
Defines how vulnerable the lightblue team is. This is a percentage, if set to 200 then team will be attacked twice as much as any other team with the default value. Setting this to a high value clearly disadvantages this team.
--team-profile-lightblue-weapon-alternate-id=<value>LW6_TEAM_PROFILE_LIGHTBLUE_WEAPON_ALTERNATE_IDteam-profile-lightblue-weapon-alternate-idType: integer
Default value: 17 Min value: 0 Max value: 19
Id of the default alternate weapon for the lightblue team, see the documentation about weapons to know what these ids mean.
--team-profile-lightblue-weapon-id=<value>LW6_TEAM_PROFILE_LIGHTBLUE_WEAPON_IDteam-profile-lightblue-weapon-idType: integer
Default value: 4 Min value: 0 Max value: 19
Id of the default weapon for the lightblue team, see the documentation about weapons to know what these ids mean.
--team-profile-lightblue-weapon-mode=<value>LW6_TEAM_PROFILE_LIGHTBLUE_WEAPON_MODEteam-profile-lightblue-weapon-modeType: integer
Default value: 1 Min value: 0 Max value: 2
Weapon mode for lightblue team. 0 means there’s no weapon, 1 means one weapon per team, defined by the weapon-id parameter, 2 means random weapon.
--team-profile-magenta-aggressive=<value>LW6_TEAM_PROFILE_MAGENTA_AGGRESSIVEteam-profile-magenta-aggressiveType: integer
Default value: 192 Min value: 5 Max value: 2000
Defines how aggressive the magenta team is. This is a percentage, if set to 200 then team will attack twice as much as any other team with the default value. Setting this to a high value clearly advantages this team.
--team-profile-magenta-fast=<value>LW6_TEAM_PROFILE_MAGENTA_FASTteam-profile-magenta-fastType: integer
Default value: 320 Min value: 5 Max value: 2000
Changes the speed of the magenta team. This is a percentage, if set to 50, then team will move twice slower than other teams with the default parameter. Setting this high is very likely to advantage the team.
--team-profile-magenta-handicap=<value>LW6_TEAM_PROFILE_MAGENTA_HANDICAPteam-profile-magenta-handicapType: integer
Default value: 100 Min value: 10 Max value: 1000
Defines the handicap for the magenta team.
--team-profile-magenta-mobile=<value>LW6_TEAM_PROFILE_MAGENTA_MOBILEteam-profile-magenta-mobileType: integer
Default value: 0 Min value: -3 Max value: 3
Increases (or decreases if negative) the number of move/attack/defense tries for the magenta team. If set to a high value team will appear more mobile and do more things, but it won’t change its cruising speed. It’s not obvious to tell wether this is an advantage or not, but it clearly changes the behavior.
--team-profile-magenta-vulnerable=<value>LW6_TEAM_PROFILE_MAGENTA_VULNERABLEteam-profile-magenta-vulnerableType: integer
Default value: 1920 Min value: 5 Max value: 2000
Defines how vulnerable the magenta team is. This is a percentage, if set to 200 then team will be attacked twice as much as any other team with the default value. Setting this to a high value clearly disadvantages this team.
--team-profile-magenta-weapon-alternate-id=<value>LW6_TEAM_PROFILE_MAGENTA_WEAPON_ALTERNATE_IDteam-profile-magenta-weapon-alternate-idType: integer
Default value: 15 Min value: 0 Max value: 19
Id of the default alternate weapon for the magenta team, see the documentation about weapons to know what these ids mean.
--team-profile-magenta-weapon-id=<value>LW6_TEAM_PROFILE_MAGENTA_WEAPON_IDteam-profile-magenta-weapon-idType: integer
Default value: 6 Min value: 0 Max value: 19
Id of the default weapon for the magenta team, see the documentation about weapons to know what these ids mean.
--team-profile-magenta-weapon-mode=<value>LW6_TEAM_PROFILE_MAGENTA_WEAPON_MODEteam-profile-magenta-weapon-modeType: integer
Default value: 1 Min value: 0 Max value: 2
Weapon mode for magenta team. 0 means there’s no weapon, 1 means one weapon per team, defined by the weapon-id parameter, 2 means random weapon.
--team-profile-orange-aggressive=<value>LW6_TEAM_PROFILE_ORANGE_AGGRESSIVEteam-profile-orange-aggressiveType: integer
Default value: 48 Min value: 5 Max value: 2000
Defines how aggressive the orange team is. This is a percentage, if set to 200 then team will attack twice as much as any other team with the default value. Setting this to a high value clearly advantages this team.
--team-profile-orange-fast=<value>LW6_TEAM_PROFILE_ORANGE_FASTteam-profile-orange-fastType: integer
Default value: 160 Min value: 5 Max value: 2000
Changes the speed of the orange team. This is a percentage, if set to 50, then team will move twice slower than other teams with the default parameter. Setting this high is very likely to advantage the team.
--team-profile-orange-handicap=<value>LW6_TEAM_PROFILE_ORANGE_HANDICAPteam-profile-orange-handicapType: integer
Default value: 100 Min value: 10 Max value: 1000
Defines the handicap for the orange team.
--team-profile-orange-mobile=<value>LW6_TEAM_PROFILE_ORANGE_MOBILEteam-profile-orange-mobileType: integer
Default value: 0 Min value: -3 Max value: 3
Increases (or decreases if negative) the number of move/attack/defense tries for the orange team. If set to a high value team will appear more mobile and do more things, but it won’t change its cruising speed. It’s not obvious to tell wether this is an advantage or not, but it clearly changes the behavior.
--team-profile-orange-vulnerable=<value>LW6_TEAM_PROFILE_ORANGE_VULNERABLEteam-profile-orange-vulnerableType: integer
Default value: 144 Min value: 5 Max value: 2000
Defines how vulnerable the orange team is. This is a percentage, if set to 200 then team will be attacked twice as much as any other team with the default value. Setting this to a high value clearly disadvantages this team.
--team-profile-orange-weapon-alternate-id=<value>LW6_TEAM_PROFILE_ORANGE_WEAPON_ALTERNATE_IDteam-profile-orange-weapon-alternate-idType: integer
Default value: 16 Min value: 0 Max value: 19
Id of the default alternate weapon for the orange team, see the documentation about weapons to know what these ids mean.
--team-profile-orange-weapon-id=<value>LW6_TEAM_PROFILE_ORANGE_WEAPON_IDteam-profile-orange-weapon-idType: integer
Default value: 0 Min value: 0 Max value: 19
Id of the default weapon for the orange team, see the documentation about weapons to know what these ids mean.
--team-profile-orange-weapon-mode=<value>LW6_TEAM_PROFILE_ORANGE_WEAPON_MODEteam-profile-orange-weapon-modeType: integer
Default value: 1 Min value: 0 Max value: 2
Weapon mode for orange team. 0 means there’s no weapon, 1 means one weapon per team, defined by the weapon-id parameter, 2 means random weapon.
--team-profile-pink-aggressive=<value>LW6_TEAM_PROFILE_PINK_AGGRESSIVEteam-profile-pink-aggressiveType: integer
Default value: 640 Min value: 5 Max value: 2000
Defines how aggressive the pink team is. This is a percentage, if set to 200 then team will attack twice as much as any other team with the default value. Setting this to a high value clearly advantages this team.
--team-profile-pink-fast=<value>LW6_TEAM_PROFILE_PINK_FASTteam-profile-pink-fastType: integer
Default value: 80 Min value: 5 Max value: 2000
Changes the speed of the pink team. This is a percentage, if set to 50, then team will move twice slower than other teams with the default parameter. Setting this high is very likely to advantage the team.
--team-profile-pink-handicap=<value>LW6_TEAM_PROFILE_PINK_HANDICAPteam-profile-pink-handicapType: integer
Default value: 100 Min value: 10 Max value: 1000
Defines the handicap for the pink team.
--team-profile-pink-mobile=<value>LW6_TEAM_PROFILE_PINK_MOBILEteam-profile-pink-mobileType: integer
Default value: 0 Min value: -3 Max value: 3
Increases (or decreases if negative) the number of move/attack/defense tries for the pink team. If set to a high value team will appear more mobile and do more things, but it won’t change its cruising speed. It’s not obvious to tell wether this is an advantage or not, but it clearly changes the behavior.
--team-profile-pink-vulnerable=<value>LW6_TEAM_PROFILE_PINK_VULNERABLEteam-profile-pink-vulnerableType: integer
Default value: 640 Min value: 5 Max value: 2000
Defines how vulnerable the pink team is. This is a percentage, if set to 200 then team will be attacked twice as much as any other team with the default value. Setting this to a high value clearly disadvantages this team.
--team-profile-pink-weapon-alternate-id=<value>LW6_TEAM_PROFILE_PINK_WEAPON_ALTERNATE_IDteam-profile-pink-weapon-alternate-idType: integer
Default value: 19 Min value: 0 Max value: 19
Id of the default alternate weapon for the pink team, see the documentation about weapons to know what these ids mean.
--team-profile-pink-weapon-id=<value>LW6_TEAM_PROFILE_PINK_WEAPON_IDteam-profile-pink-weapon-idType: integer
Default value: 1 Min value: 0 Max value: 19
Id of the default weapon for the pink team, see the documentation about weapons to know what these ids mean.
--team-profile-pink-weapon-mode=<value>LW6_TEAM_PROFILE_PINK_WEAPON_MODEteam-profile-pink-weapon-modeType: integer
Default value: 1 Min value: 0 Max value: 2
Weapon mode for pink team. 0 means there’s no weapon, 1 means one weapon per team, defined by the weapon-id parameter, 2 means random weapon.
--team-profile-purple-aggressive=<value>LW6_TEAM_PROFILE_PURPLE_AGGRESSIVEteam-profile-purple-aggressiveType: integer
Default value: 32 Min value: 5 Max value: 2000
Defines how aggressive the purple team is. This is a percentage, if set to 200 then team will attack twice as much as any other team with the default value. Setting this to a high value clearly advantages this team.
--team-profile-purple-fast=<value>LW6_TEAM_PROFILE_PURPLE_FASTteam-profile-purple-fastType: integer
Default value: 80 Min value: 5 Max value: 2000
Changes the speed of the purple team. This is a percentage, if set to 50, then team will move twice slower than other teams with the default parameter. Setting this high is very likely to advantage the team.
--team-profile-purple-handicap=<value>LW6_TEAM_PROFILE_PURPLE_HANDICAPteam-profile-purple-handicapType: integer
Default value: 100 Min value: 10 Max value: 1000
Defines the handicap for the purple team.
--team-profile-purple-mobile=<value>LW6_TEAM_PROFILE_PURPLE_MOBILEteam-profile-purple-mobileType: integer
Default value: 0 Min value: -3 Max value: 3
Increases (or decreases if negative) the number of move/attack/defense tries for the purple team. If set to a high value team will appear more mobile and do more things, but it won’t change its cruising speed. It’s not obvious to tell wether this is an advantage or not, but it clearly changes the behavior.
--team-profile-purple-vulnerable=<value>LW6_TEAM_PROFILE_PURPLE_VULNERABLEteam-profile-purple-vulnerableType: integer
Default value: 16 Min value: 5 Max value: 2000
Defines how vulnerable the purple team is. This is a percentage, if set to 200 then team will be attacked twice as much as any other team with the default value. Setting this to a high value clearly disadvantages this team.
--team-profile-purple-weapon-alternate-id=<value>LW6_TEAM_PROFILE_PURPLE_WEAPON_ALTERNATE_IDteam-profile-purple-weapon-alternate-idType: integer
Default value: 18 Min value: 0 Max value: 19
Id of the default alternate weapon for the purple team, see the documentation about weapons to know what these ids mean.
--team-profile-purple-weapon-id=<value>LW6_TEAM_PROFILE_PURPLE_WEAPON_IDteam-profile-purple-weapon-idType: integer
Default value: 11 Min value: 0 Max value: 19
Id of the default weapon for the purple team, see the documentation about weapons to know what these ids mean.
--team-profile-purple-weapon-mode=<value>LW6_TEAM_PROFILE_PURPLE_WEAPON_MODEteam-profile-purple-weapon-modeType: integer
Default value: 1 Min value: 0 Max value: 2
Weapon mode for purple team. 0 means there’s no weapon, 1 means one weapon per team, defined by the weapon-id parameter, 2 means random weapon.
--team-profile-red-aggressive=<value>LW6_TEAM_PROFILE_RED_AGGRESSIVEteam-profile-red-aggressiveType: integer
Default value: 220 Min value: 5 Max value: 2000
Defines how aggressive the red team is. This is a percentage, if set to 200 then team will attack twice as much as any other team with the default value. Setting this to a high value clearly advantages this team.
--team-profile-red-fast=<value>LW6_TEAM_PROFILE_RED_FASTteam-profile-red-fastType: integer
Default value: 160 Min value: 5 Max value: 2000
Changes the speed of the red team. This is a percentage, if set to 50, then team will move twice slower than other teams with the default parameter. Setting this high is very likely to advantage the team.
--team-profile-red-handicap=<value>LW6_TEAM_PROFILE_RED_HANDICAPteam-profile-red-handicapType: integer
Default value: 100 Min value: 10 Max value: 1000
Defines the handicap for the red team.
--team-profile-red-mobile=<value>LW6_TEAM_PROFILE_RED_MOBILEteam-profile-red-mobileType: integer
Default value: 0 Min value: -3 Max value: 3
Increases (or decreases if negative) the number of move/attack/defense tries for the red team. If set to a high value team will appear more mobile and do more things, but it won’t change its cruising speed. It’s not obvious to tell wether this is an advantage or not, but it clearly changes the behavior.
--team-profile-red-vulnerable=<value>LW6_TEAM_PROFILE_RED_VULNERABLEteam-profile-red-vulnerableType: integer
Default value: 110 Min value: 5 Max value: 2000
Defines how vulnerable the red team is. This is a percentage, if set to 200 then team will be attacked twice as much as any other team with the default value. Setting this to a high value clearly disadvantages this team.
--team-profile-red-weapon-alternate-id=<value>LW6_TEAM_PROFILE_RED_WEAPON_ALTERNATE_IDteam-profile-red-weapon-alternate-idType: integer
Default value: 2 Min value: 0 Max value: 19
Id of the default alternate weapon for the red team, see the documentation about weapons to know what these ids mean.
--team-profile-red-weapon-id=<value>LW6_TEAM_PROFILE_RED_WEAPON_IDteam-profile-red-weapon-idType: integer
Default value: 10 Min value: 0 Max value: 19
Id of the default weapon for the red team, see the documentation about weapons to know what these ids mean.
--team-profile-red-weapon-mode=<value>LW6_TEAM_PROFILE_RED_WEAPON_MODEteam-profile-red-weapon-modeType: integer
Default value: 1 Min value: 0 Max value: 2
Weapon mode for red team. 0 means there’s no weapon, 1 means one weapon per team, defined by the weapon-id parameter, 2 means random weapon.
--team-profile-yellow-aggressive=<value>LW6_TEAM_PROFILE_YELLOW_AGGRESSIVEteam-profile-yellow-aggressiveType: integer
Default value: 200 Min value: 5 Max value: 2000
Defines how aggressive the yellow team is. This is a percentage, if set to 200 then team will attack twice as much as any other team with the default value. Setting this to a high value clearly advantages this team.
--team-profile-yellow-fast=<value>LW6_TEAM_PROFILE_YELLOW_FASTteam-profile-yellow-fastType: integer
Default value: 70 Min value: 5 Max value: 2000
Changes the speed of the yellow team. This is a percentage, if set to 50, then team will move twice slower than other teams with the default parameter. Setting this high is very likely to advantage the team.
--team-profile-yellow-handicap=<value>LW6_TEAM_PROFILE_YELLOW_HANDICAPteam-profile-yellow-handicapType: integer
Default value: 100 Min value: 10 Max value: 1000
Defines the handicap for the yellow team.
--team-profile-yellow-mobile=<value>LW6_TEAM_PROFILE_YELLOW_MOBILEteam-profile-yellow-mobileType: integer
Default value: 0 Min value: -3 Max value: 3
Increases (or decreases if negative) the number of move/attack/defense tries for the yellow team. If set to a high value team will appear more mobile and do more things, but it won’t change its cruising speed. It’s not obvious to tell wether this is an advantage or not, but it clearly changes the behavior.
--team-profile-yellow-vulnerable=<value>LW6_TEAM_PROFILE_YELLOW_VULNERABLEteam-profile-yellow-vulnerableType: integer
Default value: 90 Min value: 5 Max value: 2000
Defines how vulnerable the yellow team is. This is a percentage, if set to 200 then team will be attacked twice as much as any other team with the default value. Setting this to a high value clearly disadvantages this team.
--team-profile-yellow-weapon-alternate-id=<value>LW6_TEAM_PROFILE_YELLOW_WEAPON_ALTERNATE_IDteam-profile-yellow-weapon-alternate-idType: integer
Default value: 9 Min value: 0 Max value: 19
Id of the default alternate weapon for the yellow team, see the documentation about weapons to know what these ids mean.
--team-profile-yellow-weapon-id=<value>LW6_TEAM_PROFILE_YELLOW_WEAPON_IDteam-profile-yellow-weapon-idType: integer
Default value: 5 Min value: 0 Max value: 19
Id of the default weapon for the yellow team, see the documentation about weapons to know what these ids mean.
--team-profile-yellow-weapon-mode=<value>LW6_TEAM_PROFILE_YELLOW_WEAPON_MODEteam-profile-yellow-weapon-modeType: integer
Default value: 1 Min value: 0 Max value: 2
Weapon mode for yellow team. 0 means there’s no weapon, 1 means one weapon per team, defined by the weapon-id parameter, 2 means random weapon.
--total-armies-size=<value>LW6_TOTAL_ARMIES_SIZEtotal-armies-sizeType: integer
Default value: 60 Min value: 1 Max value: 95
Defines the proportion of the whole available space, which can be occupied by all the armies present together. Setting this low, whenever a new team arrives on the map, fighters might be stolen to other teams, otherwise the ame would get too crowded. This allows you to play with reasonnably enough fighters with 2 players, while still allowing interesting gameplay with many players. This is a percentage, but will be multiplied by itself to get the actual surface. That is, 50 means 50%*50%, that is, a square of 1/2 the size of a square map, so it represents 25% (1/4) of the total surface.
--total-time=<value>LW6_TOTAL_TIMEtotal-timeType: integer
Default value: 900 Min value: 10 Max value: 864000
Defines the maximum time of the game, in seconds. Note that in some cases, the game can end much earlier if some player has managed to win before the bell rings. Also, technically, this value will be translated into rounds and moves, and the game engine will wait until enough rounds and moves have been played. So if the computer is too slow and the desired speed is not reached, then the game will last for a longer time.
--use-team-profiles=<value>LW6_USE_TEAM_PROFILESuse-team-profilesType: integer
Default value: 1 Min value: 0 Max value: 1
If set, then all the team-profile-... values will be taken in account. This enables a mode in which teams behave differently according to their colors. If you disable this, then all teams will behave the same, which is more fair, but might not be as fun.
--vertical-move=<value>LW6_VERTICAL_MOVEvertical-moveType: integer
Default value: 1 Min value: 0 Max value: 7
Defines when to process a vertical move (along the Z ’depth’ axis). If set to 0, fighters never spontaneously move along this axis. If set to 1, it will be tried just after the first move failed. If set to 2, it will be tried just after the second move failed. And so on.
--weapon-charge-delay=<value>LW6_WEAPON_CHARGE_DELAYweapon-charge-delayType: integer
Default value: 30 Min value: 1 Max value: 600
How long it will take for weapons to charge and be usable, by default. Unit is seconds.
--weapon-charge-max=<value>LW6_WEAPON_CHARGE_MAXweapon-charge-maxType: integer
Default value: 200 Min value: 100 Max value: 1000
Maximum (percentage) of charge intensity that one have. For instance, if this is 400, then if you wait four times more than required before firing, then you weapon will have four times its default power, but if you wait five times more it will still be four times more powerfull, it’s just the limit after which it’s useless to charge.
--weapon-duration=<value>LW6_WEAPON_DURATIONweapon-durationType: integer
Default value: 3 Min value: 1 Max value: 60
How long all weapons (for which duration makes sense) will last. Unit is seconds.
--weapon-tune-berzerk-power=<value>LW6_WEAPON_TUNE_BERZERK_POWERweapon-tune-berzerk-powerType: integer
Default value: 3 Min value: 1 Max value: 100
Use to specifiy how strong berzerk mode is, if set to 3, then attacks will be 3 times as efficient in berzerk mode.
--weapon-tune-turbo-power=<value>LW6_WEAPON_TUNE_TURBO_POWERweapon-tune-turbo-powerType: integer
Default value: 3 Min value: 1 Max value: 10
Defines how fast fighters move in turbo mode, if set to 3, then fighters move and act 3 times as fast.
--x-polarity=<value>LW6_X_POLARITYx-polarityType: integer
Default value: 0 Min value: -1 Max value: 1
Defines how the map will be wrapped on the X (horizontal) axis. If set to 0, nothing is wrapped. If set to 1, the right and left borders are connected, any fighter can disappear on the right border and reappear on the left border, for instance. If set to -1, it will be wrapped but also inversed, that is on a 320x240 map, a fighter disappearing on the left border at position (0,60) will reapper on the right border at position (319,180). You can combine it with ’y-polarity’.
--y-polarity=<value>LW6_Y_POLARITYy-polarityType: integer
Default value: 0 Min value: -1 Max value: 1
Defines how the map will be wrapped on the Y (vertical) axis. If set to 0, nothing is wrapped. If set to 1, the top and bottom borders are connected, any fighter can disappear on the top border and reappear on the bottom border, for instance. If set to -1, it will be wrapped but also inversed, that is on a 320x240 map, a fighter disappearing on the bottom border at position (40,239) will reapper on the top border at position (280,0). You can combine it with ’x-polarity’.
--z-polarity=<value>LW6_Z_POLARITYz-polarityType: integer
Default value: 0 Min value: 0 Max value: 1
Defines how the map will be wrapped on the Z (deep) axis. If set to 0, nothing is wrapped. If set to 1, when using a 4 layer map, for instance, fighters on layer 1 will be able to go directly to layer 4 even if layers 2 and 3 are filled with walls. A value of -1 is forbidden, this is not like x and y axis, it does not really make sense. Consider this an advanced setting which might save a layer in some tricky cases, the default value of 0 should fit in most cases.
Next: Map style.xml, Previous: Map rules.xml, Up: Reference [Contents][Index]
--background-color-auto=<value>LW6_BACKGROUND_COLOR_AUTObackground-color-autoType: boolean
Default value: true
Defines wether hud colors will be set automatically from base and alternate colors. This is a time saver to keep map designers from requiring to redefined every single color in the game. You only need to set color-base-bg, color-base-fg, color-alternate-bg and color-alternate-fg. Then hud_color_frame_bg, hud_color_frame_fg, hud_color_text_bg and hud_color_text_fg will be automatically set.
--downsize-using-bench-value=<value>LW6_DOWNSIZE_USING_BENCH_VALUEdownsize-using-bench-valueType: boolean
Default value: true
If set, then the game will automatically downsize a map according to the ’bench-value’ parameter. Downsizing means: a 1600x1200 maps becomes 200x150, for instance. Downsizing causes fighters to be bigger because map resolution is lower. This will avoid running the game on a too big map, with your computer not being able to handle it at the required speed.
--downsize-using-fighter-scale=<value>LW6_DOWNSIZE_USING_FIGHTER_SCALEdownsize-using-fighter-scaleType: boolean
Default value: false
If set, then the game will automatically downsize a map according to the ’fighter-scale’ parameter. Downsizing means: a 1600x1200 maps becomes 200x150, for instance. Downsizing causes fighters to be bigger because map resolution is lower. This can be usefull if you don’t want fighters to be too small.
--fighter-scale=<value>LW6_FIGHTER_SCALEfighter-scaleType: float
Default value: 1.0
Defines how wide (in pixels) fighters must be. This parameter is very important and will largely condition the number of fighters on the map. It is used when loading the map. If it is, for instance, set to 1, there will be exactly a fighter per pixel on the screen. That is, if you play 640x480 on an empty map, the maximum fighters you could have is about 300000. The idea is that by changing the resolution, you also define the density of the map. In pratice, this is done in the hope that someone with a slow computer will pick up a low resolution and therefore play small levels. Conversely, someone with a brand new computer with powerfull CPU & GPU will use great resolutions and be happy with many fighters on the map. Still, changing the resolution after loading the map will not affet the number of fighters. Same for network games, the first player, who loads the map, defines its properties according to its own settings.
--guess-colors=<value>LW6_GUESS_COLORSguess-colorsType: boolean
Default value: true
Defines wether colors should be set automatically from texture colors. If set to true, then the program will try to pick up colors automatically from the texture, and will override the values of the color-base-bg, color-base-fg, color-alternate-bg and color-alternate-fg parameters. How these colors are picked up can’t be garanteed, so if the map does not have strong contrast or if there can be any form of ambiguity, it’s safe to set this to false and define one’s own colors.
--guess-moves-per-sec=<value>LW6_GUESS_MOVES_PER_SECguess-moves-per-secType: boolean
Default value: true
If set, then loader will use ’time-to-cross-level’ to guess the game speed parameters.
--hud-color-auto=<value>LW6_HUD_COLOR_AUTOhud-color-autoType: boolean
Default value: true
Defines wether hud colors will be set automatically from base and alternate colors. This is a time saver to keep map designers from requiring to redefined every single color in the game. You only need to set color-base-bg, color-base-fg, color-alternate-bg and color-alternate-fg. Then hud_color_frame_bg, hud_color_frame_fg, hud_color_text_bg and hud_color_text_fg will be automatically set.
--max-map-height=<value>LW6_MAX_MAP_HEIGHTmax-map-heightType: integer
Default value: 1000
Allows you to give a maximum map height. When designing a map you might wonder: this is dumb I’m conceiving this map I know its height, why should I limit it? Now think of the play who plays on a old slowish computer with a tiny screen. He might redefine this himself, and does not necessarly wishes to fire Gimp to rescale the map.
--max-map-surface=<value>LW6_MAX_MAP_SURFACEmax-map-surfaceType: integer
Default value: 1000000
Allows you to give a maximum map surface. Map surface is simply (width * height). This parameter is just here to save you the hassle of defining both ’max-map-width’ and ’max-map-height’ in a consistent manner.
--max-map-width=<value>LW6_MAX_MAP_WIDTHmax-map-widthType: integer
Default value: 1500
Allows you to give a maximum map width. When designing a map you might wonder: this is dumb I’m conceiving this map I know its width, why should I limit it? Now think of the play who plays on a old slowish computer with a tiny screen. He might redefine this himself, and does not necessarly wishes to fire Gimp to rescale the map.
--menu-color-auto=<value>LW6_MENU_COLOR_AUTOmenu-color-autoType: boolean
Default value: true
Defines wether menu colors will be set automatically from base and alternate colors. This is a time saver to keep map designers from requiring to redefined every single color in the game. You only need to set color-base-bg, color-base-fg, color-alternate-bg and color-alternate-fg. Then menu_color_default_bg, menu_color_default_fg, menu_color_selected_bg, menu_color_selected_fg, menu_color_disabled_bg and menu_color_disabled_fg will be automatically set.
--min-map-height=<value>LW6_MIN_MAP_HEIGHTmin-map-heightType: integer
Default value: 30
Allows you to give a minimum map height. When designing a map you might wonder: this is dumb I’m conceiving this map I know its height, why should I limit it? Now think of the player who decided to play with highly-defined maps because he has a super calculator and a hudge screen. He might redefine this himself, and does not necessarly wishes to fire Gimp to rescale the map.
--min-map-surface=<value>LW6_MIN_MAP_SURFACEmin-map-surfaceType: integer
Default value: 3600
Allows you to give a minimum map surface. Map surface is simply (width * height). This parameter is just here to save you the hassle of defining both ’min-map-width’ and ’min-map-height’ in a consistent manner.
--min-map-width=<value>LW6_MIN_MAP_WIDTHmin-map-widthType: integer
Default value: 40
Allows you to give a minimum map width. When designing a map you might wonder: this is dumb I’m conceiving this map I know its width, why should I limit it? Now think of the player who decided to play with highly-defined maps because he has a super calculator and a hudge screen. He might redefine this himself, and does not necessarly wishes to fire Gimp to rescale the map.
--resample=<value>LW6_RESAMPLEresampleType: boolean
Default value: true
If set to true, maps will always be resampled to a size which depends on your screen resolution, zoom factor, and the rest. If false, maps will be set at the exact resolution of map.png.
--speed=<value>LW6_SPEEDspeedType: float
Default value: 1.0
This parameter is the main parameter on which game speed depends. The map loader will garantee, by downscaling the map, that to cross the level (by crossing the level we mean, for instance, going from top-left corner to bottom-right corner in a straight line) a fighter will take a constant amount of time. Under the hood, the loader might of course rescale the map but it will also change game speed so that, at the end, fighters take a constant time to cross the level. This is, indeed, the most important thing, players do not care much if internally there are X or Y moves per second, the global game experience depends on how fast fighter movement looks on the screen. The default settings corresponds roughly to one second to cross the level. If you set this to 2.0, it will go twice faster.
--system-color-auto=<value>LW6_SYSTEM_COLOR_AUTOsystem-color-autoType: boolean
Default value: true
Defines wether system colors will be set automatically from base and alternate colors. This is a time saver to keep map designers from requiring to redefined every single color in the game. You only need to set color-base-bg, color-base-fg, color-alternate-bg and color-alternate-fg. Then system_color_bg and system_color_fg will be automatically set.
--upsize-using-bench-value=<value>LW6_UPSIZE_USING_BENCH_VALUEupsize-using-bench-valueType: boolean
Default value: false
If set, then the game will automatically upsize a map according to the ’fighter-scale’ parameter. Upsizing means: a 160x120 maps becomes 400x300, for instance. Upsizing causes fighters to be smaller because map resolution is higher. This will avoid useless pixelish ’jumbo fighters’ look when your computer is powerfull enough to do better.
--upsize-using-fighter-scale=<value>LW6_UPSIZE_USING_FIGHTER_SCALEupsize-using-fighter-scaleType: boolean
Default value: true
If set, then the game will automatically upsize a map according to the ’fighter-scale’ parameter. Upsizing means: a 160x120 maps becomes 400x300, for instance. Upsizing causes fighters to be smaller because map resolution is higher. This can be usefull if you don’t want fighters to be too big.
--view-color-auto=<value>LW6_VIEW_COLOR_AUTOview-color-autoType: boolean
Default value: true
Defines wether view colors will be set automatically from base and alternate colors. This is a time saver to keep map designers from requiring to redefined every single color in the game. You only need to set color-base-bg, color-base-fg, color-alternate-bg and color-alternate-fg. Then view_color_cursor_bg, view_color_cursor_fg, view_color_map_bg and view_color_map_fg will be automatically set.
--wall-grease=<value>LW6_WALL_GREASEwall-greaseType: integer
Default value: 0 Min value: -5 Max value: 5
This parameter allows you to make walls (AKA map foreground) thicker, or thiner, when map is loaded. Indeed, when map are resampled, and especially when they are downscaled, some walls may disappear, or some passages may be blocked. The loader can’t automatically figure out wether it’s more important to keep an existing wall or to keep an open passage for fighters. This parameter helps doing so, if you set it to a low value, level will be less greasy, and many passages might open themselves. On the contrary, if grease is at a high level, then a thin line of almost isolated pixels might become a thick wall. There’s no real garantee your wall or passage will always be present, but it’s a same bet to assume on a ’tunnel-like’ level one needs to set grease to a low value, and on a ’wide open’ level with few walls one needs to set grease to a high value.
Next: Map teams.xml, Previous: Map hints.xml, Up: Reference [Contents][Index]
--animation-density=<value>LW6_ANIMATION_DENSITYanimation-densityType: float
Default value: 1.0 Min value: 0 Max value: 10
Density of the background animation, that is, for instance, if the background animation is about displaying bubbles, using a high value will display many bubbles. A value of 1.0 corresponds to the default setting.
--animation-speed=<value>LW6_ANIMATION_SPEEDanimation-speedType: float
Default value: 1.0 Min value: 0 Max value: 10
Speed of the background animation, that is, for instance, if the background animation is about displaying bubbles, using a high value will cause bubbles to move very fast. A value of 1.0 corresponds to the default setting.
--background-color-root-bg=<value>LW6_BACKGROUND_COLOR_ROOT_BGbackground-color-root-bgType: color
Default value: #000000
Defines the main background color. This is, for instance, the color which will be used to clear the screen before drawing thing. Will be automatically guessed from the map texture if color-auto is set. Can be #RGB, #RGBA, #RRGGBB or #RRGGBBAA.
--background-color-root-fg=<value>LW6_BACKGROUND_COLOR_ROOT_FGbackground-color-root-fgType: color
Default value: #cccccc
Defines a color which will be used together with color-base-bg to compose the background. It can be wise to have a minimum contrast between this color and color-base-bg, but it is not mandatory, especially if other colors are manually redefined. Will be automatically guessed from the map texture if color-auto is set. Can be #RGB, #RGBA, #RRGGBB or #RRGGBBAA.
--background-color-stuff-bg=<value>LW6_BACKGROUND_COLOR_STUFF_BGbackground-color-stuff-bgType: color
Default value: #333333
Defines a color which will be used together with color-alternate-fg to draw things (animations, sprites, text, whatever) in the background. It should be different enough from color-alternate-fg so that one can really distinguish these colors. Will be automatically guessed from the map texture if color-auto is set. Can be #RGB, #RGBA, #RRGGBB or #RRGGBBAA.
--background-color-stuff-fg=<value>LW6_BACKGROUND_COLOR_STUFF_FGbackground-color-stuff-fgType: color
Default value: #ffffff
Defines a color which will be used to draw things (animations, sprites, text, whatever) in the background. It should be different enough from color-alternate-bg so that one can really distinguish these colors. Think of this as the sprite, the text, the whatever-needs-to-be-seen-uses-this color. Will be automatically guessed from the map texture if color-auto is set. Can be #RGB, #RGBA, #RRGGBB or #RRGGBBAA.
--background-style=<value>LW6_BACKGROUND_STYLEbackground-styleType: string
Default value: bubbles
The background defines, of course, what is displayed at the background, but it also conditions the colors used for other items, such as the menus for instance. The possible values are ’void’ and ’bubbles’.
--blink-cursor=<value>LW6_BLINK_CURSORblink-cursorType: boolean
Default value: false
If set, then cursor will blink, allowing you to see what’s under the cursor. It’s just a matter of taste, you might to always have your cursor displayed, or prefer to have it disappear from time to time so that you can see the action below
--color-alternate-bg=<value>LW6_COLOR_ALTERNATE_BGcolor-alternate-bgType: color
Default value: #333333
Defines the alternate color, more precisely, its bg (background) part. Colors are always defined by a bg/fg pair. Most colors in the game can be deduced from this one, usually to color a map you only need to define color-base-bg, color-base-fg, color-alternate-bg and color-alternate-fg.
--color-alternate-fg=<value>LW6_COLOR_ALTERNATE_FGcolor-alternate-fgType: color
Default value: #ffffff
Defines the alternate color, more precisely, its fg (foreground) part. Colors are always defined by a bg/fg pair. Most colors in the game can be deduced from this one, usually to color a map you only need to define color-base-bg, color-base-fg, color-alternate-bg and color-alternate-fg.
--color-base-bg=<value>LW6_COLOR_BASE_BGcolor-base-bgType: color
Default value: #000000
Defines the base color, more precisely, its bg (background) part. Colors are always defined by a bg/fg pair. Most colors in the game can be deduced from this one, usually to color a map you only need to define color-base-bg, color-base-fg, color-alternate-bg and color-alternate-fg.
--color-base-fg=<value>LW6_COLOR_BASE_FGcolor-base-fgType: color
Default value: #cccccc
Defines the base color, more precisely, its fg (foreground) part. Colors are always defined by a bg/fg pair. Most colors in the game can be deduced from this one, usually to color a map you only need to define color-base-bg, color-base-fg, color-alternate-bg and color-alternate-fg.
--colorize=<value>LW6_COLORIZEcolorizeType: boolean
Default value: true
If set, then all background drawings including textures will use the background colors. This means, for instance, that if background colors are set automatically by color-auto from the map texture, then the background will adopt the same range of colors than the map itself. In short, the background will mimic the map.
--colorize-cursor=<value>LW6_COLORIZE_CURSORcolorize-cursorType: boolean
Default value: true
If set, then all cursors will use the automatic guessed colors, or the specified colors, but basically they won’t be displayed using their native colors. This can be usefull for you can wish to use a generic non-colored texture for your cursor and let it be colorized automatically so that it’s accorded to the level.
--cursor-size=<value>LW6_CURSOR_SIZEcursor-sizeType: float
Default value: 1.0 Min value: 0 Max value: 10
Size of the cursors on the map. 1 is the default, setting it to a higher value will make cursors bigger, a lower value will make them smaller.
--hidden-layer-alpha=<value>LW6_HIDDEN_LAYER_ALPHAhidden-layer-alphaType: float
Default value: 0.1 Min value: 0 Max value: 1
Whenever players are supposed to be hidden behind a wall, for instance if they are in layer 2 and layer 1 is filled with walls, it’s still possible to see them, but with a low alpha value (almost transparent). This parameter allows you to trick this value, 0 will make these players absolutely invisible, 1 will make them totally opaque, like if they were on layer 1.
--hud-color-frame-bg=<value>LW6_HUD_COLOR_FRAME_BGhud-color-frame-bgType: color
Default value: #000000
Defines the background color for the hud frame. Ignored if hud-color-auto is set. Can be #RGB, #RGBA, #RRGGBB or #RRGGBBAA.
--hud-color-frame-fg=<value>LW6_HUD_COLOR_FRAME_FGhud-color-frame-fgType: color
Default value: #cccccc
Defines the foreground color for the hud frame. Ignored if hud-color-auto is set. Can be #RGB, #RGBA, #RRGGBB or #RRGGBBAA.
--hud-color-text-bg=<value>LW6_HUD_COLOR_TEXT_BGhud-color-text-bgType: color
Default value: #333333
Defines the background color for hud text. Ignored if hud-color-auto is set. Can be #RGB, #RGBA, #RRGGBB or #RRGGBBAA.
--hud-color-text-fg=<value>LW6_HUD_COLOR_TEXT_FGhud-color-text-fgType: color
Default value: #ffffff
Defines the foreground color for hud text. Ignored if hud-color-auto is set. Can be #RGB, #RGBA, #RRGGBB or #RRGGBBAA.
--hud-style=<value>LW6_HUD_STYLEhud-styleType: string
Default value: floating
The hud is where informations about the game are displayed. This means, who is winning, are other status-like informations. Possible values include ’floating’ and ’tactical’.
--keep-ratio=<value>LW6_KEEP_RATIOkeep-ratioType: boolean
Default value: true
Defines wether the map should keep its ratio, or if it should be stretched to fill the shape of your screen.
--menu-color-default-bg=<value>LW6_MENU_COLOR_DEFAULT_BGmenu-color-default-bgType: color
Default value: #333333
Defines the default background color for menus. Ignored if menu-color-auto is set. Can be #RGB, #RGBA, #RRGGBB or #RRGGBBAA.
--menu-color-default-fg=<value>LW6_MENU_COLOR_DEFAULT_FGmenu-color-default-fgType: color
Default value: #ffffff
Defines the default foreground color for menus. In fact, this is the main color for menu text, the color used to draw letters in menus. Ignored if menu-color-auto is set. Can be #RGB, #RGBA, #RRGGBB or #RRGGBBAA.
--menu-color-disabled-bg=<value>LW6_MENU_COLOR_DISABLED_BGmenu-color-disabled-bgType: color
Default value: #000000
Defines the background color for a disabled menu item. Ignored if menu-color-auto is set. Can be #RGB, #RGBA, #RRGGBB or #RRGGBBAA.
--menu-color-disabled-fg=<value>LW6_MENU_COLOR_DISABLED_FGmenu-color-disabled-fgType: color
Default value: #cccccc
Defines the foreground color for a disabled menu item. Ignored if menu-color-auto is set. Can be #RGB, #RGBA, #RRGGBB or #RRGGBBAA.
--menu-color-selected-bg=<value>LW6_MENU_COLOR_SELECTED_BGmenu-color-selected-bgType: color
Default value: #ffffff
Defines the background color for a selected menu item. Ignored if menu-color-auto is set. Can be #RGB, #RGBA, #RRGGBB or #RRGGBBAA.
--menu-color-selected-fg=<value>LW6_MENU_COLOR_SELECTED_FGmenu-color-selected-fgType: color
Default value: #333333
Defines the foreground color for a selected menu item. Ignored if menu-color-auto is set. Can be #RGB, #RGBA, #RRGGBB or #RRGGBBAA.
--menu-style=<value>LW6_MENU_STYLEmenu-styleType: string
Default value: cylinder
The menu style is simply the name of the engine used to power the menu system. The only possible value, for now, is ’cylinder’.
--music-exclude=<value>LW6_MUSIC_EXCLUDEmusic-excludeType: string
Default value: Chadburn
If this string is found in a music file name, it will be excluded from the list when playing in random mode.
--music-file=<value>LW6_MUSIC_FILEmusic-fileType: string
Default value:
Allows you to play a custom music file (typically your own ogg music) and override default game music. If file does not exist, game will use its internal music. The file will be searched for in the current ’music-path’ but also in the current map directory. No absolute or even relative path are allowed, only a plain filename with no slash or backslash. Avoid special characters at all cost.
--music-filter=<value>LW6_MUSIC_FILTERmusic-filterType: string
Default value:
A music filter, used when files are played randomly. This is not a complex regex-enabled filter, just a plain string search. Even the ’*’ wildcard won’t work. If you want precise control on what music file to play, please consider reorganizing your files and/or use the ’music-file’ parameter.
--pixelize=<value>LW6_PIXELIZEpixelizeType: boolean
Default value: false
Depending on the renderer capabilities, will try to pixelize some parts of the game. This can be used to emulate the old LW5 appearance.
--system-color-bg=<value>LW6_SYSTEM_COLOR_BGsystem-color-bgType: color
Default value: #333333
Defines the system background color, used when displaying system info, such as the number of frames per second. Can be #RGB, #RGBA, #RRGGBB or #RRGGBBAA.
--system-color-fg=<value>LW6_SYSTEM_COLOR_FGsystem-color-fgType: color
Default value: #ffffff
Defines the system foreground color, used when displaying system info, such as the number of frames per second. This will typically be text color. Can be #RGB, #RGBA, #RRGGBB or #RRGGBBAA.
--team-color-blue=<value>LW6_TEAM_COLOR_BLUEteam-color-blueType: color
Default value: #0000ff
Defines the color for the blue team. Syntax is HTML-like, #RGB or #RRGGBB.
--team-color-cyan=<value>LW6_TEAM_COLOR_CYANteam-color-cyanType: color
Default value: #00ffff
Defines the color for the cyan team. Syntax is HTML-like, #RGB or #RRGGBB.
--team-color-dead=<value>LW6_TEAM_COLOR_DEADteam-color-deadType: color
Default value: #000000
Defines the color for the teams when they are dead. By default it is black, this means when a team is weak it becomes black. Syntax is HTML-like, #RGB or #RRGGBB.
--team-color-green=<value>LW6_TEAM_COLOR_GREENteam-color-greenType: color
Default value: #00ff00
Defines the color for the green team. Syntax is HTML-like, #RGB or #RRGGBB.
--team-color-lightblue=<value>LW6_TEAM_COLOR_LIGHTBLUEteam-color-lightblueType: color
Default value: #88bbff
Defines the color for the light blue team. Syntax is HTML-like, #RGB or #RRGGBB.
--team-color-magenta=<value>LW6_TEAM_COLOR_MAGENTAteam-color-magentaType: color
Default value: #ff00ff
Defines the color for the magenta team. Syntax is HTML-like, #RGB or #RRGGBB.
--team-color-orange=<value>LW6_TEAM_COLOR_ORANGEteam-color-orangeType: color
Default value: #ff8800
Defines the color for the orange team. Syntax is HTML-like, #RGB or #RRGGBB.
--team-color-pink=<value>LW6_TEAM_COLOR_PINKteam-color-pinkType: color
Default value: #ff88bb
Defines the color for the pink team. Syntax is HTML-like, #RGB or #RRGGBB.
--team-color-purple=<value>LW6_TEAM_COLOR_PURPLEteam-color-purpleType: color
Default value: #bb88ff
Defines the color for the purple team. Syntax is HTML-like, #RGB or #RRGGBB.
--team-color-red=<value>LW6_TEAM_COLOR_REDteam-color-redType: color
Default value: #ff0000
Defines the color for the red team. Syntax is HTML-like, #RGB or #RRGGBB.
--team-color-yellow=<value>LW6_TEAM_COLOR_YELLOWteam-color-yellowType: color
Default value: #ffff00
Defines the color for the yellow team. Syntax is HTML-like, #RGB or #RRGGBB.
--view-color-cursor-bg=<value>LW6_VIEW_COLOR_CURSOR_BGview-color-cursor-bgType: color
Default value: #333333
Defines the background cursor color. Will typically be used to draw the shape of the cursor. Ignored if view-color-auto is set. Can be #RGB, #RGBA, #RRGGBB or #RRGGBBAA.
--view-color-cursor-fg=<value>LW6_VIEW_COLOR_CURSOR_FGview-color-cursor-fgType: color
Default value: #ffffff
Defines the foreground cursor color. Will typically be used to draw text in the cursor. Ignored if view-color-auto is set. Can be #RGB, #RGBA, #RRGGBB or #RRGGBBAA.
--view-color-map-bg=<value>LW6_VIEW_COLOR_MAP_BGview-color-map-bgType: color
Default value: #000000
Defines the background map color. If there’s no map texture defined or if use-texture is false, this is the color of the places where armies will go. Ignored if view-color-auto is set. Can be #RGB, #RGBA, #RRGGBB or #RRGGBBAA.
--view-color-map-fg=<value>LW6_VIEW_COLOR_MAP_FGview-color-map-fgType: color
Default value: #cccccc
Defines the foreground map color. If there’s no map texture defined or if use-texture is false, this is the color of walls, what armies can’t go through. Ignored if view-color-auto is set. Can be #RGB, #RGBA, #RRGGBB or #RRGGBBAA.
--view-style=<value>LW6_VIEW_STYLEview-styleType: string
Default value: flat
The view style conditions which renderer is used for the map, the area where fighters are displayed. This is not the graphics backend. Indeed, the graphics backend defines which technical tool one uses (which library) one runs, wether this parameter says what kind of rendering one wants.
--waves=<value>LW6_WAVESwavesType: boolean
Default value: true
Activates the wave effect, that’s to say level appears to be under water when playing.
--x-wrap=<value>LW6_X_WRAPx-wrapType: boolean
Default value: true
Defines wether the map should be wrapped on the x axis. This is the companion of ’x-polarity’, if no polarity is defined, map can’t be wrapped, but in some cases, one might wish to have a map with polarity but without wrapping if, for instance, textures do not tile nicely.
--y-wrap=<value>LW6_Y_WRAPy-wrapType: boolean
Default value: true
Defines wether the map should be wrapped on the y axis. This is the companion of ’y-polarity’, if no polarity is defined, map can’t be wrapped, but in some cases, one might wish to have a map with polarity but without wrapping if, for instance, textures do not tile nicely.
--zoom=<value>LW6_ZOOMzoomType: float
Default value: 1.0
Defines the map zoom. If lower than 1.0, map will occupy only a fraction of the screen, if greater than 1.0, some areas will be outside the screen, and the player will need to scroll through it.
--zoom-max=<value>LW6_ZOOM_MAXzoom-maxType: float
Default value: 30.0
Defines the max map zoom. If set to a high value, you’ll be able to dynamically view the map with hudge fighters, seeing only a fraction of the level.
--zoom-min=<value>LW6_ZOOM_MINzoom-minType: float
Default value: 0.3
Defines the min map zoom. If set to a low value, you’ll be able to dynamically view a very small, reduced map.
Next: Advanced settings, Previous: Map style.xml, Up: Reference [Contents][Index]
--bot-iq=<value>LW6_BOT_IQbot-iqType: integer
Default value: 100 Min value: 0 Max value: 200
The IQ (intelligence quotient) of bots. Typically, a value of 100 will make the bot behave normally, performing at its best. A value of 0 will just make it act the worst way it can. Values over 100 probably won’t change anything compared to 100, but this truely depends on which bot backend you’re running.
--bot-speed=<value>LW6_BOT_SPEEDbot-speedType: float
Default value: 1.0f
The speed of bots, 1 means normal speed, higher value will speed it up, lower will slow it down. Note that this only has an impact on bot engines, not on the game speed itself.
--bot1-ai=<value>LW6_BOT1_AIbot1-aiType: string
Default value: idiot
AI engine for bot number 1.
--bot1-color=<value>LW6_BOT1_COLORbot1-colorType: string
Default value: green
Color for bot number 1.
--bot2-ai=<value>LW6_BOT2_AIbot2-aiType: string
Default value: idiot
AI engine for bot number 2.
--bot2-color=<value>LW6_BOT2_COLORbot2-colorType: string
Default value: blue
Color for bot number 2.
--bot3-ai=<value>LW6_BOT3_AIbot3-aiType: string
Default value: random
AI engine for bot number 3.
--bot3-color=<value>LW6_BOT3_COLORbot3-colorType: string
Default value: yellow
Color for bot number 3.
--bot4-ai=<value>LW6_BOT4_AIbot4-aiType: string
Default value: follow
AI engine for bot number 4.
--bot4-color=<value>LW6_BOT4_COLORbot4-colorType: string
Default value: cyan
Color for bot number 4.
--bot5-ai=<value>LW6_BOT5_AIbot5-aiType: string
Default value: random
AI engine for bot number 5.
--bot5-color=<value>LW6_BOT5_COLORbot5-colorType: string
Default value: magenta
Color for bot number 5.
--bot6-ai=<value>LW6_BOT6_AIbot6-aiType: string
Default value: follow
AI engine for bot number 6.
--bot6-color=<value>LW6_BOT6_COLORbot6-colorType: string
Default value: orange
Color for bot number 6.
--bot7-ai=<value>LW6_BOT7_AIbot7-aiType: string
Default value: idiot
AI engine for bot number 7.
--bot7-color=<value>LW6_BOT7_COLORbot7-colorType: string
Default value: lightblue
Color for bot number 7.
--bot8-ai=<value>LW6_BOT8_AIbot8-aiType: string
Default value: idiot
AI engine for bot number 8.
--bot8-color=<value>LW6_BOT8_COLORbot8-colorType: string
Default value: purple
Color for bot number 8.
--bot9-ai=<value>LW6_BOT9_AIbot9-aiType: string
Default value: idiot
AI engine for bot number 9.
--bot9-color=<value>LW6_BOT9_COLORbot9-colorType: string
Default value: pink
Color for bot number 9.
--nb-bots=<value>LW6_NB_BOTSnb-botsType: integer
Default value: 2 Min value: 0 Max value: 9
Number of bots on the map. 0 means no bots, if set to 1 the the bot1-... settings will be used, if set to 2 then bot1-... and bot2-... will be used, and so on.
--player1-color=<value>LW6_PLAYER1_COLORplayer1-colorType: string
Default value: red
Color of the first player, must be red, green, blue, yellow, cyan, magenta, orange, lightblue, purple or pink
--player2-color=<value>LW6_PLAYER2_COLORplayer2-colorType: string
Default value: green
Color of the second player, must be red, green, blue, yellow, cyan, magenta, orange, lightblue, purple or pink
--player3-color=<value>LW6_PLAYER3_COLORplayer3-colorType: string
Default value: blue
Color of the third player, must be red, green, blue, yellow, cyan, magenta, orange, lightblue, purple or pink
--player4-color=<value>LW6_PLAYER4_COLORplayer4-colorType: string
Default value: yellow
Color of the fourth player, must be red, green, blue, yellow, cyan, magenta, orange, lightblue, purple or pink
Next: C to Guile, Previous: Map teams.xml, Up: Reference [Contents][Index]
--base64-decodeIf specified, program will take stdin and base64 decode it to stdout. This is for testing purpose (for network messages for instance). Will decode in standard base64 encoding using characters + and / but also the url-compliant version using - and /, see RFC 4648 for details.
--base64-encodeIf specified, program will take stdin and base64 encode it to stdout. This is for testing purpose (for network messages for instance). Will *not* use standard base64 encoding using characters + and / but - and _ instead to be url-compliant, see RFC 4648 for details.
--benchRuns a benchmarking test which will report an approximative performance estimation of the game on your computer. The result is in an arbitrary unit, but it is logarithmic, and works the way the audio decibels do. That is, 30 is 10 times greater than 20. 10 is supposed to be a reference of a computer that can reasonnably run the game. So if you get 40, you are 1000 times powerfull enough. Negative values can technically show up on very slow computers.
--bench-value=<value>LW6_BENCH_VALUEbench-valueType: integer
Default value: LW6LDR_DEFAULT_BENCH_VALUE
Contains the current bench value of the computer running the game. This is used internally to choose the right map settings. You can override this value and use your own but... use at your own risk. Pretending you have a faster computer than what you really have can lead to confusion.
--bin-id=<value>LW6_BIN_IDbin-idType: integer
Default value: 0
The internal ’bin-id’ value. Note that this is not necessarly equal to the value returned by ’show-build-bin-id’. When they are different, it is assumed this is because of a software upgrade.
--checkRunning the game with ’–check’ is almost like running ’–test’, the difference is that ’–check’ will not run tests which involve graphics or sound backends, so it’s adapted to pure console mode. This can be usefull for automated checks on a build farm, or if you want to check things in a headless (pure console) environment.
--commands-per-sec=<value>LW6_COMMANDS_PER_SECcommands-per-secType: integer
Default value: 10 Min value: 1 Max value: 1000
Defines the number of commands per second. When a command is generated, orders are actually sent to the game engine, for instance, ’this cursor moved there’. So this option will affect game responsiveness, setting this to a high value will make the game more responsive but consume bandwidth on network games.
--cunitRunning the game with ’–cunit’ is almost like running ’–test’, the difference is that ’–cunit’ will use CUnit interactive interface, allowing the user to cherry-pick some tests, and avoid running the whole suite just for one test. This can be usefull for debugging, when individual test binaries are not available.
--daemonStart the game in daemon mode, this is typically used with the server mode, if you want the process to be detached from the console and executed in the background.
--debug-layer-id=<value>LW6_DEBUG_LAYER_IDdebug-layer-idType: integer
Default value: 0 Min value: 0 Max value: 6
A team id which will be used for debugging purposes, for instance when displaying gradient.
--debug-team-id=<value>LW6_DEBUG_TEAM_IDdebug-team-idType: integer
Default value: 0 Min value: 0 Max value: 9
A team id which will be used for debugging purposes, for instance when displaying gradient.
--demoStart the game in demo mode. 2 bots play against each other forever.
--dialog-timeout=<value>LW6_DIALOG_TIMEOUTdialog-timeoutType: integer
Default value: 3600 Min value: 0 Max value: 86400
Timeout, in seconds, after which a dialog will automatically be closed, wether user clicked on it or not. Mostly used for testing, to avoid program being stall on a visual prompt. 0 will simply disable this feature and wait forever. Note that some platforms might not support this. Interfaces using Gtk do support it.
--dirty-read=<value>LW6_DIRTY_READdirty-readType: integer
Default value: 2 Min value: 0 Max value: 2
How to handle dirty reads and locks when displaying stuff. If set to 0, there will be no dirty reads at all, a lock (mutex) will be set whenever it’s needed. If set to 1, display might be done with inconsistent data, however the data itself won’t be modified while displaying. If set to 2, displayed data can (and will) be modified while the rendering thread is running.
--display-background=<value>LW6_DISPLAY_BACKGROUNDdisplay-backgroundType: boolean
Default value: true
Decides wether the background animation/image should be displayed at all.
--display-console=<value>LW6_DISPLAY_CONSOLEdisplay-consoleType: boolean
Default value: false
Defines wether the interactive system console must be displayed. Note that console support must have been enabled at compilation time. It might not be available on your computer, for instance if you are running a system such as Microsoft Windows.
--display-cursors=<value>LW6_DISPLAY_CURSORSdisplay-cursorsType: boolean
Default value: true
Debugging option which can be set to ’false’ to disable the display of cursors when playing.
--display-debug-gradient=<value>LW6_DISPLAY_DEBUG_GRADIENTdisplay-debug-gradientType: boolean
Default value: false
Set this to ’true’ to display the gradient, this is usefull to debug the core algorithm or understand how it works.
--display-debug-zones=<value>LW6_DISPLAY_DEBUG_ZONESdisplay-debug-zonesType: boolean
Default value: false
Set this to ’true’ to display the zones, this is usefull to debug the core algorithm or understand how it works.
--display-fighters=<value>LW6_DISPLAY_FIGHTERSdisplay-fightersType: boolean
Default value: true
Debugging option which can be set to ’false’ to disable the display of fighters when playing.
--display-fps=<value>LW6_DISPLAY_FPSdisplay-fpsType: boolean
Default value: false
Set this to ’true’ to display the number of frames per second. When this gets too low... play a smaller map, buy a new computer or contribute and hack Liquid War 6 so that it runs faster!
--display-hud=<value>LW6_DISPLAY_HUDdisplay-hudType: boolean
Default value: true
Decides wether the hud (informations while playing) should be displayed.
--display-log=<value>LW6_DISPLAY_LOGdisplay-logType: boolean
Default value: true
Set this to ’false’ to disable the display of error messages on the screen. Mote that you can miss valuable informations.
--display-map=<value>LW6_DISPLAY_MAPdisplay-mapType: boolean
Default value: true
Debugging option which can be set to ’false’ to disable map (level) display when playing.
--display-menu=<value>LW6_DISPLAY_MENUdisplay-menuType: boolean
Default value: true
Debugging option which can be set to ’false’ to disable the display of menus.
--display-meta=<value>LW6_DISPLAY_METAdisplay-metaType: boolean
Default value: true
Set to ’false’ to disable the display of meta information, this includes the help, tootips and breadcrumbs in menus.
--display-mouse=<value>LW6_DISPLAY_MOUSEdisplay-mouseType: boolean
Default value: true
Set this to ’false’ to always hide the mouse pointer.
--display-mps=<value>LW6_DISPLAY_MPSdisplay-mpsType: boolean
Default value: false
Set this to ’true’ to display the number of moves per second. In theory the game should maintain this constant but in practise it can get low if your computer is too slow or too busy.
--display-preview=<value>LW6_DISPLAY_PREVIEWdisplay-previewType: boolean
Default value: true
Decides wether a map preview should be displayed when choosing a level.
--display-progress=<value>LW6_DISPLAY_PROGRESSdisplay-progressType: boolean
Default value: true
Decides wether a progress bar should be displayed when a long operation is realized as a background task.
--display-score=<value>LW6_DISPLAY_SCOREdisplay-scoreType: boolean
Default value: true
Decides wether the score screen should be displayed.
--display-splash=<value>LW6_DISPLAY_SPLASHdisplay-splashType: boolean
Default value: true
Set this to ’false’ to disable the display of the splash screen at game startup.
--display-url=<value>LW6_DISPLAY_URLdisplay-urlType: boolean
Default value: false
Set this to ’true’ to display the URL (homepage) of the game. This is mostly used when doing screenshots, so that generated images contain a link to the homepage.
--executed-again=<value>LW6_EXECUTED_AGAINexecuted-againType: boolean
Default value: false
This environment variable/keyword is used to detect wether the program has been launched by itself with an internal execv call. This is used as a workarround to set some environment variables (DYLD_LIBRARY_PATH on Mac OS X for instance) before the program is run, as sometimes using setenv() inside the program does not work.
--gfx-cpu-usage=<value>LW6_GFX_CPU_USAGEgfx-cpu-usageType: float
Default value: 0.75 Min value: 0 Max value: 1
Percentage of the CPU which will be used by the display thread. It’s wise to leave some time to other threads to execute. The OS does it naturally, but setting this helps the whole process by explicitely pausing (sleep call) the display thread. You could change this to a low value if you have lagging games but smooth display.
--gfx-debug=<value>LW6_GFX_DEBUGgfx-debugType: boolean
Default value: false
Enables dedicated graphics debugging tools. This is different from ’debug’ mode which is global, this one is really graphics specific.
--io-per-sec=<value>LW6_IO_PER_SECio-per-secType: integer
Default value: 20 Min value: 1 Max value: 1000
Defines the number of calls to input/output functions per second. This can affect speed of menus but also cursors, but won’t change the speed of the game itself. It’s a cosmectic, comfort option.
--jpeg-quality=<value>LW6_JPEG_QUALITYjpeg-qualityType: integer
Default value: 85 Min value: 0 Max value: 85
Quality used by libjpeg when creating screenshot images. The same value you would give to Gimp before exporting an image as a JPEG.
--loader-sleep=<value>LW6_LOADER_SLEEPloader-sleepType: float
Default value: 0.5
Defines how long the loader thread should wait between two polls. Default value should fit in most cases.
--local-bench-delta=<value>LW6_LOCAL_BENCH_DELTAlocal-bench-deltaType: integer
Default value: 0 Min value: -70 Max value: 20
A value which is added to bench before starting a local game. This is typically zero or negative, as adding to bench is like pretending your computer is faster than it really is.
--log-level=<value>LW6_LOG_LEVELlog-levelType: integer
Default value: 3 Min value: 0 Max value: 4
Defines the log level, that is, how verbose the program will be regarding logs and console output. 0 (ERROR) is the minimum, only errors are reported. 1 (WARNING) means errors + warnings. 2 (NOTICE) displays most important messages. 3 (INFO) is the default, the log file will contain all messages but debug stuff. 4 (DEBUG) logs everything, including debug informations.
--log-timeout=<value>LW6_LOG_TIMEOUTlog-timeoutType: integer
Default value: 5000
Delay, in msec, for which a log message will stay displayed on the screen.
--magic-number=<value>LW6_MAGIC_NUMBERmagic-numberType: integer
Default value: LW6LDR_DEFAULT_MAGIC_NUMBER
This ’magic’ number probably requires an explanation. It’s used to estimate how big a map can be built. The calculus is very approximative, basically bench_value*magic_number=total_fighters_on_map*rounds_per_sec*moves_per_round with total_fighters_on_map depending on various parameters such as map size but also how many fighters are on the map. The map loader will try and adjust the map size so that it is just big enough not to saturate your CPU while being as high-res as possible. The magic number in itself has no real meaning, the higher it gets, the more optimized it means the game is. Normally you shouldn’t change this but if you find the map resizing is too agressively pessimistic, or if for some reason bench returns bogus values, you can modify it.
--max-local-bench-value=<value>LW6_MAX_LOCAL_BENCH_VALUEmax-local-bench-valueType: integer
Default value: LW6LDR_DEFAULT_MAX_LOCAL_BENCH_VALUE
Even if your computer is very fast, this parameter will be used to tame the optimism of the test, and do not load maps in very high detail. It’s believed at some point, it’s best to keep your extra power to deal with unordinary situations rather than waste it on useless details. Game should be fun with that setting, but if you really want to use your shiny CPU at its maximum, raise this.
--max-network-bench-value=<value>LW6_MAX_NETWORK_BENCH_VALUEmax-network-bench-valueType: integer
Default value: LW6LDR_DEFAULT_MAX_NETWORK_BENCH_VALUE
On network games, we need to be sure everyone can play in correct conditions, therefore maps won’t be loaded with more details than this, by default. You’re free to increase this parameter but it can cause your games to be unjoignable by some people.
--memory-bazooka-eraser=<value>LW6_MEMORY_BAZOOKA_ERASERmemory-bazooka-eraserType: boolean
Default value: true
The memory eraser is a tool which will systematically fill allocated memory with ’M’, and overwrite all allocated bytes with ’F’ before freeing memory. It will even handle realloc calls. This is usefull to track bugs. Indeed, with this option enabled, freshly allocated memory will never contain zeroes unless one calls calloc, and if you ever free some memory zone before being done with it, it will be filled with junk and therefore not be usable. The memory bazooka must be big enough if you want this feature to actually work.
--memory-bazooka-size=<value>LW6_MEMORY_BAZOOKA_SIZEmemory-bazooka-sizeType: integer
Default value: 99991
The memory bazooka is a brute-force tool, conceived after a full night spent tracking some memory leak. The idea is to keep a track of all allocated pointers, when the data was allocated (timestamp), where in the code (file, line), and even point out what data there is in that place. A memory bazooka report at the end of the game will just show what’s left. There should be nothing. This parameter is here to avoid wasting CPU cycles on a feature which is very debug-oriented and does not really make sense for the casual user. Set it to 0 for best performance, something like 100 might just be helpfull, but 1000000 is the right way to seriously debug code.
--net-log=<value>LW6_NET_LOGnet-logType: boolean
Default value: false
Activates network log, that is, logs everything sent/received over the network, except data which is sent through a third party library such as libCurl. This is mostly for debugging purpose, it can lead to rather big log files.
--net-per-sec=<value>LW6_NET_PER_SECnet-per-secType: integer
Default value: 500 Min value: 1 Max value: 1000
Defines the number of calls to network functions per second. This can technically change the network transfers speed, the higher the number, the faster it should be, but at the same time it can technically be more CPU greedy.
--network-bench-delta=<value>LW6_NETWORK_BENCH_DELTAnetwork-bench-deltaType: integer
Default value: -5 Min value: -70 Max value: 20
A value which is added to bench before starting a network game. This is typically a negative value, lower than the one added to local game. This is because network games can be more CPU greedy.
--network-reliability=<value>LW6_NETWORK_RELIABILITYnetwork-reliabilityType: integer
Default value: 1000 Min value: 1 Max value: 1000000000
The program assumes network is non-reliable, however the problem with those assumptions is that when you test, network is always reliable, even with non-garanteed protocols like UDP. This option will force the program to actually ignore some calls to send or recv functions, simulating a network disfunction. This is to ensure the internal mecanisms correcting network problems do work for good, on daily regular use. It’s not possible to set it to a perfect behavior, never dropping any packet, however using the default settings you probably won’t even notice the performance drop induced by having to fix problems. The highest the number is, the most reliable network will look, the algorithm is simply to drop one message out of X.
--open-relay=<value>LW6_OPEN_RELAYopen-relayType: boolean
Default value: false
Enables forwarding of abritrary network messages. If open relay is forbidden, the game will only forward messages when physical sender and logical sender are the same. This is to say if messages come from A for C and is sent by A to B, B will forward it to C. But if message comes from X to C and is sent by A to B, then B won’t forward it. In practice, it means without open relay, messages can only be forwarded once.
--pilot-lag=<value>LW6_PILOT_LAGpilot-lagType: integer
Default value: 10
Maximum lag, in rounds, until the game engine is slowed down. This will typically be usefull if your computer is too slow for the map resolution and the game speed you set up.
--quick-startStart the game just like if the player had requested a quick start, without showing any menu.
--resetClears the config file so that the game will run with defaults next time. The idea is to get rid of traces of previous executions. The difference with ’–defaults’ is that ’–reset’ does not run the game, while ’–defaults’ does.
--reset-config-on-upgrade=<value>LW6_RESET_CONFIG_ON_UPGRADEreset-config-on-upgradeType: boolean
Default value: true
If set, then a reset (config file set to defaults) is run every time you upgrade the game.
--screenshots-per-min=<value>LW6_SCREENSHOTS_PER_MINscreenshots-per-minType: integer
Default value: 12
Defines the number of screenshots / node info per minute. This can a quite costly operation, but still it must not be too low else screenshots are too outdated.
--serverStart the game in server mode, without requiring any graphics backend. Server mode is usefull if you just want to start a network node without hosting any real game on it. It can be used to list existing nodes and sessions or as a bounce server in case some clients can’t contact each other because firewalled. If you only want to start a server game on your computer, don’t use this option, just start the game normally and start a game server by clicking on the GUI buttons.
--simulate-basicSimulates some fights using the basic colors red, green, yellow and blue. Will output on the console a percentage based on scores obtained by the teams. This is typically for map designers and/or people who want to fiddle with team profiles, if some team is really stronger than another one, it should appear in these percentages.
--simulate-fullSimulates some fights using all available colors. This can be very long, it will run approximatively 1000 games consecutively, you can look in the log file to see the progress. Will output on the console a percentage based on scores obtained by the teams. This is typically for map designers and/or people who want to fiddle with team profiles, if some team is really stronger than another one, it should appear in these percentages.
--target-fps=<value>LW6_TARGET_FPStarget-fpsType: integer
Default value: 60 Min value: 1 Max value: 1000
Defines how many frames will be displayed per second. Of course this is a maximum value, if your hardware can’t keep up with this value, display will just be slow, no matter what value you define here. Note that you might really wish to have something rather low here, to keep network and ’logic’ function responsiveness. Passed 60 frames per second, speed is really only for visual comfort, as Liquid War 6 is now so fast-paced that it requires 200 frames/sec to outperform opponents.
--trap-errors=<value>LW6_TRAP_ERRORStrap-errorsType: boolean
Default value: false
If set to true, will trap segmentation fault and floating point errors, and display messages about those in a custom box instead of the default one
--trojan=<value>LW6_TROJANtrojanType: boolean
Default value: false
Make the program act like a (stupid) trojan horse, trying to fake messages, sending various inconsistent informations. This is to check the normal version of the program is able to detect such a fake and kick it out of the game. It’s of no use for regular players, be sure to unset this if you want to play for good.
--z-decodeIf specified, program will take stdin and z-decode it to stdout. This is for testing purpose (for network messages for instance). Z-decoding, here means verifying there a Z at the beginning, base64 decode and pass the content through Zlib inflating. I content is not Z-prefixed, will be returned as is.
--z-encodeIf specified, program will take stdin and z-encode it to stdout. This is for testing purpose (for network messages for instance). Z-encoding, here means passing the message through Zlib deflating then base64 encoding and prefix it with a Z.
Next: Script hooks, Previous: Advanced settings, Up: Reference [Contents][Index]
c-gettextCalls GNU gettext to convert string in current locale. Note that ’_’ (plain underscode) is exported as well, so that code can be written using ’_’ as a function.
c-lw6-exitWrapper on lw6_exit.
c-lw6-get-retWrapper on lw6_get_ret.
c-lw6-releaseWrapper on lw6_release.
c-lw6-set-retWrapper on lw6_set_ret.
c-lw6bot-get-backendsWrapper on lw6bot_get_backends.
c-lw6bot-newWrapper on lw6bot_new.
c-lw6bot-next-moveWrapper on lw6bot_next_move.
c-lw6cfg-defaultsWrapper on lw6cfg_defaults.
c-lw6cfg-get-optionWrapper on lw6cfg_get_option.
c-lw6cfg-initWrapper on lw6cfg_init.
c-lw6cfg-loadWrapper on lw6cfg_load.
c-lw6cfg-option-existsWrapper on lw6cfg_option_exists.
c-lw6cfg-quitWrapper on lw6cfg_quit.
c-lw6cfg-saveWrapper on lw6cfg_save.
c-lw6cfg-set-optionWrapper on lw6cfg_set_option.
c-lw6cfg-unified-get-log-fileWrapper on lw6cfg_unified_get_log_file.
c-lw6cfg-unified-get-map-pathWrapper on lw6cfg_unified_get_map_path.
c-lw6cfg-unified-get-music-pathWrapper on lw6cfg_unified_get_music_path.
c-lw6cfg-unified-get-user-dirWrapper on lw6cfg_unified_get_user_dir.
c-lw6cli-get-backendsWrapper on lw6cli_get_backends.
c-lw6cns-console-supportWrapper on lw6cns_console_support.
c-lw6cns-initWrapper on lw6cns_init.
c-lw6cns-pollWrapper on lw6cns_poll.
c-lw6cns-quitWrapper on lw6cns_quit.
c-lw6cns-term-supportWrapper on lw6cns_term_support.
c-lw6dsp-get-average-fpsWrapper on lw6dsp_get_average_fps.
c-lw6dsp-get-fullscreen-modesWrapper on lw6dsp_get_fullscreen_modes.
c-lw6dsp-get-instant-fpsWrapper on lw6dsp_get_instant_fps.
c-lw6dsp-get-last-frame-rendering-timeWrapper on lw6dsp_get_last_frame_rendering_time.
c-lw6dsp-get-nb-framesWrapper on lw6dsp_get_nb_frames.
c-lw6dsp-get-video-modeWrapper on lw6dsp_get_video_mode.
c-lw6dsp-newWrapper on lw6dsp_new.
c-lw6dsp-releaseWrapper on lw6dsp_release.
c-lw6dsp-updateWrapper on lw6dsp_update.
c-lw6gen-create-from-seedWrapper on lw6gen_create_from_seed.
c-lw6gen-seed-newWrapper on lw6gen_seed_new.
c-lw6gen-seed-normalizeWrapper on lw6gen_seed_normalize.
c-lw6gfx-get-backendsWrapper on lw6gfx_get_backends.
c-lw6gui-default-lookWrapper on lw6gui_default_look.
c-lw6gui-input-resetWrapper on lw6gui_input_reset.
c-lw6gui-joystick1-get-move-padWrapper on lw6gui_joystick1_get_move_pad.
c-lw6gui-joystick1-pop-button-aWrapper on lw6gui_joystick1_pop_button_a.
c-lw6gui-joystick1-pop-button-bWrapper on lw6gui_joystick1_pop_button_b.
c-lw6gui-joystick1-pop-button-cWrapper on lw6gui_joystick1_pop_button_c.
c-lw6gui-joystick1-pop-button-dWrapper on lw6gui_joystick1_pop_button_d.
c-lw6gui-joystick1-pop-button-eWrapper on lw6gui_joystick1_pop_button_e.
c-lw6gui-joystick1-pop-button-fWrapper on lw6gui_joystick1_pop_button_f.
c-lw6gui-joystick1-pop-pad-downWrapper on lw6gui_joystick1_pop_pad_down.
c-lw6gui-joystick1-pop-pad-leftWrapper on lw6gui_joystick1_pop_pad_left.
c-lw6gui-joystick1-pop-pad-rightWrapper on lw6gui_joystick1_pop_pad_right.
c-lw6gui-joystick1-pop-pad-upWrapper on lw6gui_joystick1_pop_pad_up.
c-lw6gui-joystick2-get-move-padWrapper on lw6gui_joystick2_get_move_pad.
c-lw6gui-joystick2-pop-button-aWrapper on lw6gui_joystick2_pop_button_a.
c-lw6gui-joystick2-pop-button-bWrapper on lw6gui_joystick2_pop_button_b.
c-lw6gui-joystick2-pop-button-cWrapper on lw6gui_joystick2_pop_button_c.
c-lw6gui-joystick2-pop-button-dWrapper on lw6gui_joystick2_pop_button_d.
c-lw6gui-joystick2-pop-button-eWrapper on lw6gui_joystick2_pop_button_e.
c-lw6gui-joystick2-pop-button-fWrapper on lw6gui_joystick2_pop_button_f.
c-lw6gui-joystick2-pop-pad-downWrapper on lw6gui_joystick2_pop_pad_down.
c-lw6gui-joystick2-pop-pad-leftWrapper on lw6gui_joystick2_pop_pad_left.
c-lw6gui-joystick2-pop-pad-rightWrapper on lw6gui_joystick2_pop_pad_right.
c-lw6gui-joystick2-pop-pad-upWrapper on lw6gui_joystick2_pop_pad_up.
c-lw6gui-keyboard-get-move-padWrapper on lw6gui_keyboard_get_move_pad.
c-lw6gui-keyboard-is-pressedWrapper on lw6gui_keyboard_is_pressed.
c-lw6gui-keyboard-pop-arrow-downWrapper on lw6gui_keyboard_pop_arrow_down.
c-lw6gui-keyboard-pop-arrow-leftWrapper on lw6gui_keyboard_pop_arrow_left.
c-lw6gui-keyboard-pop-arrow-rightWrapper on lw6gui_keyboard_pop_arrow_right.
c-lw6gui-keyboard-pop-arrow-upWrapper on lw6gui_keyboard_pop_arrow_up.
c-lw6gui-keyboard-pop-key-altWrapper on lw6gui_keyboard_pop_key_alt.
c-lw6gui-keyboard-pop-key-ctrlWrapper on lw6gui_keyboard_pop_key_ctrl.
c-lw6gui-keyboard-pop-key-enterWrapper on lw6gui_keyboard_pop_key_enter.
c-lw6gui-keyboard-pop-key-escWrapper on lw6gui_keyboard_pop_key_esc.
c-lw6gui-keyboard-pop-key-pgdownWrapper on lw6gui_keyboard_pop_key_pgdown.
c-lw6gui-keyboard-pop-key-pgupWrapper on lw6gui_keyboard_pop_key_pgup.
c-lw6gui-look-getWrapper on lw6gui_look_get.
c-lw6gui-look-setWrapper on lw6gui_look_set.
c-lw6gui-look-zoom-inWrapper on lw6gui_look_zoom_in.
c-lw6gui-look-zoom-outWrapper on lw6gui_look_zoom_out.
c-lw6gui-menu-appendWrapper on lw6gui_menu_append.
c-lw6gui-menu-close-popupWrapper on lw6gui_menu_close_popup.
c-lw6gui-menu-enable-escWrapper on lw6gui_menu_enable_esc.
c-lw6gui-menu-has-popupWrapper on lw6gui_menu_has_popup.
c-lw6gui-menu-newWrapper on lw6gui_menu_new.
c-lw6gui-menu-removeWrapper on lw6gui_menu_remove.
c-lw6gui-menu-remove-allWrapper on lw6gui_menu_remove_all.
c-lw6gui-menu-scroll-downWrapper on lw6gui_menu_scroll_down.
c-lw6gui-menu-scroll-upWrapper on lw6gui_menu_scroll_up.
c-lw6gui-menu-selectWrapper on lw6gui_menu_select.
c-lw6gui-menu-select-escWrapper on lw6gui_menu_select_esc.
c-lw6gui-menu-set-breadcrumbsWrapper on lw6gui_menu_set_breadcrumbs.
c-lw6gui-menu-syncWrapper on lw6gui_menu_sync.
c-lw6gui-mouse-get-stateWrapper on lw6gui_mouse_get_state.
c-lw6gui-mouse-poll-moveWrapper on lw6gui_mouse_poll_move.
c-lw6gui-mouse-pop-button-leftWrapper on lw6gui_mouse_pop_button_left.
c-lw6gui-mouse-pop-button-middleWrapper on lw6gui_mouse_pop_button_middle.
c-lw6gui-mouse-pop-button-rightWrapper on lw6gui_mouse_pop_button_right.
c-lw6gui-mouse-pop-double-clickWrapper on lw6gui_mouse_pop_double_click.
c-lw6gui-mouse-pop-simple-clickWrapper on lw6gui_mouse_pop_simple_click.
c-lw6gui-mouse-pop-triple-clickWrapper on lw6gui_mouse_pop_triple_click.
c-lw6gui-mouse-pop-wheel-downWrapper on lw6gui_mouse_pop_wheel_down.
c-lw6gui-mouse-pop-wheel-upWrapper on lw6gui_mouse_pop_wheel_up.
c-lw6hlp-aboutWrapper on lw6hlp_about.
c-lw6hlp-get-default-valueWrapper on lw6hlp_get_default_value.
c-lw6hlp-listWrapper on lw6hlp_list.
c-lw6hlp-list-advancedWrapper on lw6hlp_list_advanced.
c-lw6hlp-list-aliasesWrapper on lw6hlp_list_aliases.
c-lw6hlp-list-docWrapper on lw6hlp_list_doc.
c-lw6hlp-list-funcsWrapper on lw6hlp_list_funcs.
c-lw6hlp-list-graphicsWrapper on lw6hlp_list_graphics.
c-lw6hlp-list-hooksWrapper on lw6hlp_list_hooks.
c-lw6hlp-list-inputWrapper on lw6hlp_list_input.
c-lw6hlp-list-mapWrapper on lw6hlp_list_map.
c-lw6hlp-list-map-hintsWrapper on lw6hlp_list_map_hints.
c-lw6hlp-list-map-rulesWrapper on lw6hlp_list_map_rules.
c-lw6hlp-list-map-styleWrapper on lw6hlp_list_map_style.
c-lw6hlp-list-map-teamsWrapper on lw6hlp_list_map_teams.
c-lw6hlp-list-networkWrapper on lw6hlp_list_network.
c-lw6hlp-list-pathWrapper on lw6hlp_list_path.
c-lw6hlp-list-playersWrapper on lw6hlp_list_players.
c-lw6hlp-list-quickWrapper on lw6hlp_list_quick.
c-lw6hlp-list-showWrapper on lw6hlp_list_show.
c-lw6hlp-list-soundWrapper on lw6hlp_list_sound.
c-lw6hlp-list-team-colorsWrapper on lw6hlp_list_team_colors.
c-lw6hlp-list-weaponsWrapper on lw6hlp_list_weapons.
c-lw6img-screenshotWrapper on lw6img_screenshot.
c-lw6ker-add-cursorWrapper on lw6ker_add_cursor.
c-lw6ker-build-game-stateWrapper on lw6ker_build_game_state.
c-lw6ker-build-game-structWrapper on lw6ker_build_game_struct.
c-lw6ker-cursor-existsWrapper on lw6ker_cursor_exists.
c-lw6ker-did-cursor-winWrapper on lw6ker_did_cursor_win.
c-lw6ker-do-roundWrapper on lw6ker_do_round.
c-lw6ker-dup-game-stateWrapper on lw6ker_dup_game_state.
c-lw6ker-game-state-checksumWrapper on lw6ker_game_state_checksum.
c-lw6ker-game-struct-checksumWrapper on lw6ker_game_struct_checksum.
c-lw6ker-get-cursorWrapper on lw6ker_get_cursor.
c-lw6ker-get-movesWrapper on lw6ker_get_moves.
c-lw6ker-get-nb-colorsWrapper on lw6ker_game_state_get_nb_colors.
c-lw6ker-get-nb-cursorsWrapper on lw6ker_game_state_get_nb_cursors.
c-lw6ker-get-nb-nodesWrapper on lw6ker_game_state_get_nb_nodes.
c-lw6ker-get-roundsWrapper on lw6ker_get_rounds.
c-lw6ker-get-spreadsWrapper on lw6ker_get_spreads.
c-lw6ker-is-overWrapper on lw6ker_is_over.
c-lw6ker-node-existsWrapper on lw6ker_node_exists.
c-lw6ker-register-nodeWrapper on lw6ker_register_node.
c-lw6ker-remove-cursorWrapper on lw6ker_remove_cursor.
c-lw6ker-set-cursorWrapper on lw6ker_set_cursor.
c-lw6ker-sync-game-stateWrapper on lw6ker_sync_game_state.
c-lw6ker-unregister-nodeWrapper on lw6ker_unregister_node.
c-lw6ldr-chain-entryWrapper on lw6ldr_chain_entry.
c-lw6ldr-exp-validateWrapper on lw6ldr_exp_validate.
c-lw6ldr-get-entriesWrapper on lw6ldr_get_entries.
c-lw6ldr-hints-get-defaultWrapper on lw6ldr_hints_get_default.
c-lw6ldr-print-examplesWrapper on lw6ldr_print_examples.
c-lw6ldr-readWrapper on lw6ldr_read.
c-lw6ldr-read-relativeWrapper on lw6ldr_read_relative.
c-lw6map-exp-get-unlocked-team-colorWrapper on lw6map_exp_get_unlocked_team_color.
c-lw6map-exp-get-unlocked-weaponWrapper on lw6map_exp_get_unlocked_weapon.
c-lw6map-exp-is-team-color-allowedWrapper on lw6map_exp_is_team_color_allowed.
c-lw6map-exp-is-weapon-allowedWrapper on lw6map_exp_is_weapon_allowed.
c-lw6map-get-lookWrapper on lw6map_get_look.
c-lw6map-get-max-nb-colorsWrapper on lw6map_get_max_nb_colors.
c-lw6map-get-max-nb-cursorsWrapper on lw6map_get_max_nb_cursors.
c-lw6map-get-max-nb-nodesWrapper on lw6map_get_max_nb_nodes.
c-lw6map-get-music-dirWrapper on lw6map_get_music_dir.
c-lw6map-get-titleWrapper on lw6map_get_title.
c-lw6map-param-getWrapper on lw6map_param_get.
c-lw6map-rules-get-defaultWrapper on lw6map_rules_get_default.
c-lw6map-rules-get-intWrapper on lw6map_rules_get_int.
c-lw6map-rules-get-maxWrapper on lw6map_rules_get_max.
c-lw6map-rules-get-minWrapper on lw6map_rules_get_min.
c-lw6map-style-get-defaultWrapper on lw6map_style_get_default.
c-lw6map-team-color-index-to-keyWrapper on lw6map_team_color_index_to_key.
c-lw6map-team-color-index-to-labelWrapper on lw6map_team_color_index_to_label.
c-lw6map-team-color-key-to-indexWrapper on lw6map_team_color_key_to_index.
c-lw6map-team-color-listWrapper on lw6map_team_color_list.
c-lw6map-teams-get-defaultWrapper on lw6map_teams_get_default.
c-lw6map-weapon-index-to-keyWrapper on lw6map_weapon_index_to_key.
c-lw6map-weapon-index-to-labelWrapper on lw6map_weapon_index_to_label.
c-lw6map-weapon-key-to-indexWrapper on lw6map_weapon_key_to_index.
c-lw6map-weapon-listWrapper on lw6map_weapon_list.
c-lw6net-initWrapper on lw6net_init.
c-lw6net-quitWrapper on lw6net_quit.
c-lw6p2p-db-default-nameWrapper on lw6p2p_db_default_name.
c-lw6p2p-db-newWrapper on lw6p2p_db_new.
c-lw6p2p-db-resetWrapper on lw6p2p_db_reset.
c-lw6p2p-node-calibrateWrapper on lw6p2p_node_calibrate.
c-lw6p2p-node-client-joinWrapper on lw6p2p_node_client_join.
c-lw6p2p-node-closeWrapper on lw6p2p_node_close.
c-lw6p2p-node-disconnectWrapper on lw6p2p_node_disconnect.
c-lw6p2p-node-get-entriesWrapper on lw6p2p_node_get_entries.
c-lw6p2p-node-get-idWrapper on lw6p2p_node_get_id.
c-lw6p2p-node-get-local-seq-0Wrapper on lw6p2p_node_get_local_seq_0.
c-lw6p2p-node-get-local-seq-lastWrapper on lw6p2p_node_get_local_seq_last.
c-lw6p2p-node-get-next-draft-msgWrapper on lw6p2p_node_get_next_draft_msg.
c-lw6p2p-node-get-next-reference-msgWrapper on lw6p2p_node_get_next_reference_msg.
c-lw6p2p-node-get-seq-draftWrapper on lw6p2p_node_get_seq_draft.
c-lw6p2p-node-get-seq-maxWrapper on lw6p2p_node_get_seq_max.
c-lw6p2p-node-get-seq-minWrapper on lw6p2p_node_get_seq_min.
c-lw6p2p-node-get-seq-referenceWrapper on lw6p2p_node_get_seq_reference.
c-lw6p2p-node-is-dump-neededWrapper on lw6p2p_node_is_dump_needed.
c-lw6p2p-node-is-peer-connectedWrapper on lw6p2p_node_is_peer_connected.
c-lw6p2p-node-is-peer-registeredWrapper on lw6p2p_node_is_peer_registered.
c-lw6p2p-node-is-seed-neededWrapper on lw6p2p_node_is_seed_needed.
c-lw6p2p-node-newWrapper on lw6p2p_node_new.
c-lw6p2p-node-pollWrapper on lw6p2p_node_poll.
c-lw6p2p-node-put-local-msgWrapper on lw6p2p_node_put_local_msg.
c-lw6p2p-node-refresh-peerWrapper on lw6p2p_node_refresh_peer.
c-lw6p2p-node-server-startWrapper on lw6p2p_node_server_start.
c-lw6p2p-node-update-infoWrapper on lw6p2p_node_update_info.
c-lw6pil-benchWrapper on lw6pil_bench.
c-lw6pil-build-pilotWrapper on lw6pil_build_pilot.
c-lw6pil-calibrateWrapper on lw6pil_calibrate.
c-lw6pil-commitWrapper on lw6pil_commit.
c-lw6pil-did-cursor-winWrapper on lw6pil_did_cursor_win.
c-lw6pil-dump-command-generateWrapper on lw6pil_dump_command_generate.
c-lw6pil-execute-commandWrapper on lw6pil_execute_command.
c-lw6pil-fix-coordsWrapper on lw6pil_coords_fix.
c-lw6pil-fix-coords-x10Wrapper on lw6pil_coords_fix_x10.
c-lw6pil-get-last-commit-seqWrapper on lw6pil_get_last_commit_seq.
c-lw6pil-get-looserWrapper on lw6pil_get_looser.
c-lw6pil-get-max-seqWrapper on lw6pil_get_max_seq.
c-lw6pil-get-next-seqWrapper on lw6pil_get_next_seq.
c-lw6pil-get-reference-current-seqWrapper on lw6pil_get_reference_current_seq.
c-lw6pil-get-reference-target-seqWrapper on lw6pil_get_reference_target_seq.
c-lw6pil-get-round-0Wrapper on lw6pil_get_round_0.
c-lw6pil-get-seq-0Wrapper on lw6pil_get_seq_0.
c-lw6pil-get-winnerWrapper on lw6pil_get_winner.
c-lw6pil-is-overWrapper on lw6pil_is_over.
c-lw6pil-local-commandWrapper on lw6pil_local_command.
c-lw6pil-local-cursors-set-mainWrapper on lw6pil_local_cursors_set_main.
c-lw6pil-local-cursors-set-mouse-controlledWrapper on lw6pil_local_cursors_set_mouse_controlled.
c-lw6pil-make-backupWrapper on lw6pil_make_backup.
c-lw6pil-poll-dumpWrapper on lw6pil_poll_dump.
c-lw6pil-round2seqWrapper on lw6pil_round2seq.
c-lw6pil-seed-command-generateWrapper on lw6pil_seed_command_generate.
c-lw6pil-send-commandWrapper on lw6pil_send_command.
c-lw6pil-seq-random-0Wrapper on lw6pil_seq_random_0.
c-lw6pil-seq2roundWrapper on lw6pil_seq2round.
c-lw6pil-slow-downWrapper on lw6pil_slow_down.
c-lw6pil-speed-upWrapper on lw6pil_speed_up.
c-lw6pil-suite-get-checkpointWrapper on lw6pil_suite_get_checkpoint.
c-lw6pil-suite-get-commands-by-node-indexWrapper on lw6pil_suite_get_command_by_node_index, returns the list of all steps.
c-lw6pil-suite-get-commands-by-stageWrapper on lw6pil_suite_get_command_by_stage, returns the list of all steps.
c-lw6pil-suite-get-node-idWrapper on lw6pil_suite_get_node_id.
c-lw6pil-suite-get-seq-0Wrapper on lw6pil_suite_get_seq_0.
c-lw6pil-suite-initWrapper on lw6pil_suite_init.
c-lw6pil-sync-from-backupWrapper on lw6pil_sync_from_backup.
c-lw6pil-sync-from-draftWrapper on lw6pil_sync_from_draft.
c-lw6pil-sync-from-referenceWrapper on lw6pil_sync_from_reference.
c-lw6snd-get-backendsWrapper on lw6snd_get_backends.
c-lw6snd-is-music-fileWrapper on lw6snd_is_music_file.
c-lw6snd-newWrapper on lw6snd_new.
c-lw6snd-play-fxWrapper on lw6snd_play_fx.
c-lw6snd-play-music-fileWrapper on lw6snd_play_music_file.
c-lw6snd-play-music-randomWrapper on lw6snd_play_music_random.
c-lw6snd-pollWrapper on lw6snd_poll.
c-lw6snd-releaseWrapper on lw6snd_release.
c-lw6snd-set-fx-volumeWrapper on lw6snd_set_fx_volume.
c-lw6snd-set-music-volumeWrapper on lw6snd_set_music_volume.
c-lw6snd-set-water-volumeWrapper on lw6snd_set_water_volume.
c-lw6snd-stop-musicWrapper on lw6snd_stop_music.
c-lw6srv-get-backendsWrapper on lw6srv_get_backends.
c-lw6sys-build-get-abs-srcdirWrapper on lw6sys_build_get_abs_srcdir.
c-lw6sys-build-get-bin-idWrapper on lw6sys_build_get_bin_id.
c-lw6sys-build-get-bugs-urlWrapper on lw6sys_build_get_bugs_url.
c-lw6sys-build-get-cflagsWrapper on lw6sys_build_get_cflags.
c-lw6sys-build-get-codenameWrapper on lw6sys_build_get_codename.
c-lw6sys-build-get-configure-argsWrapper on lw6sys_build_get_configure_args.
c-lw6sys-build-get-copyrightWrapper on lw6sys_build_get_copyright.
c-lw6sys-build-get-datadirWrapper on lw6sys_build_get_datadir.
c-lw6sys-build-get-dateWrapper on lw6sys_build_get_date.
c-lw6sys-build-get-docdirWrapper on lw6sys_build_get_docdir.
c-lw6sys-build-get-enable-allinoneWrapper on lw6sys_build_get_enable_allinone.
c-lw6sys-build-get-enable-consoleWrapper on lw6sys_build_get_enable_console.
c-lw6sys-build-get-enable-fullstaticWrapper on lw6sys_build_get_enable_fullstatic.
c-lw6sys-build-get-enable-gcovWrapper on lw6sys_build_get_enable_gcov.
c-lw6sys-build-get-enable-gprofWrapper on lw6sys_build_get_enable_gprof.
c-lw6sys-build-get-enable-gtkWrapper on lw6sys_build_get_enable_gtk.
c-lw6sys-build-get-enable-instrumentWrapper on lw6sys_build_get_enable_instrument.
c-lw6sys-build-get-enable-mod-cacaWrapper on lw6sys_build_get_enable_mod_caca.
c-lw6sys-build-get-enable-mod-csoundWrapper on lw6sys_build_get_enable_mod_csound.
c-lw6sys-build-get-enable-mod-gl1Wrapper on lw6sys_build_get_enable_mod_gl1.
c-lw6sys-build-get-enable-mod-gles2Wrapper on lw6sys_build_get_enable_mod_gles2.
c-lw6sys-build-get-enable-mod-httpWrapper on lw6sys_build_get_enable_mod_http.
c-lw6sys-build-get-enable-mod-oggWrapper on lw6sys_build_get_enable_mod_ogg.
c-lw6sys-build-get-enable-mod-softWrapper on lw6sys_build_get_enable_mod_soft.
c-lw6sys-build-get-enable-openmpWrapper on lw6sys_build_get_enable_openmp.
c-lw6sys-build-get-enable-optimizeWrapper on lw6sys_build_get_enable_optimize.
c-lw6sys-build-get-enable-paranoidWrapper on lw6sys_build_get_enable_paranoid.
c-lw6sys-build-get-enable-profilerWrapper on lw6sys_build_get_enable_profiler.
c-lw6sys-build-get-enable-valgrindWrapper on lw6sys_build_get_enable_valgrind.
c-lw6sys-build-get-endiannessWrapper on lw6sys_build_get_endianness.
c-lw6sys-build-get-gcc-versionWrapper on lw6sys_build_get_gcc_version.
c-lw6sys-build-get-home-urlWrapper on lw6sys_build_get_home_url.
c-lw6sys-build-get-host-cpuWrapper on lw6sys_build_get_host_cpu.
c-lw6sys-build-get-host-osWrapper on lw6sys_build_get_host_os.
c-lw6sys-build-get-hostnameWrapper on lw6sys_build_get_hostname.
c-lw6sys-build-get-includedirWrapper on lw6sys_build_get_includedir.
c-lw6sys-build-get-ldflagsWrapper on lw6sys_build_get_ldflags.
c-lw6sys-build-get-libdirWrapper on lw6sys_build_get_libdir.
c-lw6sys-build-get-licenseWrapper on lw6sys_build_get_license.
c-lw6sys-build-get-localedirWrapper on lw6sys_build_get_localedir.
c-lw6sys-build-get-md5sumWrapper on lw6sys_build_get_md5sum.
c-lw6sys-build-get-package-idWrapper on lw6sys_build_get_package_id.
c-lw6sys-build-get-package-nameWrapper on lw6sys_build_get_package_name.
c-lw6sys-build-get-package-stringWrapper on lw6sys_build_get_package_string.
c-lw6sys-build-get-package-tarnameWrapper on lw6sys_build_get_package_tarname.
c-lw6sys-build-get-pointer-sizeWrapper on lw6sys_build_get_pointer_size.
c-lw6sys-build-get-prefixWrapper on lw6sys_build_get_prefix.
c-lw6sys-build-get-stampWrapper on lw6sys_build_get_stamp.
c-lw6sys-build-get-timeWrapper on lw6sys_build_get_time.
c-lw6sys-build-get-top-srcdirWrapper on lw6sys_build_get_top_srcdir.
c-lw6sys-build-get-versionWrapper on lw6sys_build_get_version.
c-lw6sys-build-get-version-baseWrapper on lw6sys_build_get_version_base.
c-lw6sys-build-get-version-majorWrapper on lw6sys_build_get_version_major.
c-lw6sys-build-get-version-minorWrapper on lw6sys_build_get_version_minor.
c-lw6sys-build-is-gnuWrapper on lw6sys_build_is_gnu.
c-lw6sys-build-is-gp2xWrapper on lw6sys_build_is_gp2x.
c-lw6sys-build-is-mac-os-xWrapper on lw6sys_build_is_mac_os_x.
c-lw6sys-build-is-ms-windowsWrapper on lw6sys_build_is_ms_windows.
c-lw6sys-build-is-unixWrapper on lw6sys_build_is_unix.
c-lw6sys-build-is-x86Wrapper on lw6sys_build_is_x86.
c-lw6sys-debug-getWrapper on lw6sys_debug_get.
c-lw6sys-debug-setWrapper on lw6sys_debug_set.
c-lw6sys-delayWrapper on lw6sys_delay.
c-lw6sys-dumpWrapper on lw6sys_dump.
c-lw6sys-dump-clearWrapper on lw6sys_dump_clear.
c-lw6sys-generate-id-16Wrapper on lw6sys_generate_id_16.
c-lw6sys-generate-id-32Wrapper on lw6sys_generate_id_32.
c-lw6sys-generate-id-64Wrapper on lw6sys_generate_id_64.
c-lw6sys-get-config-fileWrapper on lw6sys_get_config_file.
c-lw6sys-get-cwdWrapper on lw6sys_get_cwd.
c-lw6sys-get-cycleWrapper on lw6sys_get_cycle.
c-lw6sys-get-data-dirWrapper on lw6sys_get_data_dir.
c-lw6sys-get-default-config-fileWrapper on lw6sys_get_default_config_file.
c-lw6sys-get-default-data-dirWrapper on lw6sys_get_default_data_dir.
c-lw6sys-get-default-log-fileWrapper on lw6sys_get_default_log_file.
c-lw6sys-get-default-map-dirWrapper on lw6sys_get_default_map_dir.
c-lw6sys-get-default-map-pathWrapper on lw6sys_get_default_map_path.
c-lw6sys-get-default-mod-dirWrapper on lw6sys_get_default_mod_dir.
c-lw6sys-get-default-music-dirWrapper on lw6sys_get_default_music_dir.
c-lw6sys-get-default-music-pathWrapper on lw6sys_get_default_music_path.
c-lw6sys-get-default-prefixWrapper on lw6sys_get_default_prefix.
c-lw6sys-get-default-script-fileWrapper on lw6sys_get_default_script_file.
c-lw6sys-get-default-user-dirWrapper on lw6sys_get_default_user_dir.
c-lw6sys-get-hostnameWrapper on lw6sys_get_hostname.
c-lw6sys-get-log-fileWrapper on lw6sys_get_log_file.
c-lw6sys-get-map-dirWrapper on lw6sys_get_map_dir.
c-lw6sys-get-map-pathWrapper on lw6sys_get_map_path.
c-lw6sys-get-memory-bazooka-eraserWrapper on lw6sys_get_memory_bazooka_eraser.
c-lw6sys-get-memory-bazooka-sizeWrapper on lw6sys_get_memory_bazooka_size.
c-lw6sys-get-mod-dirWrapper on lw6sys_get_mod_dir.
c-lw6sys-get-music-dirWrapper on lw6sys_get_music_dir.
c-lw6sys-get-music-pathWrapper on lw6sys_get_music_path.
c-lw6sys-get-prefixWrapper on lw6sys_get_prefix.
c-lw6sys-get-run-dirWrapper on lw6sys_get_run_dir.
c-lw6sys-get-script-fileWrapper on lw6sys_get_script_file.
c-lw6sys-get-timestampWrapper on lw6sys_get_timestamp.
c-lw6sys-get-uptimeWrapper on lw6sys_get_uptime.
c-lw6sys-get-user-dirWrapper on lw6sys_get_user_dir.
c-lw6sys-get-usernameWrapper on lw6sys_get_username.
c-lw6sys-getenvWrapper on lw6sys_getenv.
c-lw6sys-getenv-prefixedWrapper on lw6sys_getenv_prefixed.
c-lw6sys-idleWrapper on lw6sys_idle.
c-lw6sys-logWrapper on lw6sys_log.
c-lw6sys-log-get-backtrace-modeWrapper on lw6sys_log_get_backtrace_mode.
c-lw6sys-log-get-levelWrapper on lw6sys_log_get_level.
c-lw6sys-log-set-backtrace-modeWrapper on lw6sys_log_set_backtrace_mode.
c-lw6sys-log-set-dialog-timeoutWrapper on lw6sys_log_set_dialog_timeout.
c-lw6sys-log-set-levelWrapper on lw6sys_log_set_level.
c-lw6sys-megabytes-availableWrapper on lw6sys_megabytes_available.
c-lw6sys-openmp-get-num-procsWrapper on lw6sys_openmp_get_num_procs.
c-lw6sys-path-concatWrapper on lw6sys_path_concat.
c-lw6sys-path-file-onlyWrapper on lw6sys_path_file_only.
c-lw6sys-path-parentWrapper on lw6sys_path_parent.
c-lw6sys-path-splitWrapper on lw6sys_path_split.
c-lw6sys-set-memory-bazooka-eraserWrapper on lw6sys_set_memory_bazooka_eraser.
c-lw6sys-set-memory-bazooka-sizeWrapper on lw6sys_set_memory_bazooka_size.
c-lw6sys-signal-customWrapper on lw6sys_signal_custom.
c-lw6sys-signal-defaultWrapper on lw6sys_signal_default.
c-lw6sys-signal-poll-quitWrapper on lw6sys_signal_poll_quit.
c-lw6sys-signal-send-quitWrapper on lw6sys_signal_send_quit.
c-lw6sys-sleepWrapper on lw6sys_sleep.
c-lw6sys-snoozeWrapper on lw6sys_snooze.
c-lw6sys-url-canonizeWrapper on lw6sys_url_canonize.
c-lw6tsk-loader-get-stageWrapper on lw6tsk_loader_get_stage.
c-lw6tsk-loader-newWrapper on lw6tsk_loader_new.
c-lw6tsk-loader-popWrapper on lw6tsk_loader_pop.
c-lw6tsk-loader-push-genWrapper on lw6tsk_loader_push_gen.
c-lw6tsk-loader-push-ldrWrapper on lw6tsk_loader_push_ldr.
Previous: C to Guile, Up: Reference [Contents][Index]
This chapter contains a description of all modules and a list of all documented C functions in the program. It contains many references and is self-generated from C comments using gdoc by Simon Josefsson.
In order to reduce the number of pages of printed output, this complete reference is, by default, disabled in printable versions of the documentation (PostScript, PDF). This is both to make the manual more readable and to avoid wasting paper. Think about the environment.
It is however available in the HTML version of the documentation, which you can read online on http://www.gnu.org/software/liquidwar6/manual/html_node/.
Additionnally, the following adresses contain various view on the source code, giving informations on all the internal and public C interfaces:
./liquidwar6 --test.
It shows what functions are actually tested, and how many times they are called.
| • libliquidwar6: | Top-level functions. | |
| • libbot: | Bot algorithms. | |
| • mod-brute: | Brute-force bot. | |
| • mod-follow: | A bot that follows others. | |
| • mod-idiot: | Basic idiot bot. | |
| • mod-random: | Totally random bot. | |
| • libcfg: | Loading and saving config files. | |
| • libcli: | Network clients. | |
| • mod-http: | Web client. | |
| • mod-tcp: | Tcp client using native protocol. | |
| • mod-udp: | Udp client using native protocol. | |
| • libcns: | Console handling. | |
| • libcnx: | Connection common code. | |
| • libdat: | Storing network data. | |
| • libdef: | Keywords definitions. | |
| • libdsp: | Threaded display. | |
| • libdyn: | Dynamic module loading. | |
| • libgen: | Pseudo-random map generation. | |
| • libgfx: | Graphics. | |
| • mod-gl1: | Initial 3D graphics backend. | |
| • mod-gles2: | Embedded 3D graphics backend. | |
| • mod-soft: | Software only graphics backend. | |
| • shared-sdl: | SDL utils shared in some graphics backends. | |
| • mod-caca: | TTY/xterm text graphics backend. | |
| • libglb: | Gnulib embedded routines. | |
| • libgui: | GUI utilities. | |
| • libhlp: | Built-in help system. | |
| • libimg: | Generating screenshots. | |
| • libker: | Main kernel module (core algorithm). | |
| • libldr: | Loading maps. | |
| • libmap: | Map, AKA levels. | |
| • libmat: | Math and matrix utilities. | |
| • libmsg: | Network messages. | |
| • libnet: | Low-level network routines. | |
| • libnod: | Manipulating node data. | |
| • libp2p: | A la peer to peer network system. | |
| • libpil: | Dealing with game lag. | |
| • libscm: | Guile wrapper. | |
| • libsim: | Simulating fights. | |
| • libsnd: | Sound. | |
| • mod-csound: | Csound sound backend (vaporware). | |
| • mod-ogg: | Ogg/libSDL default sound backend. | |
| • libsrv: | Network servers. | |
| • mod-httpd: | Embedded web server. | |
| • mod-tcpd: | Tcp server using native protocol. | |
| • mod-udpd: | Udp server using native protocol. | |
| • libsys: | Low-level system utilities. | |
| • libtsk: | Asynchronous loading. | |
| • libvox: | Voxel-based 3D rendering. |
View lcov test coverage results on http://www.ufoot.org/liquidwar/v6/doc/coverage/src/lib/index.html.
sys_context: global system context
video_mode: the new video mode
This callback is here because gfx needs to update the config when the screen is resized. But... we did not want to make gfx depend on cfg "directly". It’s cleaner to pass parameters with Scheme, in the long run, it should make things easier. So this callback is the solution. Another side effect is that this way there’s a tangible obvious trace of this updating of config status by the gfx module. Seeing it sticking out like a thumb isn’t a bad thing.
Return value: none
sys_context: global system context
Functions which will call quit, free, destroy on whatever
smob object that has threads and/or requires hardware ressources.
This is to be called before the Guile interpreter ends. This is because
when it garbage collects objects at the end of the program, it has
no idea of what order to use when freeing objects. So if an object
which uses another one in a thread is freed after the other is freed,
you get a (rather unexplainabled if not warned) segfault.
Return value: none
sys_context: global system context
Sends a quit message and displays a newline.
Return value: none
sys_context: global system context
ret: return value to set, 1 for success, 0 for failure
Sets the ret value for the script.
Return value: none
sys_context: global system context
Get the ret value for the script.
Return value: 1 if success, 0 if not.
sys_context: global system context
argc: number of args as passed to main
argv: array of strings as passed to main
Fixes environment variables (path related) so that program can find its requirements. This must be called early in the program flow (else other calls might fail).
Return value: 1 if success, 0 if failure
sys_context: global system context
Register the functions of the bot module, make them callable from Guile.
Return value: 1 on success, 0 if failed.
sys_context: global system context
Register all the functions, make them callable from Guile. This is a very simple yet long and very usefull function, without it Guile has no knowledge of what LW6 is.
Return value: 1 on success, 0 if failed.
sys_context: global system context
c_line: the line typed by the user
This function will be called every time a message is typed on the console. It runs the given line in the current Guile environment.
Return value: none
sys_context: global system context
Register the functions of the cfg module, make them callable from Guile.
Return value: 1 on success, 0 if failed.
sys_context: global system context
Register the functions of the cli module, make them callable from Guile.
Return value: 1 on success, 0 if failed.
sys_context: global system context
Register the functions of the cns module, make them callable from Guile.
Return value: 1 on success, 0 if failed.
sys_context: global system context
Register the functions of the dsp module, make them callable from Guile.
Return value: 1 on success, 0 if failed.
sys_context: global system context
Register the functions of the gen module, make them callable from Guile.
Return value: 1 on success, 0 if failed.
sys_context: global system context
Register the functions of the gfx module, make them callable from Guile.
Return value: 1 on success, 0 if failed.
sys_context: global system context
Register the functions of the gui module, make them callable from Guile.
Return value: 1 on success, 0 if failed.
sys_context: global system context
Register the functions of the hlp module, make them callable from Guile.
Return value: 1 on success, 0 if failed.
sys_context: global system context
Register the functions of the img module, make them callable from Guile.
Return value: 1 on success, 0 if failed.
sys_context: global system context
Register the functions of the ker module, make them callable from Guile.
Return value: 1 on success, 0 if failed.
sys_context: global system context
Register the functions of the ldr module, make them callable from Guile.
Return value: 1 on success, 0 if failed.
sys_context: global system context
Register the functions of the map module, make them callable from Guile.
Return value: 1 on success, 0 if failed.
sys_context: global system context
Register the functions of the net module, make them callable from Guile.
Return value: 1 on success, 0 if failed.
sys_context: global system context
Register the functions of the p2p module, make them callable from Guile.
Return value: 1 on success, 0 if failed.
sys_context: global system context
Register the functions of the pil module, make them callable from Guile.
Return value: 1 on success, 0 if failed.
sys_context: global system context
Register the functions of the snd module, make them callable from Guile.
Return value: 1 on success, 0 if failed.
sys_context: global system context
Register the functions of the srv module, make them callable from Guile.
Return value: 1 on success, 0 if failed.
sys_context: global system context
Register the functions of the sys module, make them callable from Guile.
Return value: 1 on success, 0 if failed.
sys_context: global system context
Register the functions of the tsk module, make them callable from Guile.
Return value: 1 on success, 0 if failed.
sys_context: global system context
argc: number of args as passed to main
argv: array of strings as passed to main
Initializes global values to their defaults.
Return value: 1 on success, 0 if failed
sys_context: global system context
Frees global values. Will also garbage collect objects in case Guile failed to do it perfectly (or we failed to tell Guile how to do it). Important note: this function can only be called once in a program, usually at the end. If called twice, and typically, if *any* Guile code is run after it, the risk is that Guile code does not find objects that it should, or said differently, Guile might try to manipulate stuff that has been deleted without its being warned about it. In practice, libGC way of doing thing is usually a good thing, since it will from time to time keep objects in memory that shouldn’t, so there’s no point in changing that, but as we are pedantic in LW6 about the fact that everything at program exit must be perfectly freed, the problem arises. So well, only call this once at the end, else problem will show up, the usual form is a segfault on the delete callback, as when Guile finally runs its GC, the object does not exist any more.
Return value: none.
sys_context: global system context
argc: the argc parameter of the main function, that is, the number
of command-line args.
argv: the argv parameter of the main function, that is, an array
containing pointers on command-line args.
This function is directly called by main. This means by linking
against libliquidwar6 and calling it, you would have a program
that is almost exactly the "official" upstream liquidwar6 binary,
except you can tweak it and have all the power to call whatever
other functions you like, embed it. In short, everything the binary
does, you can do it in your own binarn, by linking against the
library and calling this function.
Return value: 1 if success, zero if failure. Note that this
is the "standard" C / liquidwar6 way to proceed, but your main
function should return 0 if success, else an error code. Typical
use is "return !lw6_main(argc, argv);".
sys_context: global system context
argc: the number of command-line args, as passed to main
argv: an array of strings containing command-line args, as passed to main
run_game: a pointer to a boolean which will contain true (1) if the game must be launched, or false (0) if the option is such that game must be skipped. Example: –copyright, –help, ...
Interprets command line arguments, and if some need to be processed, typically those args that are used to display stuff on the console, then perform the corresponding actions.
Return value: non-zero if success, 0 if error. The error can be, for instance, the test suite returning "no, tests were not OK".
sys_context: global system context
c_dsp: the display object
Creates an SCM ’dsp’ object from C data.
Return value: the SCM object
sys_context: global system context
dsp: the dsp to convert (SCM object)
Gets the internal C pointer corresponding to the scheme ’dsp’ object.
Return value: a pointer, *not* a copy, must not be freed
sys_context: global system context
dsp_smob: the smob to free
Frees a dsp smob, we need a special function to do that as structures like assoc hold pointers to these objects and therefore need a proper callback when being destroyed.
Return value: none
sys_context: global system context
c_snd: the sound object
Creates an SCM ’snd’ object from C data.
Return value: the SCM object
sys_context: global system context
snd: the snd to convert (SCM object)
Gets the internal C pointer corresponding to the scheme ’snd’ object.
Return value: a pointer, *not* a copy, must not be freed
sys_context: global system context
snd_smob: the smob to free
Frees a snd smob, we need a special function to do that as structures like assoc hold pointers to these objects and therefore need a proper callback when being destroyed.
Return value: none
sys_context: global system context
c_map: the map object
Creates an SCM ’map’ object from C data.
Return value: the SCM object
sys_context: global system context
map: the map to convert (SCM object)
Gets the internal C pointer corresponding to the scheme ’map’ object.
Return value: a pointer, *not* a copy, must not be freed
sys_context: global system context
map_smob: the smob to free
Frees a map smob, we need a special function to do that as structures like assoc hold pointers to these objects and therefore need a proper callback when being destroyed.
Return value: none
sys_context: global system context
c_menu: the menu object
Creates an SCM ’menu’ object from C data.
Return value: the SCM object
sys_context: global system context
menu: the menu to convert (SCM object)
Gets the internal C pointer corresponding to the scheme ’menu’ object.
Return value: a pointer, *not* a copy, must not be freed
sys_context: global system context
menu_smob: the smob to free
Frees a menu smob, we need a special function to do that as structures like assoc hold pointers to these objects and therefore need a proper callback when being destroyed.
Return value: none
sys_context: global system context
c_game_struct: the game struct object
map: the map (SCM object) referenced
Creates an SCM ’game-struct’ object from C data. Passing the map object enables the garbage collector not to free the map until the game struct is freed.
Return value: the SCM object
sys_context: global system context
game_struct: the game_struct to convert (SCM object)
Gets the internal C pointer corresponding to the scheme ’game_struct’ object.
Return value: a pointer, *not* a copy, must not be freed
sys_context: global system context
game_struct_smob: the smob to free
Frees a game_struct smob, we need a special function to do that as structures like assoc hold pointers to these objects and therefore need a proper callback when being destroyed.
Return value: none
sys_context: global system context
c_game_state: the game state object
game_struct: the game struct (SCM object) referenced
Creates an SCM ’game_state’ object from C data. Passing game_struct enables the garbage collector not to free the game_struct until the game_state is freed.
Return value: the SCM object
sys_context: global system context
game_state: the game_state to convert (SCM object)
Gets the internal C pointer corresponding to the scheme ’game_state’ object.
Return value: a pointer, *not* a copy, must not be freed
sys_context: global system context
game_state_smob: the smob to free
Frees a game_state smob, we need a special function to do that as structures like assoc hold pointers to these objects and therefore need a proper callback when being destroyed.
Return value: none
sys_context: global system context
c_pilot: the pilot object
Creates an SCM ’pilot’ object from C data.
Return value: the SCM object
sys_context: global system context
pilot: the pilot to convert (SCM object)
Gets the internal C pointer corresponding to the scheme ’pilot’ object.
Return value: a pointer, *not* a copy, must not be freed
sys_context: global system context
pilot_smob: the smob to free
Frees a pilot smob, we need a special function to do that as structures like assoc hold pointers to these objects and therefore need a proper callback when being destroyed.
Return value: none
sys_context: global system context
c_bot: the bot object
game_state: the game state
pilot: the pilot
Creates an SCM ’bot’ object from C data. Passing game_state and pilot enables the garbage collector not the free them until bot is freed.
Return value: the SCM object
sys_context: global system context
bot: the bot to convert (SCM object)
Gets the internal C pointer corresponding to the scheme ’bot’ object.
Return value: a pointer, *not* a copy, must not be freed
sys_context: global system context
bot_smob: the smob to free
Frees a bot smob, we need a special function to do that as structures like assoc hold pointers to these objects and therefore need a proper callback when being destroyed.
Return value: none
sys_context: global system context
c_look: the look object
Creates an SCM ’look’ object from C data.
Return value: the SCM object
sys_context: global system context
look: the look to convert (SCM object)
Gets the internal C pointer corresponding to the scheme ’look’ object.
Return value: a pointer, *not* a copy, must not be freed
sys_context: global system context
look_smob: the smob to free
Frees a look smob, we need a special function to do that as structures like assoc hold pointers to these objects and therefore need a proper callback when being destroyed.
Return value: none
sys_context: global system context
c_loader: the loader object
Creates an SCM ’loader’ object from C data.
Return value: the SCM object
sys_context: global system context
loader: the loader to convert (SCM object)
Gets the internal C pointer corresponding to the scheme ’loader’ object.
Return value: a pointer, *not* a copy, must not be freed
sys_context: global system context
loader_smob: the smob to free
Frees a loader smob, we need a special function to do that as structures like assoc hold pointers to these objects and therefore need a proper callback when being destroyed.
Return value: none
sys_context: global system context
c_db: the database object
Creates an SCM ’db’ object from C data.
Return value: the SCM object
sys_context: global system context
db: the db to convert (SCM object)
Gets the internal C pointer corresponding to the scheme ’db’ object.
Return value: a pointer, *not* a copy, must not be freed
sys_context: global system context
db_smob: the smob to free
Frees a db smob, we need a special function to do that as structures like assoc hold pointers to these objects and therefore need a proper callback when being destroyed.
Return value: none
sys_context: global system context
c_node: the node object
db: the db (SCM object) referenced
Creates an SCM ’node’ object from C data. Passing db enables the garbage collector not to free db until node is freed.
Return value: the SCM object
sys_context: global system context
node: the node to convert (SCM object)
Gets the internal C pointer corresponding to the scheme ’node’ object.
Return value: a pointer, *not* a copy, must not be freed
sys_context: global system context
node_smob: the smob to free
Frees a node smob, we need a special function to do that as structures like assoc hold pointers to these objects and therefore need a proper callback when being destroyed.
Return value: none
sys_context: global system context
c_jpeg: the database object
Creates an SCM ’jpeg’ object from C data.
Return value: the SCM object
sys_context: global system context
jpeg: the jpeg to convert (SCM object)
Gets the internal C pointer corresponding to the scheme ’jpeg’ object.
Return value: a pointer, *not* a copy, must not be freed
sys_context: global system context
jpeg_smob: the smob to free
Frees a jpeg smob, we need a special function to do that as structures like assoc hold pointers to these objects and therefore need a proper callback when being destroyed.
Return value: none
sys_context: global system context
Register all smobs to Guile.
Return value: 1 on success, 0 if failed.
sys_context: global system context
mode: test mode (bitmask)
Registers all tests for the lw6 module.
Return value: 1 if test is successfull, 0 on error.
sys_context: global system context
mode: test mode (bitmask)
Runs the liquidwar6 core module test suite, this will mostly test how Guile script integration works, loading a sample script and running it. It does not launch all the other sub modules tests.
Return value: 1 if test is successfull, 0 on error.
Next: mod-brute, Previous: libliquidwar6, Up: C API [Contents][Index]
View lcov test coverage results on http://www.ufoot.org/liquidwar/v6/doc/coverage/src/lib/bot/index.html.
sys_context: global system context
backend: backend to use
seed: parameters required to build bot (game state, among other things)
Initializes a bot object. Must be performed before any other call. The seed is absolutely required, for a bot really needs to know what map/context it’s working on, including at creation time
Return value: 1 on success, 0 on failure.
sys_context: global system context
backend: unitialize a bot backend
Closes a bot, but does not free all ressources.
sys_context: global system context
backend: bot to work on
x: next x position (out param)
y: next y position (out param)
Queries the bot for its next move, this is actually the one interesting function in the whole bot API.
Return value: 1 on success, 0 on failure.
sys_context: global system context
backend: bot to represent
Gives a human readable representation of bot
Return value: dynamically allocated string.
sys_context: global system context
argc: argc, as passed to main
argv: argv, as passed to main
List available bot backends. The hash contains pairs with id and name for each backend. The id is the technical key you can use to load the backend, the name is something more readable you can display in an interface. The backend objects themselves are not instanciated by this (in fact, they are, but released on the fly) you need to load and initialize them afterwards.
Return value: hash containing id/name pairs.
sys_context: global system context
argc: argc, as passed to main
argv: argv, as passed to main
name: string containing bot key, typically got from lw6bot_get_backends
Creates a bot backend, this is just about loading the dynamic library if needed, and/or check bot engine is available, and connect to it. It does not perform initialization.
Return value: bot backend.
sys_context: global system context
backend: bot backend to destroy
Frees the ressources associated to a bot, which must have been properly uninitialized before.
Return value: none.
sys_context: global system context
mode: test mode (bitmask)
Registers all tests for the libbot module.
Return value: 1 if test is successfull, 0 on error.
sys_context: global system context
mode: test mode (bitmask)
Runs the bot module test suite, testing most (if not all...)
functions.
Return value: 1 if test is successfull, 0 on error.
The bot backend is the first argument passed to any bot function, it contains reference to all the functions which can be used as well as a pointer on associated data. In OO, this would just be an object, with members and methods, using polymorphism through opaque pointers.
Type: lw6dyn_dl_handle_t *
Definition: lw6dyn_dl_handle_t* lw6bot_backend_s::dl_handle
Handle on dynamic library (if it makes sense).
Type: void *
Definition: void* lw6bot_backend_s::bot_context
Bot specific data, what is behind this pointer really depends on the bot engine.
Type: int
Definition: int lw6bot_backend_s::argc
The argc value passed to main.
Type: const char **
Definition: const char** lw6bot_backend_s::argv
The argv value passed to main.
Type: u_int32_t
Definition: u_int32_t lw6bot_backend_s::id
The id of the object, this is non-zero and unique within one run session, incremented at each object creation.
Type: lw6bot_seed_t
Definition: lw6bot_seed_t lw6bot_backend_s::seed
Parameters passed at initialization.
Type: void *(*
Definition: void*(* lw6bot_backend_s::init)(lw6sys_context_t *sys_context, int argc, const char *argv[], lw6bot_data_t *data)
Pointer on lw6bot_init callback code.
Type: void(*
Definition: void(* lw6bot_backend_s::quit)(lw6sys_context_t *sys_context, void *bot_context)
Pointer on lw6bot_context callback code.
Type: int(*
Definition: int(* lw6bot_backend_s::next_move)(lw6sys_context_t *sys_context, void *bot_context, int *x, int *y, lw6bot_data_t *data)
Pointer on lw6bot_next_move callback code.
Type: char *(*
Definition: char*(* lw6bot_backend_s::repr)(lw6sys_context_t *sys_context, void *bot_context, u_int32_t id)
Pointer on lw6bot_repr callback code.
Data used by a bot, those are essentially stable data passed as an argument plus changing data, that is, the game state.
Type: const lw6ker_game_state_t *
Definition: const lw6ker_game_state_t* lw6bot_data_s::game_state
Game state the bot will have to base its reflexion upon. This not need be always the same game state, the pointer might change, but it should always refer to the same logical game, that is, at least, same struct.
Type: lw6bot_param_t
Definition: lw6bot_param_t lw6bot_data_s::param
Constant parameters passed to the bot at creation.
Parameters usable by a bot engine. Those are the stable, fixed parameters passed at bot creation, they don’t change during the bot life.
Type: float
Definition: float lw6bot_param_s::speed
Speed of the bot, this is a value between 0.0f and 1.0f, 1 means normal speed, 0 is as slow as possible. Values over 1 will make the bot act/move faster than usual.
Type: int
Definition: int lw6bot_param_s::iq
IQ is supposed to reflect the cleverness of the bot. The default is 100 (this value is basically a percentage), 0 means just so stupid, and a high value, for instance 200, means very clever.
Type: u_int16_t
Definition: u_int16_t lw6bot_param_s::cursor_id
The cursor ID, which is a 16-bit non-null integer.
Parameters passed at bot creation, the only use for this is to simplify the protoype of the init function.
Type: const lw6ker_game_state_t *
Definition: const lw6ker_game_state_t* lw6bot_seed_s::game_state
Game state, that is, the level used, the fighters on it, the other cursors positions, and so on.
Type: lw6pil_pilot_t *
Definition: lw6pil_pilot_t* lw6bot_seed_s::pilot
This can be NULL, it’s a pilot object which can be used in some case, when, for instance, in dirty read mode, we want to read the level on the fly without syncing.
Type: int
Definition: int lw6bot_seed_s::dirty_read
The dirty read mode (between 0 and 2).
Type: lw6bot_param_t
Definition: lw6bot_param_t lw6bot_seed_s::param
Parameters given to the bot at creation.
Next: mod-follow, Previous: libbot, Up: C API [Contents][Index]
View lcov test coverage results on http://www.ufoot.org/liquidwar/v6/doc/coverage/src/lib/bot/mod-brute/index.html.
Defined to tell mod_brute is compatible with GNU General Public License. Of course it is. This function does nothing, but the fact it’s declared makes its GPL compatibility obvious. Having this declared is required.
Return value: none
Defined to tell mod_brute has no dlclose issue, once can safely call lt_dlclose on it when done with it, without risking any segfault. Some other LW6 modules/shared libraries do have this problem.
Return value: none
sys_context: global system context
Returns the pedigree for mod-brute, giving details about the module, including name, description, licence, date/time of compilation.
Return value: dynamically allocated object.
sys_context: global system context
Creates a mod-brute backend.
Return value: backend pointer.
View lcov test coverage results on http://www.ufoot.org/liquidwar/v6/doc/coverage/src/lib/bot/mod-follow/index.html.
Defined to tell mod_follow is compatible with GNU General Public License. Of course it is. This function does nothing, but the fact it’s declared makes its GPL compatibility obvious. Having this declared is required.
Return value: none
Defined to tell mod_follow has no dlclose issue, once can safely call lt_dlclose on it when done with it, without risking any segfault. Some other LW6 modules/shared libraries do have this problem.
Return value: none
sys_context: global system context
Returns the pedigree for mod-follow, giving details about the module, including name, description, licence, date/time of compilation.
Return value: dynamically allocated object.
sys_context: global system context
Creates a mod-follow backend.
Return value: backend pointer.
Next: mod-random, Previous: mod-follow, Up: C API [Contents][Index]
View lcov test coverage results on http://www.ufoot.org/liquidwar/v6/doc/coverage/src/lib/bot/mod-idiot/index.html.
Defined to tell mod_idiot is compatible with GNU General Public License. Of course it is. This function does nothing, but the fact it’s declared makes its GPL compatibility obvious. Having this declared is required.
Return value: none
Defined to tell mod_idiot has no dlclose issue, once can safely call lt_dlclose on it when done with it, without risking any segfault. Some other LW6 modules/shared libraries do have this problem.
Return value: none
sys_context: global system context
Returns the pedigree for mod-idiot, giving details about the module, including name, description, licence, date/time of compilation.
Return value: dynamically allocated object.
sys_context: global system context
Creates a mod-idiot backend.
Return value: backend pointer.
View lcov test coverage results on http://www.ufoot.org/liquidwar/v6/doc/coverage/src/lib/bot/mod-random/index.html.
Defined to tell mod_random is compatible with GNU General Public License. Of course it is. This function does nothing, but the fact it’s declared makes its GPL compatibility obvious. Having this declared is required.
Return value: none
Defined to tell mod_random has no dlclose issue, once can safely call lt_dlclose on it when done with it, without risking any segfault. Some other LW6 modules/shared libraries do have this problem.
Return value: none
sys_context: global system context
Returns the pedigree for mod-random, giving details about the module, including name, description, licence, date/time of compilation.
Return value: dynamically allocated object.
sys_context: global system context
Creates a mod-random backend.
Return value: backend pointer.
Next: libcli, Previous: mod-random, Up: C API [Contents][Index]
View lcov test coverage results on http://www.ufoot.org/liquidwar/v6/doc/coverage/src/lib/cfg/index.html.
sys_context: global system context
cfg_context: opaque pointer on a context
Overwrites any existing option with command line args
Return value: 1 if success, 0 if error
sys_context: global system context
cfg_context: opaque pointer on a context
Sets all values to their defaults.
Return value: 1 if success, 0 if error
sys_context: global system context
cfg_context: a context returned by lw6cfg_init
Overwrites any existing vale in the config with environment variables prefixed by LW6_.
Return value: 1 if successfull, 0 if error.
sys_context: global system context
user_dir: the user directory
exp: the exp (out param)
Gets exp from file.
Return value: 1 on success, 0 on failure
sys_context: global system context
user_dir: the user directory
exp: the exp
Saves exp to file.
Return value: 1 on success, 0 on failure
sys_context: global system context
key: the key of the value to format
value: the value to format
type: the type of the value to format
Formats, converts, a given value to its cannonical representation. Booleans will be converted to true/false, strings containing integers will be stripped from junk, and so on. This is a performance killer but will ensure everything is correct.
Return value: a newly allocated string, containing the same as the input, but reformatted the pedantic way.
sys_context: global system context
key: the key of the value to format
value: the value to format
Formats, converts, a given value to its cannonical representation. Booleans will be converted to true/false, strings containing integers will be stripped from junk, and so on. This is a performance killer but will ensure everything is correct. This function will automatically guess the type of the value from its description in the help system.
Return value: a newly allocated string, containing the same as the input, but reformatted the pedantic way.
sys_context: global system context
cfg_context: a context returned by lw6cfg_init
filename: a file path, absolute or relative
Loads the given config file, and stores its values into the current context. Parameters which are both in the config file and given as command line parameters, will be taken from the command-line.
Return value: 1 if successfull, 0 if error.
sys_context: global system context
cfg_context: context to query
key: key to search
Returns wether a key exists within context or not.
Return value: 1 if exists, 0 if not
sys_context: global system context
cfg_context: context to query
key: key to search
Returns the current value for a given query, the returned value is always a string, typically the string one would pass on the command line or set in a config file
Return value: pointer to string, must be freed.
sys_context: global system context
cfg_context: context to modify
key: key to search and change
value: new value
Sets a given key to the specified value, this is a string only function, pass the value you would pass on the command line or set in a config file.
Return value: none
key: key to search
Returns an option as an integer. Note that this function does not know wether the parameter should really be an integer or not, so you can call it even on non-integer values, but of course results will have no real meaning.
Return value: option value converted to int
sys_context: global system context
cfg_context: context to modify
key: key to search and change
value: new value
Set a config option to an integer value. Note that this function does not know wether the parameter should really be an integer or not, so you can call it even on non-integer values, at your own risk.
Return value: none.
sys_context: global system context
cfg_context: context to query
key: key to search
Returns an option as a boolean. Note that this function does not know wether the parameter should really be a boolean or not, so you can call it even on non-boolean values, but of course results will have no real meaning.
Return value: option value converted to boolean
sys_context: global system context
cfg_context: context to modify
key: key to search and change
value: new value
Set a config option to a boolean value. Note that this function does not know wether the parameter should really be a boolean or not, so you can call it even on non-boolean values, at your own risk.
Return value: none.
sys_context: global system context
key: key to test
Tells wether a key should be saved in the config file. Typically, some options you don’t want to savem such as the location of the config file itself. Most of those non-savable parameters are path-related. This does not mean no paths are saved in the config file.
Return value: 1 if must be saved, 0 if not
sys_context: global system context
cfg_context: a context returned by lw6cfg_init
filename: a file path, absolute or relative
Save current options into the given config file. Before saving the file, all command line arguments will be read and will override current values. This means the saved file will contain values given as command line arguments.
Return value: 1 if successfull, 0 if error.
sys_context: global system context
argc: number of command line arguments, as given to main
argv: a list of command line arguments, as given to main
Initializes a config context object. This object is hidden behind an opaque void * pointer to avoid direct access to its elements.
Return value: an opaque pointer, must be freed with lw6cfg_quit.
sys_context: global system context
cfg_context: a context returned by lw6cfg_init
Frees a config cfg_context object. You must call this once you’re done with the context.
Return value: none.
sys_context: global system context
argc: number of command line arguments, as given to main
argv: a list of command line arguments, as given to main
Overwrites the config file with defaults. Use this to get rid of old configurations.
sys_context: global system context
mode: test mode (bitmask)
Registers all tests for the libcfg module.
Return value: 1 if test is successfull, 0 on error.
sys_context: global system context
mode: test mode (bitmask)
Runs the cfg module test suite, testing most (if not all...)
functions.
Return value: 1 if test is successfull, 0 on error.
sys_context: global system context
argc: number of command-line args, as passed to main
argv: arry of command-line args, as passed to main
key: the key to query
Unified "value" getter, which gets informations from environment variables, command line, and config file. The rules is that the command-line argument always has the last word. It will override any other value. Follows environment variables, which will be used if no command-line argument is supplied. Note that these are "LW6_" prefixed and uppercased environment variables as opposed to lowercased and "dash-separated" keys. Finally, if there’s no environment variable, nor any config-file corresponding entry, the value will be searched in the config file. If there’s no information in the config file, NULL is returned.
Return value: a string with the value. Can be NULL. Must be freed.
sys_context: global system context
argc: number of command-line args, as passed to main
argv: arry of command-line args, as passed to main
Gets the user dir, taking all parameters in account, that’s to say the "LW6_USER_DIR" env value, the "–user-dir" command-line paramater and the LW6DEF_USER_DIR config file entry.
Return value: the directory path, might be NULL, must be freed.
sys_context: global system context
argc: number of command-line args, as passed to main
argv: arry of command-line args, as passed to main
Gets the log file, taking all parameters in account, that’s to say the "LW6_LOG_FILE" env value, the "–log-file" command-line paramater and the LW6DEF_LOG_FILE config file entry.
Return value: the directory path, might be NULL, must be freed.
sys_context: global system context
argc: number of command-line args, as passed to main
argv: arry of command-line args, as passed to main
Gets the user dir, taking all parameters in account, that’s to say the "LW6_MUSIC_PATH" env value, the "–music-path" command-line paramater and the LW6DEF_MUSIC_PATH config file entry.
Return value: the directory path, might be NULL, must be freed.
sys_context: global system context
argc: number of command-line args, as passed to main
argv: arry of command-line args, as passed to main
Gets the user dir, taking all parameters in account, that’s to say the "LW6_MAP_PATH" env value, the "–map-path" command-line paramater and the LW6DEF_MAP_PATH config file entry.
Return value: the directory path, might be NULL, must be freed.
sys_context: global system context
type: type as an enum
Returns the string corresponding to a given type, suitable for
use in XML files. For instance if you pass LW6HLP_TYPE_INT then
you will obtain the string int (string of 3 chars containing i, n
and t.
Return value: string, must not be freed.
sys_context: global system context
xml_key: key found in XML file
xml_value: value found in XML file
target_key: key we’re searching for
value: the value if found (out param)
Tries to find a value in a key/value pair. If xml_key and target_key
match, then will put the corresponding value (converted to int) in
the value param. Typically, you would call this in a loop on every
single entry found in an XML file, in an expat callback.
Return value: none.
sys_context: global system context
xml_key: key found in XML file
xml_value: value found in XML file
target_key: key we’re searching for
value: the value if found (out param)
Tries to find a value in a key/value pair. If xml_key and target_key
match, then will put the corresponding value (converted to boolean) in
the value param. Typically, you would call this in a loop on every
single entry found in an XML file, in an expat callback.
Return value: none.
sys_context: global system context
xml_key: key found in XML file
xml_value: value found in XML file
target_key: key we’re searching for
value: the value if found (out param)
Tries to find a value in a key/value pair. If xml_key and target_key
match, then will put the corresponding value (converted to float) in
the value param. Typically, you would call this in a loop on every
single entry found in an XML file, in an expat callback.
Return value: none.
sys_context: global system context
xml_key: key found in XML file
xml_value: value found in XML file
target_key: key we’re searching for
value: the value if found (out param)
Tries to find a value in a key/value pair. If xml_key and target_key
match, then will put the corresponding value (as a string) in
the value param. Typically, you would call this in a loop on every
single entry found in an XML file, in an expat callback.
Return value: none.
sys_context: global system context
xml_key: key found in XML file
xml_value: value found in XML file
target_key: key we’re searching for
value: the value if found (out param)
Tries to find a value in a key/value pair. If xml_key and target_key
match, then will put the corresponding value (converted to a color) in
the value param. Typically, you would call this in a loop on every
single entry found in an XML file, in an expat callback.
Return value: none.
sys_context: global system context
filename: full path of file to read
callback_func: callback function to be called on each element
callback_data: additionnal pointer passed to callback function
Will parse a file and call the given callback on each element. This is an over-simplified way to read XML file, in fact we just explain plain non-nested simple elements but this is exactly what LW config files are made of.
Return value: 1 on success, 0 on failure.
sys_context: global system context
f: file to write data to (append mode)
key: key to write
value: value to write
Writes an int entry into an opened XML file.
Return value: none.
sys_context: global system context
f: file to write data to (append mode)
key: key to write
value: value to write
Writes a boolean entry into an opened XML file.
Return value: none.
sys_context: global system context
f: file to write data to (append mode)
key: key to write
value: value to write
Writes a float entry into an opened XML file.
Return value: none.
sys_context: global system context
f: file to write data to (append mode)
key: key to write
value: value to write
Writes a string entry into an opened XML file.
Return value: none.
sys_context: global system context
f: file to write data to (append mode)
key: key to write
value: value to write
Writes a color entry into an opened XML file.
Return value: none.
sys_context: global system context
f: file to write data to (append mode)
key: key to write
value: value to write
Writes an entry into an opened XML file, will try and guess type from the internal help system, typically, if this is a standard config file entry (the one documented by the about command line function) it will pick up the right type. The reason not to use this all the times is that sometimes, one might to to store non-standard options, and additionnally, guessing the type does consume some CPU.
Return value: none.
sys_context: global system context
f: file to write data to (append mode)
key: key to write
value: value to write
Writes an entry into an opened XML file, will try and guess type from the internal help system, typically, if this is a standard config file entry (the one documented by the about command line function) it will pick up the right type. The reason not to use this all the times is that sometimes, one might to to store non-standard options, and additionnally, guessing the type does consume some CPU. Also, this function will write only values that are different from the default.
Return value: none.
View lcov test coverage results on http://www.ufoot.org/liquidwar/v6/doc/coverage/src/lib/cli/index.html.
sys_context: global system context
backend: backend to use
Initializes a client backend. Must be performed before any other call.
Return value: 1 on success, 0 on failure
sys_context: global system context
backend: unitialize a cli backend
Closes a cli, but does not free all ressources.
sys_context: global system context
backend: backend to use
node_info: information on the current node
oob_data: data of the out-of-band request
Processes the required out-of-band tasks, this typically, for a client, includes broadcasting. Depending on parameters passed in oob_data, might actually do a broadcast or simply call a given host and see what’s the answer. A typicall exchange is PING then INFO and finally LIST. It’s the responsability of the client to take the OOB initiative and contact the server.
Return value: 1 on success, 0 on failure.
sys_context: global system context
backend: backend to use
local_url: our local public url
remote_url: the remote url we want to connect to
remote_ip: remote IP address
remote_port: remote IP port
password: password to use (if needed)
local_id: our local id
remote_id: the remote id
dns_ok: wether the remote announced URL matches DNS information
network_reliability: network reliability (the highest, the better)
Opens a connection with a remote host.
Return value: new object.
sys_context: global system context
backend: backend to use
connection: connection to use
Closes a connection, this will free the connection object.
Return value: none.
sys_context: global system context
backend: backend to use
connection: connection to use
now: current timestamp
physical_ticket_sig: signature of physical sender
logical_ticket_sig: signature of logical sender
logical_from_id: id of logical sender
logical_to_id: id of logicial target
message: text of message to send
Sends a message to a peer over a given connection.
Return value: 1 on success, 0 on failure.
sys_context: global system context
backend: backend to use
connection: connection to use
Tells wether a client connection can technically send messages. This does not garantee send will succeed, but if it’s not OK at this stage, it’s not even worth trying.
Return value: 1 if it can be used to send messages, 0 if not ready.
sys_context: global system context
backend: backend to use
connection: connection to use
Performs required duty on connection, depending on the backend, this can include sending messages and/or receiving them. Must be called on a regular basis.
Return value: none.
sys_context: global system context
backend: backend to use
connection: connection to represent
Gives a human readable representation of the connection.
Return value: dynamically allocated string.
sys_context: global system context
public_url: the address of the distant server to test
verify_callback_func: a function which will be called when a node has been verified
verify_callback_data: additionnal data passed to the callback func
Create a new OOB structure, copying required objects. We need to make copies for this is for usage in a separate thread. The thread member is not set here since the right way to do things is first to set up data then to fire the thread.
Return value: new object
sys_context: global system context
oob: the object to free
Frees an OOB structure.
Return value: none
sys_context: global system context
Returns the list of the default cli backends.
Return value: comma separated string, must not be freed.
sys_context: global system context
argc: argc, as passed to main
argv: argv, as passed to main
List available cli backends. The hash contains pairs with id and name for each backend. The id is the technical key you can use to load the backend, the name is something more readable you can display in an interface. The backend objects themselves are not instanciated by this (in fact, they are, but released on the fly) you need to load and initialize them afterwards.
Return value: hash containing id/name pairs.
sys_context: global system context
argc: argc, as passed to main
argv: argv, as passed to main
name: string containing cli key, typically got from lw6cli_get_backends
Creates a cli backend, this is just about loading the dynamic library if needed, and/or check cli engine is available, and connect to it. It does not perform initialization.
Return value: cli backend.
sys_context: global system context
backend: backend to destroy
Destroys a cli backend.
Return value: none.
sys_context: global system context
mode: test mode (bitmask)
Registers all tests for the libcli module.
Return value: 1 if test is successfull, 0 on error.
sys_context: global system context
mode: test mode (bitmask)
Runs the cli module test suite, testing most (if not all...)
functions.
Return value: 1 if test is successfull, 0 on error.
The cli backend is the first argument passed to any cli function, it contains reference to all the functions which can be used as well as a pointer on associated data. In OO, this would just be an object, with members and methods, using polymorphism through opaque pointers.
Type: lw6dyn_dl_handle_t *
Definition: lw6dyn_dl_handle_t* lw6cli_backend_s::dl_handle
Handle on dynamic library (if it makes sense).
Type: void *
Definition: void* lw6cli_backend_s::cli_context
Cli specific data, what is behind this pointer really depends on the cli engine.
Type: int
Definition: int lw6cli_backend_s::argc
The argc value passed to main.
Type: const char **
Definition: const char** lw6cli_backend_s::argv
The argv value passed to main.
Type: u_int32_t
Definition: u_int32_t lw6cli_backend_s::id
The id of the object, this is non-zero and unique within one run session, incremented at each object creation.
Type: char *
Definition: char* lw6cli_backend_s::name
Module name.
Type: lw6cnx_properties_t
Definition: lw6cnx_properties_t lw6cli_backend_s::properties
General backend properties.
Type: void *(*
Definition: void*(* lw6cli_backend_s::init)(lw6sys_context_t *sys_context, int argc, const char *argv[], lw6cnx_properties_t *properties)
Pointer on lw6cli_init callback code.
Type: void(*
Definition: void(* lw6cli_backend_s::quit)(lw6sys_context_t *sys_context, void *cli_context)
Pointer on lw6cli_quit callback code.
Type: int(*
Definition: int(* lw6cli_backend_s::process_oob)(lw6sys_context_t *sys_context, void *cli_context, lw6nod_info_t *node_info, lw6cli_oob_data_t *oob_data)
Pointer on lw6cli_process_oob callback code.
Type: lw6cnx_connection_t *(*
Definition: lw6cnx_connection_t*(* lw6cli_backend_s::open)(lw6sys_context_t *sys_context, void *cli_context, const char *local_url, const char *remote_url, const char *remote_ip, int remote_port, const char *password, u_int64_t local_id, u_int64_t remote_id, int dns_ok, int network_reliability)
Pointer on lw6cli_open callback code.
Type: void(*
Definition: void(* lw6cli_backend_s::close)(lw6sys_context_t *sys_context, void *cli_context, lw6cnx_connection_t *connection)
Pointer on lw6cli_close callback code.
Type: int(*
Definition: int(* lw6cli_backend_s::send)(lw6sys_context_t *sys_context, void *cli_context, lw6cnx_connection_t *connection, int64_t now, u_int32_t physical_ticket_sig, u_int32_t logical_ticket_sig, u_int64_t logical_from_id, u_int64_t logical_to_id, const char *message)
Pointer on lw6cli_send callback code.
Type: int(*
Definition: int(* lw6cli_backend_s::can_send)(lw6sys_context_t *sys_context, void *cli_context, lw6cnx_connection_t *connection)
Pointer on lw6cli_can_send callback code.
Type: void(*
Definition: void(* lw6cli_backend_s::poll)(lw6sys_context_t *sys_context, void *cli_context, lw6cnx_connection_t *connection)
Pointer on lw6cli_poll callback code.
Type: char *(*
Definition: char*(* lw6cli_backend_s::repr)(lw6sys_context_t *sys_context, void *cli_context, lw6cnx_connection_t *connection)
Pointer on lw6cli_repr callback code.
Holds the data for the process_oob function, this is merely a utility struct to simplify headers/
Type: int64_t
Definition: int64_t lw6cli_oob_data_s::creation_timestamp
Creation timestamp of the OOB request, this is used to know wether we have already timed out or not. This is not the node creation timestamp.
Type: int
Definition: volatile int lw6cli_oob_data_s::do_not_finish
Flag used to force finish, for instance when we want to delete the object quickly and do not want to wait until a long polling-based network operation finishes completely.
Type: char *
Definition: char* lw6cli_oob_data_s::public_url
Public URL of the node, we need this at hand to serve it quickly to peers, and be able to perform basic checks.
Type: lw6cli_verify_callback_func_t
Definition: lw6cli_verify_callback_func_t lw6cli_oob_data_s::verify_callback_func
Pointer on a function which will verify if peer is OK, and act accordinlgy if it’s OK or not. Note that the callback function might be called pretty much anytime in the heavily multithreaded context of LW6 so it must be reentrant and have mutexes if needed. Indeed, it’s very likely to update some shared list of available nodes.
Type: void *
Definition: void* lw6cli_oob_data_s::verify_callback_data
Data passed to the verify_callback function.
Structure containing both the thread running an OOB request and its data. It was advantagious to separate thoses two and not make the thread a permanent member of the OOB data struct, since it allows the actual OOB code to be totally unaware of the thread running it, which is, to some extent, safer.
Type: lw6sys_thread_handler_t *
Definition: lw6sys_thread_handler_t* lw6cli_oob_s::thread
Pointer on thread running the OOB request.
Type: lw6cli_oob_data_t
Definition: lw6cli_oob_data_t lw6cli_oob_s::data
Data used by the OOB request.
View lcov test coverage results on http://www.ufoot.org/liquidwar/v6/doc/coverage/src/lib/cli/mod-http/index.html.
Defined to tell mod_http is compatible with GNU General Public License. Of course it is. This function does nothing, but the fact it’s declared makes its GPL compatibility obvious. Having this declared is required.
Return value: none
Defined to tell mod_http has no dlclose issue, once can safely call lt_dlclose on it when done with it, without risking any segfault. Some other LW6 modules/shared libraries do have this problem.
Return value: none
sys_context: global system context
Returns the pedigree for mod-http, giving details about the module, including name, description, licence, date/time of compilation.
Return value: dynamically allocated object.
sys_context: global system context
Creates a mod-http backend.
Return value: backend pointer.
View lcov test coverage results on http://www.ufoot.org/liquidwar/v6/doc/coverage/src/lib/cli/mod-tcp/index.html.
Defined to tell mod_tcp is compatible with GNU General Public License. Of course it is. This function does nothing, but the fact it’s declared makes its GPL compatibility obvious. Having this declared is required.
Return value: none
Defined to tell mod_tcp has no dlclose issue, once can safely call lt_dlclose on it when done with it, without risking any segfault. Some other LW6 modules/shared libraries do have this problem.
Return value: none
sys_context: global system context
Returns the pedigree for mod-tcp, giving details about the module, including name, description, licence, date/time of compilation.
Return value: dynamically allocated object.
sys_context: global system context
Creates a mod-tcp backend.
Return value: backend pointer.
View lcov test coverage results on http://www.ufoot.org/liquidwar/v6/doc/coverage/src/lib/cli/mod-udp/index.html.
Defined to tell mod_udp is compatible with GNU General Public License. Of course it is. This function does nothing, but the fact it’s declared makes its GPL compatibility obvious. Having this declared is required.
Return value: none
Defined to tell mod_udp has no dlclose issue, once can safely call lt_dlclose on it when done with it, without risking any segfault. Some other LW6 modules/shared libraries do have this problem.
Return value: none
sys_context: global system context
Returns the pedigree for mod-udp, giving details about the module, including name, description, licence, date/time of compilation.
Return value: dynamically allocated object.
sys_context: global system context
Creates a mod-udp backend.
Return value: backend pointer.
View lcov test coverage results on http://www.ufoot.org/liquidwar/v6/doc/coverage/src/lib/cns/index.html.
line: the input line
The global console handler. Because readline does not, or at
least, because I did not find any proper way to pass it a general
pointer along with the string, and since we need sys_context
pretty much everywhere, we rely on using this handler which,
in turn, calls the handler passed to lw6cns_handler_install
with sys_context added as a first argument.
Return value: none.
sys_context: global system context
callback: handler function.
Installs a console handler.
Return value: none.
sys_context: global system context
Polling function for console, must be called on a regular basis.
Return value: none.
sys_context: global system context
Remove console handler.
Return value: none.
sys_context: global system context
line: line to add
Adds a line to the console history, won’t add it if it’s NULL or empty.
Return value: none.
sys_context: global system context
Tells wether console is supported.
Return value: 1 if console can be enabled, 0 if not
sys_context: global system context
Tells wether program is likely to have proper term (xterm, Linux console) support.
Return value: 1 if has validated TERM support, 0 if not
sys_context: global system context
mode: test mode (bitmask)
Registers all tests for the libcns module.
Return value: 1 if test is successfull, 0 on error.
sys_context: global system context
mode: test mode (bitmask)
Runs the cns module test suite, testing most (if not all...)
functions.
Return value: 1 if test is successfull, 0 on error.
View lcov test coverage results on http://www.ufoot.org/liquidwar/v6/doc/coverage/src/lib/cnx/index.html.
sys_context: global system context
local_url: the local public URL
remote_url: the remote public URL
remote_ip: the remote IP address
remote_port: the remote port
password: the password to use
local_id: the local ID
remote_id: the remote ID
dns_ok: 1 if no DNS mismatch, 0 if IP does not match public URL
network_reliability: drop 1 out of X packets
Create a connection object. This object in itself does
nothing, it’s just to share common structures among
modules, more precisely, between cli and srv code.
It’s the responsability off the caller/backend to handle
the backend_specific_data field which is NULL after this
call.
Return value: newly allocated object.
sys_context: global system context
connection: object to free
Frees a connection object. It’s the responsibility of
the caller/backend to handle the backend_specific_data field.
Return value: none.
sys_context: global system context
connection: the connection concerned
now: the current timestamp
Tells wether a new foo message must be issued.
Return value: 1 if true, 0 if false.
sys_context: global system context
connection: the connection concerned
now: the current timestamp
next_foo_delay: the delay (msec) before next foo message is sent
Generates a new foo_bar_key, and schedules the next foo message send timestamp.
Return value: none.
sys_context: global system context
connection: the connexion to lock
Acquires a "send" lock on the connexion, the idea is to avoid too threads sending data using the same socket at the same time. Note that each backend must call this when accessing the socket, there’s no top-level lock for the sake of performance.
Return value: 1 on success, 0 if not.
sys_context: global system context
connection: the connexion to lock
Releases a "send" lock on the connexion, the idea is to avoid too threads sending data using the same socket at the same time. Note that each backend must call this when accessing the socket, there’s no top-level lock for the sake of performance.
Return value: none.
sys_context: global system context
connection: the connexion concerned
Will filter and return true only in "rare" cases when packets must be artificially dropped for testing purpose.
Return value: 1 if message must be sent/received, 0 if not
sys_context: global system context
logical_ticket_sig: logical signature
physical_ticket_sig: physical signature
logical_from_id: logical sender
logical_to_id: logical receiver
msg: the message text
Creates a new packet object, this simply allocates memory and copy the string. The string is duplicated, param msg can be freed.
Return value: new object.
sys_context: global system context
packet: object to free
Frees a packet object.
Return value: none.
sys_context: global system context
packet: packet to analyse
Calculates a checksum for a packet.
Return value: 32-bit checksum.
sys_context: global system context
a: first packet to analyse
b: second packet to analyse
Compares two packets. The comparison is made using checksums, the result is a strcmp-like integer, which is adapted to sorting. The order has no real signification, it’s mostly used to re-order packets in a pseudo-random order, to ensure no algorithm relies on packets arriving in the right order.
Return value: -1 if a lower than b, 0 if a equals b, 1 if a is greater than b.
sys_context: global system context
func_data: additionnal data, function specific
ptr_a: first packet to analyse
ptr_b: second packet to analyse
Callback usable to sort packets, relies on lw6cnx_packet_compare internally.
Return value: -1 if ptr_a lower than ptr_b, 0 if ptr_a equals ptr_b, 1 if ptr_a is greater than ptr_b.
sys_context: global system context
seed: a seed to blur the password, can be NULL
password: the password, can be NULL
Calculates the checksum of a password, and returns it as a string, ready to be sent on the network. If password is empty or NULL, then an empty (but not NULL unless internal error) string will be returned. All LW6 protocols should send these checksums instead of real passwords, then on server side value can be checked against both real password and its checksum. The seed is here so that eavesdropper can’t reuse the checksum to connect on random sessions. Seed can typically be the node ’public_url’ value.
Return value: a dynamically allocated string
sys_context: global system context
seed: a seed to blur the password, can be NULL
password_here: the local password, can be NULL
password_received: the password received from network, can be NULL
Tells wether a password received over the network is valid.
The password_here argument (the local password) will be
checksumed so that password_received is checked against both
clear and checksumed values, so it can be in any form.
Return value: 1 if OK, passwords are the same, 0 if not.
sys_context: global system context
mode: test mode (bitmask)
Registers all tests for the libcnx module.
Return value: 1 if test is successfull, 0 on error.
sys_context: global system context
mode: test mode (bitmask)
Runs the cnx module test suite, testing most (if not all...)
functions.
Return value: 1 if test is successfull, 0 on error.
sys_context: global system context
ticket_table: the ticket table to fill with zero
Fills the ticket table struct with 0s.
Return value: none.
sys_context: global system context
ticket_table: the ticket table to init
hash_size: the hash size for both recv/send hashs
Initialize a ticket table, that is, set it up with two empty hashs. Recv hash is filled automatically as it’s queried for tickets, send hash must be filled explicitely with info from the network.
Return value: none.
sys_context: global system context
ticket_table: the ticket table to clear
Clears the object (frees memory).
Return value: none.
sys_context: global system context
ticket_table: the ticket table to query
peer_id: the id of remote node
Gets the ticket used to communicate with peer, to check its incoming (recv) messages. If ticket does not exist yet, it’s automatically generated so tunction will always return a non-zero value.
Return value: the ticket used to check incoming messages.
sys_context: global system context
ticket_table: the ticket table to query
peer_id: the id of remote node
ack_delay_msec: delay before which we’ll consider the ticket as really received
Acknowledges the ticket used to communicate with peer, to check its incoming (recv) messages has been received. This is to avoid sending it again when it has been received, as it’s kept "forever" by peer, we never need to send it again. The delay is here to avoid checking tickets too quickly, for instance one could have sent the ticket yet, but for some reason some unsigned messages are still in the pipe, typically they transit through another slow channel such as httpd while the ticket was sent on udp.
Return value: none.
sys_context: global system context
ticket_table: the ticket table to query
peer_id: the id of remote node
Acknowledges the ticket used to communicate with peer, to check its incoming (recv) messages has been received. This is to avoid sending it again when it has been received, as it’s kept "forever" by peer, we never need to send it again.
Return value: the ticket used to check incoming messages.
sys_context: global system context
ticket_table: the ticket table to query
peer_id: the id of remote node
Gets the ticket used to communicate with peer, to stamp the outgoing messages. If ticket does not exist yet, 0 is returned, indeed this value must be initialized with the value the peer gives us.
Return value: the ticket used to stamp outgoing messages.
sys_context: global system context
ticket_table: the ticket table to query
peer_id: the id of remote node
send_ticket: the ticket to use to stamp outgoing messages
Sets the ticket used to communicate with peer, to stamp the outgoing (send) messages. This value should be received from the network. Note that once it’s set, it’s impossible to change it, it will remain the same for the whole duration of the node existence.
Return value: NULL
This structure holds all data associated to a physical connexion with a remote peer. This includes informations about the local node, informations about the peer, and protocol specific details. Depending on which backend is used to handle the connection, it will behave differently. If you search for attributes such as socket id, search for them in backend_specific_data which is, in fact, handle by the backend code.
Type: char *
Definition: char* lw6cnx_connection_s::local_url
URL of our local node.
Type: char *
Definition: char* lw6cnx_connection_s::remote_url
URL of the remote node.
Type: char *
Definition: char* lw6cnx_connection_s::remote_ip
IP address of the remote node.
Type: int
Definition: int lw6cnx_connection_s::remote_port
IP port of the remote node.
Type: char *
Definition: char* lw6cnx_connection_s::password
Password as clear text.
Type: char *
Definition: char* lw6cnx_connection_s::password_send_checksum
Password as a checksum, what will be sent on the network.
Type: u_int64_t
Definition: u_int64_t lw6cnx_connection_s::local_id_int
ID of the local node, as an unsigned 64-bit integer.
Type: char *
Definition: char* lw6cnx_connection_s::local_id_str
ID of the local node, as an hexa string.
Type: u_int64_t
Definition: u_int64_t lw6cnx_connection_s::remote_id_int
ID of the remote node, as an unsigned 64-bit integer.
Type: char *
Definition: char* lw6cnx_connection_s::remote_id_str
ID of the local node, as an hexa string.
Type: int
Definition: int lw6cnx_connection_s::dns_ok
Will be set to 1 if the peer domain name is the same as the one reported in the URL. For instance, if we get a connection from 23.45.23.45, but this host claims to be on www.foo.bar and DNS reports www.foo.bar as being 111.222.111.222 then there’s something strange. It could just be someone doing NAT, but in all cases it’s worth mentionning, so we keep the information here. Having 0 here is a bad point for the connection.
Type: int
Definition: int lw6cnx_connection_s::network_reliability
The higher, the most reliable message sending will be. It can never be perfect, LW6 will always drop some packets from time to time, just to simulate real packet loss and be sure if it happens, it’s handled nicely.
Type: lw6cnx_properties_t
Definition: lw6cnx_properties_t lw6cnx_connection_s::properties
Properties got from the backend.
Type: lw6sys_list_r_t *
Definition: lw6sys_list_r_t* lw6cnx_connection_s::recv_list
List of messages received. This is a list_r and not a plain list because it can typically be filled and consumed in different threads.
Type: lw6sys_mutex_t *
Definition: lw6sys_mutex_t* lw6cnx_connection_s::send_mutex
Send mutex, this will be used so that sending operations are properly serialized. Indeed, threads that respond on the fly could be likely to call this concurrently.
Type: u_int32_t
Definition: u_int32_t lw6cnx_connection_s::foo_bar_key
This is used to handle keepalive. Actually, the protocol is that from time to time FOO key is sent and then each connection (in a tentacle object, typically) is supposed to respond BAR key to show it has received the latest message. This field just stores the value so that when we receive a BAR message we know which key to check against.
Type: int64_t
Definition: int64_t lw6cnx_connection_s::last_send_foo_timestamp
The last time FOO was sent.
Type: int64_t
Definition: int64_t lw6cnx_connection_s::next_send_foo_timestamp
The next time FOO needs to be sent.
Type: int
Definition: int lw6cnx_connection_s::ping_msec
The current ping, updated when receiving BAR message.
Type: int
Definition: int lw6cnx_connection_s::sent_nb_total
Number of sent messages on this cnx.
Type: int
Definition: int lw6cnx_connection_s::sent_nb_success
Number of successfully sent messages on this cnx.
Type: int
Definition: int lw6cnx_connection_s::sent_nb_fail
Number of failed sent messages on this cnx.
Type: int64_t
Definition: int64_t lw6cnx_connection_s::last_recv_timestamp
Last time something was received on this connection.
Type: void *
Definition: void* lw6cnx_connection_s::backend_specific_data
Store backend data, this is when, for instance, a socket handle will be kept, or a library handle (CURL, to name it). Common code does not know what’s in there.
Used to hold a network message plus some metadata, such as who it is for, and who emitted the message.
Type: u_int32_t
Definition: u_int32_t lw6cnx_packet_s::logical_ticket_sig
Logical signature for the packet.
Type: u_int32_t
Definition: u_int32_t lw6cnx_packet_s::physical_ticket_sig
Physical signature for the packet.
Type: u_int64_t
Definition: u_int64_t lw6cnx_packet_s::logical_from_id
Logical sender.
Type: u_int64_t
Definition: u_int64_t lw6cnx_packet_s::logical_to_id
Logical receiver.
Type: char *
Definition: char* lw6cnx_packet_s::msg
Used to hold generic client/server properties, set up by the backend, can then be queried by the caller.
Type: int
Definition: int lw6cnx_properties_s::hint_timeout
Gives an idea of what timeout one can expect with this backend, this is not necessarly the exact timeout but it gives an order of magnitude. Unit is seconds.
Type: int
Definition: int lw6cnx_properties_s::ping_alter_base
Modifies the ping returned by terrain experience, this is a way to help some kind of connections to be preferred over others. Set it to N to add N milliseconds to the real ping. Adding a few msecs, such as 1 or 5 will just give an advantage to a given connection while not giving really wrong results. High values like 50 or 100 seriously penalizes some kind of connections, which is whishable, think of the httpd way to send things for instance.
Type: int
Definition: int lw6cnx_properties_s::ping_alter_percent
Modifies the ping returned by terrain experience, this is a way to help some kind of connections to be preferred over others. Set it to 100 for default value, means 100% of real ping delay, set it to 50 to make the algorithm believe lag is twice lower (this means, connection twice faster) and set it to 1000 to make believe that everything is slow. In practice only a slight alteration should be required, one should still favor really fast connections when it’s proved in real life that they are faster!
Type: int
Definition: int lw6cnx_properties_s::reliable
Wether this connexion is to be considered reliable or not. Well, in LW6, all connexions are unrealiable since LW6 will drop packets on purpose to simulate problems, but however, some are well-known to be unreliable (UDP...) while others are OK.
Type: const char *
Definition: const char* lw6cnx_properties_s::backend_id
The backend id, beware, this is a static string, must not be freed, and depends on backend library to be here, if this one is unloaded, will point to nowhere.
A common, shared table, to store all the tickets associated with various connections. This needs to be in-memory and quite fast for it’s called very often (at each message, in fact) to perform sanity checks and avoid fakes/cheaters.
Type: lw6sys_spinlock_t *
Definition: lw6sys_spinlock_t* lw6cnx_ticket_table_s::recv_spinlock
Lock for the recv_table hash.
Type: lw6sys_spinlock_t *
Definition: lw6sys_spinlock_t* lw6cnx_ticket_table_s::recv_ack_spinlock
Lock for the recv_ack_table hash.
Type: lw6sys_spinlock_t *
Definition: lw6sys_spinlock_t* lw6cnx_ticket_table_s::send_spinlock
Lock for the send_table hash.
Type: lw6sys_hash_t *
Definition: lw6sys_hash_t* lw6cnx_ticket_table_s::recv_table
Hash table containing the tickets for recv operations. This table is auto-generated, if one asks for a ticket for an unknown host, one is generated. The key is the ID (64-bit integer) of the host, as an hexa string.
Type: lw6sys_hash_t *
Definition: lw6sys_hash_t* lw6cnx_ticket_table_s::recv_ack_table
Hash table containing wether the send ticket was received by a given host. The data is just a NULL pointer, only if the key is present, we know we don’t need to resend our key to the peer. An easy way to know that the key was sent is if the peer was abled to produce a valid message/checksum. The key is the ID (64-bit integer) of the host, as an hexa string.
Type: lw6sys_hash_t *
Definition: lw6sys_hash_t* lw6cnx_ticket_table_s::send_table
Hash table containing the tickets for send operations. Those tickets are typically received from the peers themselves who generate them on the fly. The key is the ID (64-bit integer) of the host, as an hexa string.
View lcov test coverage results on http://www.ufoot.org/liquidwar/v6/doc/coverage/src/lib/dat/index.html.
from_id: who needs to resend the message
serial_min: serial range begin (included)
serial_max: serial range end (included)
Creates a miss structure, simply allocates memory and pumps values into the right fields.
Return value: new dynamically allocated object
miss: structure to free
Frees a miss structure, simply unallocates memory.
Return value: none.
dst: target object
src: source object
Writes the contents of src to dst
Return value: none.
a: first element to compare
b: second element to compare
Compares two miss objects, returning true if they are the same.
Return value: 1 if same, else 0.
a: first element to compare
b: second element to compare
Compares two miss objects, returning true if a is included in b.
Return value: 1 if included, else 0.
a: first element to compare
b: second element to compare
Compares two miss objects, returning true if a overlaps with b.
Return value: 1 if included, else 0.
sys_context: global system context
mode: test mode (bitmask)
Registers all tests for the libdat module.
Return value: 1 if test is successfull, 0 on error.
sys_context: global system context
mode: test mode (bitmask)
Runs the dat module test suite, testing most (if not all...)
functions.
Return value: 1 if test is successfull, 0 on error.
sys_context: global system context
warehouse: object to initialize
local_node_id: id of local node, used to handle local messages
seq_0: initial seq number
Initializes a warehouse object. Won’t free anything, will just erase values if they’re here
Return value: new object, allocated dynamically
sys_context: global system context
local_node_id: id of local node, used to handle local messages
seq_0: initial seq number
Creates a new warehouse object.
Return value: new object, allocated dynamically
sys_context: global system context
warehouse: the object to free
Frees a warehouse object.
Return value: new object, allocated dynamically
sys_context: global system context
warehouse: the object to clear
Clears a warehouse object. Clears means emptying everything and resetting the current seq_id to the minimal/start value.
Return value: none.
sys_context: global system context
warehouse: the object to purge
Purges a warehouse object. Purges means emptying everything but keeping the current seq_id and the nodes list unchanged.
Return value: none.
sys_context: global system context
warehouse: the warehouse object to query.
Tells how many nodes are registered in the object.
Return value: integer, number of nodes
sys_context: global system context
warehouse: the warehouse object to query.
Returns the local id.
Return value: 64-bit id.
sys_context: global system context
warehouse: the warehouse object to query.
Returns the latest (highest) serial number given for local node.
Return value: integer, latest serial number
sys_context: global system context
warehouse: the warehouse object to query
Gives the warehouse seq_0 number, any seq below does not make sense.
Return value: long integer.
sys_context: global system context
warehouse: the warehouse object to modify
seq_0: the new seq value
Set the warehouse seq_0 number, any seq below does not make sense.
Return value: none.
sys_context: global system context
warehouse: the warehouse object to query
Gives the warehouse seq_last number, this is the seq that corresponds to the last local message put in this warehouse. This is usefull to get the last seq used and, for instance, put a NOP message just for keepalive purposes.
Return value: long integer.
sys_context: global system context
warehouse: object to update
node_id: id of node to register
serial_0: serial number of first message
seq_0: initial seq number
Registers a node, in practice this is automatically done when receiving a data message but it might be interesting to do it elsewhere and force it.
Return value: the stack index of the registered node, <0 is invalid.
sys_context: global system context
warehouse: object to update
node_id: id of node to register
Tells wether a node is registered or not in our list.
Return value: 1 if registered, 0 if not.
sys_context: global system context
warehouse: warehouse object to use
logical_from: from who the message came from originally
full_str: message of the form serial i n seq from cmd
Puts an atomic string in the object, this kind of string is typically received on the network.
Return value: 1 on success, 0 on error
sys_context: global system context
warehouse: object to work on
The various get_seq functions can perform slowly if
we don’t pre-calculate the serial number of draft and reference
atoms. So this calculation is not within the functions themselves
but can be cached by using this function. Just call it and
after you might query the object for reference and draft info.
Return value: 1 if some valid informations were found, else 0, which means no interesting (complete) atoms where found, and there’s probably nothing to do yet.
sys_context: global system context
warehouse: warehouse object to use
msg: message
Puts a message in the object. The message will be splitted into several atoms if needed, it can be arbitrary long.
Return value: 1 on success, 0 on error
sys_context: global system context
warehouse: object to query
Tells the lowest seq referenced in the warehouse. Does not mean this is the lowest ever received, only we really have no chances of going below that point, nothing is stored, either complete or partial, below that.
Return value: integer.
sys_context: global system context
warehouse: object to query
Tells the highest seq referenced in the warehouse. Does not mean an actual message can be built from it, only we’ve got some traces of such a high seq.
Return value: integer.
sys_context: global system context
warehouse: object to query
Tells the highest seq that can be considered as a valid draft. This is not exactly the maximimum seq encountered, for here we want at least one complete message and not just one chunk of data (an atom) referring to a high seq, we want the complete stuff. However there can be missing messages in between.
Return value: integer.
sys_context: global system context
warehouse: object to query
Tells the highest seq that can be considered as a reference. Being considered as a reference means we received all messages for this seq *and* at least one message from the following seq, and this for every node involved. This being said, we’re sure to have the right information, nothing is missing.
Return value: integer.
sys_context: global system context
warehouse: object to query
seq_min: lowest sequence number (round or chat index)
seq_max: highest sequence number (round or chat index)
for_reference: set to 1 if this is for reference building else 0 for draft
progress: progress indicator (read/write).
Gets the list of messages for a given sequence (round or chat index), polling all the nodes. The from and to boundaries are included.
Return value: a list of strings.
sys_context: global system context
warehouse: object to query
logical_to: the id of the node that we want to send data to
Returns all the messages that were not sent for the given warehouse.
Return value: a list of strings, containing atoms.
sys_context: global system context
warehouse: object to query
max_range: max range of the returned list (-1 if none)
progress: progress indicator, to show advancement to end-user
Returns a list of lw6dat_miss_t objects which contains informations about
the messages which need to be re-sent by peers. The function will always
return something, the list is not cleared if it’s called several times,
so one should not poll this too often. Additionnally, the max_range parameter
can be used to limit the size of the returned ranges, to avoid querying for
too many messages at once.
Return value: a list of pointers to lw6dat_miss_t structs, NULL on failure.
sys_context: global system context
warehouse: object to modify
from_id: node which needs to resend data
to_id: node which needs to get the data
serial_min: minimum serial number to send
serial_max: maximum serial number to send
Re-sends messages in a given serial range. Actually, does not really resend messages, but marks them as needing to be sent again. We might, or not, have those messages in stock, if we have them we send them, if not we just do nothing, someone else might have them.
Return value: none
sys_context: global system context
warehouse: object to update
remote_id: id of remote host to update (which stack)
serial: new max serial value
Return value: none
sys_context: global system context
warehouse: data warehouse to reset
Resets the nb_atom_parts_since_last_poll attribute of every stack.
Return value: none
sys_context: global system context
warehouse: data warehouse to get info from
remote_id: remote id to get info about
Returns the nb_atom_parts_since_last_poll attribute of the stack concerning the remote_id. The idea is to track down, since the last call to the companion reset function, how many "atom parts" have been received, by "atom part" we mean atoms representing a splitted message. Usually this corresponds to very long messages and if this number of splitted messages is large enough, we don’t send MISS commands, as it would overload the network for nothing.
Return value: number of atom parts received since last reset.
sys_context: global system context
warehouse: data warehouse to put message into
seq: seq to use to stamp the message
Puts a META message in the warehouse. The META message purpose is to tell other warehouses (on other nodes, peers) that the list of peers is updated. This typically happens when a node joins in.
Return value: 1 on success, 0 if failed.
sys_context: global system context
warehouse: data warehouse to put message into
meta_array: current informations sendable by a meta message
seq: seq to use to stamp the message
Gets the data required for a META message. Note that this function can be called in other contexts to know who is registered within the warehouse, which, as an opaque type, doesn’t export that info otherwise.
Return value: 1 on success, 0 if failed.
Used to get informations about "what messages are missing", The struct typically contains informations to send a MISS message on the network, that is, who needs to resend the information, and the message serial range. The informations "who needs it" need not be stored as this is logically our local node.
Type: u_int64_t
Definition: u_int64_t lw6dat_miss_s::from_id
Id of node which needs to resend the information.
Type: int
Definition: int lw6dat_miss_s::serial_min
Minimum serial, included in the range.
Type: int
Definition: int lw6dat_miss_s::serial_max
Maximum serial, included in the range.
Contains all recent messages sent to peers, and received from them, int fact this is a local database, think of it as a giant array, containing all messages. This is usefull both resend messages if one peer wants one and also to check wether informations are consistent and nobody is cheating. This structure is hiddent, casted to the real stuff internally if needed, so that other parts of the code don’t rely on specific implementation.
Type: int
Definition: int lw6dat_warehouse_s::dummy
Dummy field, unused.
There are no functions in libdef, only a header file with constants.
View lcov test coverage results on http://www.ufoot.org/liquidwar/v6/doc/coverage/src/lib/dsp/index.html.
sys_context: global system context
argc: argc as passed to main
argv: argv as passed to main
gfx_backend_name: the id/name of the gfx backend to use
Creates a dsp_backend object. The created object won’t be displaying
things until lw6dsp_init is called. No thread is created,
but the graphics backend is loaded into memory. If video mode is
not available, it will appear later, when trying to start displaying
things, this function only allocates memory and checks code is
available in case of a dynamically loaded gfx backend.
Return value: a newly allocated object.
sys_context: global system context
dsp_backend: the dsp_backend object to free
Frees all ressources used by a dsp_backend object. Note that you must call this on a inactive ’stopped’ dsp_backend object.
Return value: none.
sys_context: global system context
dsp_backend: the object to represent
Gives a short human-readable description of the object.
Return value: a newly allocated string, must be freed.
sys_context: global system context
dsp_backend: the dsp_backend to start
param: parameters to pass to the display funcs
resize_callback: a function which will be called when there’s a resize event
Starts a dsp_backend object, that is, fire a separate thread and start rendering. This will set up a video mode, so it’s very likely to fail if for some reason the video context isn’t right, for instance if you try to set up graphical stuff but only have console access.
Return value: 1 if success, 0 if error.
sys_context: global system context
dsp_backend: the dsp_backend to stop
Stops a dsp_backend, that is, cancel rendering and unset the video mode, hardware shouldn’t be used any more after this call.
Return value: none.
sys_context: global system context
dsp_backend: the dsp_backend to update
param: parameters to pass to the dsp_backend funcs
Passes a new set of parameters to the display function. This is in fact the only way to pass informations to the dsp_backend object once it’s been started. This function will acquire a mutex, copy parameters, then give control back to the main thread while display keeps on going with new parameters in the background. It will get input informations. You really must call it often otherwise the screen won’t get updated, or, at least, it will always display the same informations. It should be reasonnable to call this 10 or 20 times per second, the display itself can be faster, run at 60 or 100 fps to show smooth animation (eye candy).
Return value: 1 if success, 0 if error.
sys_context: global system context
dsp_backend: the dsp_backend to query
Returns the number of frames displayed since the display was started.
Return value: the number of frames displayed.
dsp_backend: the dsp_backend to query
Returns the rendering time of the last frame. Gives clues about performance.
Return value: the number of milliseconds it took to draw screen
sys_context: global system context
dsp_backend: the dsp_backend to query
Returns the current frames per sec display rate. This is the instant value, it changes very often even if display seems smooth.
Return value: the current instant display rate.
sys_context: global system context
dsp_backend: the dsp_backend to query
Returns the current frames per sec display rate. This is not absolutely accurate but fits for displaying info to the player, it’s an average.
Return value: the current averaged display rate.
sys_context: global system context
dsp_backend: the dsp_backend to query
video_mode: a structure which will contain the results
Returns the current video mode, the one obtained by the driver. This function is also a way to know wether display is running correcly or not, by testing its return value.
Return value: 1 if ok, 0 if failure (mode not set)
sys_context: global system context
dsp_backend: the dsp_backend to query
fullscreen_modes: a structure which will contain the results
Returns the current available fullscreen modes. Note that this one
will only work if display is started, unlike lw6gfx_get_fullscreen_modes which
is used internally. The reason is that in this dsp module context, we need
the thread to be launched, and the thread does start/stop display on its own.
Return value: 1 if ok, 0 if failure (mode not set)
sys_context: global system context
param: the structure to initialize
Fills a display param struct with zeros, this is mandatory before any use. Think of it as a raw memset.
Return value: none.
sys_context: global system context
mode: test mode (bitmask)
Registers all tests for the libdsp module.
Return value: 1 if test is successfull, 0 on error.
sys_context: global system context
mode: test mode (bitmask)
Runs the dsp module test suite, testing most (if not all...)
functions.
Return value: 1 if test is successfull, 0 on error.
The dsp backend is the first argument passed to any dsp function, it contains reference to all the functions which can be used as well as a pointer on associated data. In OO, this would just be an object, with members and methods, using polymorphism through opaque pointers.
Type: u_int32_t
Definition: u_int32_t lw6dsp_backend_s::id
The id of the object, this is non-zero and unique within one run session, incremented at each object creation.
Type: lw6sys_thread_handler_t *
Definition: lw6sys_thread_handler_t* lw6dsp_backend_s::thread
Thread running the display code. In fact running in a separate thread is the whole point of this display object.
Type: void *
Definition: void* lw6dsp_backend_s::data
Data used by the display code. This is an opaque pointer, the internal structure will store details such as mutexes, parameters, information about the graphics backend, and so on.
Type: lw6gui_input_t *
Definition: lw6gui_input_t* lw6dsp_backend_s::input
Input structure, will be updated by the display thread, so that it contains up-to-date information. This is actually the only way to get input from the user.
Miscellaneous parameters for display. One of the idea with this structure is that one must be able to compare two of them with a simple memcmp. Even the progress pointer can be compared this way, the rest is just plain data.
Type: int
Definition: int lw6dsp_misc_s::mask
Display mask, define what must be displayed.
Type: int
Definition: int lw6dsp_misc_s::target_fps
How many frames per second the engine needs to display.
Type: float
Definition: float lw6dsp_misc_s::gfx_cpu_usage
How much CPU need be used, the maximum is 1.0f, the idea behind this parameter is that if you set it to a low value, the display thread will yield timeslices letting other threads speed up. On a single-core CPU this can be usefull if the main calculation thread, the one that updates the game state, is falling behind.
Type: int
Definition: int lw6dsp_misc_s::dirty_read
Dirty read mode.
Type: int
Definition: int lw6dsp_misc_s::capture
Wether we want to capture screen and dump it on disk.
Type: int
Definition: int lw6dsp_misc_s::gfx_debug
Wether to enable GFX debug mode.
Type: int
Definition: int lw6dsp_misc_s::debug_team_id
Parameter for debug mode, team ID to show info about.
Type: int
Definition: int lw6dsp_misc_s::debug_layer_id
Parameter for debug mode, layer ID to show info about.
Type: lw6gui_repeat_settings_t
Definition: lw6gui_repeat_settings_t lw6dsp_misc_s::repeat_settings
Repeat settings, used by the input module.
Type: int
Definition: int lw6dsp_misc_s::log_timeout
Delay after which messages disappear, in milliseconds.
Type: float *
Definition: volatile float* lw6dsp_misc_s::progress
Pointer on progress float, provides feedback to user.
Parameters used by the display thread. Be carefull, those need be modify with adequate functions, else a (serious) race condition could occur.
Type: lw6dsp_misc_t
Definition: lw6dsp_misc_t lw6dsp_param_s::misc
Miscellaneous parameters, things that didn’t fit elsewhere.
Type: lw6gui_video_mode_t
Definition: lw6gui_video_mode_t lw6dsp_param_s::video_mode
Video mode. This is separated from the misc parameters for it requires special handling, indeed changing resolution might need calls to special functions to set up a new graphical context.
Type: lw6gui_look_t *
Definition: lw6gui_look_t* lw6dsp_param_s::look
Visual parameters.
Type: lw6gui_menu_t *
Definition: lw6gui_menu_t* lw6dsp_param_s::menu
Menu object, the main interface to gather and transmit informations to the user, when not playing.
Type: lw6map_level_t *
Definition: lw6map_level_t* lw6dsp_param_s::level
The level, as loaded from disk.
Type: lw6ker_game_struct_t *
Definition: lw6ker_game_struct_t* lw6dsp_param_s::game_struct
The game struct, that is the level post-processed to be usable by game algorithms.
Type: lw6ker_game_state_t *
Definition: lw6ker_game_state_t* lw6dsp_param_s::game_state
Changeable state of the game. Not that this pointer must really always be available, you can technically change its value but any value passed to it must be available and valid as long as the display is running, else you end up with a good old segfault.
Type: lw6pil_pilot_t *
Definition: lw6pil_pilot_t* lw6dsp_param_s::pilot
If in dirty-read mode, then game_state will be fetched from this object. It can be NULL if you don’t want to use the pilot.
View lcov test coverage results on http://www.ufoot.org/liquidwar/v6/doc/coverage/src/lib/dyn/index.html.
sys_context: global system context
Opens a .so file directly, using a valid (full) path name.
Return value: a handle to the module, once it’s opened. You might still
need to call a module specific init function, but it’s another story.
sys_context: global system context
Opens a .so file directly, using a valid (full) path name.
Return value: a handle to the shared code, once it’s opened. You might still
need to call a module specific init function, but it’s another story.
sys_context: global system context
argc: the number of command-line arguments as passed to main
top_level_lib: the top-level library concerned, this means is it "cli", "gfx", "snd" or "srv". This will tell the function to search for the .so file in the correct subdirectory. Think of this as a category.
Opens a .so file corresponding to the given backend, it is capable to search for system libraries installed after "make install" but if not found, it will also search in the current build directory, finding the .so files in hidden .libs subdirectories.
Return value: a handle to the module, once it’s opened. You might still
need to call a module specific init function, but it’s another story.
sys_context: global system context
argc: the number of command-line arguments as passed to main
top_level_lib: the top-level library concerned, this means is it "cli", "gfx", "snd" or "srv". This will tell the function to search for the .so file in the correct subdirectory. Think of this as a category.
Opens a .so file corresponding to the given shared code, it is capable to search for system libraries installed after "make install" but if not found, it will also search in the current build directory, finding the .so files in hidden .libs subdirectories.
Return value: a handle to the shared code, once it’s opened. This is different from a real module, there’s no real prototype, it just loads code.
sys_context: global system context
handle: the backend to close.
Closes an opened backend. Note that you must call any backend specific clear, destroy, deinit, exit, function before.
Return value: 1 if success, 0 on error.
sys_context: global system context
handle: the shared code library to close.
Closes an opened shared code library. Note that you must call any shared code library specific clear, destroy, deinit, exit, function before.
Return value: 1 if success, 0 on error.
sys_context: global system context
handle: the backend concerned
func_name: the function name, as a NULL terminated string
Finds a C function in the given backend.
Return value: a pointer to the function, NULL if not found.
sys_context: global system context
argc: the number of command line args, as passed to main
argv: the commind line args, as passed to main
top_level_lib: the library category to query (gfx, snd, cli, srv ...)
Returns an assoc which lists all the available modules. The key of the assoc entries in the module internal name such as ’gl’ and the value associated is a NULL terminated string describing the module, for instance ’OpenGL’.
Return value: an assoc object containing key/label pairs.
sys_context: global system context
argc: the number of command-line arguments as passed to main
top_level_lib: the top-level library concerned, this means is it "cli", "gfx", "snd" or "srv". This will tell the function to search for the .so file in the correct subdirectory. Think of this as a category.
backend_name: the actual name of the backend, this is the name of the .so file, between "libmod_" and ".so". For instance, to find "libmod_gl.so", the right argument is "gl1".
Get the full path to a .so file corresponding to the given backend, it is capable to search for system libraries installed after "make install" but if not found, it will also search in the current build directory, finding the .so files in hidden .libs subdirectories.
Return value: the full path of the .so file, needs to be freed.
sys_context: global system context
argc: the number of command-line arguments as passed to main
top_level_lib: the top-level library concerned, this means is it "cli", "gfx", "snd" or "srv". This will tell the function to search for the .so file in the correct subdirectory. Think of this as a category.
shared_name: the actual name of the shared code, this is the name of the .so file, between "libshared_" and ".so". For instance, to find "libshared_sdl.so", the right argument is "sdl".
Get the full path to a .so file corresponding to the given shared code entry, it is capable to search for system libraries installed after "make install" but if not found, it will also search in the current build directory, finding the .so files in hidden .libs subdirectories. This is different from the standard module loader, since it will search for .so files with a slightly different name. The idea is to distinguish modules that are truely loadable and shared code that can’t be used standalone and can’t either be stuffed in the main binary since it refers to external dynamic library which will only be loaded at runtime.
Return value: the full path of the .so file, needs to be freed.
sys_context: global system context
mode: test mode (bitmask)
Registers all tests for the libdyn module.
Return value: 1 if test is successfull, 0 on error.
sys_context: global system context
mode: test mode (bitmask)
Runs the dyn module test suite, testing most (if not all...)
functions.
Return value: 1 if test is successfull, 0 on error.
Handle on dynamic library. Well, actually, ltdl does already provide something like, so why use our own wrapper? It happens storing the library path, that’s to say what .so files it comes from, is usefull for debugging, so this structure bundles those two informations together.
Type: lt_dlhandle
Definition: lt_dlhandle lw6dyn_dl_handle_s::handle
Libtool handler.
Type: char *
Definition: char* lw6dyn_dl_handle_s::library_path
Path to .so file containing the code, or whatever file is relevant on the current platform, the idea is to keep track of where the library comes from.
Type: int
Definition: int lw6dyn_dl_handle_s::is_backend
True (1) if the handle is a backend or false (0) if it’s just some shared code.
Type: int
Definition: int lw6dyn_dl_handle_s::is_dlclose_safe
True (1) if one can safely call dlclose on this backend. Set to false (0) if low level dlclose must be skipped. For some reason, some (external) libraries really do not behave well when unloaded on the fly, even if we stop threads using them and don’t use them anymore. The workarround is to have this flag defined, to skip the internal close to dlclose. LW will still free the memory, but won’t call libtool dlclose for real. Libtool keeps track of this internally and won’t reload it on next call, maintain reference counts etc. so there’s no real harm. Except it just looks ugly not to be able to truely unload the module.
View lcov test coverage results on http://www.ufoot.org/liquidwar/v6/doc/coverage/src/lib/gen/index.html.
sys_context: global system context
seed: a random seed used to generate the map
map_w: width of the screen, in pixels
map_h: height of the screen, in pixels
Builds a complete, usable map from the string passed in seed. Each triplet composed of seed/map_w/map_h should build the same map on any computer, in any context, for a given version of the game (no backwards compatibility).
Return value: new map on success, NULL on failure.
sys_context: global system context
Generate a new random seed. The seed is composed of letters and numbers.
Return value: newly allocated string.
sys_context: global system context
seed: the seed to normalize
Builds a normalized seed from an arbitrary string. The idea is to avoid sending strange stuff on the network and/or storing strange stuff in config files, so we process correct strings only
Return value: newly allocated string.
sys_context: global system context
Returns a random char suitable for seed (letter or digit).
Return value: a single char
sys_context: global system context
mode: test mode (bitmask)
Registers all tests for the libgen module.
Return value: 1 if test is successfull, 0 on error.
sys_context: global system context
mode: test mode (bitmask)
Runs the gen module test suite, testing most (if not all...)
functions.
Return value: 1 if test is successfull, 0 on error.
View lcov test coverage results on http://www.ufoot.org/liquidwar/v6/doc/coverage/src/lib/gfx/index.html.
sys_context: global system context
backend: the graphical backend to use
video_mode: the video mode to use at start up
resize_callback: a callback function which will be called at each resize event
Sets up the graphical backend for good, initializing a video mode and allocating ressources. This call can typically fail if there’s no device available, if the user doesn’t have enough rights to access the hardware, and so on.
Return value: 1 on success, 0 if not
sys_context: global system context
backend: the backend to quit
Uninitializes the backend, that is, exits the graphical mode. All threads that use graphics must be closed when this is called.
Return value: none.
sys_context: global system context
backend: the backend to represent
Returns a readable version of the backend object.
Return value: a newly allocated pointer.
sys_context: global system context
backend: the backend to use
video_mode: the new video mode
This function changes the video mode. Note that the first time you set up
the graphical environment you must call lw6gfx_init but to change the current
mode, use this function. It should reload backend data automatically if needed
(textures for instance). Note that before giving up and failing this function
will try alternate video modes, and you’re not garanteed to have the right mode
after the call, even if it returns true. To check this, use lw6gfx_get_video_mode.
Return value: 1 on success, 0 on failure;
sys_context: global system context
backend: the backend to use
video_mode: the current video mode (will be overwritten, out parameter)
This function returns the current video mode.
Return value: 1 on success, 0 on failure;
sys_context: global system context
backend: the backend to use
fullscreen_modes: the available fullscreen modes (will be overwritten, out parameter)
This function returns the current video mode.
Return value: 1 on success, 0 on failure;
sys_context: global system context
backend: the backend to use
This function "pumps" events, that is gets pending events, puts them in queues, maintains internal states up to date. You really must call this very often or no input will be processed at all.
Return value: a pointer on the internal input state, musn’t be freed.
sys_context: global system context
backend: the graphical backend to use
mask: display flag, tells what to display
look: the look, the skin, contains display options
level: the level to display
game_struct: the game_struct associated with the level
game_state: the game_state associated with the level
local_cursors: the cursor to center the focus on
menu: the menu to display
progress: the value of the progress indicator
fps: the number of frames per second to display
mps: the number of moves per second to display
log_list: log messages to display
capture: wether to enable capture mode or not
gfx_debug: wether to enable gfx debugging tools
debug_team_id: for debug display, team to display informations about
debug_layer_id: for debug display, layer to display
This is the major drawing function, the one that encapsulates all others. As the program uses a separate thread to display things, we just pass this function many parameters, and let it do its job alone. So many parameters might sometimes be useless. It also allows the graphics backend decide wether menus and hud and background should interact. Or not.
Return value: 1 on success, 0 on failure.
sys_context: global system context
argc: argc, as passed to main
argv: argv, as passed to main
List available gfx backends. The hash contains pairs with id and name for each backend. The id is the technical key you can use to load the backend, the name is something more readable you can display in an interface. The backend objects themselves are not instanciated by this (in fact, they are, but released on the fly) you need to load and initialize them afterwards.
Return value: hash containing id/name pairs.
sys_context: global system context
argc: argc, as passed to main
argv: argv, as passed to main
name: string containing gfx key, typically got from lw6gfx_get_backends
Creates a gfx backend, this is just about loading the dynamic library if needed, and/or check gfx engine is available, and connect to it. It does not perform initialization.
Return value: gfx backend.
sys_context: global system context
backend: gfx backend to destroy
Frees the ressources associated to a gfx, which must have been properly uninitialized before.
Return value: none.
sys_context: global system context
mode: test mode (bitmask)
Registers all tests for the libgfx module.
Return value: 1 if test is successfull, 0 on error.
sys_context: global system context
mode: test mode (bitmask)
Runs the gfx module test suite, testing most (if not all...)
functions.
Return value: 1 if test is successfull, 0 on error.
The gfx backend is the first argument passed to any gfx function, it contains reference to all the functions which can be used as well as a pointer on associated data. In OO, this would just be an object, with members and methods, using polymorphism through opaque pointers.
Type: lw6dyn_dl_handle_t *
Definition: lw6dyn_dl_handle_t* lw6gfx_backend_s::dl_handle
Handle on dynamic library (if it makes sense).
Type: void *
Definition: void* lw6gfx_backend_s::gfx_context
Gfx specific data, what is behind this pointer really depends on the gfx engine.
Type: int
Definition: int lw6gfx_backend_s::argc
The argc value passed to main.
Type: const char **
Definition: const char** lw6gfx_backend_s::argv
The argv value passed to main.
Type: lw6sys_mutex_t *
Definition: lw6sys_mutex_t* lw6gfx_backend_s::call_lock
Lock used to avoid concurrent access to underlying libs.
Type: u_int32_t
Definition: u_int32_t lw6gfx_backend_s::id
The id of the object, this is non-zero and unique within one run session, incremented at each object creation.
Type: void *(*
Definition: void*(* lw6gfx_backend_s::init)(lw6sys_context_t *sys_context, int argc, const char *argv[], lw6gui_video_mode_t *video_mode, lw6gui_resize_callback_func_t resize_callback)
Pointer on lw6gfx_init callback code.
Type: void(*
Definition: void(* lw6gfx_backend_s::quit)(lw6sys_context_t *sys_context, void *gfx_context)
Pointer on lw6gfx_quit callback code.
Type: char *(*
Definition: char*(* lw6gfx_backend_s::repr)(lw6sys_context_t *sys_context, void *gfx_context, u_int32_t id)
Pointer on lw6gfx_repr callback code.
Type: int(*
Definition: int(* lw6gfx_backend_s::set_video_mode)(lw6sys_context_t *sys_context, void *gfx_context, lw6gui_video_mode_t *video_mode)
Pointer on lw6gfx_set_video_mode callback code.
Type: int(*
Definition: int(* lw6gfx_backend_s::get_video_mode)(lw6sys_context_t *sys_context, void *gfx_context, lw6gui_video_mode_t *video_mode)
Pointer on lw6gfx_get_video_mode callback code.
Type: int(*
Definition: int(* lw6gfx_backend_s::get_fullscreen_modes)(lw6sys_context_t *sys_context, void *gfx_context, lw6gui_fullscreen_modes_t *modes)
Pointer on lw6gfx_get_fullscreen_modes callback code.
Type: lw6gui_input_t *(*
Definition: lw6gui_input_t*(* lw6gfx_backend_s::pump_events)(lw6sys_context_t *sys_context, void *gfx_context)
Pointer on lw6gfx_pump_events code.
Type: int(*
Definition: int(* lw6gfx_backend_s::display)(lw6sys_context_t *sys_context, void *gfx_context, int mask, const lw6gui_look_t *look, const lw6map_level_t *level, const lw6ker_game_struct_t *game_struct, const lw6ker_game_state_t *game_state, lw6pil_local_cursors_t *local_cursors, lw6gui_menu_t *menu, float progress, float fps, float mps, const char **log_list, int capture, int gfx_debug, int debug_team_id, int debug_layer_id)
Pointer on lw6gfx_display code.
View lcov test coverage results on http://www.ufoot.org/liquidwar/v6/doc/coverage/src/lib/gfx/mod-gl1/gl-utils/index.html (as there are many sub-directories in this module, please refer to the test coverage directory index for complete information).
Defined to tell mod_gl1 is compatible with GNU General Public License Of course it is. This function does nothing, but the fact it’s declared makes its GPL compatibility obvious. Having this declared is required.
Return value: none
sys_context: global system context
Returns the pedigree for mod-gl1, giving details about the module, including name, description, licence, date/time of compilation.
Return value: dynamically allocated object.
sys_context: global system context
Creates a mod-gl1 backend.
Return value: backend pointer.
View lcov test coverage results on http://www.ufoot.org/liquidwar/v6/doc/coverage/src/lib/gfx/mod-gles2/index.html (as there are many sub-directories in this module, please refer to the test coverage directory index for complete information).
Defined to tell mod_gles2 is compatible with GNU General Public License Of course it is. This function does nothing, but the fact it’s declared makes its GPL compatibility obvious. Having this declared is required.
Return value: none
sys_context: global system context
Returns the pedigree for mod-gles2, giving details about the module, including name, description, licence, date/time of compilation.
Return value: dynamically allocated object.
sys_context: global system context
Creates a mod-gles2 backend.
Return value: backend pointer.
Next: shared-sdl, Previous: mod-gles2, Up: C API [Contents][Index]
View lcov test coverage results on http://www.ufoot.org/liquidwar/v6/doc/coverage/src/lib/gfx/mod-soft/index.html (as there are many sub-directories in this module, please refer to the test coverage directory index for complete information).
Defined to tell mod_soft is compatible with GNU General Public License Of course it is. This function does nothing, but the fact it’s declared makes its GPL compatibility obvious. Having this declared is required.
Return value: none
sys_context: global system context
Returns the pedigree for mod-soft, giving details about the module, including name, description, licence, date/time of compilation.
Return value: dynamically allocated object.
sys_context: global system context
Creates a mod-soft backend.
Return value: backend pointer.
View lcov test coverage results on http://www.ufoot.org/liquidwar/v6/doc/coverage/src/lib/gfx/shared-sdl/index.html (as there are many sub-directories in this module, please refer to the test coverage directory index for complete information).
Defined to tell shared_sdl is compatible with GNU General Public License Of course it is. This function does nothing, but the fact it’s declared makes its GPL compatibility obvious. Having this declared is required.
Return value: none
Next: libglb, Previous: shared-sdl, Up: C API [Contents][Index]
View lcov test coverage results on http://www.ufoot.org/liquidwar/v6/doc/coverage/src/lib/gfx/mod-caca/index.html (as there are many sub-directories in this module, please refer to the test coverage directory index for complete information).
Defined to tell mod_caca is compatible with GNU General Public License Of course it is. This function does nothing, but the fact it’s declared makes its GPL compatibility obvious. Having this declared is required.
Return value: none
sys_context: global system context
Returns the pedigree for mod-caca, giving details about the module, including name, description, licence, date/time of compilation.
Return value: dynamically allocated object.
sys_context: global system context
Creates a mod-caca backend.
Return value: backend pointer.
View lcov test coverage results on http://www.ufoot.org/liquidwar/v6/doc/coverage/src/lib/glb/index.html.
sys_context: global system context
buf: the data to encode
size: the size of data to encode
Encodes data into base64. Memory allocation is done automatically.
Return value: newly allocated string.
sys_context: global system context
size: the size of the decoded data
base64_str: the string to decode
Decodes data from base64. Memory allocation is done automatically. Note that this function only works for strings, other data might not be handled correctly.
Return value: newly allocated pointer, NULL on error.
sys_context: global system context
str: the string to encode
Encodes a string into base64.
Return value: newly allocated string.
sys_context: global system context
str: the string to decode
Decodes a string from base64.
Return value: newly allocated string, NULL on error.
sys_context: global system context
buf: the data to encode
size: the size of data to encode
prefix: a prefix string
Encodes data into base64. Memory allocation is done
automatically. The encoded string will
be prefixed with prefix.
Return value: newly allocated string.
sys_context: global system context
size: the size of the decoded data
base64_str: the string to decode
prefix: a prefix string
Decodes data from base64. Memory allocation is done
automatically. Note that this function only works for
strings, other data might not be handled correctly.
The encoded is expected
to start with prefix prefix and then contain base64 data.
Return value: newly allocated pointer, NULL on error.
sys_context: global system context
str: the string to encode
prefix: a prefix string
Encodes a string into base64. The encoded string will
be prefixed with prefix.
Return value: newly allocated string.
sys_context: global system context
str: the string to decode
prefix: a prefix string
Decodes a string from base64. The encoded is expected
to start with prefix prefix and then contain base64 data.
Return value: newly allocated string, NULL on error.
sys_context: global system context
key: the key buffer
key_size
buf: the data to analyse
buf_size: the size of data to analyse
Calculates an SHA-1 sum of buffer, using key to seed calc.
Return value: newly allocated string, containing 20 chars checksum.
sys_context: global system context
key: a key (string)
str: the string to calculate the checksum for
Calculates an SHA-1 sum of a string, using key to seed calc.
Return value: newly allocated string, containing 20 chars checksum.
sys_context: global system context
key: the key buffer
key_size: the key buffer size
buf: the data to analyse
buf_size: the size of data to analyse
Calculates an SHA-1 sum of buffer, using key to seed calc.
Return value: a 32-bit unsigned integer
sys_context: global system context
key: a key (string)
str: the string to calculate the checksum for
Calculates an SHA-1 sum of a string, using key to seed calc.
Return value: a 32-bit unsigned integer
sys_context: global system context
mode: test mode (bitmask)
Registers all tests for the libglb module.
Return value: 1 if test is successfull, 0 on error.
sys_context: global system context
mode: test mode (bitmask)
Runs the glb module test suite, testing most (if not all...)
functions.
Return value: 1 if test is successfull, 0 on error.
View lcov test coverage results on http://www.ufoot.org/liquidwar/v6/doc/coverage/src/lib/gui/index.html.
sys_context: global system context
button: the button to update
timestamp: the current ticks (milliseconds)
Registers a "down" (press) event on a button.
Return value: none.
sys_context: global system context
button: the button to update
Registers a "up" (release) event on a button.
Return value: none.
sys_context: global system context
button: the button to query
Tells wether a button is pressed or not.
Return value: 1 if pressed, 0 if not.
sys_context: global system context
button: the button to query
Tells how many times the button has been pressed. Typical usage: the
button is pressed, released, pressed, released several times. Then,
after all this, you want to know how many times it has been pressed.
Querying its state with lw6gui_button_is_pressed won’t tell you much
but this pop_press function will return 1 for each press there’s been.
Return value: 1 if there’s a press event in the queue, 0 if empty.
sys_context: global system context
button: the button to query
Tells how many times the button has been simpleclicked. This is different from a simple press, in fact, there’s a delay, we must wait until the double-click delay is elapsed to make sure this is a simple click... Designed for use with mouse to differentiate fire and alternate fire.
Return value: 1 if there’s a simpleclick event in the queue, 0 if empty.
sys_context: global system context
button: the button to query
Tells how many times the button has been doubleclicked. Typical usage: the button is doubleclicked, released, doubleclicked, released several times. Then, after all this, you want to know how many times it has been doubleclicked.
Return value: 1 if there’s a doubleclick event in the queue, 0 if empty.
sys_context: global system context
button: the button to query
Tells how many times the button has been tripleclicked. Typical usage: the button is tripleclicked, released, tripleclicked, released several times. Then, after all this, you want to know how many times it has been tripleclicked.
Return value: 1 if there’s a tripleclick event in the queue, 0 if empty.
sys_context: global system context
button: the button to update
repeat_settings: the repeat settings
timestamp: the current ticks (milliseconds)
Updates the repeat informations for a button, must be called regularly, as often as possible.
Return value: none.
sys_context: global system context
dst: the target button object
src: the source button object
Synchronizes two button objects. This is typically used to pass data from one thread to another. This is not a simple copy, it will handle data such as "when was it pressed last" it an intelligent manner, popping src data to put it in dst, and clearing src.
Return value: 1 if success, O if failure.
sys_context: global system context
dst_x: the x coord to return
dst_y: the y coord to return
dst_x0: the x coord of point 0 in destination coord system
dst_y0: the y coord of point 0 in destination coord system
dst_w: the width of the area in destination coord system
dst_h: the width of the area in destination coord system
src_x: the x coord in source coord system
src_y: the y coord in source coord system
src_x0: the x coord of point 0 in source coord system
src_y0: the y coord of point 0 in source coord system
src_w: the width of the area in source coord system
src_h: the width of the area in source coord system
Registers a "down" (press) event on a button.
Return value: 1 if OK, 0 if error (unable to calculate).
sys_context: global system context
x: x coord (in/out param)
y: y coord (in/out param)
x_flip: flip on x (out param, -1 or +1)
y_flip: flip on y (out param, -1 or +1)
w: width
h: height
x_polarity: x polarity (-1, 0 or 1)
y_polarity: y polarity (-1, 0 or 1)
Same as lw6map_fix_coords except it operates on floats.
Usefull for cursor and other rendering operations. Additionnally,
will keep track of inversions, that is to say if map is flip
in one or another way. Be carefull, the flip values are -1 or 1
so that it’s easy to multiply an offset by it, for instance, but
this means testing if flip is not 0 will always return true, you must
test if flip is stritly positive or negative.
Return value: none
sys_context: global system context
input: the input struct to initialise
Initialises an input structure, don’t use twice, it won’t free a previous init.
Return value: a pointer to the newly allocated object.
sys_context: global system context
input: the input struct to uninitialise
Unitialises an input structure, need to call it to free event queue.
Return value: a pointer to the newly allocated object.
sys_context: global system context
Creates an input structure, which can be used to handle input state & buffer.
Return value: a pointer to the newly allocated object.
sys_context: global system context
input: the input object to free.
Deletes an input structure.
Return value: none.
sys_context: global system context
input: the input struct to reset
Resets an input structure. Must have been initialized before. It will empty all queues and mark everything as unpressed.
Return value: 1 on success, 0 if failure.
sys_context: global system context
input: the input to update
repeat_settings: the repeat settings (delay + interval)
timestamp: the current ticks (milliseconds)
Updates the repeat informations for an input, must be called regularly, as often as possible.
Return value: none.
sys_context: global system context
input: the input to update
Tells an input object that one of its descendants has been
modified. This will affect the return value of lw6gui_input_need_sync
Return value: none.
sys_context: global system context
input: the input to test
Tests wether an input object contains was modified and needs synchronisation.
Return value: 1 if sync is need, 0 if not.
sys_context: global system context
dst: the target input object
src: the source input object
Synchronizes two input objects. This is typically used to pass data from one thread to another. This is not a copy, it will brute-force copy the static data such as mouse position, but anything like a queue will be treated in a "empty source and fill target with data" scheme. So source will be affected by this, the key buffer will be emptied, and so on. And if there are key in the target buffer, they won’t be overwritten but kept in front of the FIFO list.
Return value: 1 if success, O if failure.
sys_context: global system context
input: input object to modify
Enables auto_release mode, in this mode, it’s assummed after some time any key is automatically released.
Return value: none.
sys_context: global system context
i: index to check
Checks wether the index is correct. Does not mean the joystick exists, it’s just to avoid out of bounds errors.
Return value: 1 if within range, 0 if not.
sys_context: global system context
joystick: joystick to update
x: x-axis position, as returned by the driver
limit: the limit, under this, buttons are considered unpressed.
timestamp: current ticks (timestamp in ms)
Updates the x axis of a joystick, this will convert an information of analog type such as "joystick is here" to a pad-like information such as "pressed in that direction".
Return value: 1 if within range, 0 if not.
sys_context: global system context
joystick: joystick to update
limit: the limit, under this, buttons are considered unpressed.
timestamp: current ticks (timestamp in ms)
Updates the y axis of a joystick, this will convert an information of analog type such as "joystick is here" to a pad-like information such as "pressed in that direction".
Return value: 1 if within range, 0 if not.
sys_context: global system context
joystick: the joystick to update
repeat_settings: the repeat settings (delay + interval)
timestamp: the current ticks (milliseconds)
Updates the repeat informations for a joystick, must be called regularly, as often as possible.
Return value: none.
sys_context: global system context
dst: the target joystick object
src: the source joystick object
Synchronizes two joystick objects. This is typically used to pass data from one thread to another.
Return value: 1 if success, O if failure.
sys_context: global system context
joystick: the joystick to query
move_pad: the structure which will contain the results
Returns the state of the joystick in a uniform, non-device specific structure containing only the up/down/left/right information.
Return value: none, the value are stored in move_pad.
sys_context: global system context
keysym: the keysym to check
Tells wether the keysym is valid or not.
Return value: 1 if valid, 0 if not
sys_context: global system context
keyboard: the keyboard structure which stores keyboard state
Pops (in FIFO mode) a keypress stored in the keyboard buffer. You must free the obtained keypress object after you’re done with it.
Return value: a newly allocated pointer, or NULL if no keypress pending.
sys_context: global system context
keyboard: the keyboard structure which stores keyboard state
Tells wether a key is pressed or not. The function will test out of bound values.
Return value: 1 if pressed, 0 if not.
sys_context: global system context
keyboard: the keyboard structure which will store the keypress
keysym: the keysym for the keypress
unicode: the ASCII/unicode code for the keypress
label: the label for the keypress
timestamp: the current ticks (timestamp in ms)
Registers a keypress event, that is, puts it in the event queue. This
function does not take an lw6gui_keypress_t structure but separated
args, this is because it will construct the object internally. You
may free label after calling this, an internal copy will be done.
This function will also maintain the array of key states up to date.
Return value: 1 if success, O if failure.
sys_context: global system context
keyboard: the keyboard structure which will store the keypress
keysym: the keysym for the keypress
Registers a key release event.
Return value: 1 if success, O if failure.
sys_context: global system context
keyboard: the keyboard to update
repeat_settings: the repeat settings (delay + interval)
timestamp: the current ticks (milliseconds)
Updates the repeat informations for a keyboard, must be called regularly, as often as possible.
Return value: none.
sys_context: global system context
dst: the target keyboard object
src: the source keyboard object
Synchronizes two keyboard objects. This is typically used to pass data from one thread to another. Will pop the src queue to fill the dst queue.
Return value: 1 if success, O if failure.
sys_context: global system context
keyboard: the keyboard to query
move_pad: the structure which will contain the results
Returns the state of the keyboard in a uniform, non-device specific structure containing only the up/down/left/right information.
Return value: none, the value are stored in move_pad.
sys_context: global system context
keysym: the keysym to use
unicode: the unicode value for this keysym
label: the label (optional, might be NULL)
Creates a keypress structure, the only reason for needing a contructor is that the label field needs be duplicated.
Return value: a pointer to the newly allocated object.
sys_context: global system context
keypress: the keypress object to free.
Deletes a keypress structure.
Return value: none.
sys_context: global system context
keypress: the keypress to work on
Returns a human-readable representation of the keypress.
Return value: a newly allocated string
sys_context: global system context
map_style: map_style to use as a base
Create a new look object, a look is basically a style plus some dynamic parameters.
Return value: newly created object.
sys_context: global system context
look: look object to free
Frees a look and all its members.
Return value: none.
sys_context: global system context
look: look object to query
Gives the memory taken by this object in memory.
Return value: number of bytes.
sys_context: global system context
look: look object to describe
Returns a readable description of the object.
Return value: newly allocated string.
sys_context: global system context
look: look object to modify
key: the key to change
value: the new value for the key
Sets a new value for a given key in the look. The value is always a string, it will be converted/casted to the right type if needed.
Return value: 1 on success, 0 on failure.
sys_context: global system context
look: look object to query
key: the key to get
Gets a new value for a given key in the look. The value is always a string, it will be converted/casted from the right type if needed.
Return value: dynamically allocated string.
sys_context: global system context
look_a: first object to compare
look_b: second object to compare
Compares two look objects, doing recursive comparisons. This can be very usefull if, for instance, a graphics renderer is using some contextual objects that depend on the look (colors?) and need to be updated/regenerated on a look change
Return value: 1 if they are the same, 0 if not.
sys_context: global system context
look: object to duplicate
Duplicates a look object, performing recursive copies.
Return value: newly allocated object.
sys_context: global system context
look: look object to modify
Peforms sanity checks and modifies the look if needed, to make all values fit within acceptable ranges, among other things.
Return value: none.
sys_context: global system context
look: look object to act upon
zoom_step: how much we should zoom, 2.0 means 2 times bigger
Zooms in, the function does not only multiplicates the current zoom, it also performs sanity checks.
Return value: 1 if zoom was changed, 0 if not.
sys_context: global system context
look: look object to act upon
zoom_step: how much we should zoom, 2.0 means 2 times smaller
Zooms out, the function does not only divides the current zoom, it also performs sanity checks.
Return value: 1 if zoom was changed, 0 if not.
sys_context: global system context
title: the string to be displayed, what the user sees. Can be freed after the call is done, function will make a copy internally.
help: a string introducing the menu, describing what it does, giving hints on how to use it.
popup: a string to be displayed in popup mode when menu is displayed for the first time.
esc: the label to be displayed in the ESC button
enable_esc: wether to enable the escape button.
Constructs a new menu object. Note that you can always call other functions to modify it afterwards.
Return value: a pointer to the newly allocated object.
sys_context: global system context
menu: a pointer to the menu.
Frees the menu, checking if things are OK before doing so.
Return value: none.
sys_context: global system context
menu: a pointer to the menu.
Gets the memory occupied by the menu. Could be usefull to help a garbage collector taking decisions or reporting erros, for instance.
Return value: the number of bytes used.
sys_context: global system context
menu: a pointer to the menu.
Constructs a readable description of the object. Usefull for debugging, or to introspect things using scripts, at run-time. Does not necessarly describe all the informations about the object, but helps knowing what it is.
Return value: a string describing the object, must be freed.
sys_context: global system context
menu: a pointer to the menu.
title: the new title, you can free it after calling the function, an internal copy will be made.
Change the title of the menu. Use this function to change the title, don’t try to access the struct directly. The idea is to have safe memory management.
Return value: none
sys_context: global system context
menu: a pointer to the menu.
help: the new help, you can free it after calling the function, an internal copy will be made.
Change the help of the menu. Use this function to change the help, don’t try to access the struct directly. The idea is to have safe memory management.
Return value: none
sys_context: global system context
menu: a pointer to the menu.
popup: the new popup, you can free it after calling the function, an internal copy will be made.
Change the popup of the menu. That is to say, its popup. Use this function to change the popup, don’t try to access the struct directly. The idea is to have safe memory management.
Return value: none
sys_context: global system context
menu: a pointer to the menu.
Closes the popup, in practice, this is equivalent to setting the popup string to "" or NULL.
Return value: none
sys_context: global system context
menu: a pointer to the menu.
Tells wether a popup is defined. Behavior is simplistic, at creation (when a non-NULL non-empty popup string has been set) then the popup is displayed. In this state, popup is considered to be defined. Then it can be close, and after this action the popup ain’t here anymore, program continues the way it started.
Return value: 1 if has popup, 0 if does not
sys_context: global system context
menu: the menu we want to query
position: the order of the item we want
Gets the menu item at the given position. First item is 0, last is N-1. Returns a pointer on the real object, not a copy.
Return value: a pointer to a menu item, NULL if out of range.
sys_context: global system context
menu: the menu we want to modify
position: the position of the item we want to select
allow_scroll: wether scrolling should be allowed when displaying it
now: the current time, as a timestamp.
Selects the item at the given position. Use this function to be sure that only one item is selected, and all other states are consistent. Timestamp is needed for the sake of eye-candy.
Return value: 1 if success, 0 if failure (out of range).
sys_context: global system context
menu: the menu we want to modify
state: 1 to select, 0 to unselect
now: the current time, as a timestamp.
Selects the escape item, this does not affect other items, it’s mostly. to handle eye candy.
Return value: none.
sys_context: global system context
menu: the menu we want to modify
state: 1 to enable, 0 to disable
now: the current time, as a timestamp.
Enables the escape item, this does not affect other items, it’s mostly. to handle eye candy.
Return value: none.
sys_context: global system context
menu: the menu to scroll
Scrolls a menu up, used as a callback for mouse wheel up for instance. The idea is just to decrement the first displayed item index.
Return value: 1 if OK, 0 if failed (out of range).
sys_context: global system context
menu: the menu to scroll
Scrolls a menu down, used as a callback for mouse wheel down for instance. The idea is just to increment the first displayed item index.
Return value: 1 if OK, 0 if failed (out of range).
sys_context: global system context
menu: the menu to scroll
breadcrumbs: list of strings containing breadcrumbs
Set the breadcrumbs, that’s to say the readable, logical path to get to a given menu. This is just eye candy, not linked to any logic at this level.
Return value: 1 if OK, 0 if failed.
sys_context: global system context
menu: the menu to center
position: the position of the menuitem to be put in the center
max_displayed_items: the maximum number of items displayed
Centers the menu on a given menuitem. Typically used when pushing a menu with a menuitem selected ’anywhere’ in the list.
Return value: none.
sys_context: global system context
menu: the menu we want to modify
menuitem: the item to insert
position: the position the new item will occupy ("insert before" mode)
now: the current time, as a timestamp.
Inserts the given item in the menu. All items starting at the insert position will be "pushed" (that is, their position incremented by 1). Once the menuitem is inserted, the menu object will take care of memory management and automatically free it when needed.
Return value: 1 if success, 0 if failure (memory problem, out of range).
sys_context: global system context
menu: the menu we want to modify
menuitem: the item to insert
now: the current time, as a timestamp.
Appends the given item to the menu. Once the menuitem is appended, the menu object will take care of memory management and automatically free it when needed.
Return value: 1 if success, 0 if failure (memory problem).
sys_context: global system context
menu: the menu we want to modify
position: the item to insert
now: the current time, as a timestamp.
Removes an item from the menu. It will automatically be freed.
Return value: 1 if success, 0 if failure (out of range).
sys_context: global system context
menu: the menu we want to modify
now: the current time, as a timestamp.
Removes all items from the menu, usefull when one wants to repopulate the items completely, from scratch.
Return value: 1 if success, 0 if failure.
sys_context: global system context
menu: the menu concerned
max_displayed_items: the maximum number of items to display at once
Updates the display range. The reason for having this is that the
first item, that is, how far we scroll in a very long menu, depends
on the previous position. Plus you have to handle limit cases (begin/end).
Thus, this function, which will automatically pick-up a suitable
position. Of course, first_item_displayed is not necessarly
equal to selected_item.
Return value: none.
sys_context: global system context
menu: the menu to work on
label: the label of the menuitem to append
tooltip: the tooltip of the menuitem to append
value: the value of the menuitem to append
enabled: wether the inserted menuitem should be enabled
selected: wether the inserted menuitem should be selected
colored: wether the inserted menuitem should use value as its color
now: current time (timestamp)
Inserts a menu item at the given position. The idea is that the menu item object is automatically constructed on the fly, and an id is returned, which can be passed to ’_using_id’ menu-related functions. This is typically for using in scripts. The idea is that the script just keeps a copy of the id returned, and can this way operate directly on the menuitem without keeping a pointer, a smob or anything internally. From the C point of view, having a real C structure enables persistent data from one display to the other, and this is nice and conveninent. I acknowledge the prototype is scary.
Return value: 0 if error, or else an id which will later be used with ’_using_id’ functions.
sys_context: global system context
menu: the menu to work on
label: the label of the menuitem to append
tooltip: the tooltip of the menuitem to append
value: the value of the menuitem to append
enabled: wether the appended menuitem should be enabled
selected: wether the appended menuitem should be selected
colored: wether the appended menuitem should use value as its color
now: current time (timestamp)
Appends a menuitem using the same logic as lw6gui_menu_insert_for_id_use
that is to say a parameter is returned which can later be used to
directly operate on a given menuitem, without having its pointer,
and even if its position changes.
Return value: 0 if error, or else an id which will later be used with ’_using_id’ functions.
sys_context: global system context
menu: the menu to work on
menuitem_id: the id of the menuitem to remove
now: current time (timestamp)
Deletes the menuitem with the given id. Very important: the id is not the position. Id are arbitrary numbers that stick to menuitems, but they are not directly linked with the position. This function is practical to use if, for some reason, you don’t have the pointer on the menuitem.
Return value: 1 if success, 0 if failure (out of range).
sys_context: global system context
menu: the menu to work on
menuitem_id: the id of the menuitem to synchronize
label: menu label
tooltip: menu tooltip
value: value
enabled: wether it’s usable or not
selected: 1 if the menuite is current item
colored: wether to use color
now: current time (timestamp)
Updates the menuitem with the given id. Very important: the id is not
the position. Id are arbitrary numbers that stick to menuitems, but
they are not directly linked with the position. This function is practical
to use if, for some reason, you don’t have the pointer on the menuitem.
In practice, it’s heavily used in the game to transmit informations from
the scripts to the core C engine. Additionnaly, this function will
automatically synchronize the selected_item field of the menu struct.
Return value: 1 if success, 0 if failure (out of range).
sys_context: global system context
menu_a: first item to compare
menu_b: second item to compare
Compares two menus.
Return value: 1 if they are the same, 0 if not
sys_context: global system context
menu: the menu to duplicate
Duplicates a menu structure.
Return value: a pointer to the new menu.
sys_context: global system context
dst: the target menu
src: the source menu
Synchronizes two menus, this supposes that they represent the same menu, but
simply in a different state. This function does not really copy src to dst, it
has a special behavior, indeed everything is copied from src to dst, except
the first_item_displayed and nb_items_displayed which are taken from dst
and copied to src. This is because in practise, those values are updated
in the display loop/thread, which is the one which uses the target. This is
not very orthodox, but should work.
Return value: 1 if success, 0 if failure
sys_context: global system context
label: the string to be displayed, what the user sees. Can be freed after the call is done, function will make a copy internally.
tooltip: the string to be displayed as a tooltip, describing the menu item in detail. Can be NULL if you don’t want to use this feature.
value: the value. No GUI function uses this, this is the "real" value associated to the item.
enabled: wether the menu item can be selected, used, and so on
selected: wether the menu item is the item selected among all menu items.
colored: wetherr the menu item must, when drawn, be colored according to its value.
Constructs a new menuitem object. Note that you can always call other
functions to modify these values afterwards, this might change rendering
since lw6gui_menuitem_set_value or lw6gui_menuitem_set_label will,
for instance, modify the "when was that item last modified" information.
Return value: a pointer to the newly allocated object.
sys_context: global system context
menuitem: a pointer to the menuitem.
Frees the menuitem, checking if things are OK before doing so.
Return value: none.
sys_context: global system context
menuitem: a pointer to the menuitem.
Gets the memory occupied by the menuitem. Could be usefull to help a garbage collector taking decisions or reporting erros, for instance.
Return value: the number of bytes used.
sys_context: global system context
menuitem: a pointer to the menuitem.
Constructs a readable description of the object. Usefull for debugging, or to introspect things using scripts, at run-time. Does not necessarly describe all the informations about the object, but helps knowing what it is.
Return value: a string describing the object, must be freed.
sys_context: global system context
menuitem: a pointer to the menuitem.
label: the new label, you can free it after calling the function, an internal copy will be made.
now: the current time, as a timestamp.
Change the label of the menu item. That is to say, what the user sees.
Use this function to change the menuitem
value, don’t try to access the struct directly. The idea is 1) to have safe
memory management and 2) to keep the last_change member up to date.
It can be later used for eye-candy effects.
Return value: none
sys_context: global system context
menuitem: a pointer to the menuitem.
tooltip: the new tooltip, you can free it after calling the function, an internal copy will be made.
now: the current time, as a timestamp.
Change the tooltip of the menu item (the explanation of what the item is about)
Use this function to change the menuitem
value, don’t try to access the struct directly. The idea is 1) to have safe
memory management and 2) to keep the last_change member up to date.
It can be later used for eye-candy effects.
Return value: none
sys_context: global system context
menuitem: a pointer to the menuitem.
value: the new value.
now: the current time, as a timestamp.
Changes the value of a menuitem. This is the internal value, not what
the user sees. Use this function to change the menuitem
value, don’t try to access the struct directly. The idea is to keep
the last_change member up to date.
It can be later used for eye-candy effects.
Return value: none
sys_context: global system context
menuitem: a pointer to the menuitem.
state: 1 to select, 0 to unselect
now: the current time, as a timestamp.
Switches the menuitem to (un)selected state. Use this function, don’t try
to modify the struct members directly. The idea is to have
the last_select parameter up to date.
It can be later used for eye-candy effects.
Return value: none
sys_context: global system context
menuitem: a pointer to the menuitem.
state: 1 to enable, 0 to disable
now: the current time, as a timestamp.
Switches the menuitem to enabled/disabled state. Use this function, don’t try
to modify the struct members directly. The idea is to have
the last_select parameter up to date.
It can be later used for eye-candy effects.
Return value: none
sys_context: global system context
menuitem: the menuitem we want to identify
Returns a checksum which can be used to know, for instance, wether the menuitem has changed or not, and if we should redraw it.
Return value: a checksum.
sys_context: global system context
menuitem_a: first item to compare
menuitem_b: second item to compare
Compares two menuitems.
Return value: 1 if they are the same, 0 if not
sys_context: global system context
menuitem: the menuitem to duplicate
The menuitem to duplicate.
Return value: a pointer to the duplicted menuitem.
sys_context: global system context
dst: the target menuitem
src: the source menuitem
Synchronizes two menuitems, this supposes that they represent the same item, but simply in a different state.
Return value: 1 if success, 0 if failure
sys_context: global system context
mouse: the mouse object to work on
screen_pos_x: the x position on screen
screen_pos_y: the y position on screen
timestamp: current timestamp
Registers a mouse move event.
Return value: note.
sys_context: global system context
mouse: the mouse object to poll
screen_pos_x: pointer to the x position (can be NULL), will be updated even if no move
screen_pos_y: pointer to the y position (can be NULL), will be updated even if no move
Asks wether the mouse has moved or not.
Return value: 1 if mouse was moved since last call, 0 if not.
mouse: the mouse to update
repeat_settings: the repeat settings (delay + interval)
timestamp: the current ticks (milliseconds)
Updates the repeat informations for a mouse, must be called regularly, as often as possible.
Return value: none.
sys_context: global system context
dst: the target mouse object
src: the source mouse object
Synchronizes two mouse objects. This is typically used to pass data from one thread to another. Will handle "mouse move" attribute and clear it in src if needed while setting it in dst.
Return value: 1 if success, O if failure.
sys_context: global system context
mouse: mouse struct to update
To be called when one wants to start recording a drag session, typically when left button is pressed.
Return value: none.
sys_context: global system context
mouse: mouse struct to update
To be called when one wants to stop recording a drag session, typically when left button is released.
Return value: none.
sys_context: global system context
mouse: mouse struct to query
delta_x: x movement (on screen, out param can be NULL)
delta_y: y movement (on screen, out param can be NULL)
pos_x: x pos (on screen, out param can be NULL)
pos_y: y pos (on screen, out param can be NULL)
speed_x: x speed (on screen, out param can be NULL)
speed_y: y speed (on screen, out param can be NULL)
To be called when one wants to stop recording a drag session, typically when left button is released.
Return value: none.
sys_context: global system context
point: point to test
rect: rectangle in which point is supposed to be
Tests wether a point is inside a rectangle, this is typically used to know if a point is inside the right texture or if we’re outside.
Return value: 1 if OK, 0 if outside
sys_context: global system context
input: the value to approach
Finds the closest power of two, which is at least greater or equal to input. Typically used to size textures.
Return value: a power of two.
sys_context: global system context
input: the value to approach
Finds the closest power of two, which is equal of inferior to input. Typically used to size textures.
Return value: a power of two.
sys_context: global system context
quad: quad to test
rect: rectangle in which quad is supposed to be
Tests wether a quad is inside a rectangle, this is typically used to know if a quad is inside the right texture or if we’re outside.
Return value: 1 if OK, 0 if outside
sys_context: global system context
rect_array: the rectangle array to initializae
w: width of the zone to initialize
h: height of the zone to initialize
tile_size: tile size, that is, width and height of sub rectangles
border_size: border to add so that sub rectangles overlap
Initializes a rect array structure, this is usefull for texture handling, it builds an array of sub-rectangle which slightly overlap each other.
Return value: 1 on success, 0 on failure.
sys_context: global system context
rect_array: the rectangle array to initializae
rect: the sub-rectangle (out param)
i: the index of the sub-rectangle (out param)
source_x: the x position on the global rect array
source_y: the y position on the global rect array
Finds out which sub-rectangle is the right one, given a source position. The output values are a correctly initialized sub-rectangle with relative position set plus its index within the container rectangle array.
Return value: 1 on success, 0 on failure.
sys_context: global system context
rect_array: the rectangle array to initializae
rect: the sub-rectangle (out param)
i: the index of the sub-rectangle
Finds out which sub-rectangle is the right one, given a source position. The output value is a correctly initialized sub-rectangle with relative position set.
Return value: 1 on success, 0 on failure.
sys_context: global system context
rect_array: the rectangle array to initializae
rect: the sub-rectangle (out param)
i: the index of the sub-rectangle (out param)
quad: the 4 corresponding points within the sub-rectangle (out param)
source_quad: 4 points within the container rectangle array
x_polarity: polarity along the X axis
y_polarity: polarity along the Y axis
Finds out which sub-rectangle is the right one, given 4 points as an input, and places these 4 points on the sub-rectangle, taking in account the polarity. This is typically used for texture mapping. Note that a rectangle array can’t handle all requests, it need have the good size, granularity.
Return value: 1 on success, 0 on failure.
sys_context: global system context
rect: the structure to initialize
x1: x for top left corner
y1: y for top left corner
x2: x for bottom right corner
y2: y for bottom right corner
Initializes a rect structure, will calculate w & h.
Return value: none.
sys_context: global system context
rect: the structure to initialize
x: x for top left corner
y: y for top left corner
w: width
h: height
Initializes a rect structure, will calculate x2 & y2.
Return value: none.
sys_context: global system context
dst: the structure which will contain the result
src: the source rect
clip: the clipping rect (boundaries)
Clips a rect (think of rectangle clips).
Return value: none.
sys_context: global system context
segment: segment to test
rect: rectangle in which segment is supposed to be
Tests wether a segment is inside a rectangle, this is typically used to know if a segment is inside the right texture or if we’re outside.
Return value: 1 if OK, 0 if outside
sys_context: global system context
smoother: the structure to initialize
value: the value to use for now
duration: the duration of a standard move, in ticks (msec)
Initializes a smoother object, with a default value. The important point is the duration which will condition all the behavior of the object.
Return value: none.
sys_context: global system context
smoother: the structure to use
value: the target value
Forces a smoother object to immediately point on a value.
Return value: none.
sys_context: global system context
smoother: the structure to use
value: the target value
now: the current timestamp
Sets a new target, will automatically calculate current speed to smooth the next returned values.
Return value: none.
sys_context: global system context
smoother: the structure to use
now: the current timestamp
Returns the current value of the smoother.
Return value: a float.
sys_context: global system context
smoother: object to modify
step: step size, typically twice the map size
Companion function of lw6pil_coords_fix_x10, this one will fix
a smoother target to avoid crazy scrolls when cursor is on a map
edge.
Return value: none.
sys_context: global system context
mode: test mode (bitmask)
Registers all tests for the libgui module.
Return value: 1 if test is successfull, 0 on error.
sys_context: global system context
mode: test mode (bitmask)
Runs the gui module test suite, testing most (if not all...)
functions.
Return value: 1 if test is successfull, 0 on error.
sys_context: global system context
triangle: triangle to test
rect: rectangle in which triangle is supposed to be
Tests wether a triangle is inside a rectangle, this is typically used to know if a triangle is inside the right texture or if we’re outside.
Return value: 1 if OK, 0 if outside
sys_context: global system context
closest: the closest video_mode found
wished: the wished video_mode
available: a list of available video_modes (list of lw6gui_video_mode_t *)
Finds the closest video_mode available, this is just a small utility to cope with different screen shapes and avoid requesting 640x480 when it’s just not available but there’s a 640x400 instead.
Return value: 1 if the wished video_mode exists in available list and was found, else 0 if the wished video_mode doesn’t exist and an approximative match was picked.
sys_context: global system context
mode_a: first mode to compare
mode_b: second mode to compare
Compares two video modes, to know if they’re the same.
Return value: 1 if equal, 0 if not.
sys_context: global system context
dst: the target video mode
src: the source video mode
Applies the ratio of src to dst, for instance if src is 16/9, then dst will be made 16/9 too, trying to keep the same surface.
Return value: 1 on success, 0 on failure
sys_context: global system context
viewport: the viewport to initalize
screen_w: screen width
screen_h: screen height
drawable_x1: viewport min x
drawable_y1: viewport min y
drawable_x2: viewport max x
drawable_y2: viewport max y
center_x: center of display (in map coordinates)
center_y: center of display (in map coordinates)
map_w: map width (shape)
map_h: map height (shape)
x_polarity: x polarity
y_polarity: y polarity
x_wrap: wether to wrap horizontally
y_wrap: wether to wrap vertically
keep_ratio: wether to adapt to viewport shape or keep original
global_zoom: global zoom is style_zoom * dynamic_zoom
scroll_limit: inside this zone, don’t scroll
use_old_center: wether to take previous center in account
Initializes all the (jumbo?) viewport structure which will contain valuable informations for a simple "flat" display. Special renderers might not find usefull some fields and handle wrapping and zooming their own way, but this offers a basic skeleton.
Return value: 1 if ok, 0 on failure
sys_context: global system context
viewport: the viewport to use
screen_x: the x coord on the screen
screen_y: the y coord on the screen
map_x: the x coord in map coordinates
map_y: the y coord in map coordinates
clip: wether to clip returned values
Translates from map coords to screen coords. Returned values might be outside screen boundaries if clip is 0. If screen coords are outside drawable area anc clip is 1, then they will be clipped.
Return value: NULL
sys_context: global system context
viewport: the viewport to use
map_x: the x coord in map coordinates
map_y: the y coord in map coordinates
screen_x: the x coord on the screen
screen_y: the y coord on the screen
wrap: wether to use polarity informations to wrap coords.
Translates from screen coords to map coords. If wrap is set, it will
interpret coords the way lw6map_coords_fix_xy would, only it can still
be formally outside map boundaries for it can return a value exactly
equal to w,h while in interger mode it would be w-1,h-1.
Return value: NULL
sys_context: global system context
viewport: viewport to work on
map_dst_x: map det x coord (out param)
map_dst_y: map dst y coord (out param)
map_src_x: map src x coord
map_src_y: map src y coord
screen_dx: drag x (on screen)
screen_dy: drag y (on screen)
Used to calculate the new "center" when in drag mode.
Return value: none.
sys_context: global system context
zone: the structure to initialize
x1: x for top left corner
y1: y for top left corner
x2: x for bottom right corner
y2: y for bottom right corner
Initializes a zone structure, will calculate w & h.
Return value: none.
sys_context: global system context
zone: the structure to initialize
x: x for top left corner
y: y for top left corner
w: width
h: height
Initializes a zone structure, will calculate x2 & y2.
Return value: none.
sys_context: global system context
dst: the structure which will contain the result
src: the source zone
clip: the clipping zone (boundaries)
Clips a zone (think of rectangle clips).
Return value: none.
Used to store a complete button state, along with repeat informations, queues. It might be overkill for basic cases, having different types of buttons (union?) for different cases might be a good idea.
Type: int
Definition: int lw6gui_button_s::is_pressed
Wether button is pressed, 1 means pressed, 0 unpressed.
Type: int
Definition: int lw6gui_button_s::press_queue
Each time the button is pressed, this increases, each times one "pops" a press from it, it’s decreased. This allows for button buffering, as events might take some time to go through the pipeline given the heavily multithreaded nature of the dsp/gfx couple.
Type: int
Definition: int lw6gui_button_s::simple_click_queue
Simple-click counter, as opposed to double-click. A "simple-click" is validated when one has pressed the button, and then waiting long enough to discard the possibility to double-click. This is not really buffered, queue will ignore simple-clicks if one is already buffered.
Type: int
Definition: int lw6gui_button_s::double_click_queue
Double-click counter. This is not really buffered, queue will ignore double-clicks if one is already buffered.
Type: int
Definition: int lw6gui_button_s::triple_click_queue
Triple-click counter. This is not really buffered, queue will ignore triple-clicks if one is already buffered.
Type: int64_t
Definition: int64_t lw6gui_button_s::last_press
Timestamp of last key press.
Type: int64_t
Definition: int64_t lw6gui_button_s::last_repeat
Timestamp of last key repeat.
Type: int64_t
Definition: int64_t lw6gui_button_s::double_click_t1
Used to handle multiple-clicks, this is the timestamp of the click "2 clicks ago".
Type: int64_t
Definition: int64_t lw6gui_button_s::double_click_t2
Used to handle multiple-clicks, this is the timestamp of the click just before the last click.
Type: int64_t
Definition: int64_t lw6gui_button_s::double_click_t3
Used to handle multiple-clicks, this is the timestamp of the last click.
Contains information about available fullscreen modes.
Type: lw6gui_video_mode_t
Definition: lw6gui_video_mode_t lw6gui_fullscreen_modes_s::low
Low resolution mode.
Type: lw6gui_video_mode_t
Definition: lw6gui_video_mode_t lw6gui_fullscreen_modes_s::standard
Standard resolution mode.
Type: lw6gui_video_mode_t
Definition: lw6gui_video_mode_t lw6gui_fullscreen_modes_s::high
High resolution mode.
Global input state, contains informations about the keyboard, mouse and joystick. This is the macro object used to exchange data and transmit input information from the rendering thread which gathers it to the logical thread which computes the game state.
Type: int
Definition: int lw6gui_input_s::need_sync
Wether this input struct has changed and needs to be synchronized.
Type: lw6gui_keyboard_t
Definition: lw6gui_keyboard_t lw6gui_input_s::keyboard
Keyboard information.
Type: lw6gui_mouse_t
Definition: lw6gui_mouse_t lw6gui_input_s::mouse
Mouse information.
Type: lw6gui_joystick_t
Definition: lw6gui_joystick_t lw6gui_input_s::joysticks[LW6GUI_NB_JOYSTICKS]
Joysticks information.
Joystick information, contains detailed joystick state. This structure uses a pad-like interface, there’s no knowledge of analog interfaces, it transforms everything to a binary "up or down" and "left or right". This interface only knows about 6 buttons, this is done on purpose, the logic behind it is that more than 6 buttons makes the control way too complicated. Actually, most common functions are and should be available through the 4 first (a,b,c,d) buttons. The e and f are here for additionnal not-so-important features.
Type: lw6gui_button_t
Definition: lw6gui_button_t lw6gui_joystick_s::pad_up
Joystick up button state.
Type: lw6gui_button_t
Definition: lw6gui_button_t lw6gui_joystick_s::pad_down
Joystick down button state.
Type: lw6gui_button_t
Definition: lw6gui_button_t lw6gui_joystick_s::pad_left
Joystick left button state.
Type: lw6gui_button_t
Definition: lw6gui_button_t lw6gui_joystick_s::pad_right
Joystick right button state.
Type: lw6gui_button_t
Definition: lw6gui_button_t lw6gui_joystick_s::button_a
Joystick a button state.
Type: lw6gui_button_t
Definition: lw6gui_button_t lw6gui_joystick_s::button_b
Joystick b button state.
Type: lw6gui_button_t
Definition: lw6gui_button_t lw6gui_joystick_s::button_c
Joystick c button state.
Type: lw6gui_button_t
Definition: lw6gui_button_t lw6gui_joystick_s::button_d
Joystick d button state.
Type: lw6gui_button_t
Definition: lw6gui_button_t lw6gui_joystick_s::button_e
Joystick e button state.
Type: lw6gui_button_t
Definition: lw6gui_button_t lw6gui_joystick_s::button_f
Joystick f button state.
Stores a complete keyboard state.
Type: int
Definition: int lw6gui_keyboard_s::auto_release_enabled
Wether auto_release mode is set.
Type: lw6gui_button_t
Definition: lw6gui_button_t lw6gui_keyboard_s::arrow_up
State of keyboard up arrow. This can be the combination of several keys, for instance the numeric pad up arrow, and the corresponding arrow pad key.
Type: lw6gui_button_t
Definition: lw6gui_button_t lw6gui_keyboard_s::arrow_down
State of keyboard down arrow. This can be the combination of several keys, for instance the numeric pad down arrow, and the corresponding arrow pad key.
Type: lw6gui_button_t
Definition: lw6gui_button_t lw6gui_keyboard_s::arrow_left
State of keyboard left arrow. This can be the combination of several keys, for instance the numeric pad left arrow, and the corresponding arrow pad key.
Type: lw6gui_button_t
Definition: lw6gui_button_t lw6gui_keyboard_s::arrow_right
State of keyboard right arrow. This can be the combination of several keys, for instance the numeric pad right arrow, and the corresponding arrow pad key.
Type: lw6gui_button_t
Definition: lw6gui_button_t lw6gui_keyboard_s::key_enter
State of keyboard ENTER key. This can be the combination of several keys, for instance both the numeric pad ENTER and the standard, default one.
Type: lw6gui_button_t
Definition: lw6gui_button_t lw6gui_keyboard_s::key_esc
State of keyboard ESC key. This can be the combination of several keys, for instance both the standard ESC key and another key.
Type: lw6gui_button_t
Definition: lw6gui_button_t lw6gui_keyboard_s::key_ctrl
State of keyboard ESC key. This can be the combination of several keys, for instance both left and right CTRL keys.
Type: lw6gui_button_t
Definition: lw6gui_button_t lw6gui_keyboard_s::key_alt
State of keyboard ESC key. This can be the combination of several keys, for instance both left and right ALT keys.
Type: lw6gui_button_t
Definition: lw6gui_button_t lw6gui_keyboard_s::key_pgup
State of keyboard PAGE UP key. This can be the combination of several keys.
Type: lw6gui_button_t
Definition: lw6gui_button_t lw6gui_keyboard_s::key_pgdown
State of keyboard PAGE UP key. This can be the combination of several keys.
Type: lw6sys_list_t *
Definition: lw6sys_list_t* lw6gui_keyboard_s::queue
List of events, contains keypress objects.
Type: lw6gui_button_t
Definition: lw6gui_button_t lw6gui_keyboard_s::keys_state[LW6GUI_NB_KEYS]
Array of button states, indexed by keycodes.
Keypress information, contains more than just a keycode but also meta/readable informations about it.
Type: int
Definition: int lw6gui_keypress_s::keysym
The keysym, note that this is implementation specific. In practice, SDL uniformizes this, but there’s no garantee all graphics engine are SDL based, so don’t rely on this too much outside the graphics backend.
Type: int
Definition: int lw6gui_keypress_s::unicode
Unicode code for this letter/key.
Type: char *
Definition: char* lw6gui_keypress_s::label
Readable label for the key, typically usable in a "choose keyboard settings" interface.
The look structure contains everything the renderer needs to skin the display. This is where one specifies the color set, dynamic zoom effect, and possibly other things.
Type: u_int32_t
Definition: u_int32_t lw6gui_look_s::id
The id of the object, this is non-zero and unique within one run session, incremented at each object creation.
Type: float
Definition: float lw6gui_look_s::dynamic_zoom
Dynamic zoom, this is multiplicated by the map zoom, and gives the global zoom, the one finally used.
Type: int
Definition: int lw6gui_look_s::gfx_quality
Overall graphics quality, the higher the better, will trigger various parameters, depending on the renderer.
Type: lw6map_style_t
Definition: lw6map_style_t lw6gui_look_s::style
A style structure which will override the one from the map, depending on the local options (config file, environnement, command-line options).
Menu item object. Basically, a menu is an array of these items, it’s up to the gfx backend to render this as accurately as possible. The most important field is probably the label.
Type: u_int32_t
Definition: u_int32_t lw6gui_menuitem_s::id
The id of the object, this is non-zero and unique within one run session, incremented at each object creation.
Type: char *
Definition: char* lw6gui_menuitem_s::label
What is displayed in the menu item.
Type: char *
Definition: char* lw6gui_menuitem_s::tooltip
An additionnal tooltip explaining what the item is about.
Type: int
Definition: int lw6gui_menuitem_s::value
The value for this item, can typically be used for booleans and integer values, in addition to the information conveyed by the label. One special case is colored items, in that case the value will be used as a color index.
Type: int
Definition: int lw6gui_menuitem_s::enabled
Wether the item is valid and can be used.
Type: int
Definition: int lw6gui_menuitem_s::selected
Wether the item is the current selection.
Type: int
Definition: int lw6gui_menuitem_s::colored
Wether to colorize the item, and in that case, use the value field to know which color to use.
Type: int
Definition: int lw6gui_menuitem_s::last_change
Timestamp of last time the menu item was updated and changed.
Type: int
Definition: int lw6gui_menuitem_s::last_select
Timestamp of last time the menu was selected.
Type: int
Definition: int lw6gui_menuitem_s::last_unselect
Timestamp of last time the menu was unselected.
Menu item object. Basically, a menu is an array of menu items, it’s up to the gfx backend to render this as accurately as possible. The most important field is probably the items labels. The menu object also stores state information such as what was the first item displayed lately.
Type: u_int32_t
Definition: u_int32_t lw6gui_menu_s::id
The id of the object, this is non-zero and unique within one run session, incremented at each object creation.
Type: char *
Definition: char* lw6gui_menu_s::title
Title of the menu, used for breadcrumbs.
Type: char *
Definition: char* lw6gui_menu_s::help
Additionnal help text, explaining what the menu is about.
Type: char *
Definition: char* lw6gui_menu_s::popup
Popup text, will be displayed when the menu is first displayed, and then disappear.
Type: int
Definition: int lw6gui_menu_s::nb_items
Number of items.
Type: lw6gui_menuitem_t *
Definition: lw6gui_menuitem_t* lw6gui_menu_s::esc_item
Special item describing the ESC button.
Type: lw6gui_menuitem_t **
Definition: lw6gui_menuitem_t** lw6gui_menu_s::items
Array of items, containing all the menu items.
Type: int
Definition: int lw6gui_menu_s::selected_item
The current selection.
Type: int
Definition: int lw6gui_menu_s::first_item_displayed
The first item displayed, this is mandatory if we want the menus to be displayable in different states, for instance with first item being 2 and items displayed from 2 to 10 or with first item being 5 and items displayed from 2 to 10. In the first case the 1st item is selected, in the second case it’s the 4th.
Type: int
Definition: int lw6gui_menu_s::nb_items_displayed
Number of items displayed.
Type: int
Definition: int lw6gui_menu_s::order_of_selected_on_display
Index, display-based (that is, 0 here means first displayed and not necessarly first in the items array), of the selected item.
Type: int
Definition: int lw6gui_menu_s::allow_scroll
Wether scrolling is allowed.
Type: lw6sys_list_t *
Definition: lw6sys_list_t* lw6gui_menu_s::breadcrumbs
List of strings containing the breadcrumbs, that is to say all the menu titles that one must use to get here.
Use to store mouse pointer information.
Type: int
Definition: int lw6gui_mouse_pointer_s::pos_x
Mouse X position (pixels).
Type: int
Definition: int lw6gui_mouse_pointer_s::pos_y
Mouse Y position (pixels).
Type: int
Definition: int lw6gui_mouse_pointer_s::speed_x
Mouse X speed. The unit is pixels per second. This is based on the last move, for instance if between two moves 100 msec have elapsed, and mouse moved 13 pixels, then speed is 130.
Type: int
Definition: int lw6gui_mouse_pointer_s::speed_y
Mouse Y speed. The unit is pixels per second. This is based on the last move, for instance if between two moves 100 msec have elapsed, and mouse moved 13 pixels, then speed is 130.
Mouse information, contains detailed mouse state, including mouse position and button states but also keeps track of mouse speed as well as its corresponding map coordinates. That is, given the current screen position, what does it mean on the logical map/battlefield.
Type: int
Definition: int lw6gui_mouse_s::moved
Wether mouse was moved lately. 1 means yes, 0 no.
Type: int64_t
Definition: int64_t lw6gui_mouse_s::last_moved
Timestamp of last move.
Type: lw6gui_mouse_pointer_t
Definition: lw6gui_mouse_pointer_t lw6gui_mouse_s::screen_pointer
Information about the mouse pointer, using screen coordinates, the unit being pixels.
Type: lw6gui_mouse_pointer_t
Definition: lw6gui_mouse_pointer_t lw6gui_mouse_s::map_pointer
Information about the mouse pointer, using map coordinates, the unit being the map slot. This is possibly very different from screen coordinates, they can be inverted, have a different scale, and globally it’s just something else, even if it refers to the same physical move.
Type: lw6gui_mouse_pointer_t
Definition: lw6gui_mouse_pointer_t lw6gui_mouse_s::screen_drag_start
Information about the mouse pointer when drag mode was entered. The unit is screen pixels.
Type: lw6gui_drag_mode_t
Definition: lw6gui_drag_mode_t lw6gui_mouse_s::drag_mode
The current drag state.
Type: int
Definition: int lw6gui_mouse_s::menu_position
The index of the menu item the mouse is on. This is the only was to know when to select an item, one should not use mouse coords outside the gfx renderer code for this purpose, it’s the renderer which has knowledge about where menu items are.
Type: int
Definition: int lw6gui_mouse_s::menu_scroll
Set to -1 if one needs to scroll up (decrease menu index) to +1 if one needs to scroll down (increase menu index) and 0 if one needs to do nothing as far as scrolling is concerned.
Type: int
Definition: int lw6gui_mouse_s::menu_esc
Wether mouse pointer is over the ESC button.
Type: lw6gui_button_t
Definition: lw6gui_button_t lw6gui_mouse_s::button_left
Mouse left button state.
Type: lw6gui_button_t
Definition: lw6gui_button_t lw6gui_mouse_s::button_right
Mouse right button state.
Type: lw6gui_button_t
Definition: lw6gui_button_t lw6gui_mouse_s::button_middle
Mouse middle button state.
Type: lw6gui_button_t
Definition: lw6gui_button_t lw6gui_mouse_s::wheel_up
Mouse wheel up state.
Type: lw6gui_button_t
Definition: lw6gui_button_t lw6gui_mouse_s::wheel_down
Mouse wheel down state.
Standard interface for joypad-like interfaces, can also be used to map keyboard arrows.
Type: int
Definition: int lw6gui_move_pad_s::up
Up button (boolean).
Type: int
Definition: int lw6gui_move_pad_s::down
Down button (boolean).
Type: int
Definition: int lw6gui_move_pad_s::left
Left button (boolean).
Type: int
Definition: int lw6gui_move_pad_s::right
Right button (boolean).
Basic point type, 3 floating point coords.
Type: float
Definition: float lw6gui_point_s::x
X position.
Type: float
Definition: float lw6gui_point_s::y
Y position.
Type: float
Definition: float lw6gui_point_s::z
Z position.
Basic quad type, composed of 4 points (floating point values).
Type: lw6gui_point_t
Definition: lw6gui_point_t lw6gui_quad_s::p1
1st point.
Type: lw6gui_point_t
Definition: lw6gui_point_t lw6gui_quad_s::p2
2nd point.
Type: lw6gui_point_t
Definition: lw6gui_point_t lw6gui_quad_s::p3
3rd point.
Type: lw6gui_point_t
Definition: lw6gui_point_t lw6gui_quad_s::p4
4th point.
Array of rectangles. This is typically used to make tiles that overlap. It’s mostly used to display fighters/maps using multiple textures when the whole stuff does not fit in one single OpenGL texture and needs to be splitted. Technically, when one needs to split textures, performance is poor, but still better than relying on software renderer only.
Type: lw6sys_whd_t
Definition: lw6sys_whd_t lw6gui_rect_array_s::source
Size of original source data.
Type: lw6gui_rect_t
Definition: lw6gui_rect_t lw6gui_rect_array_s::limits
Boundary limits of the rect array, this is typically bigger that source size, it starts at negative values and finishes outside the source. It’s interesting to cover that big an area to enable both the water effect and proper wrapping/clamping.
Type: int
Definition: int lw6gui_rect_array_s::tile_size
Width and height of the tiles, this is typically a power of two, as it’s designed to match an OpenGL low-level texture object.
Type: int
Definition: int lw6gui_rect_array_s::border_size
The border size one needs to cut from the tile_size (on both sides, up and down or left and right) to get the real usable size of the tile.
Type: int
Definition: int lw6gui_rect_array_s::tile_spacing
The tile spacing, difference of X or Y between two tiles, this is typically smaller that tile_size.
Type: int
Definition: int lw6gui_rect_array_s::nb_tiles_w
Number of tiles on the X axis (width).
Type: int
Definition: int lw6gui_rect_array_s::nb_tiles_h
Number of tiles on the Y axis (height).
Type: int
Definition: int lw6gui_rect_array_s::nb_tiles
Overall number of tiles.
A basic rectangle data. The idea is to store both corner positions and width and height to cache the values and avoid always recalculating them. Values are integer based, for a floating point equivalent, see the zone struct.
Type: int
Definition: int lw6gui_rect_s::x1
Top-left corner X position.
Type: int
Definition: int lw6gui_rect_s::y1
Top-left corner Y position.
Type: int
Definition: int lw6gui_rect_s::x2
Bottom-right corner X position.
Type: int
Definition: int lw6gui_rect_s::y2
Bottom-right corner Y position.
Type: int
Definition: int lw6gui_rect_s::w
Width.
Type: int
Definition: int lw6gui_rect_s::h
Height.
Parameters used to handle repeat. This is used both by keys and buttons (joystick buttons and mouse buttons).
Type: int
Definition: int lw6gui_repeat_settings_s::delay
Delay, in milliseconds, after which a given key/button enters repeat mode.
Type: int
Definition: int lw6gui_repeat_settings_s::interval
Interval, in milliseconds, between two key/button press events in repeat mode.
Type: int
Definition: int lw6gui_repeat_settings_s::double_click_delay
If pressed twice within this delay (in milliseconds) then a double-click event is generated.
Type: int
Definition: int lw6gui_repeat_settings_s::auto_release_delay
After this delay (milliseconds) any key will be considered be unpressed, that is, it will be released automatically. This is usefull when the input library (depends on the gfx backend) does not send proper "key up" events. The workarround is to automatically consider the key is released after some time. Usually, this would typically be set just below the repeat delay.
Basic segment type, composed of 2 points (floating point values).
Type: lw6gui_point_t
Definition: lw6gui_point_t lw6gui_segment_s::p1
1st point.
Type: lw6gui_point_t
Definition: lw6gui_point_t lw6gui_segment_s::p2
2nd point.
Statefull object used to make transitions between 2 floats. Basically, one needs to choose a target, which is y2, and give a start, which is defined by s1 and y1 (speed and y value). Then with t1 (start timestamp) and duration the object has functions which enables interpolation between those two values, knowing at the end the value will be y2 and the speed 0. To some extent, this is a primitive bezier-like tool.
Type: float
Definition: float lw6gui_smoother_s::s1
Speed at startup.
Type: float
Definition: float lw6gui_smoother_s::y1
Y value at startup.
Type: float
Definition: float lw6gui_smoother_s::y2
Y target value.
Type: int64_t
Definition: int64_t lw6gui_smoother_s::t1
Timestamp at startup.
Type: int
Definition: int lw6gui_smoother_s::duration
Duration (in milliseconds) of the transition.
Basic triangle type, composed of 3 points (floating point values).
Type: lw6gui_point_t
Definition: lw6gui_point_t lw6gui_triangle_s::p1
1st point.
Type: lw6gui_point_t
Definition: lw6gui_point_t lw6gui_triangle_s::p2
2nd point.
Type: lw6gui_point_t
Definition: lw6gui_point_t lw6gui_triangle_s::p3
3rd point.
Contains the parameters for a video mode, regardless of driver used.
Type: int
Definition: int lw6gui_video_mode_s::width
Width, in pixels.
Type: int
Definition: int lw6gui_video_mode_s::height
Height, in pixels.
Type: int
Definition: int lw6gui_video_mode_s::fullscreen
1 for fullscreen mode, 0 for windowed mode.
Macro object used to store viewport information. Viewport here means "what part of the map should we display, on which part of the screen, and with which parameters".
Type: lw6sys_whd_t
Definition: lw6sys_whd_t lw6gui_viewport_s::map_shape
Shape of the map to display, unit is map slot.
Type: lw6sys_whd_t
Definition: lw6sys_whd_t lw6gui_viewport_s::screen_shape
Shape of the screen, unit is pixels.
Type: float
Definition: float lw6gui_viewport_s::center_x
X coord of the point we want to display at the center of the screen. This is typically our main cursor if we’re using the keyboard to move it. Unit is map slot.
Type: float
Definition: float lw6gui_viewport_s::center_y
Y coord of the point we want to display at the center of the screen. This is typically our main cursor if we’re using the keyboard to move it. Unit is map slot.
Type: float
Definition: float lw6gui_viewport_s::old_center_x
Previous X coord of the point we wanted to display at the center of the screen. This is typically our main cursor if we’re using the keyboard to move it. Unit is map slot.
Type: float
Definition: float lw6gui_viewport_s::old_center_y
Previous Y coord of the point we wanted to display at the center of the screen. This is typically our main cursor if we’re using the keyboard to move it. Unit is map slot.
Type: float
Definition: float lw6gui_viewport_s::speed_x
Speed at which the viewport is moving on the X axis, unit is map slot per second.
Type: float
Definition: float lw6gui_viewport_s::speed_y
Speed at which the viewport is moving on the Y axis, unit is map slot per second.
Type: int
Definition: int lw6gui_viewport_s::x_polarity
X-polarity parameter (1=on, 0=off, -1=invert).
Type: int
Definition: int lw6gui_viewport_s::y_polarity
Y-polarity parameter (1=on, 0=off, -1=invert).
Type: int
Definition: int lw6gui_viewport_s::x_wrap
Wether to wrap map on the X axis.
Type: int
Definition: int lw6gui_viewport_s::y_wrap
Wether to wrap map on the Y axis.
Type: lw6gui_zone_t
Definition: lw6gui_zone_t lw6gui_viewport_s::drawable
Drawable zone, this is the physical on-screen viewport. Unit is pixels.
Type: lw6gui_zone_t
Definition: lw6gui_zone_t lw6gui_viewport_s::map_main
Zone corresponding to the map, if it was to be drawn as a whole, regardless of drawable size, wrapping and polarity.
Type: lw6gui_zone_t
Definition: lw6gui_zone_t lw6gui_viewport_s::map_main_clipped
Zone corresponding to the map, only the main map, ignoring wrapping and polarity, but clipped with drawable zone.
Type: lw6gui_zone_t
Definition: lw6gui_zone_t lw6gui_viewport_s::map_visible
Actual visible zone of the map, including wrapping, polarity, and drawable clip aware.
A basic rectangle data. The idea is to store both corner positions and width and height to cache the values and avoid always recalculating them. Values are float based, for an integer point equivalent, see the rect struct.
Type: float
Definition: float lw6gui_zone_s::x1
Top-left corner X position.
Type: float
Definition: float lw6gui_zone_s::y1
Top-left corner Y position.
Type: float
Definition: float lw6gui_zone_s::x2
Bottom-right corner X position.
Type: float
Definition: float lw6gui_zone_s::y2
Bottom-right corner Y position.
Type: float
Definition: float lw6gui_zone_s::w
Width.
Type: float
Definition: float lw6gui_zone_s::h
Height.
View lcov test coverage results on http://www.ufoot.org/liquidwar/v6/doc/coverage/src/lib/hlp/index.html.
sys_context: global system context
keyword: the keyword we want to check out
Checks wether a given keyword is documented or not.
Return value: 1 if documented, 0 if not.
sys_context: global system context
type: the type of the data associated to the keyword, will be written
default_value: the default value for the keyword, will be written
min_value: the min value for the keyword, will be written
max_value: the max value for the keyword, will be written
keyword: the keyword we want help about
Returns the documentation string associated to a keyword. The keyword might be a command-line option, a Guile function, an XML file entry. Raises a warning if the keyword is undocumented, but never returns NULL, you can use the returned value without checking it. String is localized if a translation is available. It’s safe to call this function with type or other parameters being NULL.
Return value: a help string, never NULL, must not be freed. Additionnally, type will be updated.
sys_context: global system context
keyword: the keyword we want the type of
Returns the type of a keyword. Calls lw6hlp_about internally.
Return value: the type, might be LW6HLP_TYPE_VOID.
sys_context: global system context
keyword: the keyword we want the default for
Returns the default value for a keyword. Note that it can be NULL! The returned value is always a string, it’s suitable to store in the config file, it’s the value a user would pass on a command line, the one he wants documented.
Return value: a pointer, which can be NULL, must not be freed.
sys_context: global system context
keyword: the keyword we want the min for
Returns the min value for a keyword. Wether this is relevant for a given keyword does not affect the fact that you can call this function. A min and max of zero means min and max make no sense.
Return value: the value (integer)
sys_context: global system context
keyword: the keyword we want the max for
Returns the max value for a keyword. Wether this is relevant for a given keyword does not affect the fact that you can call this function. A min and max of zero means min and max make no sense.
Return value: the value (integer)
sys_context: global system context
id: the id of the credits line to return
Returns a "credit line", that is a short sentence, about 30 to 50 chars,
saying who developped the game, created graphics, giving important URLs,
and so on. One can pass an arbitraty high id, no risk, it will just loop
on previous lines.
Return value: the string, must be freed.
sys_context: global system context
keyword1: the 1st keyword
keyword2: the 2nd keyword
Checks wether a keyword matches another. Not only a string comparison, will also try and guess if the error is only about dash "-" replaced by underscode "_", for instance.
Return value: 1 if matches, 0 if different.
sys_context: global system context
Returns the list of keywords concerning quick options.
Return value: list of static strings (can’t modify them)
sys_context: global system context
Returns the list of keywords concerning self-documentation system.
Return value: list of static strings (can’t modify them)
sys_context: global system context
Returns the list of keywords concerning the show options.
Return value: list of static strings (can’t modify them)
sys_context: global system context
Returns the list of keywords concerning the path options.
Return value: list of static strings (can’t modify them)
sys_context: global system context
Returns the list of keywords concerning the players options.
Return value: list of static strings (can’t modify them)
sys_context: global system context
Returns the list of keywords concerning the input options.
Return value: list of static strings (can’t modify them)
sys_context: global system context
Returns the list of keywords concerning the graphics options.
Return value: list of static strings (can’t modify them)
sys_context: global system context
Returns the list of keywords concerning the sound options.
Return value: list of static strings (can’t modify them)
sys_context: global system context
Returns the list of keywords concerning the network options.
Return value: list of static strings (can’t modify them)
sys_context: global system context
Returns the list of keywords concerning the map options.
Return value: list of static strings (can’t modify them)
sys_context: global system context
Returns the list of keywords concerning the rules options.
Return value: list of static strings (can’t modify them)
sys_context: global system context
Returns the list of keywords concerning the hints options.
Return value: list of static strings (can’t modify them)
sys_context: global system context
Returns the list of keywords concerning the style options.
Return value: list of static strings (can’t modify them)
sys_context: global system context
Returns the list of keywords concerning the teams options.
Return value: list of static strings (can’t modify them)
sys_context: global system context
Returns the list of C-function exported to Guile.
Return value: list of static strings (can’t modify them)
sys_context: global system context
Returns the list of hooks.
Return value: list of static strings (can’t modify them)
sys_context: global system context
Returns the list of keywords concerning advanced options.
Return value: list of static strings (can’t modify them)
sys_context: global system context
Returns the list of command-line aliases.
Return value: list of static strings (can’t modify them)
sys_context: global system context
Returns the list of team_colors.
Return value: list of static strings (can’t modify them)
sys_context: global system context
Returns the list of weapons.
Return value: list of static strings (can’t modify them)
sys_context: global system context
Returns the list of all available keywords.
Return value: list of static strings (can’t modify them)
sys_context: global system context
argc: the number of command-line args, as passed to main
argv: an array of strings containing command-line args, as passed to main
run_game: a pointer to a boolean which will contain true (1) if the game must be launched, or false (0) if the option is such that game must be skipped. Example: –copyright, –help, ...
Will interpret the command-line arguments, and trap those who are related to docs, this is usefull when building the game, we want to have an extra binary to do this without being linked to SDL, for instance.
Return value: non-zero if success, 0 if error. The error can be, for instance, the test suite returning "no, tests were not OK".
sys_context: global system context
list: a pointer to a list of keywords
f: the file to print the content to
Prints all the keywords from the list. One keyword per line.
Return value: none.
sys_context: global system context
list: a pointer to a list of keywords
f: the file to print the content to
Prints all the keywords from the list, with the associated keyword help, to the given file. Output is formatted to fit on the standard terminal/console.
Return value: none.
sys_context: global system context
keyword: the keyword to print help about
f: the file to print the content to
Displays the help about a keyword, to a file, directly. It’s formatted for the purpose of the –about=<value> option.
Return value: none
sys_context: global system context
f: the file to print the content to
Displays a short help message.
Return value: none
sys_context: global system context
f: the file to print the content to
Displays the version of the game.
Return value: none
sys_context: global system context
f: the file to print the content to
Displays the copyright of the game (short version).
Return value: none
sys_context: global system context
f: the file to print the content to
Displays the copyright of the game (long version).
Return value: none
sys_context: global system context
f: the file to print the content to
Displays the program bench value.
Return value: none
sys_context: global system context
f: the file to print the content to
Displays the program pedigree, think of this as version on steroids.
Return value: none
sys_context: global system context
f: the file to print the content to
Displays the host on which the program was compiled.
Return value: none
sys_context: global system context
f: the file to print the content to
Displays various paths used by the game.
Return value: none
sys_context: global system context
f: the file to print the content to
Displays the list of modules compiled with the game.
Return value: none
sys_context: global system context
f: the file to print the content to
Displays all credits on f, those should be available elsewhere within the game (typically on splash screen) but it’s good to be able to show them "standalone".
Return value: none
sys_context: global system context
f: the file to print the content to
Displays the list of ’quick’ options.
Return value: none
sys_context: global system context
f: the file to print the content to
Displays the list of ’doc’ options.
Return value: none
sys_context: global system context
f: the file to print the content to
Displays the list of ’show’ options.
Return value: none
sys_context: global system context
f: the file to print the content to
Displays the list of ’path’ options.
Return value: none
sys_context: global system context
f: the file to print the content to
Displays the list of ’players’ options.
Return value: none
sys_context: global system context
f: the file to print the content to
Displays the list of ’input’ options.
Return value: none
sys_context: global system context
f: the file to print the content to
Displays the list of ’graphics’ options.
Return value: none
sys_context: global system context
f: the file to print the content to
Displays the list of ’sound’ options.
Return value: none
sys_context: global system context
f: the file to print the content to
Displays the list of ’network’ options.
Return value: none
sys_context: global system context
f: the file to print the content to
Displays the list of ’map’ options.
Return value: none
sys_context: global system context
f: the file to print the content to
Displays the list of ’map rules’ options.
Return value: none
sys_context: global system context
f: the file to print the content to
Displays the list of ’map hints’ options.
Return value: none
sys_context: global system context
f: the file to print the content to
Displays the list of ’map style’ options.
Return value: none
sys_context: global system context
f: the file to print the content to
Displays the list of ’map teams’ options.
Return value: none
sys_context: global system context
f: the file to print the content to
Displays the list of ’funcs’.
Return value: none
sys_context: global system context
f: the file to print the content to
Displays the list of ’hooks’.
Return value: none
sys_context: global system context
f: the file to print the content to
Displays the list of ’advanced’ options.
Return value: none
sys_context: global system context
f: the file to print the content to
Displays the list of options aliases.
Return value: none
sys_context: global system context
f: the file to print the content to
Displays the list of team colors.
Return value: none
sys_context: global system context
f: the file to print the content to
Displays the list of weapons.
Return value: none
sys_context: global system context
f: the file to print the content to
Displays the list of all known options.
Return value: none
sys_context: global system context
argc: number of args as passed to main
argv: array of args as passed to main
Displays ’hello’ at the beginning of the program.
Return value: none
sys_context: global system context
Displays ’goodbye’, typically use at end of program to know it’s over and everything went fine.
Return value: none
sys_context: global system context
Initializes the help reference, this must be called before any call to lw6hlp_about or such help related functions.
Return value: 1 on success, 0 if failed
sys_context: global system context
un-initializes the help reference, this must be called at the end of the program.
Return value: 1 on success, 0 if failed
sys_context: global system context
mode: test mode (bitmask)
Registers all tests for the libhlp module.
Return value: 1 if test is successfull, 0 on error.
sys_context: global system context
mode: test mode (bitmask)
Runs the hlp module test suite, testing most (if not all...)
functions.
Return value: 1 if test is successfull, 0 on error.
View lcov test coverage results on http://www.ufoot.org/liquidwar/v6/doc/coverage/src/lib/img/index.html.
sys_context: global system context
jpeg: the jpeg to describe
Returns a string describing the jepg. This is a very short description, use it for logs, and to debug stuff. By no means it’s a complete exhaustive description. Still, the string returned should be unique.
Return value: a dynamically allocated string.
sys_context: global system context
game_state: game_state to create a screenshot from
user_dir: user directory
quality: quality, from 0 to 100
Creates a JPEG screenshot from a game state. The user_dir parameter
is used to build a file name and then use it
to write data on disk, it is then read and kept in memory.
Globally it’s not that bad to store it for we do not generate
screenshots that often, and it’s nice for debugging to have it so
developping a RAM-only writer wouldn’t make it a blast anyway.
Return value: dynamically allocated object.
sys_context: global system context
Frees a JPEG screenshot.
Return value: none.
sys_context: global system context
mode: test mode (bitmask)
Registers all tests for the libimg module.
Return value: 1 if test is successfull, 0 on error.
sys_context: global system context
mode: test mode (bitmask)
Runs the img module test suite, testing most (if not all...)
functions.
Return value: 1 if test is successfull, 0 on error.
Contains informations about a (loaded) JPEG file.
Type: u_int32_t
Definition: u_int32_t lw6img_jpeg_s::id
The id of the object, this is non-zero and unique within one run session, incremented at each object creation.
Type: lw6sys_whd_t
Definition: lw6sys_whd_t lw6img_jpeg_s::shape
JPEG file shape, only w and h are relevant.
Type: int
Definition: int lw6img_jpeg_s::jpeg_size
JPEG size (file size, same as data buffer size).
Type: void *
Definition: void* lw6img_jpeg_s::jpeg_data
JPEG raw data.
View lcov test coverage results on http://www.ufoot.org/liquidwar/v6/doc/coverage/src/lib/ker/index.html.
sys_context: global system context
game_state: game state to represent
Gives a string representation, an ASCII capture of the game. This representation is suitable for debugging, typically print it to a VT100 console.
Return value: dynamically allocated string.
sys_context: global system context
game_state: the game_state to track
checksum_log_interval: dump interval, if 0, feature is disabled
Debugging function used to set automatically an interval at which engine will log a checksum automatically. This is typically to track down where and when there starts to be a difference between two game_states that have evolved separately.
Return value: none
sys_context: global system context
cursor: the cursor to reset
Sets a cursor to defaults (disabled). This function will not touch the node_id and cursor_id fields, so you can call it on an already used cursor, it will stay usable.
Return value: none
sys_context: global system context
game_struct: game_struct use to construct the object
progress: progress indicator
Creates a game state from a game struct. The game struct must be kept (never freed) while game_state is in use.
Return value: newly created object.
sys_context: global system context
game_state: the object to free
Frees a game_state object, releases all required objects. At this stage the map_struct must still be available.
Return value: none
sys_context: global system context
game_state: the game_state to modify
game_struct: the game_struct to point to
This can be used when one makes a copy (dup) of a game struct and for some reason want the game_state to point on this new copy. Of course you should make the game_state point to a game_struct that is identical to the one that was used to construct the object in the first place. Use at your own risk.
Return value: none
sys_context: global system context
game_state: the game_state to query
Returns the approximative amount of memory taken by the object.
Return value: number of bytes (approximation)
sys_context: global system context
game_state: the game_state to query
Gives a readable representation of the object.
Return value: newly allocated string, must be freed
sys_context: global system context
dst: the destination game_state
src: the source game_state
Tells wether src and dst can be synced. This is not a fool proof function
but in most cases it will raise the error, use it to avoid blunders. It
just compares dst and src and tries to guess if they correspond to the
same logical objects.
Return value: 1 if they are syncable, 0 if not.
sys_context: global system context
dst: the destination game_state
src: the source game_state
Fundamental function, used to carbon copy a game state to another, this is intensively used to keep too tracks of the game state, one most-up-to-date but probably wrong, the one we use to display on the screen, and one slightly outdated (or very outdated if network is slow) but that we’re sure of, something 100% bullet proof we can rely on.
Return value: 1 on success, 0 on error
sys_context: global system context
game_state: the game_state to copy
progress: progress indicator
Dups (copy) a game_state object. The newly created object points to the same game_struct but is an independant copy, you can play a whole different game on it. In practice this is often used to create the game_state objects for anticipation in network games.
Return value: newly created object
sys_context: global system context
game_state: the game_state to query
Calculates the checksum of a game_state, this can be very usefull to make sure two states are identicall (prevent network errors and/or cheating).
Return value: 32-bit checksum
sys_context: global system context
game_state: the game_state to query
shape: the shape (out param)
Retrieves the shape (w*h*d)of the game_state.
Return value: none.
sys_context: global system context
game_state: the game_state to query
Retrieves the width (shape.w) of the game_state.
Return value: the width.
sys_context: global system context
game_state: the game_state to query
Retrieves the height (shape.h) of the game_state.
Return value: the height.
sys_context: global system context
game_state: the game_state to query
Retrieves the depth (shape.d, AKA number of layers) of the game_state.
Return value: the depth.
sys_context: global system context
game_state: the game_state to act on
node_id: the id of the node to register
Registers a node in the game, this must be done, else no action will be allowed (such as adding a cursor or moving it). There’s a limited number of nodes allowed, and ids must be unique.
Return value: 1 on success, 0 on failure.
sys_context: global system context
game_state: the game_state to act on
node_id: the id of the node to register
Unregisters a node in the game, this must be done when a node leaves the game, it will free ressources and allow others to connect.
Return value: 1 on success, 0 on failure.
sys_context: global system context
game_state: the game_state to query
node_id: the node to test
Tells wether a node is present in a game.
Return value: 1 if node is in game, 0 if not
sys_context: global system context
game_state: game_state to query
node_id: the node to get info about
last_command_round: the last round for which a command was issued (out parameter)
Queries information about a given node, mostly, what was the last round we got a command.
Return value: 1 on success, 0 on error.
sys_context: global system context
game_state: the game_state to act upon
node_id: the node issuing the command
cursor_id: the id of the cursor to add
team_color: the color we wish
Adds a cursor in a game. Note that if there’s already a cursor with that id, it will fail, and the color is only the color we wish, we might indeed be attributed another color on a successfull call.
Return value: 1 on success, 0 on error.
sys_context: global system context
game_state: the game_state to act upon
node_id: the node issuing the command
cursor_id: the id of the cursor to remove
Removes a cursor from the game, corresponding teams will be removed if needed.
Return value: 1 on success, 0 on failure.
sys_context: global system context
game_state: the game_state to query
cursor_id: the cursor to test
Tells wether a cursor is present in the game.
Return value: 1 if cursor exists, 0 if not.
sys_context: global system context
game_state: the game_state to query
cursor: the cursor data (out param)
cursor_id: the cursor to query
Get a pointer on a given cursor, pointer is read-only.
Return value: 1 on success, 0 on failure.
sys_context: global system context
game_state: the game state to query
cursor: the cursor (out param)
i: the index
Gets the cursor information, using its index. This is usefull to walk the whole cursor without knowing their ids. Pointer is read-only.
Return value: none.
sys_context: global system context
game_state: the game_state to act upon
cursor: the cursor
Sets a cursor, that is, changes its position, this is pretty much
anything we can do about a cursor except adding or removing it, just
because of Liquid War very simple rules. The passed pointer may be
freed after the call, only the cursor_id, node_id, x, y and fire fields
are used, others are ignored. More precisely, the enabled will be ignored,
it’s not a valid way to add/remove teams.
Return value: 1 on success, 0 on failure
sys_context: global system context
game_state: the game_state to query
team_color: the team color to test
Tells wether a team color is present in the game. Note that this is different from cursor ids.
Return value: 1 if team exists, 0 if not.
sys_context: global system context
game_state: the game_state to query
team_color: the color to get informations about
nb_cursors: number of cursors with this color (out param)
nb_fighters: number of fighters with this color (out param)
Gets informations about a given color. Indeed, a color can have several cursors, and knowing how many fighters there are with a given color is probably the most important things about a color.
Return value: 1 on success, 0 on failure.
sys_context: global system context
game_state: the game_state to query
Tells how many teams there are in a game. This is different from the cursors number, there can be more cursors than teams, because a team can have several cursors.
Return value: the number of teams.
sys_context: global system context
game_state: the game_state to act upon
team_mask: a binary mask of which gradients (teams) must be spreaded
Spreads the gradient, that is, calculates the potential of each point on the map, ie the distance to the closest cursor. The binary mask allows gradient to be spread for only some teams, this is usefull in a multithreaded context, as gradients can be calculated separately.
Return value: none
sys_context: global system context
game_state: the game_state to act upon
team_mask: a binary mask of which teams must be moved
Moves the fighters, note that you must calculate the gradient from
time to time else they go to the wrong places. The team_mask allows
the moving of only some given teams, but moving (for instance) even
teams then odd teams isn’t the same as moving odd teams then even teams.
Whereas as far as gradient calculation is concerned, this could have been
true, you could have multithreaded that.
Return value: none.
sys_context: global system context
game_state: the game_state to act upon
Finishes a round, that is, vaccums various stuff, checks if some team has lost, and so on. This is complementary to the spread and move steps, it should be called at each round.
Return value: none.
sys_context: global system context
game_state: the game_state to act upon
This is a fundamental function, it’s called at each round, it fires all the complex calculations in the game, the real core algorithm. Every time this function is called, the round is "over" and the game state is ready for the next... round. It’s equivalent to calling the spread, move and finish functions.
Return value: none.
sys_context: global system context
game_state: the game_state to query
Returns the number of moves done on this game.
Return value: number of moves.
sys_context: global system context
game_state: the game_state to query
Returns the number of spreads done on this game.
Return value: number of spreads.
sys_context: global system context
game_state: the game_state to query
Returns the number of rounds done on this game.
Return value: number of rounds.
sys_context: global system context
game_state: the game_state to query
Returns the number of playable rounds in the game, that is the number of rounds to be played if game goes up to the time limit. This is a fixed number, if game slows down then time is stretched, but the the exact maximum number of rounds is known at game start, and it is the number returned by this function.
Return value: number of rounds in the game
sys_context: global system context
game_state: the game_state to query
Tells wether the game is over or not. The answer depends on time limit, game rules, and of course what happened on the battlefield.
Return value: 1 if over, 0 if not.
sys_context: global system context
game_state: game_state to query
cursor_id: the cursor to test
Tells wether a cursor was the winner after a game is over.
Return value: 1 if cursor is in winning team, 0 if not.
sys_context: global system context
game_state: the game_state to query
excluded_team: a team to exclude
Returns the winner, if you set excluded_team to something else than a valid team number (for instance -1, but 0 is a valid team) then this team will be excluded from search. This is usefull if you want to find out who’s the best positionned player while excluding yourself, for instance if you’re a bot.
Return value: the winner team number, note that it can be invalid (-1) if there’s no winner (for example, there are no teams on the map).
sys_context: global system context
game_state: the game_state to query
excluded_team: a team to exclude
Returns the looser, if you set excluded_team to something else than a valid team number (for instance -1, but 0 is a valid team) then this team will be excluded from search. This is usefull if you want to find out who’s the worst positionned player while excluding yourself, for instance if you’re a bot.
Return value: the looser team number, note that it can be invalid (-1) if there’s no looser (for example, there are no teams on the map).
sys_context: global system context
game_state: the game_state to query
Gets the number of active fighters, this is relatively constant within the game, it does not change when someone looses, but it can vary when a new team arrives or disappears.
Return value: number of fighters.
sys_context: global system context
game_state: the game_state to query
Returns the time elapsed, this is not the real time you’d time with an atomic clock, rather the time that would have elapsed if game had been run at its nominal speed. There can be a difference if your computer is too slow, among other things.
Return value: time elapsed, in seconds.
sys_context: global system context
game_state: the game_state to query
Returns the time left, this is not the real time you’d time with an atomic clock, rather the time that would theorically be left is game was to be run at its nominal speed. There can be a difference if your computer is too slow, among other things. You shouldn’t rely on this to know wether a game is over or not, there’s another dedicated function for that.
Return value: time left, in seconds.
sys_context: global system context
game_state: the game_state to query
i: the index of the history point
team_id: the team to query
Returns the number of fighters at some point in the past (the lower i, the oldest). The history scrolls automatically and erases itself at some point, it’s of constant length. This is the global, long term history, reflects the whole game and could be used for an end-game score screen.
Return value: number of fighters at that time.
sys_context: global system context
game_state: the game_state to query
i: the index of the history point
team_id: the team to query
Returns the number of fighters at some point in the past (the lower i, the oldest). The history scrolls automatically and erases itself at some point, it’s of constant length. This is the latest, short term history, reflects the recent game evolutions and could be used to display an in-game monitor.
Return value: number of fighters at that time.
sys_context: global system context
game_state: game_state to query
Returns the maximum value, that is, the maximum number of fighters, all teams combined, for this history. This can be used to scale charts. This function for the global long term history.
Return value: max number of fighters.
sys_context: global system context
game_state: game_state to query
Returns the maximum value, that is, the maximum number of fighters, all teams combined, for this history. This can be used to scale charts. This function for the latest short term history.
Return value: max number of fighters.
sys_context: global system context
game_state: game_state to query
x: x position
y: y position
z: z position
Gets the id of a fighter in a given position. Previous versions of the game used to have this declared inline static for speed, but the price to pay in terms of maintainability was too high: too much stuff from the ker module had to be kept public. This functions is very likely to be called often when one wants to know what’s happening on the battlefield, to draw it, for instance. If there’s no fighter, the id is negative, any id equal or greater than 0 (returned by this function) is valid.
Return value: the id of the fighter at that position.
sys_context: global system context
game_state: game_state to query
fighter_id: the id of the fighter
Gets a fighter by its id. Internally, all fighters are stored in an array so it could be "safe" to get fighter with id 0 then walk the array. Previous versions of the game used to have this public (the array), it has been hidden since. Pointer is read/write. Pointer is read/write.
Return value: pointer to the fighter with the given id.
sys_context: global system context
game_state: game_state to query
x: x position
y: y position
z: z position
Gets a fighter by its position. This function will check for boundaries, if there’s no fighter in this place, it will return NULL, but nothing worse can happen. More precisely, if the place is in a wall, it won’t bug, unlike the non-bullet-proof equivalent of this function. Pointer is read/write.
Return value: pointer to the fighter at this position, or NULL if none.
sys_context: global system context
game_state: game_state to query
x: x position
y: y position
z: z position
Gets a fighter by its position. This function will not check for boundaries, if there’s no fighter in this place, not only will it probably not return a valid value, but it will also even segfault before that, trying to access non-existing structures in menory. So only call this if you’re sure there’s a fighter here. Pointer is read/write.
Return value: pointer to the fighter at this position, or NULL if none.
sys_context: global system context
game_state: game_state to query
fighter_id: the id of the fighter
Gets a fighter by its id. Internally, all fighters are stored in an array so it could be "safe" to get fighter with id 0 then walk the array. Previous versions of the game used to have this public (the array), it has been hidden since. Pointer is read-only. Pointer is read-only.
Return value: pointer to the fighter with the given id.
sys_context: global system context
game_state: game_state to query
x: x position
y: y position
z: z position
Gets a fighter by its position. This function will check for boundaries, if there’s no fighter in this place, it will return NULL, but nothing worse can happen. More precisely, if the place is in a wall, it won’t bug, unlike the non-bullet-proof equivalent of this function. Pointer is read-only.
Return value: pointer to the fighter at this position, or NULL if none.
sys_context: global system context
game_state: game_state to query
x: x position
y: y position
z: z position
Gets a fighter by its position. This function will not check for boundaries, if there’s no fighter in this place, not only will it probably not return a valid value, but it will also even segfault before that, trying to access non-existing structures in menory. So only call this if you’re sure there’s a fighter here. Pointer is read-only.
Return value: pointer to the fighter at this position, or NULL if none.
sys_context: global system context
game_state: the game_state to query
team_id: the team id (color)
Gets the potential of a zone. In practice this is not needed to make the game function, you need not call this to know how to move fighters, however the information can be interesting for debugging.
Return value: the potential
sys_context: global system context
game_state: game_state to query
team_color: the team color to query
Returns the charge ratio for a given team/color. A value of 100 means fire is enabled, more than 1000 means super-charge, under 100 means you have to wait.
Return value: integer value.
sys_context: global system context
game_state: game_state to query
team_color: the team color to query
Returns how much of the weapon is yet to be consumed for a given team. More than 1000 means extra time, 1000 is standard time to be elapsed, 0 means it’s over.
Return value: integer value.
sys_context: global system context
game_state: game_state to query
team_color: the team color corresponding to last weapon (out param)
weapon_id: the corresponding weapon_id (out param)
per1000_left: how much of the weapon is yet to be spent (out param)
Returns informations about the latest weapon, this is typically for drawing purposes, just query this and you know if you need to paint everything in red, green, whatever, as far as the default backend is concerned. In case there’s no weapon, well, parameters are untouched. Pointers can be passed as NULL.
Return value: 1 if found, 0 if not.
sys_context: global system context
game_state: game state to query
Gives the max number of colors (AKA teams) that are present in the game. This is just a simple utility/wrapper function which is meant to be exported to Guile scripts.
Return value: number of colors
sys_context: global system context
game_state: game state to query
Gives the max number of cursors that are present in the game. This is just a simple utility/wrapper function which is meant to be exported to Guile scripts.
Return value: number of cursors
sys_context: global system context
game_state: game state to query
Gives the max number of nodes that are present in the game. This is just a simple utility/wrapper function which is meant to be exported to Guile scripts.
Return value: number of nodes
sys_context: global system context
level: the level on which the game_struct is based
progress: progress indicator
Creates a new game_struct from a level. The game_struct is different from the level in the sense that the game_struct does contain algorithmic specific optimizations, it’s a ready-to-use struct desgined for execution speed, while the plain level just stores information.
Return value: newly allocated object
sys_context: global system context
game_struct: the game_struct to free
Frees a game_struct object, releasing all required stuff. The source level must still be available when freeing this.
Return value: none
sys_context: global system context
game_struct: the game_struct to modify
level: the level to point to
This can be used when one makes a copy (dup) of a level and for some reason want the game_struct to point on this new copy. Of course you should make the game_struct point to a level that is identical to the one that was used to construct the object in the first place. Use at your own risk.
Return value: none
sys_context: global system context
game_struct: the game_struct to query
Returns the approximative amount of memory taken by the object.
Return value: number of bytes (approximation)
sys_context: global system context
game_struct: the game_struct to query
Gives a readable representation of the object.
Return value: newly allocated string, must be freed
sys_context: global system context
game_struct: the game_struct to copy
progress: progress indicator
Dups (copy) a game_struct object. The newly created object points to the same game_struct but is an independant copy, you can play a whole different game on it. In practice this is often used to create the game_struct objects for anticipation in network games.
Return value: newly created object
sys_context: global system context
game_struct: the game_struct to query
Calculates the checksum of a game_struct, this can be very usefull to make sure two structs are identicall (prevent network errors and/or cheating).
Return value: 32-bit checksum
sys_context: global system context
game_struct: the game_struct to query
shape: the shape (out param)
Retrieves the shape (w*h*d)of the game_struct.
Return value: none.
sys_context: global system context
game_struct: the game_struct to query
Retrieves the width (shape.w) of the game_struct.
Return value: the width.
sys_context: global system context
game_struct: the game_struct to query
Retrieves the height (shape.h) of the game_struct.
Return value: the height.
sys_context: global system context
game_struct: the game_struct to query
Retrieves the depth (shape.d, AKA number of layers) of the game_struct.
Return value: the depth.
sys_context: global system context
game_struct: the game_struct to query
x: x position
y: y position
z: z position
Tests wether a given position is foreground, that is, occupied by a wall.
Return value: 1 if foreground (wall, fighters can’t move), 0 if not
sys_context: global system context
game_struct: the game_struct to query
x: x position
y: y position
z: z position
Tests wether a given position is background, that is, there’s no wall.
Return value: 1 if background (wall, fighters can move), 0 if not
sys_context: global system context
game_struct: game_struct to query
nb_zones: the maximum zone size (out param, can be NULL)
max_zone_size: the maximum zone size (out param, can be NULL)
This function gets information about the internal zoning system, can be used for debugging.
Return value: none.
sys_context: global system context
game_struct: game_struct to query
i: index of the zone to query
zone_pos: coord of the zone, top-left corner (out param, can be NULL)
zone_size: size of the zone (out param, can be NULL)
This function gets information about the internal zoning system, can be used for debugging.
Return value: none
sys_context: global system context
game_struct: the game_struct to query
x: x pos
y: y pos
z: z pos
Gets the zone id for a given position. The id returned can then be used to query for a potential, for instance.
Return value: the zone id
sys_context: global system context
game_struct: the game_struct to query
there: the closest free slot (out param)
here: where we’d like to be
Tries to find the closest free slot (there) near a given position (here). This is typically used internally to find out where to apply the cursor when it’s flying over walls.
Return value: none
sys_context: global system context
game_struct: the game struct to convert
Converts a map to something that is later readable by lw6ker_game_struct_from_hexa
to reproduce the exact same map. Just a serializer.
Return value: a newly allocated pointer, NULL if conversion failed.
sys_context: global system context
hexa: an hexadecimal ASCII string, created by lw6ker_game_struct_to_hexa
level: the level this game_struct is bounded to
Constructs a game struct from an hexadecimal string generated
by lw6ker_game_struct_to_hexa. Just an un-serializer.
Return value: a new map, might be NULL if string isn’t correct.
sys_context: global system context
game_state: the game state to convert
Converts a map to something that is later readable by lw6ker_game_state_from_hexa
to reproduce the exact same map. Just a serializer.
Return value: a newly allocated pointer, NULL if conversion failed.
sys_context: global system context
hexa: an hexadecimal ASCII string, created by lw6ker_game_state_to_hexa
game_struct: the game_struct this game_state is bounded to
Constructs a game state from an hexadecimal string generated
by lw6ker_game_state_to_hexa. Just an un-serializer.
Return value: a new map, might be NULL if string isn’t correct.
game_state: the game_state to work on
next_pos: the next position (out param)
current_pos: the current position
team_color: the team color
Tries to find the best move given a position and a team. Note that this function does not check for the presence of another fighter, it will only check walls and can even (sometimes) fail when there’s a path. The reason is that it uses the game_state at a given round and does not recalculate gradient while a real fighter has an ever-changing gradient. Whatsoever, this can be used to move cursors like they were fighters, it’s not perfect but gives a good illusion.
Return value: 1 if best place found, 0 if not.
sys_context: global system context
score_array: the score array to modify
game_state: the game_state to get the information from
Updates a score array, that is, calculates all scores, so that they can be displayed, for instance.
Return value: 1 on success, 0 on failure.
sys_context: global system context
even: even team mask (out param)
odd: odd team mask (out param)
round: round concerned
Returns a default team mask for a given round, even and odd will contain ready to use masks (for spread and move functions for instance).
Return value: none.
sys_context: global system context
even: even team mask (out param)
odd: odd team mask (out param)
game_state: the game_state concerned
Returns an optimal team mask for a given round, even and odd will contain ready to use masks (for spread and move functions for instance). The difference with the default team mask is that this one will test for which teams are present and try and manage to find an equilibrated set of odd/even teams.
Return value: none.
sys_context: global system context
team_color: color index
team_mask: team mask
Tells wether a given team is concerned by a team mask.
Return value: 1 if concerned, 0 if not.
team_color: color index
Gives the mask corresponding to a given color.
Return value: bitwise mask.
sys_context: global system context
mode: test mode (bitmask)
Registers all tests for the libker module. Thoses tests Will perform deep checksums and *really* check many things. If this passes, the algorithm is fine. What could make it fail is a serious bug and/or some weird combination of endianess, byte alignment... *
Return value: 1 if test is successfull, 0 on error.
sys_context: global system context
mode: test mode (bitmask)
Runs the ker module test suite, testing most (if not all...)
functions.
Return value: 1 if test is successfull, 0 on error.
Contains a cursor controls state, basically a cursor is a position plus a fire and fire2 booleans.
Type: lw6sys_xyz_t
Definition: lw6sys_xyz_t lw6ker_cursor_control_s::pos
Cursor position, z isn’t relevant for now.
Type: int
Definition: int lw6ker_cursor_control_s::fire
Fire, 1 if primary weapon must be used.
Type: int
Definition: int lw6ker_cursor_control_s::fire2
Fire2, 1 if secondary weapon must be used.
Data about a given cursor.
Type: u_int64_t
Definition: u_int64_t lw6ker_cursor_s::node_id
The id of the node this cursor belongs to.
Type: u_int16_t
Definition: u_int16_t lw6ker_cursor_s::cursor_id
The id of this cursor.
Type: char
Definition: char lw6ker_cursor_s::letter
ASCII code of the letter associated to the cursor.
Type: int
Definition: int lw6ker_cursor_s::enabled
Wether the cursor is enabled/active or not.
Type: int
Definition: int lw6ker_cursor_s::team_color
Team associated with this cursor.
Type: lw6sys_xyz_t
Definition: lw6sys_xyz_t lw6ker_cursor_s::pos
Cursor position, z isn’t relevant for now.
Type: int
Definition: int lw6ker_cursor_s::fire
Primary fire button state.
Type: int
Definition: int lw6ker_cursor_s::fire2
Alternate fire button state.
Type: lw6sys_xyz_t
Definition: lw6sys_xyz_t lw6ker_cursor_s::apply_pos
Position to apply cursor on. Problem follows: cursor might be hanging on a wall, somewhere fighters can’t go. In that case an alternate position is find, usually the closest free space. But this can take time to calculate so we cache this value here, as it is convenient to have it at hand.
Type: int32_t
Definition: int32_t lw6ker_cursor_s::pot_offset
Potential offset. Whenever the cursor is applied to some place, one can add a potential to it, this can be used to make some cursor more attractive than others.
Contains the parameters of a fighter, one of those little squares that are that at the very heart of Liquid War.
Type: u_int32_t
Definition: u_int32_t lw6ker_fighter_s::team_color
Team color from 0 to 9, -1 if invalid.
Type: int32_t
Definition: int32_t lw6ker_fighter_s::last_direction
Last direction this fighter used, this is important for in some cases we want to know where the fighter was heading before, our current choice might rely on previous state.
Type: int32_t
Definition: int32_t lw6ker_fighter_s::health
Fighter health from 0 to 10000.
Type: int32_t
Definition: int32_t lw6ker_fighter_s::act_counter
This counter is used to handle speed up/slow down. At each round it’s incremented, whenever it reaches 100 then the fighter really acts. Basically, there’s a Bresenham algorithm behind all that.
Type: int32_t
Definition: int32_t lw6ker_fighter_s::pad
Free for later use.
Type: lw6sys_xyz_t
Definition: lw6sys_xyz_t lw6ker_fighter_s::pos
Fighter position.
Game structure containing all changeable data state, this will hold the fighter positions, their health, the cursors position, the gradient, anything that is dynamic. Note that this structure is a wrapper over the internal structure which contains the real members, the first two members need be the same as it is casted internally.
Type: u_int32_t
Definition: u_int32_t lw6ker_game_state_s::id
The id of the object, this is non-zero and unique within one run session, incremented at each object creation.
Type: lw6ker_game_struct_t *
Definition: lw6ker_game_struct_t* lw6ker_game_state_s::game_struct
Pointer on the game non-mutable structure, which holds the data that is never changed within a game.
Game struct is very similar to the level struct of the lw6map module. Indeed, it’s immutable and won’t change during the game. The difference with lw6map_level is that game_struct is algorithm aware and has many tricks, special internals, cached data, so that it speeds up the overall algorithm. In fact it contains everything lw6ker_game_state needs to have but need not change during the game. The 3 first members, id, level, rules are the same as the internal _lw6ker_game_struct_t structure. The rest of it is hidden. The program will cast from lw6ker_game_struct_t to _lw6ker_game_struct_t internally.
Type: u_int32_t
Definition: u_int32_t lw6ker_game_struct_s::id
The id of the object, this is non-zero and unique within one run session, incremented at each object creation.
Type: lw6map_level_t *
Definition: lw6map_level_t* lw6ker_game_struct_s::level
Pointer on the level source structure. This one might still retain informations we don’t want to duplicate here, for instance the textures, which are of no use for the core algorithm so are pointless to backup here, but are still of interest for high-level functions such as display stuff.
Type: lw6map_rules_t
Definition: lw6map_rules_t lw6ker_game_struct_s::rules
Game rules, this is just a cached copy to avoid derefencing the level pointer any time we need to query a parameter.
This is an array which contains all scores for all teams, it’s calculated from game_state and should be used read only by code which is not within lw6ker.
Type: int
Definition: int lw6ker_score_array_s::active_fighters
Number of fighters on the battlefield.
Type: int
Definition: int lw6ker_score_array_s::nb_scores
Number of score items. This can be greater than the number of active teams, since it retains informations about teams which have disappeared.
Type: lw6ker_score_t
Definition: lw6ker_score_t lw6ker_score_array_s::scores[LW6MAP_NB_TEAM_COLORS]
Scores for each team, they are sorted, the first one with index 0 is the current winner, then all other teams follow, the last one being Mr Looser.
Stores the score information about a team, this structure is used to get informations from the game, and display them.
Type: int
Definition: int lw6ker_score_s::has_been_active
Wether this team (this color) has been active at some point during the game. This is important for at score time, many teams might have been disabled, this is typical of dead teams in the LW5 last player wins scheme. It can also happen in network games after a team leaves. Note that this way of counting active teams does not allow fine grain knowledge of who played, for the yellow team might have been played by different nodes through a single game session.
Type: int
Definition: int lw6ker_score_s::team_color
The color of the team this score is about.
Type: int
Definition: int lw6ker_score_s::fighters_percent
Percentage of fighters for this team. The global score array object will take care of making the sum of fighters_percent be exactly 100, regardless of exactitude, it will round this number to make a nice total and hide rounding errors.
Type: int
Definition: int lw6ker_score_s::fighters_absolute
Absolute number of fighters for this team.
Type: float
Definition: float lw6ker_score_s::fighters_ratio
One of the rare float in lw6ker, only for eye candy, this is the equivalent of fighters_percent but as a float between 0.0f and 1.0f. It gives the possibility of more precise graphical displays, will its integer companion value is usefull for writing down scores.
Type: int
Definition: int lw6ker_score_s::frags
Number of frags. Note that depending on game rules, this can have very different meanings.
Type: int
Definition: int lw6ker_score_s::consolidated_percent
OK, this is probably the most non-intuitive number but still the most usefull. It will show a percentage that is greater as we estimate the team in a stronger position. For instance, it can be higher if the team has very few fighters on the field but has a great number of frags. The one who has the greatest number here is the winner.
View lcov test coverage results on http://www.ufoot.org/liquidwar/v6/doc/coverage/src/lib/ldr/index.html.
sys_context: global system context
body: the body to read, must point to allocated memory
dirname: the directory of the map
param: map parameters
hints: map hints
display_w: the display width
display_h: the display height
ratio: wished map ratio
bench_value: the bench value (depends on computer capacity)
magic_number: arbitrary constant
progress: structure to transmit loading progress
Reads the map body, that is, all the layers.
Return value: 1 if OK, 0 if failed.
style: the style structure to process.
hints: additionnal hints to know what to set automatically
Deduces all colors from background color, if needed. The function will check color_auto parameters and replace all other colors by base and alternate colors if needed. Note that the background color itself is not changed by this function. Background can only be guessed from texture.
Return value: none.
sys_context: global system context
cursor_texture: the cursor texture (out param)
dirname: the directory we load the data form (map dir)
Reads the cursor texture information, if not available, will use defaults
Return value: 1 on success, 0 on failure.
sys_context: global system context
entry: the entry to free
Frees a map entry.
Return value: none.
sys_context: global system context
entry: the entry to dup
Dup a map entry.
Return value: newly allocated object.
sys_context: global system context
map_path: the map_path environment config variable, delimited path list
relative_path: the relative path to use to find the map directory
user_dir: the user directory
Lists all maps in a given directory. Returns a list of lw6ldr_entry_t which can contain both directories with subdirs and actual maps. Maps are sorted before being returned, first directories, then maps, sorted in alphabetical order.
Return value: a list of dynamically allocated lw6ldr_entry_t.
sys_context: global system context
map_path: the map_path environment config variable, delimited path list
relative_path: the relative path to use to find the map directory
user_dir: the user directory
recursive: if non-zero, map search will recurse in subdirs
callback_func: the function which will be called on each entry
func_data: an extra pointer to pass data to callback_func
Executes a given function on all maps in a given place, typically used in test programs.
Return value: none.
sys_context: global system context
map_path: the map_path environment config variable, delimited path list
relative_path: the relative path to use to find the map directory
user_dir: the user directory
Gets the next entry used in test programs.
Return value: none.
sys_context: global system context
level: the level to validate
user_dir: user directory
Validates a level, acknowledges you’ve won it. Upgrades exp.
Return value: 1 on success, 0 on failure.
sys_context: global system context
layer: the layer on which to apply the grease
rules: map rules
hints: map hints
progress: structure to transmit loading progress
Reads the map body, that is, all the layers.
Return value: 1 if OK, 0 if failed.
sys_context: global system context
hints: data to initialize
Set the hints struct to its defaults.
Return value: none.
sys_context: global system context
hints: data to initialize
Zeros the hints struct, this is not the same as setting to defaults.
Return value: none.
sys_context: global system context
hints: data to initialize
Clears the hints struct, this is not the same as setting to defaults.
Return value: none.
sys_context: global system context
dirname: the directory of the map
Read the hints (hints.xml) of a map. Pointer to hints must be valid, and values already initialized, either zeroed or filled in with defaults or custom values.
Return value: 1 if success, 0 if failed.
sys_context: global system context
hints: the hints to modify
key: the key to modify
value: the value to affect to the key, as a string
Sets one single parameter in a hints structure. Value must always be passed as a string, will be converted to the right type automatically when storing it in the structure.
Return value: 1 if success, 0 if failed. Note that while 0 really means there’s a problem, some affectations can fail and return 1, needs to be worked on.
sys_context: global system context
hints: the hints to modify
key: the key to modify
Gets one single parameter in a hints structure. Value is converted as a string.
Return value: dynamically allocated string, NULL on error.
sys_context: global system context
key: the key we want informations about.
Gets the default value for a given hints key.
Return value: dynamically allocated string, NULL on error.
sys_context: global system context
hints: the hints struct to fill with values (read/write parameter)
values: an assoc containing strings with the new values
Overrides hints with values. Pointer to hints must be valid, and values already initialized, either zeroed or filled in with defaults or custom values. Not all parameters need be defined in values. It can even be NULL. The idea is just that if something is defined in values, it will override the existing hints.
Return value: 1 if success, 0 if failed.
sys_context: global system context
layer: layer to update (out param)
filename: name of PNG file
param: parameters of the map
hints: hints of the map
display_w: width of display
display_h: height of display
target_ratio: width/height ratio we want
bench_value: bench for this computer
magic_number: arbitrary constant
expected_depth: depth of map according to files available
progress: progress object to provide feedback (in/out)
Reads the first layer, that is map.png. This function has many parameters since it will try and guess the final (real) resolution of the map.
Return value: 1 on success, 0 on failure.
sys_context: global system context
layer: layer to update (out param)
filename: name of PNG file
target_w: width we want
target_h: height we want
Reads a layer, knowing the exact size we want. This is typically to load layer2-7.png once map.png has been loaded.
Return value: 1 on success, 0 on failure.
sys_context: global system context
metadata: structure containting read data (out param)
dirname: map dirname (absolute path)
Reads the metadata, will first parse metadata.xml, and if not available read README and guess a title from map path. When function returns, all fields in structure are non-NULL.
Return value: 1 on success, 0 on failure.
sys_context: global system context
meta_layer: the meta layer to read
filename: the file to open
target_w: the wanted width
target_h: the wanted height
analog: wether to use analog info (0-255) or boolean (0-1)
Reads a meta-layer from the disj, resampling is done according to the given parameters.
Return value: 1 on success, 0 on failure
sys_context: global system context
meta_layer: the meta layer to read
dirname: the map directory
file_only: the meta-layer file name only (without the path)
target_w: the wanted width
target_h: the wanted height
analog: wether to use analog info (0-255) or boolean (0-1)
Reads a meta-layer from the disj, resampling is done according
to the given parameters. This function is different
from lw6ldr_meta_layer_read for it will 1) concatenate dirname
and file_only and 2) return OK (1) if file does not exist.
Return value: 1 on success, 0 on failure
sys_context: global system context
argc: the number of command-line args, as passed to main
argv: an array of strings containing command-line args, as passed to main
run_game: a pointer to a boolean which will contain true (1) if the game must be launched, or false (0) if the option is such that game must be skipped. Example: –copyright, –help, ...
Will interpret the command-line arguments, and trap those who are related to xml files, this is usefull when building the game, we want to have an extra binary to do this without being linked to SDL, for instance.
Return value: non-zero if success, 0 if error. The error can be, for instance, the test suite returning "no, tests were not OK".
sys_context: global system context
param: the parameter struct to fill with values (read/write parameter)
dirname: the directory of the map
Read the parameters associated to a map. Pointer to param must be valid, and values already initialized, either zeroed or filled in with defaults or custom values.
Return value: 1 if success, 0 if failed.
sys_context: global system context
param: the parameter struct to fill with values (read/write parameter)
values: an assoc containing strings with the new values
Overrides param with values. Pointer to param must be valid, and values already initialized, either zeroed or filled in with defaults or custom values. Not all parameters need be defined in values. It can even be NULL. The idea is just that if something is defined in values, it will override the existing param.
Return value: 1 if success, 0 if failed.
sys_context: global system context
f: file to output content to
Print to a file a typical map rules.xml file.
Return value: none.
sys_context: global system context
f: file to output content to
Print to a file a typical map hints.xml file.
Return value: none.
sys_context: global system context
f: file to output content to
Print to a file a typical map style.xml file.
Return value: none.
sys_context: global system context
f: file to output content to
Print to a file a typical map teams.xml file.
Return value: none.
sys_context: global system context
user_dir: the user directory or at least, a writable one
Writes all example XML files in ’user_dir/example/’, will create the directory if needed.
Return value: 1 if success, 0 if failed.
sys_context: global system context
dirname: the directory containing the map
default_param: default parameters, as strings
forced_param: forced parameters, as strings
display_w: the width of the display output (resolution)
display_h: the height of the display output (resolution)
bench_value: the bench value (depends on computer capacity)
magic_number: arbitrary constant
user_dir: the user directory
progress: information used to handle the progress bar
Loads a map from dist. The default_param and forced_param can contain
values corresponding to rules.xml and style.xml entries. Parameters
are read in 4 steps. 1st, a default value is picked by the program.
2nd, any value in default_param replaces previous values. 3rd, any
value in rules.xml or style.xml replaces previous values.
4th, any value in forced_param replaces previous values. In practice,
the default_param allows the user to set defaults which can still
be overwritten by the map, while forced_param is a definitive ’ignore
what is is defined in the map’ way of doing things.
See also lw6ldr_read_relative.
Return value: 1 if success, 0 if failed.
sys_context: global system context
map_path: a collection of paths where to find maps
relative_path: something which will be appended to a map_path member
default_param: default parameters, as strings
forced_param: forced parameters, as strings
display_w: the width of the display output (resolution)
display_h: the height of the display output (resolution)
bench_value: the bench value (depends on computer capacity)
magic_number: arbitrary constant
user_dir: the user directory
progress: information used to handle the progress bar
Reads a map from disk, using the map-path value, which is a collection
of paths defined by the command-line, the environment variables, and
the config file. default_param and forced_param work as in the
function lw6ldr_read.
Return value: 1 if success, 0 if failure.
sys_context: global system context
resampler: resampler object to init
param: map parameters to use
hints: loading hints
source_w: width of source map
source_h: height of source map
display_w: width of source display
display_h: height of source display
target_ratio: ratio, that is width/height of the target
bench_value: rough estimation of this computer power
magic_number: arbitrary constant, needed to calibrate speed
expected_depth: how thick the map could be (in practice, looks like d in whd)
gray_level: used to estimate capacity, 1.0f is white and means many slots
Initializes a resampler. There is wizardry based on the bench, magic number map size, gray level. This is bot bullet proof, but has been experience driven and is the result of many tries / failures and hopefully successes. Might need tuning as the algorithm evolves. This is the very function that chooses the actual logical map size.
Return value: none.
sys_context: global system context
map_w: target map width (out param)
map_h: target map height (out param)
display_w: screen width (pixels)
display_h: screen height (pixels)
bench_value: rough estimation of this computer power
magic_number: arbitrary constant, needed to calibrate speed
Builds a resampler and does all the calculus so that one gets the correct map width and height for the gen module. The idea is that when generating a pseudo-random map, one can not really know what size to give it, so this function gives a hint, relying on bench and magic values, which are computer/runtime dependant.
Return value: none
sys_context: global system context
resampler: resampler to set
source_w: source map width
source_h: source map height
target_w: target map width
target_h: target map height
Initializes a resampler with hardcoded values, does not calibrate according to context, simply set it to rescale the size you want.
Return value: none.
sys_context: global system context
target_x: target x coordinate (out param)
target_y: target y coordinate (out param)
source_x: source x coordinate (in param)
source_y: source y coordinate (in param)
Transforms from source coordinate to target coordinates. Does rounding fine-tuning, it’s not a simple integer division.
Return value: none.
sys_context: global system context
source_x: source x coordinate (out param)
source_y: source y coordinate (out param)
target_x: target x coordinate (in param)
target_y: target y coordinate (in param)
Transforms from target coordinate to source coordinates. Yes, target to source. Target is our final logical map, source is what we loaded from disk, here we want to know, given a point in the target, where to fetch its data from source. Does rounding fine-tuning, it’s not a simple integer division.
Return value: none.
sys_context: global system context
dirname: the directory of the map
Read the rules (rules.xml) of a map. Pointer to rules must be valid, and values already initialized, either zeroed or filled in with defaults or custom values.
Return value: 1 if success, 0 if failed.
sys_context: global system context
rules: the rules struct to fill with values (read/write parameter)
values: an assoc containing strings with the new values
Overrides rules with values. Pointer to rules must be valid, and values already initialized, either zeroed or filled in with defaults or custom values. Not all parameters need be defined in values. It can even be NULL. The idea is just that if something is defined in values, it will override the existing rules.
Return value: 1 if success, 0 if failed.
sys_context: global system context
dirname: the directory of the map
Read the style (style.xml) of a map. Pointer to style must be valid, and values already initialized, either zeroed or filled in with defaults or custom values.
Return value: 1 if success, 0 if failed.
sys_context: global system context
style: the style to modify
key: the key to modify
value: the value to affect to the key, as a string
Sets one single parameter in a style structure. Value must always be passed as a string, will be converted to the right type automatically when storing it in the structure.
Return value: 1 if success, 0 if failed. Note that while 0 really means there’s a problem, some affectations can fail and return 1, needs to be worked on.
sys_context: global system context
style: the style struct to fill with values (read/write parameter)
values: an assoc containing strings with the new values
Overrides style with values. Pointer to style must be valid, and values already initialized, either zeroed or filled in with defaults or custom values. Not all parameters need be defined in values. It can even be NULL. The idea is just that if something is defined in values, it will override the existing style.
Return value: 1 if success, 0 if failed.
sys_context: global system context
dirname: the directory of the map
Read the teams (teams.xml) of a map. Pointer to teams must be valid, and values already initialized, either zeroed or filled in with defaults or custom values.
Return value: 1 if success, 0 if failed.
sys_context: global system context
teams: the teams struct to fill with values (read/write parameter)
values: an assoc containing strings with the new values
Overrides teams with values. Pointer to teams must be valid, and values already initialized, either zeroed or filled in with defaults or custom values. Not all parameters need be defined in values. It can even be NULL. The idea is just that if something is defined in values, it will override the existing teams.
Return value: 1 if success, 0 if failed.
sys_context: global system context
mode: test mode (bitmask)
Registers all tests for the libldr module.
Return value: 1 if test is successfull, 0 on error.
sys_context: global system context
mode: test mode (bitmask)
Runs the ldr module test suite, testing most (if not all...)
functions.
Return value: 1 if test is successfull, 0 on error.
sys_context: global system context
texture: structure to hold read data
dirname: map dirname (absolute path)
param: parameters to use
hints: loading hints to use
use_texture: wether to use texture.png
display_w: display width
display_h: display height
ratio: target width/height factor (out param)
texture_exists: true if texture.png is here (out param)
progress: progress indicator (in/out param)
Read the texture associated to a map. Pointer to texture must be valid, it’s modified in-place. The function will automatically figure out if texture.png exists or if we must use foreground.png/background.png.
Return value: 1 on success, 0 on failure.
sys_context: global system context
use: struct to initialize
Sets the use structure to its defaults, this structure being used to now wether we should use texture, cursor textures, rules, hints, style, teams and music.
Return value: none.
sys_context: global system context
use: struct to clear
Clears the use structure, set it to the use nothing mode.
Return value: none.
sys_context: global system context
use: struct to modify
key: key to change (as a string)
value: value to set (as a string)
Sets a key to the given value, OK all fields are integer, this is just a convenient function to be called in more general functions which are fed with those string pointers, typically coming from an XML file.
Return value: 1 on success, 0 on failure (key not found).
sys_context: global system context
use: the use struct to fill with values (read/write parameter)
values: an assoc containing strings with the new values
Overrides use with values. Pointer to use must be valid, and values already initialized, either zeroed or filled in with defaults or custom values. Not all parameters need be defined in values. It can even be NULL. The idea is just that if something is defined in values, it will override the existing use.
Return value: 1 if success, 0 if failed.
Contains informations about a map, but just the minimum to, for instance, display it in a menu entry.
Type: lw6map_metadata_t
Definition: lw6map_metadata_t lw6ldr_entry_s::metadata
The map metadata.
Type: char *
Definition: char* lw6ldr_entry_s::absolute_path
The map absolute path, use this to load it.
Type: char *
Definition: char* lw6ldr_entry_s::relative_path
The map relative path, store this in config file.
Type: int
Definition: int lw6ldr_entry_s::has_subdirs
Wether the entry has subdirs (and consequently, isn’t a map)
Type: int
Definition: int lw6ldr_entry_s::nb_submaps
Number of sub mpas within this map.
Type: int
Definition: int lw6ldr_entry_s::forbidden
Wether it is forbidden (eg, not enough exp).
Content of hints.xml stored into a C struct.
Type: int
Definition: int lw6ldr_hints_s::resample
Wether to resample the map on the fly when loaded.
Type: int
Definition: int lw6ldr_hints_s::min_map_width
Minimum map width.
Type: int
Definition: int lw6ldr_hints_s::max_map_width
Maximum map width.
Type: int
Definition: int lw6ldr_hints_s::min_map_height
Minimum map height.
Type: int
Definition: int lw6ldr_hints_s::max_map_height
Maximum map height.
Type: int
Definition: int lw6ldr_hints_s::min_map_surface
Minimum map surface.
Type: int
Definition: int lw6ldr_hints_s::max_map_surface
Maximum map surface.
Type: float
Definition: float lw6ldr_hints_s::fighter_scale
Use greater or smaller fighters.
Type: int
Definition: int lw6ldr_hints_s::downsize_using_fighter_scale
Wether to downsize the map, if needed, using fighter scale.
Type: int
Definition: int lw6ldr_hints_s::upsize_using_fighter_scale
Wether to upsize the map, if needed, using fighter scale.
Type: int
Definition: int lw6ldr_hints_s::downsize_using_bench_value
Wether to downsize the map, if needed, using bench value.
Type: int
Definition: int lw6ldr_hints_s::upsize_using_bench_value
Wether to upsize the map, if needed, using bench value.
Type: int
Definition: int lw6ldr_hints_s::guess_colors
Wether to guess colors from the map.
Type: int
Definition: int lw6ldr_hints_s::background_color_auto
Wether to set up background colors automatically.
Type: int
Definition: int lw6ldr_hints_s::hud_color_auto
Wether to set up hud colors automatically.
Type: int
Definition: int lw6ldr_hints_s::menu_color_auto
Wether to set up menu colors automatically.
Type: int
Definition: int lw6ldr_hints_s::view_color_auto
Wether to set up view colors automatically.
Type: int
Definition: int lw6ldr_hints_s::system_color_auto
Wether to set up system colors automatically.
Type: int
Definition: int lw6ldr_hints_s::wall_grease
Wall grease used when rescaling.
Type: int
Definition: int lw6ldr_hints_s::guess_moves_per_sec
Guess the moves per sec value automatically.
Type: float
Definition: float lw6ldr_hints_s::speed
Global speed.
Almost internal struct use to handler the resampling process. It has informations about the source, the target, and the ratio between them. It basically contains informations about how to scale.
Type: int
Definition: int lw6ldr_resampler_s::target_w
Target width.
Type: int
Definition: int lw6ldr_resampler_s::target_h
Target height.
Type: int
Definition: int lw6ldr_resampler_s::source_w
Source width.
Type: int
Definition: int lw6ldr_resampler_s::source_h
Source height.
Type: float
Definition: float lw6ldr_resampler_s::scale_x
Ratio for the X axis (target_w/source_w).
Type: float
Definition: float lw6ldr_resampler_s::scale_y
Ratio for the Y axis (target_h/source_h).
What files to use when loading a map.
Type: int
Definition: int lw6ldr_use_s::use_texture
Wether to use texture.jpeg.
Type: int
Definition: int lw6ldr_use_s::use_cursor_texture
Wether to use cursor-texture.jpeg.
Type: int
Definition: int lw6ldr_use_s::use_rules_xml
Wether to use rules.xml.
Type: int
Definition: int lw6ldr_use_s::use_hints_xml
Wether to use hints.xml.
Type: int
Definition: int lw6ldr_use_s::use_style_xml
Wether to use style.xml.
Type: int
Definition: int lw6ldr_use_s::use_teams_xml
Wether to use teams.xml.
Type: int
Definition: int lw6ldr_use_s::use_music_file
Wether to use the map specific music file.
View lcov test coverage results on http://www.ufoot.org/liquidwar/v6/doc/coverage/src/lib/map/index.html.
sys_context: global system context
body: the body to initialize
w: the width
h: the height
d: the depth
noise_percent: the noise level to fill meta layers with
rules: the map rules
Sets up a default body structure.
Return value: none
sys_context: global system context
body: the structure to clear
Clears a body structure.
Return value: none.
sys_context: global system context
body: the structure to update
Updates (calculates) the checksum of a map body structure.
Return value: none.
sys_context: global system context
body: the structure to update
rules: the game rules
This (fundamental) function ensures that all playable areas in a map are connected. If isolated zones are found out, then they are marked as walls and not used any more.
Return value: none.
sys_context: global system context
level: the level to work on
body_x: the body (logical) x coord
body_y: the body (logical) y coord
texture_x: the texture x coord
texture_y: the texture y coord
Gets body (logical) coords from texture position.
Return value: 1 on success, 0 on failure (out of bounds)
sys_context: global system context
level: the level to work on
texture_x: the texture x coord
texture_y: the texture y coord
z: the z position (depth related)
Tells wether a given map position is free or not, but using texture coords.
Return value: 1 if position is playable, 0 if not (wall)
sys_context: global system context
color: the color to invert
Inverts a color couple, that is, replace fg by bg and vice-versa.
Return value: none.
sys_context: global system context
color1: 1st color to compare
color2: 2nd color to compare
Compares two colors.
Return value: 1 if equal, 0 if not.
sys_context: global system context
index: index of the color between 0 & 9
Transforms a team color index into its readable string form, which can be used in config files for instance.
Return value: a string, must *not* be freed.
sys_context: global system context
key: key of the color, for instance "red"
The index of the color, between 0 & 9
Return value: an integer.
sys_context: global system context
index: index of the color between 0 & 9
Transforms a team color index into its readable string form, which can be used to display information to players.
Return value: a string, must *not* be freed.
rules: set of rules to use
shape: shape of the map
x: x coord (in/out param)
y: y coord (in/out param)
Fixes the x and y values so that it’s always inside the map. This function will read the rules and if there’s some polarity enable, will do the right thing, for instance, a fighter too much on the right might reapper on the left side of the map.
Return value: none.
rules: set of rules to use
shape: shape of the map
z: z coord (in/out param)
Fixes the z value so that it’s always inside the map. This function will read the rules and if there’s some polarity enable, will do the right thing, for instance, a fighter too low it might reapper on top.
Return value: none.
sys_context: global system context
cursor_texture: the cursor texture to clear
Clears a cursor texture (set it all transparent).
Return value: none
sys_context: global system context
cursor_texture: the cursor texture to clear
Sets a cursor texture to the builtin defauts, that is a circle that is black on the outside and gets white/transparent in the middle.
Return value: none
sys_context: global system context
cursor_texture_layer: the cursor texture_layer to change
x: x coord
y: y coord
color: the color
Sets a pixel in the cursor texture_layer.
Return value: none
sys_context: global system context
cursor_texture_layer: the cursor texture_layer to query
x: x coord
y: y coord
Gets a pixel in the cursor texture_layer.
Return value: the color
sys_context: global system context
source: the map to copy
progress: to show advancement
Performs a deep copy of the map, all elements are newly allocated and source can safely be destroyed after it’s been duplicated.
Return value: a newly allocated map, may be NULL.
sys_context: global system context
exp: the player experience
Gets the highest color available for a given exp.
Return value: a color id
sys_context: global system context
exp: the player experience
Gets the highest weapon available for a given exp.
Return value: a weapon id
sys_context: global system context
rules: set of rules to use
team_color_id: color id to test
Tests wether a team color is allowed for a given set of rules.
Return value: 1 if allowed, 0 if not.
sys_context: global system context
rules: set of rules to use
weapon_id: weapon id to test
Tests wether a weapon is allowed for a given set of rules.
Return value: 1 if allowed, 0 if not.
sys_context: global system context
exp: exp to test
Get the unlocked team color for a given exp, if applyable.
Return value: -1 if nothing unlocked, else the team color
sys_context: global system context
exp: exp to test
Get the unlocked primary weapon for a given exp, if applyable.
Return value: -1 if nothing unlocked, else the weapon id
sys_context: global system context
Converts a map to something that is later readable by lw6map_from_hexa
to reproduce the exact same map. Just a serializer.
Return value: a newly allocated pointer, NULL if conversion failed.
sys_context: global system context
hexa: an hexadecimal ASCII string, created by lw6map_to_hexa
Constructs a map from an hexadecimal string generated
by lw6map_to_hexa. Just an un-serializer.
Return value: a new map, might be NULL if string isn’t correct.
sys_context: global system context
layer: the layer to init
w: width
h: height
Creates a default layer. This is mostly for testing purposes, the default layer is not empty, it contains a simplified map of the world.
Return value: none
sys_context: global system context
layer: the layer to init
Clears a layer struct. This means freeing the pointer if it’s non NULL and setting everything to 0.
Return value: none
sys_context: global system context
Creates a new empty map. This object is perfectly unusable as is, since it has a 0x0 size, and many things set to "NULL". Still, it’s used internally and is the canonical way to create the object, it ensures later calls that set up default parameters, for instance, will succeed.
Return value: a newly allocated pointer.
sys_context: global system context
Creates a map, set to defaults. This is usefull mostly for testing. This builtin map has walls, paths, it’s playable.
Return value: a newly allocated map.
sys_context: global system context
percent_factor: how big the map should be, 100 is defaults 200 is double.
Creates a map, set to defaults. This is usefull mostly for testing. This builtin map has walls, paths, it’s playable, additionnally it’s scalable, that’s to say one can make it bigger if needed, using a percent factor.
Return value: a newly allocated map.
sys_context: global system context
w: the width of the map
h: the height of the map
d: the depth (number of layers) of the map
noise_percent: percentage of noise to use for metalayers
Creates a map, set to defaults. This is usefull mostly for testing.
This one, unlike lw6map_builtin_defaults will let you give a width,
height and a depth.
Return value: a newly allocated map.
sys_context: global system context
Frees a map and releases all its internal ressources.
Return value: none.
sys_context: global system context
Reports how many bytes the map needs, in memory. Note that this is not contiguous memory, it involves a bunch of pointers, and possibly much more...
sys_context: global system context
Returns a string describing the map. This is a very short description, use it for logs, and to debug stuff. By no means it’s a complete exhaustive description. Still, the string returned should be unique.
Return value: a dynamically allocated string.
sys_context: global system context
level_a: the first level to compare
level_b: the other level to compare
Compares two level structs, the idea is to compare the content, not only the pointers and level ids.
Return value: 1 if they’re the same, 0 if not.
sys_context: global system context
level: level to get informations about
Gives the map name. This is just a simple utility/wrapper function which is meant to be exported to Guile scripts.
Return value: static string, must not be freed, can’t be NULL
level: level to get informations about
Gives the max number of colors (AKA teams) that can fit on this map. This is just a simple utility/wrapper function which is meant to be exported to Guile scripts.
Return value: number of colors, taken from rules
sys_context: global system context
level: level to get informations about
Gives the max number of cursors that can fit on this map. This is just a simple utility/wrapper function which is meant to be exported to Guile scripts.
Return value: number of cursors, taken from rules
sys_context: global system context
level: level to get informations about
Gives the max number of nodes that can fit on this map. This is just a simple utility/wrapper function which is meant to be exported to Guile scripts.
Return value: number of nodes, taken from rules
sys_context: global system context
local_info: the structure to modify
music_dir: the new music_dir value
Sets the music_dir value, in a ’safe’ manner, freeing any previous value and performing a string duplication.
Return value: 1 on success, 0 on failure.
sys_context: global system context
local_info: the structure to clear
Clears the local_info structure, before destroying a level for instance.
Return value: none
sys_context: global system context
metadata: struct to set to defaults
Sets the metadata struct to defaults, this does not set fields to NULL/empty values, but rather fills it with data claiming, for instance, that this is a default map.
Return value: none.
sys_context: global system context
metadata: struct to clear
Clears a metadata, will expect it to be in a consistent state, that is either filled with proper values or completely zeroed.
Return value: none.
sys_context: global system context
metadata_a: first item to compare
metadata_b: second item to compare
Tells wether both metadata items contain the same values.
Return value: 1 if same, 0 if different.
sys_context: global system context
meta_layer: the meta_layer structure
x: x coord
y: y coord
value: the value to set at this place
Simple setter for the meta_layer struct.
Return value: none
sys_context: global system context
meta_layer: the meta_layer structure
x: x coord
y: y coord
Simple getter for the meta_layer struct.
Return value: the value at this place
sys_context: global system context
meta_layer: the meta_layer to clear
Clears a meta_layer struct. This means freeing the pointer if it’s non NULL and setting everything to 0.
Return value: none
sys_context: global system context
meta_layer: the object to init
w: width
h: height
analog: wether to use analog mode (0-255) or boolean (0-1)
noise_percent: the quantity of noise to initialise the layer with
seed: a pseudo-random seed to feed the pseudo-random generator
Builds a custom metalyer, suitable for tests or demo, letting the choice of its size and the noise to fill it with. If noise is 100 then metalayer is "full". If noise is 0, then meta layer is empty.
Return value: 1 if OK, 0 on failure.
sys_context: global system context
param: struct to initialize
Sets a param struct to zero, simply puts zero everywhere without checking what was here before
Return value: none.
sys_context: global system context
param: the param struct to modify
Sets a param structure to its default value, note that current structured must be zeroed or correctly initialized.
Return value: none
sys_context: global system context
param: the param struct to modify
Resets a param structure to nothing. Note that current structured must be zeroed or correctly initialized. The idea is just to free member pointers before calling free.
Return value: none
sys_context: global system context
dst: the destination param struct
src: the source param struct
Copies parameters. Both structures must be zeroed or correctly initialized.
Return value: none
sys_context: global system context
param: the param struct to modify
key: the name of the parameter to modify
value: the value of the parameter to modify
Sets an entry in a param struct. All values must be submitted as strings, internally, the function will call atoi to convert to integers if needed, for instance. It will also dispatch automatically between rules, style and teams.
Return value: 1 if parameter successfully set, 0 on error.
sys_context: global system context
param: the param struct to query
key: the name of the parameter to get
Gets an entry from a param struct. All values returned as strings, do not use this in performance bottlenecks, this is just to export values to scripts, for instance.
Return value: dynamically allocated string, NULL on error, might return a string containing 0 on bad keys.
sys_context: global system context
param_a: one struct to compare
param_b: another struct to compare
Compares the contents of two param structs.
Return value: 1 if they contain the same thing, 0 if not
sys_context: global system context
rules: struct to initialize
Sets a rules struct to zero, simply puts zero everywhere without checking what was here before
Return value: none.
sys_context: global system context
rules: struct to set to defaults
Set rules to default values, as these are all integers, you can call this on any rules object.
Return value: none.
sys_context: global system context
dst: destination (out param)
src: source (in param)
Copies the data from source to destination, simple wrapper on memcpy.
Return value: none.
sys_context: global system context
rules: rules struct to check
checksum: checksum to update (in/out param)
Updates a checksum with the rules data.
Return value: none.
sys_context: global system context
key: key to query
Get the default value for a given string key. Of course you could access the member, but this function internally does the conversion between readable string and actual struct offset.
Return value: integer.
sys_context: global system context
key: key to query
Get the min value for a given string key. Of course you could access the member, but this function internally does the conversion between readable string and actual struct offset.
Return value: integer.
sys_context: global system context
key: key to query
Get the min value for a given string key. Of course you could access the member, but this function internally does the conversion between readable string and actual struct offset.
Return value: integer.
sys_context: global system context
rules: struct to use
key: key to query
Get the value for a given string key, as an integer. Of course you could access the member, but this function internally does the conversion between readable string and actual struct offset.
Return value: integer.
sys_context: global system context
rules: struct to use
key: key to set
value: new integer value for key
Set the value for a given string key, as an integer. Of course you could access the member, but this function internally does the conversion between readable string and actual struct offset.
Return value: 1 on success, 0 on failure (eg key not found)
sys_context: global system context
rules: struct to use
key: key to query
Get the value for a given string key, as a boolean. Of course you could access the member, but this function internally does the conversion between readable string and actual struct offset.
Return value: boolean.
rules: struct to use
key: key to set
value: new boolean value for key
Set the value for a given string key, as a boolean. Of course you could access the member, but this function internally does the conversion between readable string and actual struct offset.
Return value: 1 on success, 0 on failure (eg key not found)
sys_context: global system context
rules: struct to init
Set rules to 0, this is not defaults, this is 0 (probably unusable as a real-world setting).
Return value: none.
sys_context: global system context
rules_a: first item to compare
rules_b: second item to compare
Compares two rules items. Will tell if they contain the same data.
Return value: 1 if same, 0 if different.
sys_context: global system context
rules: rules to check.
Check wether the rules are within the acceptable range.
Return value: 1 if same, 0 if different.
sys_context: global system context
style: struct to initialize
Sets a style struct to zero, simply puts zero everywhere without checking what was here before
Return value: none.
sys_context: global system context
style: struct to modify
Sets a style struct to defaults values, expects the object to be in a consistent style, that’s to say either containing real data or being zeroed.
Return value: none.
sys_context: global system context
style: struct to clear
Clears a style struct. This function won’t work on an unitialized structure, structure must be zeroed by some CALLOC or something, else automatic freeing of pointers will fail.
Return value: none.
sys_context: global system context
dst: destination
src: source
Copies style data from source to destination.
Like with clear, dst must be either initialized or
totally zeroed, else function will fail (core dump)
Return value: none.
sys_context: global system context
style: style struct to modify (out param)
key: key to use
value: value to use
Sets a style entry, takes string values and will identify the struct offset and convert the value to whatever C type is needed.
Return value: 1 on success, 0 on failure (key not found)
sys_context: global system context
style: style struct to query
key: key to use
Get a style entry, takes a string key and will identify the struct offset. The return value is converted to string, typically the cannonical representation suitable to write in an XML config file.
Return value: dynamically allocated string.
sys_context: global system context
key: key to query
Get the default value for a style entry. This is quite a cost-expensive function given what it does, indeed it will convert anything to a string, and also perform key lookup to fetch the value.
Return value: dynamically allocated string.
sys_context: global system context
color_set_a: first item to compare
color_set_b: second item to compare
Compares two color sets, telling if they contain the same data.
Return value: 1 if same, 0 if different.
sys_context: global system context
style_a: first item to compare
style_b: second item to compare
Compares two style structures, telling if they contain the same data.
Return value: 1 if same, 0 if different.
sys_context: global system context
teams: data to initialize
Zeros the teams struct, this is not the same as setting to defaults.
Return value: none.
sys_context: global system context
teams: data to initialize
Set the teams struct to its defaults.
Return value: none.
sys_context: global system context
teams: data to initialize
Clears the teams struct, this is not the same as setting to defaults. This one supposes the struct has been properly initialized, at least zeroed before usage, it might contain pointers which should be freed.
Return value: none.
sys_context: global system context
dst: destination
src: source
Copies the contents of the teams struct. It’s a real duplicate, any string is reallocated.
Return value: none.
sys_context: global system context
teams: the teams to modify
key: the key to modify
value: the value to affect to the key, as a string
Sets one single parameter in a teams structure. Value must always be passed as a string, will be converted to the right type automatically when storing it in the structure.
Return value: 1 if success, 0 if failed. Note that while 0 really means there’s a problem, some affectations can fail and return 1, needs to be worked on.
sys_context: global system context
teams: the teams to modify
key: the key to modify
Gets one single parameter in a teams structure. Value is converted as a string.
Return value: dynamically allocated string, NULL on error.
sys_context: global system context
key: the key we want informations about.
Gets the default value for a given teams key.
Return value: dynamically allocated string, NULL on error.
sys_context: global system context
teams_a: one struct to compare
teams_b: another struct to compare
Compares the contents of two teams structs.
Return value: 1 if they contain the same thing, 0 if not
sys_context: global system context
mode: test mode (bitmask)
Registers all tests for the libmap module.
Return value: 1 if test is successfull, 0 on error.
sys_context: global system context
mode: test mode (bitmask)
Runs the map module test suite, testing most (if not all...)
functions.
Return value: 1 if test is successfull, 0 on error.
sys_context: global system context
texture: texture to load (out param)
body: body to pick data from
color: colors to use
Will create a default bicolor texture from the body data, this is in case we don’t want to use the texture or there is none. Result is not beautifull but might be very comfortable to play.
Return value: 1 on success, 0 on failure.
sys_context: global system context
texture: data to clear
Clears a texture object, expects it to be in a consitent state, either filled with real data of zeroed.
Return value: none.
sys_context: global system context
level: map to work on
texture_x: texture x coordinate (out param)
texture_y: texture y coordinate (out param)
body_x: body x coordinate (in param)
body_y: body y coordinate (in param)
Translates from body coordinate space to texture coordinate space.
Return value: 1 on success, 0 if failure.
sys_context: global system context
level: map to use
body_x: x coordinate in body space
body_y: y coordinate in body space
Get the color of a given point in the texture, using the body coordinate space.
Return value: RGBA 8-bit color.
sys_context: global system context
texture: texture object to test
Finds out if the texture is fully opaque or not. If it has an alpha layer (typically, PNG file) but this one is filled at 100% everywhere, then it will consider opaque. This is a slow function but the result is cached in the has_alpha member, so as the function is called at map loading, use the cached value instead.
Return value: 1 if has used alpha layer, 0 if opaque.
sys_context: global system context
index: index of the weapon between 0 & 19
Transforms a team weapon index into its readable string form, which can be used in config files for instance.
Return value: a string, must *not* be freed.
sys_context: global system context
key: key of the weapon, for instance "red"
The index of the weapon, between 0 & 19
Return value: an integer.
sys_context: global system context
index: index of the weapon between 0 & 19
Transforms a team weapon index into its readable string form, which can be used to display information to players.
Return value: a string, must *not* be freed.
Logical layers for the map. This is the big collection of bytes arrays containing most of the information, anything loaded from images (JPEG, PNG) from disk and having some logical (and not pure eye candy) meaning.
Type: int
Definition: int lw6map_body_s::checksum
Checksum for this map body, we could recalculate it dynamically but it’s cached here for convenience and speed.
Type: lw6sys_whd_t
Definition: lw6sys_whd_t lw6map_body_s::shape
Shape of the map, all layers need to be compatible with this.
Type: lw6map_layer_t
Definition: lw6map_layer_t lw6map_body_s::layers[LW6MAP_MAX_BODY_DEPTH]
Layers, layer 0 is the top layer, the one stored in map.png, other layers are layerN.png. Not all layers are defined, just depends on body shape.
Type: lw6map_meta_layer_t
Definition: lw6map_meta_layer_t lw6map_body_s::glue
Informations stored in glue.png.
Type: lw6map_meta_layer_t
Definition: lw6map_meta_layer_t lw6map_body_s::boost
Informations stored in boost.png.
Type: lw6map_meta_layer_t
Definition: lw6map_meta_layer_t lw6map_body_s::danger
Informations stored in danger.png.
Type: lw6map_meta_layer_t
Definition: lw6map_meta_layer_t lw6map_body_s::medicine
Informations stored in medicine.png.
Type: lw6map_meta_layer_t
Definition: lw6map_meta_layer_t lw6map_body_s::one_way_north
Informations stored in one-way-north.png.
Type: lw6map_meta_layer_t
Definition: lw6map_meta_layer_t lw6map_body_s::one_way_east
Informations stored in one-way-east.png.
Type: lw6map_meta_layer_t
Definition: lw6map_meta_layer_t lw6map_body_s::one_way_south
Informations stored in one-way-south.png.
Type: lw6map_meta_layer_t
Definition: lw6map_meta_layer_t lw6map_body_s::one_way_west
Informations stored in one-way-west.png.
Bot information, contains the relevant generic parameters for a bot.
Type: int
Definition: int lw6map_bot_info_s::color
Team/color the bot is associated to.
Type: char *
Definition: char* lw6map_bot_info_s::ai
AI engine used by bot, the name of the backend to load.
This structure simply binds 2 colors together, one being foreground and the other background. There’s a good reason to bind those together, indeed foreground and background need to be different enough so that text written in fg over bg is readable, and they need to go together well.
Type: lw6sys_color_8_t
Definition: lw6sys_color_8_t lw6map_color_couple_s::fg
Foreground color.
Type: lw6sys_color_8_t
Definition: lw6sys_color_8_t lw6map_color_couple_s::bg
Background color.
Holds the complete color set for the game, including all color couples used for background, hud, menu, view, as well as team colors.
Type: lw6map_color_couple_t
Definition: lw6map_color_couple_t lw6map_color_set_s::color_base
Base color couple.
Type: lw6map_color_couple_t
Definition: lw6map_color_couple_t lw6map_color_set_s::color_alternate
Alternate color couple.
Type: lw6map_color_couple_t
Definition: lw6map_color_couple_t lw6map_color_set_s::background_color_root
Background color couple for root image.
Type: lw6map_color_couple_t
Definition: lw6map_color_couple_t lw6map_color_set_s::background_color_stuff
Background color couple for drawn stuff.
Type: lw6map_color_couple_t
Definition: lw6map_color_couple_t lw6map_color_set_s::hud_color_frame
Hud color couple for frames.
Type: lw6map_color_couple_t
Definition: lw6map_color_couple_t lw6map_color_set_s::hud_color_text
Hud color couple for text.
Type: lw6map_color_couple_t
Definition: lw6map_color_couple_t lw6map_color_set_s::menu_color_default
Menu default color couple.
Type: lw6map_color_couple_t
Definition: lw6map_color_couple_t lw6map_color_set_s::menu_color_selected
Menu color couple for selected items.
Type: lw6map_color_couple_t
Definition: lw6map_color_couple_t lw6map_color_set_s::menu_color_disabled
Menu color couple for disabled items.
Type: lw6map_color_couple_t
Definition: lw6map_color_couple_t lw6map_color_set_s::view_color_cursor
Map view color couple for cursor.
Type: lw6map_color_couple_t
Definition: lw6map_color_couple_t lw6map_color_set_s::view_color_map
Map view color couple for map.
Type: lw6map_color_couple_t
Definition: lw6map_color_couple_t lw6map_color_set_s::system_color
System color couple (log messages).
Type: lw6sys_color_8_t
Definition: lw6sys_color_8_t lw6map_color_set_s::team_color_dead
Color to use for dead fighters.
Type: lw6sys_color_8_t
Definition: lw6sys_color_8_t lw6map_color_set_s::team_colors[LW6MAP_NB_TEAM_COLORS]
Team colors.
Contains a cursor texture layer, this is basically a fixed (64x64) sized array of colors.
Type: lw6sys_color_8_t
Definition: lw6sys_color_8_t lw6map_cursor_texture_layer_s::data[LW6MAP_CURSOR_TEXTURE_SIZE][LW6MAP_CURSOR_TEXTURE_SIZE]
Color for each pixel.
A cursor texture. It’s divided between a texture that will be colorized depending on the map and another texture which will be colorized depending on the team playing the cursor.
Type: lw6map_cursor_texture_layer_t
Definition: lw6map_cursor_texture_layer_t lw6map_cursor_texture_s::fg_bg_layer
Layer to be colorized using foreground and background colors.
Type: lw6map_cursor_texture_layer_t
Definition: lw6map_cursor_texture_layer_t lw6map_cursor_texture_s::color_layer
Layer to be colorized using team colors.
A layer contains the actual data for a layer.
Type: lw6sys_whd_t
Definition: lw6sys_whd_t lw6map_layer_s::shape
Shape of the layer. Z should be 1, logically.
Type: u_int8_t *
Definition: u_int8_t* lw6map_layer_s::data
Raw (byte) data.
This structure contains everything about a level, once it’s loaded from disk. It’s immutable, it cannot be changed once it’s loaded, and does not have any algorithm aware struct, this is just plain raw data, file data transformed into C struct.
Type: u_int32_t
Definition: u_int32_t lw6map_level_s::id
The id of the object, this is non-zero and unique within one run session, incremented at each object creation.
Type: lw6map_metadata_t
Definition: lw6map_metadata_t lw6map_level_s::metadata
Metadata (title, copyright, description, ...)
Type: lw6map_local_info_t
Definition: lw6map_local_info_t lw6map_level_s::local_info
Informations that depend on the host loading the map.
Type: lw6map_body_t
Definition: lw6map_body_t lw6map_level_s::body
All layers (bytes array) forming the map.
Type: lw6map_texture_t
Definition: lw6map_texture_t lw6map_level_s::texture
Texture used by the map.
Type: lw6map_cursor_texture_t
Definition: lw6map_cursor_texture_t lw6map_level_s::cursor_texture
Cursor texture.
Type: lw6map_param_t
Definition: lw6map_param_t lw6map_level_s::param
All map parameters.
Local info is for fields which can be exploited locally, but make no sense if transfered to another computer, over the network for instance. This is typically something which will be updated by the ldr module or some other external code, but it’s not directly linked to the content of the map itself.
Type: char *
Definition: char* lw6map_local_info_s::music_dir
Directory where music files can be loaded.
Content of metadata.xml stored into a C struct.
Type: char *
Definition: char* lw6map_metadata_s::title
Title of the map.
Type: char *
Definition: char* lw6map_metadata_s::author
Author of the map.
Type: char *
Definition: char* lw6map_metadata_s::description
Description of the map.
Type: char *
Definition: char* lw6map_metadata_s::license
License of the map (short, like GPLv2+ or GPLv3+).
Type: int
Definition: int lw6map_metadata_s::vanilla_exp
Exp as stored in the XML file of the map.
A meta layer is a special layer which contains, for instance, informations such as where there’s a special trick like glue.
Type: lw6sys_whd_t
Definition: lw6sys_whd_t lw6map_meta_layer_s::shape
Shape of the metalayer.
Type: u_int8_t *
Definition: u_int8_t* lw6map_meta_layer_s::data
Raw (byte) data.
All parameters in a map, indludes rules, style and teams.
Type: lw6map_rules_t
Definition: lw6map_rules_t lw6map_param_s::rules
Content of rules.xml.
Type: lw6map_style_t
Definition: lw6map_style_t lw6map_param_s::style
Content of style.xml.
Type: lw6map_teams_t
Definition: lw6map_teams_t lw6map_param_s::teams
Content of teams.xml.
Content of rules.xml stored into a C struct. This structure is used a lot, it needs to be like this for we don’t want to parse (even a hash) each time we want a param so we need it in a real C struct. In this structure, it’s important, fundamental, that floats are never ever used in map rules. In fact, we need maps to be 100,00 (lots of zeroes) predictable, given some identical user actions. Using floats could lead us to very slight differences (floats are never accurate, especially when you run calculus on different hardwares) which could, with time, become very important. Sort of a "butterfly effect". So well, we use int. Int32 to be exact.
Type: int32_t
Definition: int32_t lw6map_rules_s::total_time
total_time parameter, stored as an integer.
Type: int32_t
Definition: int32_t lw6map_rules_s::respawn_team
respawn_team parameter, stored as an integer.
Type: int32_t
Definition: int32_t lw6map_rules_s::respawn_position_mode
respawn_position_mode parameter, stored as an integer.
Type: int32_t
Definition: int32_t lw6map_rules_s::respawn_delay
respawn_delay parameter, stored as an integer.
Type: int32_t
Definition: int32_t lw6map_rules_s::moves_per_round
moves_per_round parameter, stored as an integer.
Type: int32_t
Definition: int32_t lw6map_rules_s::spreads_per_round
spreads_per_round parameter, stored as an integer.
Type: int32_t
Definition: int32_t lw6map_rules_s::rounds_per_sec
rounds_per_sec parameter, stored as an integer.
Type: int32_t
Definition: int32_t lw6map_rules_s::fighter_attack
fighter_attack parameter, stored as an integer.
Type: int32_t
Definition: int32_t lw6map_rules_s::fighter_defense
fighter_defense parameter, stored as an integer.
Type: int32_t
Definition: int32_t lw6map_rules_s::fighter_new_health
fighter_new_health parameter, stored as an integer.
Type: int32_t
Definition: int32_t lw6map_rules_s::fighter_regenerate
fighter_regenerate parameter, stored as an integer.
Type: int32_t
Definition: int32_t lw6map_rules_s::side_attack_factor
side_attack_factor parameter, stored as an integer.
Type: int32_t
Definition: int32_t lw6map_rules_s::side_defense_factor
side_defense_factor parameter, stored as an integer.
Type: int32_t
Definition: int32_t lw6map_rules_s::nb_move_tries
nb_move_tries parameter, stored as an integer.
Type: int32_t
Definition: int32_t lw6map_rules_s::nb_attack_tries
nb_attack_tries parameter, stored as an integer.
Type: int32_t
Definition: int32_t lw6map_rules_s::nb_defense_tries
nb_defense_tries parameter, stored as an integer.
Type: int32_t
Definition: int32_t lw6map_rules_s::vertical_move
vertical_move parameter, stored as an integer.
Type: int32_t
Definition: int32_t lw6map_rules_s::spread_mode
spread_mode parameter, stored as an integer.
Type: int32_t
Definition: int32_t lw6map_rules_s::single_army_size
single_army_size parameter, stored as an integer.
Type: int32_t
Definition: int32_t lw6map_rules_s::total_armies_size
total_armies_size parameter, stored as an integer.
Type: int32_t
Definition: int32_t lw6map_rules_s::max_nb_teams
max_nb_teams parameter, stored as an integer.
Type: int32_t
Definition: int32_t lw6map_rules_s::max_nb_cursors
max_nb_cursors parameter, stored as an integer.
Type: int32_t
Definition: int32_t lw6map_rules_s::max_nb_nodes
max_nb_nodes parameter, stored as an integer.
Type: int32_t
Definition: int32_t lw6map_rules_s::exp
exp parameter, stored as an integer.
Type: int32_t
Definition: int32_t lw6map_rules_s::highest_team_color_allowed
highest_team_color_allowed parameter, stored as an integer.
Type: int32_t
Definition: int32_t lw6map_rules_s::highest_weapon_allowed
highest_weapon_allowed parameter, stored as an integer.
Type: int32_t
Definition: int32_t lw6map_rules_s::x_polarity
x_polarity parameter, stored as an integer.
Type: int32_t
Definition: int32_t lw6map_rules_s::y_polarity
y_polarity parameter, stored as an integer.
Type: int32_t
Definition: int32_t lw6map_rules_s::z_polarity
z_polarity parameter, stored as an integer.
Type: int32_t
Definition: int32_t lw6map_rules_s::max_zone_size
max_zone_size parameter, stored as an integer.
Type: int32_t
Definition: int32_t lw6map_rules_s::round_delta
round_delta parameter, stored as an integer.
Type: int32_t
Definition: int32_t lw6map_rules_s::max_round_delta
max_round_delta parameter, stored as an integer.
Type: int32_t
Definition: int32_t lw6map_rules_s::max_cursor_pot
max_cursor_pot parameter, stored as an integer.
Type: int32_t
Definition: int32_t lw6map_rules_s::cursor_pot_init
cursor_pot_init parameter, stored as an integer.
Type: int32_t
Definition: int32_t lw6map_rules_s::max_cursor_pot_offset
max_cursor_pot_offset parameter, stored as an integer.
Type: int32_t
Definition: int32_t lw6map_rules_s::start_x[LW6MAP_MAX_NB_TEAMS]
start_x parameters, stored as a per team integer.
Type: int32_t
Definition: int32_t lw6map_rules_s::start_y[LW6MAP_MAX_NB_TEAMS]
start_y parameters, stored as a per team integer.
Type: int32_t
Definition: int32_t lw6map_rules_s::start_position_mode
start_position_mode parameter, stored as an integer.
Type: int32_t
Definition: int32_t lw6map_rules_s::color_conflict_mode
color_conflict_mode parameter, stored as an integer.
Type: int32_t
Definition: int32_t lw6map_rules_s::spread_thread
spread_thread parameter, stored as an integer.
Type: int32_t
Definition: int32_t lw6map_rules_s::glue_power
glue_power parameter, stored as an integer.
Type: int32_t
Definition: int32_t lw6map_rules_s::boost_power
boost_power parameter, stored as an integer.
Type: int32_t
Definition: int32_t lw6map_rules_s::danger_power
danger_power parameter, stored as an integer.
Type: int32_t
Definition: int32_t lw6map_rules_s::medicine_power
medicine_power parameter, stored as an integer.
Type: int32_t
Definition: int32_t lw6map_rules_s::frags_mode
frags_mode parameter, stored as an integer.
Type: int32_t
Definition: int32_t lw6map_rules_s::frags_to_distribute
frags_to_distribute parameter, stored as an integer.
Type: int32_t
Definition: int32_t lw6map_rules_s::frags_fade_out
frags_fade_out parameter, stored as an integer.
Type: int32_t
Definition: int32_t lw6map_rules_s::use_team_profiles
use_team_profiles parameter, stored as an integer.
Type: int32_t
Definition: int32_t lw6map_rules_s::team_profile_aggressive[LW6MAP_MAX_NB_TEAMS]
team_profile_aggressive parameters, stored as a per team integer.
Type: int32_t
Definition: int32_t lw6map_rules_s::team_profile_vulnerable[LW6MAP_MAX_NB_TEAMS]
team_profile_vulnerable parameters, stored as a per team integer.
Type: int32_t
Definition: int32_t lw6map_rules_s::team_profile_mobile[LW6MAP_MAX_NB_TEAMS]
team_profile_mobile parameters, stored as a per team integer.
Type: int32_t
Definition: int32_t lw6map_rules_s::team_profile_fast[LW6MAP_MAX_NB_TEAMS]
team_profile_fast parameters, stored as a per team integer.
Type: int32_t
Definition: int32_t lw6map_rules_s::team_profile_handicap[LW6MAP_MAX_NB_TEAMS]
team_profile_handicap parameters, stored as a per team integer.
Type: int32_t
Definition: int32_t lw6map_rules_s::team_profile_weapon_id[LW6MAP_MAX_NB_TEAMS]
team_profile_weapon_id parameters, stored as a per team integer.
Type: int32_t
Definition: int32_t lw6map_rules_s::team_profile_weapon_alternate_id[LW6MAP_MAX_NB_TEAMS]
team_profile_weapon_alternate_id parameters, stored as a per team integer.
Type: int32_t
Definition: int32_t lw6map_rules_s::team_profile_weapon_mode[LW6MAP_MAX_NB_TEAMS]
team_profile_weapon_mode parameters, stored as a per team integer.
Type: int32_t
Definition: int32_t lw6map_rules_s::weapon_duration
weapon_duration parameter, stored as an integer.
Type: int32_t
Definition: int32_t lw6map_rules_s::weapon_charge_delay
weapon_charge_delay parameter, stored as an integer.
Type: int32_t
Definition: int32_t lw6map_rules_s::weapon_charge_max
weapon_charge_max parameter, stored as an integer.
Type: int32_t
Definition: int32_t lw6map_rules_s::weapon_tune_berzerk_power
weapon_tune_berzerk_power parameter, stored as an integer.
Type: int32_t
Definition: int32_t lw6map_rules_s::weapon_tune_turbo_power
weapon_tune_turbo_power parameter, stored as an integer.
Content of style.xml stored into a C struct.
Type: int
Definition: int lw6map_style_s::keep_ratio
Boolean, wether to keep the map ratio or not.
Type: float
Definition: float lw6map_style_s::zoom
Default zoom.
Type: float
Definition: float lw6map_style_s::zoom_min
Min zoom.
Type: float
Definition: float lw6map_style_s::zoom_max
Max zoom.
Type: int
Definition: int lw6map_style_s::x_wrap
Wether to wrap on X axis.
Type: int
Definition: int lw6map_style_s::y_wrap
Wether to wrap on Y axis.
Type: char *
Definition: char* lw6map_style_s::background_style
Background style to use (for instance, bubbles).
Type: char *
Definition: char* lw6map_style_s::hud_style
Hud style to use (for instance, floating).
Type: char *
Definition: char* lw6map_style_s::menu_style
Menu style to use (for instance, cylinder).
Type: char *
Definition: char* lw6map_style_s::view_style
View style to use (for instance, flat).
Type: float
Definition: float lw6map_style_s::animation_density
How dense animations should be (many or few sprites).
Type: float
Definition: float lw6map_style_s::animation_speed
How fast animations should be (sprites speed).
Type: float
Definition: float lw6map_style_s::cursor_size
Cursor size.
Type: int
Definition: int lw6map_style_s::colorize_cursor
Wether to colorize cursors or not.
Type: int
Definition: int lw6map_style_s::blink_cursor
Wether to make cursors blink or not.
Type: float
Definition: float lw6map_style_s::hidden_layer_alpha
Alpha value used to represent fighters hidden behind a layer.
Type: int
Definition: int lw6map_style_s::colorize
Wether to use colorization or not.
Type: int
Definition: int lw6map_style_s::pixelize
Wether to pixelize the map and fighters or not.
Type: lw6map_color_set_t
Definition: lw6map_color_set_t lw6map_style_s::color_set
All colors used by the game.
Type: char *
Definition: char* lw6map_style_s::music_file
Music file to play.
Type: char *
Definition: char* lw6map_style_s::music_filter
Music files to keep.
Type: char *
Definition: char* lw6map_style_s::music_exclude
Music files to exclude.
Type: int
Definition: int lw6map_style_s::waves
Wether to turn on the wave effect or not.
Content of teams.xml stored into a C struct.
Type: int
Definition: int lw6map_teams_s::player_color[LW6MAP_TEAMS_NB_PLAYERS]
Players colors.
Type: int
Definition: int lw6map_teams_s::nb_bots
Number of bots.
Type: float
Definition: float lw6map_teams_s::bot_speed
Bots speed.
Type: int
Definition: int lw6map_teams_s::bot_iq
Bots IQ (how strong they are)
Type: lw6map_bot_info_t
Definition: lw6map_bot_info_t lw6map_teams_s::bot[LW6MAP_TEAMS_MAX_NB_BOTS]
Per-bot parameters, including their color and the ai engine they use.
Texture information, this is a bit different from a layer, since this is RGBA data, plus some meta-informations such as guessed colors.
Type: int
Definition: int lw6map_texture_s::w
Texture width.
Type: int
Definition: int lw6map_texture_s::h
Texture height.
Type: int
Definition: int lw6map_texture_s::has_alpha
True if texture has an alpha channel. If it has an alpha channel on disk (for instance, it’s a PNG) and if in practice it has nothing else than full opaque 255 alpha values, then this will be set to 0 anyway, the idea is to detect textures that really need the engine to handle transparency.
Type: lw6sys_color_8_t *
Definition: lw6sys_color_8_t* lw6map_texture_s::data
Color for each pixel.
Type: lw6map_color_couple_t
Definition: lw6map_color_couple_t lw6map_texture_s::guessed_color_base
Base guessed color couple. This is typically the best or more representative color couple (fg and bg) the program was able to automatically extract from the map.
Type: lw6map_color_couple_t
Definition: lw6map_color_couple_t lw6map_texture_s::guessed_color_alternate
An alternate color couple which still comes from the map but is a bit different from the base one.
View lcov test coverage results on http://www.ufoot.org/liquidwar/v6/doc/coverage/src/lib/mat/index.html.
dmat2: the matrix to initialize.
Fills the matrix with zeros, regardless of what was there before. Internally, does a memset the only advantage is that this function should use the right sizeof and therefore avoids typo errors.
Return value: none.
dmat2: the matrix to initialize.
Loads the matrix with the identity matrix, that is, zero everywhere but one on the main diag.
Return value: none.
dmat2: the matrix to initialize.
d: value which defines the translation.
Loads the matrix with a translation transformation matrix. By multiplicating by this matrix, a translation is done.
Return value: none.
dmat2: the matrix to initialize.
d: value used to scale matrix.
Loads the matrix with a scale matrix. By multiplicating by this matrix, a scaling is done.
Return value: none.
dmat2_a: 1st matrix to compare
dmat2_b: 2nd matrix to compare
Compares two matrix, returns true if they are equal.
Return value: 1 if equal, 0 if different.
dmat2: the matrix to transpose
Transposes the matrix, that is, inverts rows and columns.
Return value: none.
dmat2: the matrix used to calculate the determinant
Calulates the determinant of the matrix.
Return value: the determinant.
dmat2: matrix to modify
f: scale factor
Scales the matrix by multiplying all its members by a scalar value.
Return value: none
sys_context: global system context
dmat2_dst: the matrix inverted
dmat2_src: the matrix to invert
Inverts a matrix. Probably not the fastest implementation, but should work in all cases. Use hardware accelerated API such as OpenGL on dedicated hardware if you want power.
Return value: 1 if inverted, 0 if error, typically if determinant was 0, matrix can not be inverted.
dmat2: the result matrix
dmat2_a: the 1st matrix to multiply, on the left
dmat2_b: the 2nd matrix to multiply, on the right
Classic matrix multiplication.
Return value: none.
dvec2_dst: the result vector
dvec2_src: the source vector
Multiplication of matrix by vector. The result is a vector, the convention used is that of OpenGL, matrix are column major and vector are columns, that is, should you do it on a paper, vector is placed vertically, on the right of matrix. The other multiplication is not implemented, transposing the matrix will do it the other way if you wish.
Return value: none.
sys_context: global system context
Gives a readable version of the matrix, the representation uses newlines, with a different line for each row
Return value: newly allocated string
dmat3: the matrix to initialize.
Fills the matrix with zeros, regardless of what was there before. Internally, does a memset the only advantage is that this function should use the right sizeof and therefore avoids typo errors.
Return value: none.
dmat3: the matrix to initialize.
Loads the matrix with the identity matrix, that is, zero everywhere but one on the main diag.
Return value: none.
dmat3: the matrix to initialize.
dvec2: vector which defines the translation.
Loads the matrix with a translation transformation matrix. By multiplicating by this matrix, a translation is done.
Return value: none.
dmat3: the matrix to initialize.
dvec2: value used to scale matrix.
Loads the matrix with a scale matrix. By multiplicating by this matrix, a scaling is done.
Return value: none.
dmat3: the matrix to initialize.
r: value used to for the rotation, angle in radians.
Loads the matrix with a rotation matrix. By multiplicating by this matrix, a rotation is done, over a virtual Z axis such as Z is the cross product of X and Y.
Return value: none.
dmat3_a: 1st matrix to compare
dmat3_b: 2nd matrix to compare
Compares two matrix, returns true if they are equal.
Return value: 1 if equal, 0 if different.
dmat3: the matrix to transpose
Transposes the matrix, that is, inverts rows and columns.
Return value: none.
dmat3: the matrix used to calculate the determinant
Calulates the determinant of the matrix.
Return value: the determinant.
dmat3: matrix to modify
f: scale factor
Scales the matrix by multiplying all its members by a scalar value.
Return value: none
sys_context: global system context
dmat3_dst: the matrix inverted
dmat3_src: the matrix to invert
Inverts a matrix. Probably not the fastest implementation, but should work in all cases. Use hardware accelerated API such as OpenGL on dedicated hardware if you want power.
Return value: 1 if inverted, 0 if error, typically if determinant was 0, matrix can not be inverted.
dmat3: the result matrix
dmat3_a: the 1st matrix to multiply, on the left
dmat3_b: the 2nd matrix to multiply, on the right
Classic matrix multiplication.
Return value: none.
dvec3_dst: the result vector
dvec3_src: the source vector
Multiplication of matrix by vector. The result is a vector, the convention used is that of OpenGL, matrix are column major and vector are columns, that is, should you do it on a paper, vector is placed vertically, on the right of matrix. The other multiplication is not implemented, transposing the matrix will do it the other way if you wish.
Return value: none.
dvec2_dst: the result vector
Multiplication of matrix by vector. The result is a vector, the convention used is that of OpenGL, matrix are column major and vector are columns, that is, should you do it on a paper, vector is placed vertically, on the right of matrix. The other multiplication is not implemented, transposing the matrix will do it the other way if you wish. The vector, here, is smaller than the matrix, the last element is supposed to be 1, this is how one implements translation through multiplication.
Return value: none.
sys_context: global system context
Gives a readable version of the matrix, the representation uses newlines, with a different line for each row
Return value: newly allocated string
dmat4: the matrix to initialize.
Fills the matrix with zeros, regardless of what was there before. Internally, does a memset the only advantage is that this function should use the right sizeof and therefore avoids typo errors.
Return value: none.
dmat4: the matrix to initialize.
Loads the matrix with the identity matrix, that is, zero everywhere but one on the main diag.
Return value: none.
dmat4: the matrix to initialize.
dvec3: vector which defines the translation.
Loads the matrix with a translation transformation matrix. By multiplicating by this matrix, a translation is done.
Return value: none.
dmat4: the matrix to initialize.
dvec3: value used to scale matrix.
Loads the matrix with a scale matrix. By multiplicating by this matrix, a scaling is done.
Return value: none.
dmat4: the matrix to initialize.
r: value used to for the rotation, angle in radians.
Loads the matrix with a rotation matrix. By multiplicating by this matrix, a rotation is done, over the X axis.
Return value: none.
dmat4: the matrix to initialize.
r: value used to for the rotation, angle in radians.
Loads the matrix with a rotation matrix. By multiplicating by this matrix, a rotation is done, over the Y axis.
Return value: none.
dmat4: the matrix to initialize.
r: value used to for the rotation, angle in radians.
Loads the matrix with a rotation matrix. By multiplicating by this matrix, a rotation is done, over the Z axis.
Return value: none.
dmat4: the matrix to initialize.
left: left plane coordinate
right: right plane coordinate
bottom: bottom plane coordinate
top: top plane coordinate
nearval: near plane coordinate
farval: far plane coordinate
Loads the matrix with an orthogonal projection matrix. Does it the way glOrtho would, see https://www.opengl.org/sdk/docs/man2/xhtml/glOrtho.xml for details.
Note: use -nearVal and -farVal to initialize. It’s a little akward, if you expect to pass vectors with positions ranging from nearVal to farVal then you need to pass -nearVal and -farVal to this function. This is probably due to the fact that with a right-handed basis and X,Y set up "as usual", then Z is negative when going farther and farther. This tweak allows farVal to yield +1 and nearVal -1. We keep this function as is here, as this is the way OpenGL functions seem to work.
Return value: none.
dmat4: the matrix to initialize.
fovy: vertical field of view (degrees, not radians)
aspect: x/y ratio
znear: near plane coordinate (use -znear to initialize)
zfar: far plane coordinate (use -zfar to initialize)
Loads the matrix with a projection matrix. Does it the way gluPerspective would, see https://www.opengl.org/sdk/docs/man2/xhtml/gluPerspective.xml for details.
Return value: none.
dmat4_a: 1st matrix to compare
dmat4_b: 2nd matrix to compare
Compares two matrix, returns true if they are equal.
Return value: 1 if equal, 0 if different.
dmat4: the matrix to transpose
Transposes the matrix, that is, inverts rows and columns.
Return value: none.
dmat4: the matrix used to calculate the determinant
Calulates the determinant of the matrix.
Return value: the determinant.
dmat4: matrix to modify
f: scale factor
Scales the matrix by multiplying all its members by a scalar value.
Return value: none
sys_context: global system context
dmat4_dst: the matrix inverted
dmat4_src: the matrix to invert
Inverts a matrix. Probably not the fastest implementation, but should work in all cases. Use hardware accelerated API such as OpenGL on dedicated hardware if you want power.
Return value: 1 if inverted, 0 if error, typically if determinant was 0, matrix can not be inverted.
dmat4: the result matrix
dmat4_a: the 1st matrix to multiply, on the left
dmat4_b: the 2nd matrix to multiply, on the right
Classic matrix multiplication.
Return value: none.
dvec4_dst: the result vector
dmat4: the matrix to use
dvec4_src: the source vector
Multiplication of matrix by vector. The result is a vector, the convention used is that of OpenGL, matrix are column major and vector are columns, that is, should you do it on a paper, vector is placed vertically, on the right of matrix. The other multiplication is not implemented, transposing the matrix will do it the other way if you wish.
Return value: none.
dvec3_dst: the result vector
dmat4: the matrix to use
dvec3_src: the source vector
Multiplication of matrix by vector. The result is a vector, the convention used is that of OpenGL, matrix are column major and vector are columns, that is, should you do it on a paper, vector is placed vertically, on the right of matrix. The other multiplication is not implemented, transposing the matrix will do it the other way if you wish. The vector, here, is smaller than the matrix, the last element is supposed to be 1, this is how one implements translation through multiplication.
Return value: none.
sys_context: global system context
Gives a readable version of the matrix, the representation uses newlines, with a different line for each row
Return value: newly allocated string
dvec2: the vector to initialize.
Fills the vector with zeros, regardless of what was there before. Internally, does a memset the only advantage is that this function should use the right sizeof and therefore avoids typo errors.
Return value: none.
dvec2_a: 1st vector to compare
dvec2_b: 2nd vector to compare
Compares two vectors, returns true if they are equal.
Return value: 1 if equal, 0 if different.
dvec2: the vector to query.
Returns the square of a vector length. To get the real length one should then apply a square root but at this stage one has at least an idea about vector length, and this information is enough to compare them.
Return value: sigma(coord*coord)
dvec2: the vector to query.
Returns the size/length of a vector, this is the distance of the point from origin, not the number of elements.
Return value: the length of the vector.
sys_context: global system context
dvec2: the vector to normalize.
Normalizes a vector, that is, make its length be 1.
Return value: 1 if OK, 0 if error, such as trying to normalize vector zero.
sys_context: global system context
dvec2: the vector to homogeneous.
Transforms a vector into homegeneous coords, that is, scales it so that its last member is 1.
Return value: 1 if OK, 0 if error, such as trying to operate on vector zero.
dvec2: vector to modify
Calcs the opposite vector, by making a negation on all its members
Return value: none
dvec2: result vector
dvec2_a: 1st vector to add
dvec2_b: 2nd vector to add
Adds two vectors.
Return value: none
dvec2: result vector
dvec2_a: 1st vector
dvec2_b: 2nd vector, will be substracted to 1st vector
Substracts vector b from vector a.
Return value: none
dvec2_a: 1st vector
dvec2_b: 2nd vector
Calculates the dot AKA scalar product of the two vectors.
Return value: none
dvec3: result vector
dvec2_a: 1st vector
dvec2_b: 2nd vector
Calculates the cross AKA vectorial product of the two vectors. Since cross product only really makes sense in 3D, this function will interpret the 2D vectors as 3D vectors with z set t zero, that is, a vector in the xy plane.
Return value: none
dvec2: vector to modify
f: scale factor
Scales the vector by multiplying all its members by a scalar value.
Return value: none
dmat2: result matrix
dvec2_a: 1st row vector
dvec2_b: 2nd column vector
Multiplication of a row vector by a column vector to give a matrix.
Return value: none
sys_context: global system context
Gives a readable version of the vector
Return value: newly allocated string
dvec3: the vector to initialize.
Fills the vector with zeros, regardless of what was there before. Internally, does a memset the only advantage is that this function should use the right sizeof and therefore avoids typo errors.
Return value: none.
dvec3_a: 1st vector to compare
dvec3_b: 2nd vector to compare
Compares two vectors, returns true if they are equal.
Return value: 1 if equal, 0 if different.
dvec3: the vector to query.
Returns the square of a vector length. To get the real length one should then apply a square root but at this stage one has at least an idea about vector length, and this information is enough to compare them.
Return value: sigma(coord*coord)
dvec3: the vector to query.
Returns the size/length of a vector, this is the distance of the point from origin, not the number of elements.
Return value: the length of the vector.
sys_context: global system context
dvec3: the vector to normalize.
Normalizes a vector, that is, make its length be 1.
Return value: 1 if OK, 0 if error, such as trying to normalize vector zero.
sys_context: global system context
dvec3: the vector to homogeneous.
Transforms a vector into homegeneous coords, that is, scales it so that its last member is 1.
Return value: 1 if OK, 0 if error, such as trying to operate on vector zero.
dvec3: vector to modify
Calcs the opposite vector, by making a negation on all its members
Return value: none
dvec3: result vector
dvec3_a: 1st vector to add
dvec3_b: 2nd vector to add
Adds two vectors.
Return value: none
dvec3: result vector
dvec3_a: 1st vector
dvec3_b: 2nd vector, will be substracted to 1st vector
Substracts vector b from vector a.
Return value: none
dvec3_a: 1st vector
dvec3_b: 2nd vector
Calculates the dot AKA scalar product of the two vectors.
Return value: none
dvec3: result vector
dvec3_a: 1st vector
dvec3_b: 2nd vector
Calculates the cross AKA vectorial product of the two vectors.
Return value: none
dvec3: vector to modify
f: scale factor
Scales the vector by multiplying all its members by a scalar value.
Return value: none
dmat3: result matrix
dvec3_a: 1st row vector
dvec3_b: 3nd column vector
Multiplication of a row vector by a column vector to give a matrix.
Return value: none
sys_context: global system context
Gives a readable version of the vector
Return value: newly allocated string
dvec4: the vector to initialize.
Fills the vector with zeros, regardless of what was there before. Internally, does a memset the only advantage is that this function should use the right sizeof and therefore avoids typo errors.
Return value: none.
dvec4_a: 1st vector to compare
dvec4_b: 2nd vector to compare
Compares two vectors, returns true if they are equal.
Return value: 1 if equal, 0 if different.
dvec4: the vector to query.
Returns the square of a vector length. To get the real length one should then apply a square root but at this stage one has at least an idea about vector length, and this information is enough to compare them.
Return value: sigma(coord*coord)
dvec4: the vector to query.
Returns the size/length of a vector, this is the distance of the point from origin, not the number of elements.
Return value: the length of the vector.
sys_context: global system context
dvec4: the vector to normalize.
Normalizes a vector, that is, make its length be 1.
Return value: 1 if OK, 0 if error, such as trying to normalize vector zero.
sys_context: global system context
dvec4: the vector to homogeneous.
Transforms a vector into homegeneous coords, that is, scales it so that its last member is 1.
Return value: 1 if OK, 0 if error, such as trying to operate on vector zero.
dvec4: vector to modify
Calcs the opposite vector, by making a negation on all its members
Return value: none
dvec4: result vector
dvec4_a: 1st vector to add
dvec4_b: 2nd vector to add
Adds two vectors.
Return value: none
dvec4: result vector
dvec4_a: 1st vector
dvec4_b: 2nd vector, will be substracted to 1st vector
Substracts vector b from vector a.
Return value: none
dvec4_a: 1st vector
dvec4_b: 2nd vector
Calculates the dot AKA scalar product of the two vectors.
Return value: none
dvec3: result vector
dvec4_a: 1st vector
dvec4_b: 2nd vector
Calculates the cross AKA vectorial product of the two vectors. Since cross product only really makes sense in 3D, this function will interpret the 4D vectors as 3D vectors only, ignoring the last value.
Return value: none
dvec4: vector to modify
f: scale factor
Scales the vector by multiplying all its members by a scalar value.
Return value: none
dmat4: result matrix
dvec4_a: 1st row vector
dvec4_b: 4nd column vector
Multiplication of a row vector by a column vector to give a matrix.
Return value: none
sys_context: global system context
Gives a readable version of the vector
Return value: newly allocated string
fmat2: the matrix to initialize.
Fills the matrix with zeros, regardless of what was there before. Internally, does a memset the only advantage is that this function should use the right sizeof and therefore avoids typo errors.
Return value: none.
fmat2: the matrix to initialize.
Loads the matrix with the identity matrix, that is, zero everywhere but one on the main diag.
Return value: none.
fmat2: the matrix to initialize.
f: value which defines the translation.
Loads the matrix with a translation transformation matrix. By multiplicating by this matrix, a translation is done.
Return value: none.
fmat2: the matrix to initialize.
f: value used to scale matrix.
Loads the matrix with a scale matrix. By multiplicating by this matrix, a scaling is done.
Return value: none.
fmat2_a: 1st matrix to compare
fmat2_b: 2nd matrix to compare
Compares two matrix, returns true if they are equal.
Return value: 1 if equal, 0 if different.
fmat2: the matrix to transpose
Transposes the matrix, that is, inverts rows and columns.
Return value: none.
fmat2: the matrix used to calculate the determinant
Calulates the determinant of the matrix.
Return value: the determinant.
fmat2: matrix to modify
f: scale factor
Scales the matrix by multiplying all its members by a scalar value.
Return value: none
sys_context: global system context
fmat2_dst: the matrix inverted
fmat2_src: the matrix to invert
Inverts a matrix. Probably not the fastest implementation, but should work in all cases. Use hardware accelerated API such as OpenGL on dedicated hardware if you want power.
Return value: 1 if inverted, 0 if error, typically if determinant was 0, matrix can not be inverted.
fmat2: the result matrix
fmat2_a: the 1st matrix to multiply, on the left
fmat2_b: the 2nd matrix to multiply, on the right
Classic matrix multiplication.
Return value: none.
fvec2_dst: the result vector
fvec2_src: the source vector
Multiplication of matrix by vector. The result is a vector, the convention used is that of OpenGL, matrix are column major and vector are columns, that is, should you do it on a paper, vector is placed vertically, on the right of matrix. The other multiplication is not implemented, transposing the matrix will do it the other way if you wish.
Return value: none.
sys_context: global system context
Gives a readable version of the matrix, the representation uses newlines, with a different line for each row
Return value: newly allocated string
fmat3: the matrix to initialize.
Fills the matrix with zeros, regardless of what was there before. Internally, does a memset the only advantage is that this function should use the right sizeof and therefore avoids typo errors.
Return value: none.
fmat3: the matrix to initialize.
Loads the matrix with the identity matrix, that is, zero everywhere but one on the main diag.
Return value: none.
fmat3: the matrix to initialize.
fvec2: vector which defines the translation.
Loads the matrix with a translation transformation matrix. By multiplicating by this matrix, a translation is done.
Return value: none.
fmat3: the matrix to initialize.
fvec2: value used to scale matrix.
Loads the matrix with a scale matrix. By multiplicating by this matrix, a scaling is done.
Return value: none.
fmat3: the matrix to initialize.
r: value used to for the rotation, angle in radians.
Loads the matrix with a rotation matrix. By multiplicating by this matrix, a rotation is done, over a virtual Z axis such as Z is the cross product of X and Y.
Return value: none.
fmat3_a: 1st matrix to compare
fmat3_b: 2nd matrix to compare
Compares two matrix, returns true if they are equal.
Return value: 1 if equal, 0 if different.
fmat3: the matrix to transpose
Transposes the matrix, that is, inverts rows and columns.
Return value: none.
fmat3: the matrix used to calculate the determinant
Calulates the determinant of the matrix.
Return value: the determinant.
fmat3: matrix to modify
f: scale factor
Scales the matrix by multiplying all its members by a scalar value.
Return value: none
sys_context: global system context
fmat3_dst: the matrix inverted
fmat3_src: the matrix to invert
Inverts a matrix. Probably not the fastest implementation, but should work in all cases. Use hardware accelerated API such as OpenGL on dedicated hardware if you want power.
Return value: 1 if inverted, 0 if error, typically if determinant was 0, matrix can not be inverted.
fmat3: the result matrix
fmat3_a: the 1st matrix to multiply, on the left
fmat3_b: the 2nd matrix to multiply, on the right
Classic matrix multiplication.
Return value: none.
fvec3_dst: the result vector
fvec3_src: the source vector
Multiplication of matrix by vector. The result is a vector, the convention used is that of OpenGL, matrix are column major and vector are columns, that is, should you do it on a paper, vector is placed vertically, on the right of matrix. The other multiplication is not implemented, transposing the matrix will do it the other way if you wish.
Return value: none.
fvec2_dst: the result vector
Multiplication of matrix by vector. The result is a vector, the convention used is that of OpenGL, matrix are column major and vector are columns, that is, should you do it on a paper, vector is placed vertically, on the right of matrix. The other multiplication is not implemented, transposing the matrix will do it the other way if you wish. The vector, here, is smaller than the matrix, the last element is supposed to be 1, this is how one implements translation through multiplication.
Return value: none.
sys_context: global system context
Gives a readable version of the matrix, the representation uses newlines, with a different line for each row
Return value: newly allocated string
fmat4: the matrix to initialize.
Fills the matrix with zeros, regardless of what was there before. Internally, does a memset the only advantage is that this function should use the right sizeof and therefore avoids typo errors.
Return value: none.
fmat4: the matrix to initialize.
Loads the matrix with the identity matrix, that is, zero everywhere but one on the main diag.
Return value: none.
fmat4: the matrix to initialize.
fvec3: vector which defines the translation.
Loads the matrix with a translation transformation matrix. By multiplicating by this matrix, a translation is done.
Return value: none.
fmat4: the matrix to initialize.
fvec3: value used to scale matrix.
Loads the matrix with a scale matrix. By multiplicating by this matrix, a scaling is done.
Return value: none.
fmat4: the matrix to initialize.
r: value used to for the rotation, angle in radians.
Loads the matrix with a rotation matrix. By multiplicating by this matrix, a rotation is done, over the X axis.
Return value: none.
fmat4: the matrix to initialize.
r: value used to for the rotation, angle in radians.
Loads the matrix with a rotation matrix. By multiplicating by this matrix, a rotation is done, over the Y axis.
Return value: none.
fmat4: the matrix to initialize.
r: value used to for the rotation, angle in radians.
Loads the matrix with a rotation matrix. By multiplicating by this matrix, a rotation is done, over the Z axis.
Return value: none.
fmat4: the matrix to initialize.
left: left plane coordinate
right: right plane coordinate
bottom: bottom plane coordinate
top: top plane coordinate
nearval: near plane coordinate
farval: far plane coordinate
Loads the matrix with an orthogonal projection matrix. Does it the way glOrtho would, see https://www.opengl.org/sdk/docs/man2/xhtml/glOrtho.xml for details.
Note: use -nearVal and -farVal to initialize. It’s a little akward, if you expect to pass vectors with positions ranging from nearVal to farVal then you need to pass -nearVal and -farVal to this function. This is probably due to the fact that with a right-handed basis and X,Y set up "as usual", then Z is negative when going farther and farther. This tweak allows farVal to yield +1 and nearVal -1. We keep this function as is here, as this is the way OpenGL functions seem to work.
Return value: none.
fmat4: the matrix to initialize.
fovy: vertical field of view (degrees, not radians)
aspect: x/y ratio
znear: near plane coordinate (use -znear to initialize)
zfar: far plane coordinate (use -zfar to initialize)
Loads the matrix with a projection matrix. Does it the way gluPerspective would, see https://www.opengl.org/sdk/docs/man2/xhtml/gluPerspective.xml for details.
Return value: none.
fmat4_a: 1st matrix to compare
fmat4_b: 2nd matrix to compare
Compares two matrix, returns true if they are equal.
Return value: 1 if equal, 0 if different.
fmat4: the matrix to transpose
Transposes the matrix, that is, inverts rows and columns.
Return value: none.
fmat4: the matrix used to calculate the determinant
Calulates the determinant of the matrix.
Return value: the determinant.
fmat4: matrix to modify
f: scale factor
Scales the matrix by multiplying all its members by a scalar value.
Return value: none
sys_context: global system context
fmat4_dst: the matrix inverted
fmat4_src: the matrix to invert
Inverts a matrix. Probably not the fastest implementation, but should work in all cases. Use hardware accelerated API such as OpenGL on dedicated hardware if you want power.
Return value: 1 if inverted, 0 if error, typically if determinant was 0, matrix can not be inverted.
fmat4: the result matrix
fmat4_a: the 1st matrix to multiply, on the left
fmat4_b: the 2nd matrix to multiply, on the right
Classic matrix multiplication.
Return value: none.
fvec4_dst: the result vector
fmat4: the matrix to use
fvec4_src: the source vector
Multiplication of matrix by vector. The result is a vector, the convention used is that of OpenGL, matrix are column major and vector are columns, that is, should you do it on a paper, vector is placed vertically, on the right of matrix. The other multiplication is not implemented, transposing the matrix will do it the other way if you wish.
Return value: none.
fvec3_dst: the result vector
fmat4: the matrix to use
fvec3_src: the source vector
Multiplication of matrix by vector. The result is a vector, the convention used is that of OpenGL, matrix are column major and vector are columns, that is, should you do it on a paper, vector is placed vertically, on the right of matrix. The other multiplication is not implemented, transposing the matrix will do it the other way if you wish. The vector, here, is smaller than the matrix, the last element is supposed to be 1, this is how one implements translation through multiplication.
Return value: none.
sys_context: global system context
Gives a readable version of the matrix, the representation uses newlines, with a different line for each row
Return value: newly allocated string
fvec2: the vector to initialize.
Fills the vector with zeros, regardless of what was there before. Internally, does a memset the only advantage is that this function should use the right sizeof and therefore avoids typo errors.
Return value: none.
fvec2_a: 1st vector to compare
fvec2_b: 2nd vector to compare
Compares two vectors, returns true if they are equal.
Return value: 1 if equal, 0 if different.
fvec2: the vector to query.
Returns the square of a vector length. To get the real length one should then apply a square root but at this stage one has at least an idea about vector length, and this information is enough to compare them.
Return value: sigma(coord*coord)
fvec2: the vector to query.
Returns the size/length of a vector, this is the distance of the point from origin, not the number of elements.
Return value: the length of the vector.
sys_context: global system context
fvec2: the vector to normalize.
Normalizes a vector, that is, make its length be 1.
Return value: 1 if OK, 0 if error, such as trying to normalize vector zero.
sys_context: global system context
fvec2: the vector to homogeneous.
Transforms a vector into homegeneous coords, that is, scales it so that its last member is 1.
Return value: 1 if OK, 0 if error, such as trying to operate on vector zero.
fvec2: vector to modify
Calcs the opposite vector, by making a negation on all its members
Return value: none
fvec2: result vector
fvec2_a: 1st vector to add
fvec2_b: 2nd vector to add
Adds two vectors.
Return value: none
fvec2: result vector
fvec2_a: 1st vector
fvec2_b: 2nd vector, will be substracted to 1st vector
Substracts vector b from vector a.
Return value: none
fvec2_a: 1st vector
fvec2_b: 2nd vector
Calculates the dot AKA scalar product of the two vectors.
Return value: none
fvec3: result vector
fvec2_a: 1st vector
fvec2_b: 2nd vector
Calculates the cross AKA vectorial product of the two vectors. Since cross product only really makes sense in 3D, this function will interpret the 2D vectors as 3D vectors with z set t zero, that is, a vector in the xy plane.
Return value: none
fvec2: vector to modify
f: scale factor
Scales the vector by multiplying all its members by a scalar value.
Return value: none
fmat2: result matrix
fvec2_a: 1st row vector
fvec2_b: 2nd column vector
Multiplication of a row vector by a column vector to give a matrix.
Return value: none
sys_context: global system context
Gives a readable version of the vector
Return value: newly allocated string
fvec3: the vector to initialize.
Fills the vector with zeros, regardless of what was there before. Internally, does a memset the only advantage is that this function should use the right sizeof and therefore avoids typo errors.
Return value: none.
fvec3_a: 1st vector to compare
fvec3_b: 2nd vector to compare
Compares two vectors, returns true if they are equal.
Return value: 1 if equal, 0 if different.
fvec3: the vector to query.
Returns the square of a vector length. To get the real length one should then apply a square root but at this stage one has at least an idea about vector length, and this information is enough to compare them.
Return value: sigma(coord*coord)
fvec3: the vector to query.
Returns the size/length of a vector, this is the distance of the point from origin, not the number of elements.
Return value: the length of the vector.
sys_context: global system context
fvec3: the vector to normalize.
Normalizes a vector, that is, make its length be 1.
Return value: 1 if OK, 0 if error, such as trying to normalize vector zero.
sys_context: global system context
fvec3: the vector to homogeneous.
Transforms a vector into homegeneous coords, that is, scales it so that its last member is 1.
Return value: 1 if OK, 0 if error, such as trying to operate on vector zero.
fvec3: vector to modify
Calcs the opposite vector, by making a negation on all its members
Return value: none
fvec3: result vector
fvec3_a: 1st vector to add
fvec3_b: 2nd vector to add
Adds two vectors.
Return value: none
fvec3: result vector
fvec3_a: 1st vector
fvec3_b: 2nd vector, will be substracted to 1st vector
Substracts vector b from vector a.
Return value: none
fvec3_a: 1st vector
fvec3_b: 2nd vector
Calculates the dot AKA scalar product of the two vectors.
Return value: none
fvec3: result vector
fvec3_a: 1st vector
fvec3_b: 2nd vector
Calculates the cross AKA vectorial product of the two vectors.
Return value: none
fvec3: vector to modify
f: scale factor
Scales the vector by multiplying all its members by a scalar value.
Return value: none
fmat3: result matrix
fvec3_a: 1st row vector
fvec3_b: 3nd column vector
Multiplication of a row vector by a column vector to give a matrix.
Return value: none
sys_context: global system context
Gives a readable version of the vector
Return value: newly allocated string
fvec4: the vector to initialize.
Fills the vector with zeros, regardless of what was there before. Internally, does a memset the only advantage is that this function should use the right sizeof and therefore avoids typo errors.
Return value: none.
fvec4_a: 1st vector to compare
fvec4_b: 2nd vector to compare
Compares two vectors, returns true if they are equal.
Return value: 1 if equal, 0 if different.
fvec4: the vector to query.
Returns the square of a vector length. To get the real length one should then apply a square root but at this stage one has at least an idea about vector length, and this information is enough to compare them.
Return value: sigma(coord*coord)
fvec4: the vector to query.
Returns the size/length of a vector, this is the distance of the point from origin, not the number of elements.
Return value: the length of the vector.
sys_context: global system context
fvec4: the vector to normalize.
Normalizes a vector, that is, make its length be 1.
Return value: 1 if OK, 0 if error, such as trying to normalize vector zero.
sys_context: global system context
fvec4: the vector to homogeneous.
Transforms a vector into homegeneous coords, that is, scales it so that its last member is 1.
Return value: 1 if OK, 0 if error, such as trying to operate on vector zero.
fvec4: vector to modify
Calcs the opposite vector, by making a negation on all its members
Return value: none
fvec4: result vector
fvec4_a: 1st vector to add
fvec4_b: 2nd vector to add
Adds two vectors.
Return value: none
fvec4: result vector
fvec4_a: 1st vector
fvec4_b: 2nd vector, will be substracted to 1st vector
Substracts vector b from vector a.
Return value: none
fvec4_a: 1st vector
fvec4_b: 2nd vector
Calculates the dot AKA scalar product of the two vectors.
Return value: none
fvec3: result vector
fvec4_a: 1st vector
fvec4_b: 2nd vector
Calculates the cross AKA vectorial product of the two vectors. Since cross product only really makes sense in 3D, this function will interpret the 4D vectors as 3D vectors only, ignoring the last value.
Return value: none
fvec4: vector to modify
f: scale factor
Scales the vector by multiplying all its members by a scalar value.
Return value: none
fmat4: result matrix
fvec4_a: 1st row vector
fvec4_b: 4nd column vector
Multiplication of a row vector by a column vector to give a matrix.
Return value: none
sys_context: global system context
Gives a readable version of the vector
Return value: newly allocated string
f_a: 1st value to compare
f_b: 2nd value to compare
Compares two value, and returns true if they look the same. This similarity is based on a percentage of difference for big enough values, and for very small values, they are just considered equal whatever happens. This is far from perfect but the purpose is usually just to track blunders in matrix code.
Return value: 1 if similar, 0 if not.
i_a: 1st value to compare
i_b: 2nd value to compare
Compares two value, and returns true if they look the same. This similarity is based on a percentage of difference for big enough values, and for very small values, they are just considered equal whatever happens. This is far from perfect but the purpose is usually just to track blunders in matrix code.
Return value: 1 if similar, 0 if not.
d_a: 1st value to compare
d_b: 2nd value to compare
Compares two value, and returns true if they look the same. This similarity is based on a percentage of difference for big enough values, and for very small values, they are just considered equal whatever happens. This is far from perfect but the purpose is usually just to track blunders in matrix code.
Return value: 1 if similar, 0 if not.
x_a: 1st value to compare
x_b: 2nd value to compare
Compares two value, and returns true if they look the same. This similarity is based on a percentage of difference for big enough values, and for very small values, they are just considered equal whatever happens. This is far from perfect but the purpose is usually just to track blunders in matrix code.
Return value: 1 if similar, 0 if not.
sys_context: global system context
mode: test mode (bitmask)
Registers all tests for the libmat module.
Return value: 1 if test is successfull, 0 on error.
sys_context: global system context
mode: test mode (bitmask)
Runs the mat module test suite, testing most (if not all...)
functions.
Return value: 1 if test is successfull, 0 on error.
Double 2x2 matrix (AKA 2D rectangle).
Type: double
Definition: double lw6mat_dmat2_t::m[LW6MAT_MAT2_M_SIZE][LW6MAT_MAT2_M_SIZE]
Accessor with 2 dimensions array index. The convention is column-major mode as done in OpenGL so that m[i][j] is element at column i and row j. Beware, this is not the most natural order for a C programmer.
Type: double
Definition: double lw6mat_dmat2_t::v[LW6MAT_MAT2_V_SIZE_X_SIZE]
Accessor with flat array index. To access element a column i and row j, use i*2+j.
Double 3x3 matrix (AKA 3D triangle).
Type: double
Definition: double lw6mat_dmat3_t::m[LW6MAT_MAT3_M_SIZE][LW6MAT_MAT3_M_SIZE]
Accessor with 2 dimensions array index. The convention is column-major mode as done in OpenGL so that m[i][j] is element at column i and row j. Beware, this is not the most natural order for a C programmer.
Type: double
Definition: double lw6mat_dmat3_t::v[LW6MAT_MAT3_V_SIZE_X_SIZE]
Accessor with flat array index. To access element a column i and row j, use i*3+j.
Double 4x4 matrix (AKA 3D transformation/composition matrix).
Type: double
Definition: double lw6mat_dmat4_t::m[LW6MAT_MAT4_M_SIZE][LW6MAT_MAT4_M_SIZE]
Accessor with 2 dimensions array index. The convention is column-major mode as done in OpenGL so that m[i][j] is element at column i and row j. Beware, this is not the most natural order for a C programmer.
Type: double
Definition: double lw6mat_dmat4_t::v[LW6MAT_MAT4_V_SIZE_X_SIZE]
Accessor with flat array index. To access element a column i and row j, use i*4+j.
Double vector with 2 elements (AKA 2D point).
Type: double
Definition: double lw6mat_dvec2_t::x
Type: double
Definition: double lw6mat_dvec2_t::y
Type: struct lw6mat_dvec2_t::16
Definition: struct lw6mat_dvec2_t::16 lw6mat_dvec2_t::p
Accessor with named/point coords.
Type: double
Definition: double lw6mat_dvec2_t::s
Type: double
Definition: double lw6mat_dvec2_t::t
Type: struct lw6mat_dvec2_t::17
Definition: struct lw6mat_dvec2_t::17 lw6mat_dvec2_t::t
Accessor with texture-like name.
Type: double
Definition: double lw6mat_dvec2_t::v[LW6MAT_VEC2_V_SIZE]
Accessor with array index.
Double vector with 3 elements (AKA 3D point).
Type: double
Definition: double lw6mat_dvec3_t::x
Type: double
Definition: double lw6mat_dvec3_t::y
Type: double
Definition: double lw6mat_dvec3_t::z
Type: struct lw6mat_dvec3_t::18
Definition: struct lw6mat_dvec3_t::18 lw6mat_dvec3_t::p
Accessor with named/point coords.
Type: double
Definition: double lw6mat_dvec3_t::r
Type: double
Definition: double lw6mat_dvec3_t::g
Type: double
Definition: double lw6mat_dvec3_t::b
Type: struct lw6mat_dvec3_t::19
Definition: struct lw6mat_dvec3_t::19 lw6mat_dvec3_t::c
Accessor with color-like name.
Type: double
Definition: double lw6mat_dvec3_t::s
Type: double
Definition: double lw6mat_dvec3_t::t
Type: double
Definition: double lw6mat_dvec3_t::p
Type: struct lw6mat_dvec3_t::20
Definition: struct lw6mat_dvec3_t::20 lw6mat_dvec3_t::t
Accessor with texture-like name.
Type: double
Definition: double lw6mat_dvec3_t::v[LW6MAT_VEC3_V_SIZE]
Accessor with array index.
Type: lw6mat_dvec2_t
Definition: lw6mat_dvec2_t lw6mat_dvec3_t::v2
Accessor with smaller-sized vector, only 2 dimensions.
Double vector with 4 elements (AKA quaternion).
Type: double
Definition: double lw6mat_dvec4_t::x
Type: double
Definition: double lw6mat_dvec4_t::y
Type: double
Definition: double lw6mat_dvec4_t::z
Type: double
Definition: double lw6mat_dvec4_t::w
Type: struct lw6mat_dvec4_t::21
Definition: struct lw6mat_dvec4_t::21 lw6mat_dvec4_t::p
Accessor with named/point coords.
Type: double
Definition: double lw6mat_dvec4_t::r
Type: double
Definition: double lw6mat_dvec4_t::g
Type: double
Definition: double lw6mat_dvec4_t::b
Type: double
Definition: double lw6mat_dvec4_t::a
Type: struct lw6mat_dvec4_t::22
Definition: struct lw6mat_dvec4_t::22 lw6mat_dvec4_t::c
Accessor with color-like name.
Type: double
Definition: double lw6mat_dvec4_t::s
Type: double
Definition: double lw6mat_dvec4_t::t
Type: double
Definition: double lw6mat_dvec4_t::p
Type: double
Definition: double lw6mat_dvec4_t::q
Type: struct lw6mat_dvec4_t::23
Definition: struct lw6mat_dvec4_t::23 lw6mat_dvec4_t::t
Accessor with texture-like name.
Type: double
Definition: double lw6mat_dvec4_t::v[LW6MAT_VEC4_V_SIZE]
Accessor with array index.
Type: lw6mat_dvec2_t
Definition: lw6mat_dvec2_t lw6mat_dvec4_t::v2
Accessor with smaller-sized vector, only 2 dimensions.
Type: lw6mat_dvec3_t
Definition: lw6mat_dvec3_t lw6mat_dvec4_t::v3
Accessor with smaller-sized vector, only 3 dimensions.
Float 2x2 matrix (AKA 2D rectangle).
Type: float
Definition: float lw6mat_fmat2_t::m[LW6MAT_MAT2_M_SIZE][LW6MAT_MAT2_M_SIZE]
Accessor with 2 dimensions array index. The convention is column-major mode as done in OpenGL so that m[i][j] is element at column i and row j. Beware, this is not the most natural order for a C programmer.
Type: float
Definition: float lw6mat_fmat2_t::v[LW6MAT_MAT2_V_SIZE_X_SIZE]
Accessor with flat array index. To access element a column i and row j, use i*4+j.
Float 3x3 matrix (AKA 3D triangle).
Type: float
Definition: float lw6mat_fmat3_t::m[LW6MAT_MAT3_M_SIZE][LW6MAT_MAT3_M_SIZE]
Accessor with 2 dimensions array index. The convention is column-major mode as done in OpenGL so that m[i][j] is element at column i and row j. Beware, this is not the most natural order for a C programmer.
Type: float
Definition: float lw6mat_fmat3_t::v[LW6MAT_MAT3_V_SIZE_X_SIZE]
Accessor with flat array index. To access element a column i and row j, use i*3+j.
Float 4x4 matrix (AKA 3D transformation/composition matrix).
Type: float
Definition: float lw6mat_fmat4_t::m[LW6MAT_MAT4_M_SIZE][LW6MAT_MAT4_M_SIZE]
Accessor with 2 dimensions array index. The convention is column-major mode as done in OpenGL so that m[i][j] is element at column i and row j. Beware, this is not the most natural order for a C programmer.
Type: float
Definition: float lw6mat_fmat4_t::v[LW6MAT_MAT4_V_SIZE_X_SIZE]
Accessor with flat array index. To access element a column i and row j, use i*4+j.
Float vector with 2 elements (AKA 2D point).
Type: float
Definition: float lw6mat_fvec2_t::x
Type: float
Definition: float lw6mat_fvec2_t::y
Type: struct lw6mat_fvec2_t::0
Definition: struct lw6mat_fvec2_t::0 lw6mat_fvec2_t::p
Accessor with named/point coords.
Type: float
Definition: float lw6mat_fvec2_t::s
Type: float
Definition: float lw6mat_fvec2_t::t
Type: struct lw6mat_fvec2_t::1
Definition: struct lw6mat_fvec2_t::1 lw6mat_fvec2_t::t
Accessor with texture-like name.
Type: float
Definition: float lw6mat_fvec2_t::v[LW6MAT_VEC2_V_SIZE]
Accessor with array index.
Float vector with 3 elements (AKA 3D point).
Type: float
Definition: float lw6mat_fvec3_t::x
Type: float
Definition: float lw6mat_fvec3_t::y
Type: float
Definition: float lw6mat_fvec3_t::z
Type: struct lw6mat_fvec3_t::2
Definition: struct lw6mat_fvec3_t::2 lw6mat_fvec3_t::p
Accessor with named/point coords.
Type: float
Definition: float lw6mat_fvec3_t::r
Type: float
Definition: float lw6mat_fvec3_t::g
Type: float
Definition: float lw6mat_fvec3_t::b
Type: struct lw6mat_fvec3_t::3
Definition: struct lw6mat_fvec3_t::3 lw6mat_fvec3_t::c
Accessor with color-like name.
Type: float
Definition: float lw6mat_fvec3_t::s
Type: float
Definition: float lw6mat_fvec3_t::t
Type: float
Definition: float lw6mat_fvec3_t::p
Type: struct lw6mat_fvec3_t::4
Definition: struct lw6mat_fvec3_t::4 lw6mat_fvec3_t::t
Accessor with texture-like name.
Type: float
Definition: float lw6mat_fvec3_t::v[LW6MAT_VEC3_V_SIZE]
Accessor with array index.
Type: lw6mat_fvec2_t
Definition: lw6mat_fvec2_t lw6mat_fvec3_t::v2
Accessor with smaller-sized vector, only 2 dimensions.
Float vector with 4 elements (AKA quaternion).
Type: float
Definition: float lw6mat_fvec4_t::x
Type: float
Definition: float lw6mat_fvec4_t::y
Type: float
Definition: float lw6mat_fvec4_t::z
Type: float
Definition: float lw6mat_fvec4_t::w
Type: struct lw6mat_fvec4_t::5
Definition: struct lw6mat_fvec4_t::5 lw6mat_fvec4_t::p
Accessor with named/point coords.
Type: float
Definition: float lw6mat_fvec4_t::r
Type: float
Definition: float lw6mat_fvec4_t::g
Type: float
Definition: float lw6mat_fvec4_t::b
Type: float
Definition: float lw6mat_fvec4_t::a
Type: struct lw6mat_fvec4_t::6
Definition: struct lw6mat_fvec4_t::6 lw6mat_fvec4_t::c
Accessor with color-like name.
Type: float
Definition: float lw6mat_fvec4_t::s
Type: float
Definition: float lw6mat_fvec4_t::t
Type: float
Definition: float lw6mat_fvec4_t::p
Type: float
Definition: float lw6mat_fvec4_t::q
Type: struct lw6mat_fvec4_t::7
Definition: struct lw6mat_fvec4_t::7 lw6mat_fvec4_t::t
Accessor with texture-like name.
Type: float
Definition: float lw6mat_fvec4_t::v[LW6MAT_VEC4_V_SIZE]
Accessor with array index.
Type: lw6mat_fvec2_t
Definition: lw6mat_fvec2_t lw6mat_fvec4_t::v2
Accessor with smaller-sized vector, only 2 dimensions.
Type: lw6mat_fvec3_t
Definition: lw6mat_fvec3_t lw6mat_fvec4_t::v3
Accessor with smaller-sized vector, only 3 dimensions.
Integer 2x2 matrix (AKA 2D rectangle).
Type: int32_t
Definition: int32_t lw6mat_imat2_t::m[LW6MAT_MAT2_M_SIZE][LW6MAT_MAT2_M_SIZE]
Accessor with 2 dimensions array index. The convention is column-major mode as done in OpenGL so that m[i][j] is element at column i and row j. Beware, this is not the most natural order for a C programmer.
Type: int32_t
Definition: int32_t lw6mat_imat2_t::v[LW6MAT_MAT2_V_SIZE_X_SIZE]
Accessor with flat array index. To access element a column i and row j, use i*2+j.
Integer 3x3 matrix (AKA 3D triangle).
Type: int32_t
Definition: int32_t lw6mat_imat3_t::m[LW6MAT_MAT3_M_SIZE][LW6MAT_MAT3_M_SIZE]
Accessor with 2 dimensions array index. The convention is column-major mode as done in OpenGL so that m[i][j] is element at column i and row j. Beware, this is not the most natural order for a C programmer.
Type: int32_t
Definition: int32_t lw6mat_imat3_t::v[LW6MAT_MAT3_V_SIZE_X_SIZE]
Accessor with flat array index. To access element a column i and row j, use i*3+j.
Integer 4x4 matrix (AKA 3D transformation/composition matrix).
Type: int32_t
Definition: int32_t lw6mat_imat4_t::m[LW6MAT_MAT4_M_SIZE][LW6MAT_MAT4_M_SIZE]
Accessor with 2 dimensions array index. The convention is column-major mode as done in OpenGL so that m[i][j] is element at column i and row j. Beware, this is not the most natural order for a C programmer.
Type: int32_t
Definition: int32_t lw6mat_imat4_t::v[LW6MAT_MAT4_V_SIZE_X_SIZE]
Accessor with flat array index. To access element a column i and row j, use i*4+j.
Integer vector with 2 elements (AKA 2D point).
Type: int32_t
Definition: int32_t lw6mat_ivec2_t::x
Type: int32_t
Definition: int32_t lw6mat_ivec2_t::y
Type: struct lw6mat_ivec2_t::8
Definition: struct lw6mat_ivec2_t::8 lw6mat_ivec2_t::p
Accessor with named/point coords.
Type: int32_t
Definition: int32_t lw6mat_ivec2_t::s
Type: int32_t
Definition: int32_t lw6mat_ivec2_t::t
Type: struct lw6mat_ivec2_t::9
Definition: struct lw6mat_ivec2_t::9 lw6mat_ivec2_t::t
Accessor with texture-like name.
Type: int32_t
Definition: int32_t lw6mat_ivec2_t::v[LW6MAT_VEC2_V_SIZE]
Accessor with array index.
Integer vector with 3 elements (AKA 3D point).
Type: int32_t
Definition: int32_t lw6mat_ivec3_t::x
Type: int32_t
Definition: int32_t lw6mat_ivec3_t::y
Type: int32_t
Definition: int32_t lw6mat_ivec3_t::z
Type: struct lw6mat_ivec3_t::10
Definition: struct lw6mat_ivec3_t::10 lw6mat_ivec3_t::p
Accessor with named/point coords.
Type: int32_t
Definition: int32_t lw6mat_ivec3_t::r
Type: int32_t
Definition: int32_t lw6mat_ivec3_t::g
Type: int32_t
Definition: int32_t lw6mat_ivec3_t::b
Type: struct lw6mat_ivec3_t::11
Definition: struct lw6mat_ivec3_t::11 lw6mat_ivec3_t::c
Accessor with color-like name.
Type: int32_t
Definition: int32_t lw6mat_ivec3_t::s
Type: int32_t
Definition: int32_t lw6mat_ivec3_t::t
Type: int32_t
Definition: int32_t lw6mat_ivec3_t::p
Type: struct lw6mat_ivec3_t::12
Definition: struct lw6mat_ivec3_t::12 lw6mat_ivec3_t::t
Accessor with texture-like name.
Type: int32_t
Definition: int32_t lw6mat_ivec3_t::v[LW6MAT_VEC3_V_SIZE]
Accessor with array index.
Integer vector with 4 elements (AKA quaternion).
Type: int32_t
Definition: int32_t lw6mat_ivec4_t::x
Type: int32_t
Definition: int32_t lw6mat_ivec4_t::y
Type: int32_t
Definition: int32_t lw6mat_ivec4_t::z
Type: int32_t
Definition: int32_t lw6mat_ivec4_t::w
Type: struct lw6mat_ivec4_t::13
Definition: struct lw6mat_ivec4_t::13 lw6mat_ivec4_t::p
Accessor with named/point coords.
Type: int32_t
Definition: int32_t lw6mat_ivec4_t::r
Type: int32_t
Definition: int32_t lw6mat_ivec4_t::g
Type: int32_t
Definition: int32_t lw6mat_ivec4_t::b
Type: int32_t
Definition: int32_t lw6mat_ivec4_t::a
Type: struct lw6mat_ivec4_t::14
Definition: struct lw6mat_ivec4_t::14 lw6mat_ivec4_t::c
Accessor with color-like name.
Type: int32_t
Definition: int32_t lw6mat_ivec4_t::s
Type: int32_t
Definition: int32_t lw6mat_ivec4_t::t
Type: int32_t
Definition: int32_t lw6mat_ivec4_t::p
Type: int32_t
Definition: int32_t lw6mat_ivec4_t::q
Type: struct lw6mat_ivec4_t::15
Definition: struct lw6mat_ivec4_t::15 lw6mat_ivec4_t::t
Accessor with texture-like name.
Type: int32_t
Definition: int32_t lw6mat_ivec4_t::v[LW6MAT_VEC4_V_SIZE]
Accessor with array index.
Fixed Point 2x2 matrix (AKA 2D rectangle).
Type: int32_t
Definition: int32_t lw6mat_xmat2_t::m[LW6MAT_MAT2_M_SIZE][LW6MAT_MAT2_M_SIZE]
Accessor with 2 dimensions array index. The convention is column-major mode as done in OpenGL so that m[i][j] is element at column i and row j. Beware, this is not the most natural order for a C programmer.
Type: int32_t
Definition: int32_t lw6mat_xmat2_t::v[LW6MAT_MAT2_V_SIZE_X_SIZE]
Accessor with flat array index. To access element a column i and row j, use i*3+j.
Fixed Point 3x3 matrix (AKA 3D triangle).
Type: int32_t
Definition: int32_t lw6mat_xmat3_t::m[LW6MAT_MAT3_M_SIZE][LW6MAT_MAT3_M_SIZE]
Accessor with 2 dimensions array index. The convention is column-major mode as done in OpenGL so that m[i][j] is element at column i and row j. Beware, this is not the most natural order for a C programmer.
Type: int32_t
Definition: int32_t lw6mat_xmat3_t::v[LW6MAT_MAT3_V_SIZE_X_SIZE]
Accessor with flat array index. To access element a column i and row j, use i*3+j.
Fixed Point 4x4 matrix (AKA 3D transformation/composition matrix).
Type: int32_t
Definition: int32_t lw6mat_xmat4_t::m[LW6MAT_MAT4_M_SIZE][LW6MAT_MAT4_M_SIZE]
Accessor with 2 dimensions array index. The convention is column-major mode as done in OpenGL so that m[i][j] is element at column i and row j. Beware, this is not the most natural order for a C programmer.
Type: int32_t
Definition: int32_t lw6mat_xmat4_t::v[LW6MAT_MAT4_V_SIZE_X_SIZE]
Accessor with flat array index. To access element a column i and row j, use i*4+j.
Fixed Point vector with 2 elements (AKA 2D point).
Type: int32_t
Definition: int32_t lw6mat_xvec2_t::x
Type: int32_t
Definition: int32_t lw6mat_xvec2_t::y
Type: struct lw6mat_xvec2_t::24
Definition: struct lw6mat_xvec2_t::24 lw6mat_xvec2_t::p
Accessor with named/point coords.
Type: int32_t
Definition: int32_t lw6mat_xvec2_t::s
Type: int32_t
Definition: int32_t lw6mat_xvec2_t::t
Type: struct lw6mat_xvec2_t::25
Definition: struct lw6mat_xvec2_t::25 lw6mat_xvec2_t::t
Accessor with texture-like name.
Type: int32_t
Definition: int32_t lw6mat_xvec2_t::v[LW6MAT_VEC2_V_SIZE]
Accessor with array index.
Fixed Point vector with 3 elements (AKA 3D point).
Type: int32_t
Definition: int32_t lw6mat_xvec3_t::x
Type: int32_t
Definition: int32_t lw6mat_xvec3_t::y
Type: int32_t
Definition: int32_t lw6mat_xvec3_t::z
Type: struct lw6mat_xvec3_t::26
Definition: struct lw6mat_xvec3_t::26 lw6mat_xvec3_t::p
Accessor with named/point coords.
Type: int32_t
Definition: int32_t lw6mat_xvec3_t::r
Type: int32_t
Definition: int32_t lw6mat_xvec3_t::g
Type: int32_t
Definition: int32_t lw6mat_xvec3_t::b
Type: struct lw6mat_xvec3_t::27
Definition: struct lw6mat_xvec3_t::27 lw6mat_xvec3_t::c
Accessor with color-like name.
Type: int32_t
Definition: int32_t lw6mat_xvec3_t::s
Type: int32_t
Definition: int32_t lw6mat_xvec3_t::t
Type: int32_t
Definition: int32_t lw6mat_xvec3_t::p
Type: struct lw6mat_xvec3_t::28
Definition: struct lw6mat_xvec3_t::28 lw6mat_xvec3_t::t
Accessor with texture-like name.
Type: int32_t
Definition: int32_t lw6mat_xvec3_t::v[LW6MAT_VEC3_V_SIZE]
Accessor with array index.
Fixed Point vector with 4 elements (AKA quaternion).
Type: int32_t
Definition: int32_t lw6mat_xvec4_t::x
Type: int32_t
Definition: int32_t lw6mat_xvec4_t::y
Type: int32_t
Definition: int32_t lw6mat_xvec4_t::z
Type: int32_t
Definition: int32_t lw6mat_xvec4_t::w
Type: struct lw6mat_xvec4_t::29
Definition: struct lw6mat_xvec4_t::29 lw6mat_xvec4_t::p
Accessor with named/point coords.
Type: int32_t
Definition: int32_t lw6mat_xvec4_t::r
Type: int32_t
Definition: int32_t lw6mat_xvec4_t::g
Type: int32_t
Definition: int32_t lw6mat_xvec4_t::b
Type: int32_t
Definition: int32_t lw6mat_xvec4_t::a
Type: struct lw6mat_xvec4_t::30
Definition: struct lw6mat_xvec4_t::30 lw6mat_xvec4_t::c
Accessor with color-like name.
Type: int32_t
Definition: int32_t lw6mat_xvec4_t::s
Type: int32_t
Definition: int32_t lw6mat_xvec4_t::t
Type: int32_t
Definition: int32_t lw6mat_xvec4_t::p
Type: int32_t
Definition: int32_t lw6mat_xvec4_t::q
Type: struct lw6mat_xvec4_t::31
Definition: struct lw6mat_xvec4_t::31 lw6mat_xvec4_t::t
Accessor with texture-like name.
Type: int32_t
Definition: int32_t lw6mat_xvec4_t::v[LW6MAT_VEC4_V_SIZE]
Accessor with array index.
View lcov test coverage results on http://www.ufoot.org/liquidwar/v6/doc/coverage/src/lib/msg/index.html.
sys_context: global system context
info: the node info to use
Generate a HELLO command.
Return value: newly allocated string.
sys_context: global system context
info: the node info to use
ticket: the ticket to send
Generate a TICKET command.
Return value: newly allocated string.
sys_context: global system context
info: the node info to use
key: the key to identify the message
serial: serial number of latest data message
Generate a FOO command.
Return value: newly allocated string.
sys_context: global system context
info: the node info to use
key: the key to identify the message
serial: serial number of latest data message
Generate a BAR command.
Return value: newly allocated string.
sys_context: global system context
info: the node info to use
seq: the current seq
serial: the serial message number to start with
Generate a JOIN command. The seq parameter, if 0, means we want to request to join to a server. Wether this is a real server or a physical client acting as a server is out of consideration, 0 means request to join, period. If greater than 0, means we are accepting a client, and then the value is our current seq, which the client must use to calibrate its own data. The serial number is here to avoid querying messages before the join and keep the serie complete.
Return value: newly allocated string.
sys_context: global system context
info: the node info to use
Generate a GOODBYE command.
Return value: newly allocated string.
sys_context: global system context
serial: the message serial number
i: the message index in the group
n: the number of messages in the group
seq: the message seq (round + an offset)
ker_msg: the actual content of the message (passed to core algo)
Generate a DATA command. Serial is an ever increasing number, i and n are most of the time 1 and 1, they are usefull only in long multipart messages.
Return value: newly allocated string.
sys_context: global system context
serial: the message serial number
i: the message index in the group
n: the number of messages in the group
seq: the message seq (round + an offset)
meta_array: the content to send
Generate a META command. Serial is an ever increasing number, i and n are most of the time 1 and 1, they are usefull only in long multipart messages.
Return value: newly allocated string.
sys_context: global system context
id_from: id of the node which didn’t send data correctly
id_to: id of the node which didn’t receive data correctly
serial_min: minimum serial number of unsent/unreceived messages
serial_max: maximum serial number of unsent/unreceived messages
Generate a MISS command. This will request anyone who has the messages mentionned in stock to resent them to the one who’s asking for them.
Return value: newly allocated string.
sys_context: global system context
info: will contain (remote) node info on success
msg: the message to analyse
Analyzes a HELLO message.
Return value: 1 on success, 0 on failure
sys_context: global system context
info: will contain (remote) node info on success
ticket: if not NULL, will contain the ticket value on success
msg: the message to analyse
Analyzes a TICKET message.
Return value: 1 on success, 0 on failure
sys_context: global system context
info: will contain (remote) node info on success
key: if not NULL, will contain the foo/bar key on success
serial: if not NULL, will contain the latest serial number of peer
msg: the message to analyse
Analyzes a FOO message.
Return value: 1 on success, 0 on failure
sys_context: global system context
info: will contain (remote) node info on success
key: if not NULL, will contain the foo/bar key on success
serial: if not NULL, will contain the latest serial number of peer
msg: the message to analyse
Analyzes a BAR message.
Return value: 1 on success, 0 on failure
sys_context: global system context
info: will contain (remote) node info on success
local_info: local node info to be updated (peer_id list), can be NULL
seq: sequence used to initialize communication
serial: serial used to initialize communication
msg: the message to analyse
Analyzes a JOIN message.
Return value: 1 on success, 0 on failure
sys_context: global system context
info: will contain (remote) node info on success
msg: the message to analyse
Analyzes a GOODBYE message.
Return value: 1 on success, 0 on failure
sys_context: global system context
serial: will contain serial number on success
i: will contain group index on success
n: will contain group size on success
seq: will contain seq on success (round + an offset)
ker_msg: will contain actual message on success
msg: the message to analyze
Analyzes a DATA message.
Return value: 1 on success, 0 on failure
sys_context: global system context
serial: will contain serial number on success
i: will contain group index on success
n: will contain group size on success
seq: will contain seq on success (round + an offset)
meta_array: will contain the content on success
msg: the message to analyze
Analyzes a META message.
Return value: 1 on success, 0 on failure
sys_context: global system context
id_from: will contain the id of the node which didn’t send data correctly
id_to: will contain the id of the node which didn’t receive data correctly
serial_min: will contain the minimum serial number of unsent/unreceived messages
serial_max: will contain the maximum serial number of unsent/unreceived messages
msg: the message to analyze
Analyzes a MISS message.
Return value: 1 on success, 0 on failure
sys_context: global system context
msg: the message to analyse
Analyzes a GOODBYE message.
Return value: the from url, if found (dynamically allocated)
sys_context: global system context
mode: mode to use (a la TELNET or URL compatible)
version: the program version to use (note: can be changed when testing)
password_checksum: the password string to send
physical_ticket_sig: the signature of the message, calculated with ticket + physical from/to
logical_ticket_sig: the signature of the message, calculated with ticket + logical from/to
physical_from_id: the sender id
physical_to_id: the receiver id
logical_from_id: the message creator id
logical_to_id: the message final destination id
msg: the body of the message
Generate an envelope, that is, the complete message sendable on the network.
Return value: newly allocated string.
sys_context: global system context
envelope: the envelope to analyse
mode: mode to use (a la TELNET or URL compatible)
local_url: the url of local server (usefull for password)
password: the password to check against
expected_physical_from_id: the sender id, if NULL, no check performed
expected_physical_to_id: the receiver id, if NULL, no check performed
msg: if not NULL, will contain body of the message
physical_ticket_sig: if not NULL, will contain signature of message, calculated with ticket
logical_ticket_sig: if not NULL, will contain signature of message, calculated with ticket
physical_from_id: if not NULL, will contain sender id
physical_to_id: if not NULL, will contain receiver id
logical_from_id: if not NULL, will contain message creator id
logical_to_id: if not NULL, will contain message final destination id
physical_from_url: if not NULL and if message allows, will contain sender public URL
Generate an envelope, that is, the complete message sendable on the network.
Return value: newly allocated string.
sys_context: global system context
meta_array: meta meta_array (list of nodes) to modify
Fills the meta meta_array with zeroes, emptying all nodes.
Return value: none
sys_context: global system context
meta_array: meta meta_array (list of nodes) to modify
node_id: the ID (64-bit) of the node to seartch
Registers a node in the meta_array.
Return value: 1 if registered, 0 if not (possible error: no place left)
sys_context: global system context
meta_array: meta meta_array (list of nodes) to modify
node_id: the ID (64-bit) of the node to test
Registers a node in the meta_array.
Return value: 1 if registered, 0 if not (possible error: no place left)
sys_context: global system context
meta_array: meta meta_array (list of nodes) to modify
node_id: the ID (64-bit) of the node to add
serial_0: base serialfor the node to add
seq_0: base seq for for node to add
Registers a node in the meta_array.
Return value: 1 if registered, 0 if not (possible error: no place left)
sys_context: global system context
meta_array: meta meta_array (list of nodes) to modify
node_id: the ID (64-bit) of the node to remove
Unregisters a node in the meta_array.
Return value: 1 if node existed, 0 if it was not here
sys_context: global system context
meta_array: meta meta_array (list of nodes) to get (out param)
str: meta string (list of nodes) to be put in the meta_array
Transforms a string describing the nodes and their id/serial/seq into a more usable C structure.
Return value: 1 if parseable and success, 0 if not.
sys_context: global system context
meta_array: meta meta_array (list of nodes) to transform as a string
Transforms a C struct describing the nodes and their id/serial/seq into a string transmittable on the network.
Return value: dynamically allocated string
sys_context: global system context
info: the node to generate info about
Generates a standard response to the INFO question for OOB (out of band) messages. The same message is sent, be it on http or tcp or udp, so it’s factorized here. Function will lock the info object when needed.
Return value: newly allocated string.
sys_context: global system context
info: the node to generate info about
Generates a standard response to the LIST question for OOB (out of band) messages. The same message is sent, be it on http or tcp or udp, so it’s factorized here. Function will lock the info object when needed. There’s a max length because we don’t want the udp buffer to be saturated + too long lists do not really mean anything anyway.
Return value: newly allocated string.
sys_context: global system context
info: the node to generate info about
Generates a standard response to the PING question for OOB (out of band) messages. The same message is sent, be it on http or tcp or udp, so it’s factorized here. Function will lock the info object when needed.
Return value: newly allocated string.
sys_context: global system context
command: the command to send (PING, INFO, LIST)
remote_url: the remote URL (used to seed password)
password: the password, can be NULL or ""
local_url: the public URL to send along with the message, can be NULL or ""
Generates a simple clear text OOB request, with a password if needed.
Return value: a newly allocated string
sys_context: global system context
syntax_ok: will contain 1 if syntax is OK, 0 if not
command: the command (out param, needs *not* to be freed)
password_ok: will contain 1 if password is OK, 0 if not
remote_url: the URL detected, if provided (out param, does needs to be freed)
request: the request to analyse
local_url: the local url (used to seed password)
password: the password to check against
Analyses a simple OOB message of the form COMMAND <passwd> <url>.
Return value: 1 if OK, 0 if not. If 0, check the value of password_ok.
sys_context: global system context
text: the text of the message to parse
Analyses a PONG message and gets the public_url from it, if it exists.
Return value: newly allocated string containing public_url if OK, NULL on error.
sys_context: global system context
func_data: function specific data
ptr_a: pointer to a string
ptr_b: pointer to a string
Sort callback for a list containing strings which begin by a seq number, will sort with lower seq number first.
Return value: -1 if ptr_a < ptr_b , 0 if ptr_a == ptr_b,
1 if ptr_a > ptr_b
sys_context: global system context
mode: test mode (bitmask)
Registers all tests for the libmsg module.
Return value: 1 if test is successfull, 0 on error.
sys_context: global system context
mode: test mode (bitmask)
Runs the msg module test suite, testing most (if not all...)
functions.
Return value: 1 if test is successfull, 0 on error.
sys_context: global system context
ticket: the (private) ticket to use
from_id: the sender/creator
to_id: the receiver/target
msg: the message to sign
Produces a little signature, which is clearly vulnerable to brute-force attacks but makes it possible to be 100% sure if it’s wrong, someone is trying to do something nasty (or there’s a serious bug!).
Return value: the sig, always non-zero
sys_context: global system context
ticket: the (private) ticket to use
from_id: the sender/creator
to_id: the receiver/target
msg: the message to sign
ticket_sig: the signature to check against
Checks a sig is OK.
Return value: 1 if they are the same, 0 if not.
sys_context: global system context
key: will contain the key detected
value: will contain the value detected
line: the line to analyse
Analyses a trivial "KEY value" line and returns the key and the value in the passed pointers.
Return value: 1 if line OK (and in this case key and value are set), 0 if not.
sys_context: global system context
assoc: an assoc object which will contain the result
line: the line to analyse
Analyses a trivial "KEY value" line and sets the assoc parameter according
to detected values. Note that assoc must be set to contain string, and
free them automatically with lw6sys_free_callback for instance.
Return value: 1 if line OK (and in this case assoc is updated), 0 if not.
sys_context: global system context
assoc: the string assoc to query
key: the key to find in the assoc
default_value: the default value to return
Queries a string assoc for a given value, and if not available, returns default value. Not that default value (nor the assoc value) is copied, so you must take care all remain valid until usage of returned value is over.
Return value: a string, must not be freed.
sys_context: global system context
assoc: the string assoc to query
key: the key to find in the assoc
default_value: the default value to return
Queries a string assoc for a given value, and if not available, returns
default value. Not that default value (nor the assoc value) is copied,
so you must take care all remain valid until usage of returned value
is over. This one will returned an int converted with lw6sys_atoi.
Return value: a string, must not be freed.
sys_context: global system context
word: will contain the parsed word
next: if NOT NULL, will contain a (non freeable) pointer on remaining message
msg: the message to parse
Analyses a message and gets the first word. This word is put in buf member
with its length. next is usefull if you want to parse the rest of the message,
it points at the beginning of it.
Return value: 1 on success, 0 on failure.
sys_context: global system context
word: will contain the parsed word
next: if NOT NULL, will contain a (non freeable) pointer on remaining message
msg: the message to parse
Analyses a message and gets the first word. This word is put in buf member
with its length. next is usefull if you want to parse the rest of the message,
it points at the beginning of it. This special x function will consider slash
("/") as valid separator. It can’t be used all the time but for almost every
field but URLs, it’s fine. Internally, this one is used to parse integers,
IDs, etc.
Return value: 1 on success, 0 on failure.
sys_context: global system context
word: will contain the parsed word
next: if NOT NULL, will contain a (non freeable) pointer on remaining message
msg: the message to parse
Analyses a message and gets the first word. This word is put in buf member
with its length. next is usefull if you want to parse the rest of the message,
it points at the beginning of it. The word is expected to
be base64 encoded and is decoded on-the-fly.
Return value: 1 on success, 0 on failure.
sys_context: global system context
parsed_value: will contain the parsed value
next: if NOT NULL, will contain a (non freeable) pointer on remaining message
msg: the message to parse
Analyses a message, gets the first word and interpret it as an int.
Return value: 1 on success, 0 on failure.
sys_context: global system context
parsed_value: will contain the parsed value
next: if NOT NULL, will contain a (non freeable) pointer on remaining message
msg: the message to parse
Analyses a message, gets the first word and interpret it as an int. The value must be strictly greater than 0.
Return value: 1 on success, 0 on failure.
sys_context: global system context
parsed_value: will contain the parsed value
next: if NOT NULL, will contain a (non freeable) pointer on remaining message
msg: the message to parse
Analyses a message, gets the first word and interpret it as an 16-bit id.
Return value: 1 on success, 0 on failure.
sys_context: global system context
parsed_value: will contain the parsed value
next: if NOT NULL, will contain a (non freeable) pointer on remaining message
msg: the message to parse
Analyses a message, gets the first word and interpret it as an 32-bit id.
Return value: 1 on success, 0 on failure.
sys_context: global system context
parsed_value: will contain the parsed value
next: if NOT NULL, will contain a (non freeable) pointer on remaining message
msg: the message to parse
Analyses a message, gets the first word and interpret it as an 64-bit id.
Return value: 1 on success, 0 on failure.
sys_context: global system context
msg: message to encode
limit: if under this limit (length in bytes), do not encode, return as is
Z-encode a message, by "Z-encoding" we mean pass the string through 1) zlib then 2) base64 encoding, this way we get a string without any blank and/or special character, and of reasonnable length. There’s an optional limit *not* to encode anything, just when we know there are no special characters to escape and string is small, it’s useless to fire this big artillery.
Return value: newly allocated string, 0 terminated, NULL on error.
sys_context: global system context
msg: message to decode
Z-decode a message, by "Z-encoding" we mean pass the string through 1) zlib then 2) base64 encoding, this way we get a string without any blank and/or special character, and of reasonnable length. This decode string does it the reverse way, un64-encode the string then uncompress it back to a readable string.
Return value: newly allocated string, 0 terminated, NULL on error.
Type: u_int64_t
Definition: u_int64_t lw6msg_meta_array_item_s::node_id
Type: int
Definition: int lw6msg_meta_array_item_s::serial_0
Type: int64_t
Definition: int64_t lw6msg_meta_array_item_s::seq_0
Type: u_int64_t
Definition: u_int64_t lw6msg_meta_array_s::logical_from
Type: lw6msg_meta_array_item_t
Definition: lw6msg_meta_array_item_t lw6msg_meta_array_s::items[LW6MSG_NB_META_ARRAY_ITEMS]
This structure is used to retrieve words from messages. We use a structure here with a fixed sized buffer and a len member, this is to avoid mallocating too often when parsing.
Type: int
Definition: int lw6msg_word_s::len
Length of word, in bytes.
Type: char
Definition: char lw6msg_word_s::buf[LW6MSG_MAX_WORD_SIZE+1]
Word data, containing a 0 char at the end, so it is safe to call standard C string functions on it.
View lcov test coverage results on http://www.ufoot.org/liquidwar/v6/doc/coverage/src/lib/net/index.html.
sys_context: global system context
ip: IP address
port: IP port
Tells wether we’re likely to be able to connect on a given host and port. This is to save ressources, any call to connect which fails will register an entry that says "OK this is rotten, don’t try it before some time, you’ll waste your ressources trying to do this".
Return value: 1 if connectable, 0 if not.
sys_context: global system context
ip: IP address
port: IP port
status: status, set to 1 if connectable, 0 if not
Registers a destination ip: port as connectable or not. Connectable means, there are chances that a connect on this might return true. The information will be kept in a cache. This is to avoid too many low-level calls to connect, the information will be kept in cache "for some time", and this way connect will return "can’t connect" right away and not even try to connect, therefore saving ressources.
Return value: none.
ip: the string to check
Tests if a given string is a valid IP (IPV4). Test is only syntaxic, it’s just to know if we’re likely to need to query the DNS, it does not mean the IP is *really* valid.
Return value: 1 if it’s an IP, O if not.
name: name of the host
A wrapper over the standard gethostbyname function, will even accept an IP as an input (in this case, will copy it...) and allocate a new string for the result.
Return value: an IP if success, NULL on error.
sys_context: global system context
Locks access to dns function lw6net_dns_gethostbyname.
This is because gethostbyname isn’t reentrant plus, even
if we didn’t use it but its multithreadable equivalent
(which is however not standard and always available)
other libs (such as libcurl not to name it) might use
this function too so in a general manner it’s a good
idea to use a mutex to protect multiple accesses to this.
Return value: an IP if success, 0 on error.
sys_context: global system context
Unlocks access to dns function lw6net_dns_gethostbyname.
Return value: an IP if success, 0 on error.
sys_context: global system context
Reports the last network error. This is basically a debug function, designed mostly for Microsoft Winsock API, but can be safely called on any platform.
Return value: the last error code, has no universal meaning, depends on the platform you’re working on.
sys_context: global system context
Guess the local IP address. This is not fool-proof, and it probably cannot be as we can’t handle all user-specific configs involving multiple IP addresses, virtual private networks, and so on. But this is just to provide a default public IP address when starting a network game, saavy users can always specify the right interface/address if needed. Will return NULL if interface can’t be guessed.
Return value: the IP as a string, dynamically allocated
sys_context: global system context
bind_ip: the IP address used to bind on
bind_port: the IP port used to bind on
Guess the server public url, based
on lw6net_if_guess_local which tries to find a
valid local IP address which is not loopback. This is only
in case bind_ip is 0.0.0.0 (listen on all addresses) else
it will just use bind_ip as you would expect.
Function isn’t foolproof, that’s why one can override
its default with a user settings.
Return value: the IP as a string, dynamically allocated
sys_context: global system context
sock: the socket descriptor
Receives a line terminated by LF ("\n", chr(10)) or CR/LF ("\r\n", chr(10)chr(13)) on a TCP socket, that is, stream oriented. If there’s no complete line available, function returns immediately with NULL. Same if socket is closed, broken, whatever. Only if there’s something consistent will the function return non-NULL. Socket descriptor is closed on the fly on connection problem.
Return value: a dynamically allocated string with the content received. The tailing (CR)/LF is stripped.
sys_context: global system context
sock: the socket descriptor
line: the line to be sent, without the "\n" at the end
Sends a line terminated by LF ("\n", chr(10)) on a TCP socket, that is, stream oriented. The "\n" is automatically added, do not bother sending it. Socket descriptor is closed on the fly on connection problem.
Return value: non-zero if success
sys_context: global system context
sock: the socket descriptor
incoming_ip: the IP address of the sender (returned)
incoming_port: the IP port of the sender (returned)
Receives a line terminated by LF ("\n", chr(10)) or CR/LF ("\r\n", chr(10)chr(13)) on a UDP socket, that is, datagram oriented. If there’s no complete line available, function returns immediately with NULL. Same if socket is closed, broken, whatever. Only if there’s something consistent will the function return non-NULL. By-value parameters allow the caller to know where the data come from.
Return value: a dynamically allocated string with the content received. The tailing (CR)/LF is stripped.
sys_context: global system context
sock: the socket descriptor
incoming_ip: the IP address of the sender (returned)
incoming_port: the IP port of the sender (returned)
Receives several lines terminated by LF ("\n", chr(10)) or
CR/LF ("\r\n", chr(10)chr(13)) on a UDP socket, that is,
datagram oriented. If there’s no complete line
available, function returns immediately with NULL. Same
if socket is closed, broken, whatever. Only if there’s
something consistent will the function return non-NULL.
By-value parameters allow the caller to know where the
data come from. This variant of lw6net_recv_line_tcp will
return a list of lines, this is mandatory since in UDP
we can’t call recv several times.
Return value: a list of dynamically allocated strings. The tailing (CR)/LF is stripped from strings.
sys_context: global system context
sock: the socket descriptor
line: the line to be sent, without the "\n" at the end
ip: the IP address of the target
port: the IP port of the target
Sends a line terminated by LF ("\n", chr(10)) on a UDP socket, that is, datagram oriented. The "\n" is automatically added, do not bother sending it.
Return value: the number of bytes sent, 0 if failure
sys_context: global system context
argc: argc as passed to main
argv: argv as passed to main
net_log: 1 if you want to enable net log, 0 if not
Initializes the low-level network API, you must call this before calling any other network related function, for it allocates a dynamic context which is in turn used by every function.
Return value: non-zero if success
sys_context: global system context
Frees memory, joins active threads, and releases everything set up by network code.
Return value: void
sys_context: global system context
sock: the socket to modify
mode: the mode to use (1 -> blocking mode, 0 -> non-blocking)
Sets the blocking mode of a socket, the reason we use
this is that ioctl isn’t portable (ioctlsocket on MS-Windows).
Return value: 1 on success, 0 on failure.
sys_context: global system context
sock: the socket to test
Tells if a socket is valid or not. This does not mean the socket is opened/connected and/or the peer is reachable, it just checks the socket is a valid descriptor. In practice it’s just to avoid copy/pasting if (sock>=0)" everywhere.
Return value: 1 if valid, 0 if not
sys_context: global system context
sock: the socket to close
Closes a socket, that is, stop activity and free its descriptor. This function will take a pointer on the socket, this is done on purpose, the idea is to make sure once the socket is closed it’s never used again within the code, so we modify the pointed value in place.
Return value: none.
sys_context: global system context
ip: IP address to bind to
port: IP port to listen on
Listens in TCP on a given port.
Return value: >=0 on success, -1 on failure.
sys_context: global system context
incoming_ip: address of remote peer (out param, dynamically allocated)
incoming_port: port of remote peer (out param)
listening_sock: socket to listen on
delay_msec: delay, in msec, after which we stop accepting
Accepts for a connexion on the given socket.
Return value: the new socket (>=0) if accepted, else -1
sys_context: global system context
ip: address to connect to
port: port to connect to
delay_msec: delay before we consider it’s too late
Tries to connect on a given socket.
Return value: socket (>=0) on success, else -1
sys_context: global system context
sock: socket to use
buf: data buffer
len: data buffer length
delay_msec: delay after which we give up
loop: accept to do several calls if needed
Will send data, possibly looping until all is send, and waiting for a maximum time of delay_msec. If the send reveals a socket closed by peer or other serious problem, socket is closed and sock set to -1.
Return value: 1 on success, 0 on failure.
sys_context: global system context
sock: socket to use
buf: data buffer
len: data buffer length
delay_msec: maximum time to wait
Tells wether data is available. Will actually fill the buffer with the data, but not remove it from the fifo list. If the peel reveals a socket closed by peer or other serious problem, socket is closed and sock set to -1.
Return value: number of bytes available, 0 when nothing
sys_context: global system context
sock: socket to use
buf: data buffer
len: data buffer length
delay_msec: maximum time to wait
loop: wether to loop or not
If data is available, put it in buffer. If needed, will
loop until delay_msec is elapsed. Data is removed from queue.
If the peel reveals a socket closed
by peer or other serious problem, socket is closed and sock set to -1.
Return value: number of bytes received, 0 when nothing
sys_context: global system context
sock: socket to test
Tells wether a socket is alive and able to send data. This function will attempt a write to test if it’s really usable. If not, will close in on the fly.
Return value: 1 if alive, 0 if not.
sys_context: global system context
mode: test mode (bitmask)
Registers all tests for the libnet module.
Return value: 1 if test is successfull, 0 on error.
sys_context: global system context
mode: test mode (bitmask)
Runs the net module test suite, testing most (if not all...)
functions.
Return value: 1 if test is successfull, 0 on error.
sys_context: global system context
Creates an UDP client socket, that is, creates it and does not bind it to any address.
Return value: socket (>=0) on success, else -1
sys_context: global system context
ip: IP address to bind to
port: IP port to listen on
Creates an UDP listening socket, that is, creates it and binds it on a given address.
Return value: socket (>=0) on success, else -1
sys_context: global system context
sock: socket to use
buf: data buffer
len: data buffer length
ip: IP address to send data to
port: IP port to send data to
Sends an UDP datagram. Size can’t be longer than about 1400 bytes, see problems about MTU, in practice all values arround 1000 are quite safe, 500 is pretty much garanteed to work everywhere, and for various reasons 1452 is a good maximum bet.
Return value: number of bytes sent
sys_context: global system context
sock: socket to use
buf: data buffer
len: data buffer length
Peeks for a UDP datagram. Will not remove the data from queue.
Return value: number of bytes received
sys_context: global system context
sock: socket to use
buf: data buffer
len: data buffer length
Receives a UDP datagram. Will remove the data from queue.
Return value: number of bytes received
View lcov test coverage results on http://www.ufoot.org/liquidwar/v6/doc/coverage/src/lib/nod/index.html.
sys_context: global system context
info: node info object to modify
id: ID of the new member
url: URL of the new member, can be NULL
Adds a new member to the community.
Return value: 1 if new member could be added, 0 if not.
sys_context: global system context
info: node info object to test
id: ID of the member we want to check
url: URL of the member we want to check
Tells wether a member is already in the community. Note that if there’s a member with the same URL but with a different ID, or a member with the same ID but a different URL, the function will fail, we need URLs and IDs to both be different for the peer to be added. Not respecting this would lead to confusion, while sharing an ID is conceivable over the whole network, it can’t be tolerated within a community. Same for the URL.
Return value: 1 if new member could be added, 0 if not.
sys_context: global system context
info: node info object to test
id: ID of the member we want to check
Tells wether a member exists with this ID. Will test both ourselves and remote peers.
Return value: 1 if ID is already taken, 0 if available.
sys_context: global system context
info: node info object to test
id: ID of the member we want to check
Tells wether a member exists with this ID, but for which we don’t know the URL, that is, url is NULL.
Return value: 1 if ID is already taken and has NULL url, 0 else.
sys_context: global system context
info: node info object to test
url: URL of the member we want to check
Tells wether a member exists with this URL. Will test both ourselves and remote peers.
Return value: 1 if URL is already taken, 0 if available.
sys_context: global system context
info: node info object to test
url: URL of the member we want to check
Returns the id of the node with this URL, if it’s known to us.
Return value: id if it’s the community, else 0
sys_context: global system context
info: node info object to test
id: ID of the member we want to check
Returns the id of the node with this URL, if it’s known to us.
Return value: url if it’s the community else NULL, must be freed
sys_context: global system context
info: node info object to modify
id: ID of the member we want to remove
Removes a community member by ID.
Return value: 1 if successfully removed, 0 if was not present.
sys_context: global system context
info: node info object to modify
url: URL of the member we want to remove
Removes a community member by URL.
Return value: 1 if successfully removed, 0 if was not present.
sys_context: global system context
info: node info object to modify
Tells how many members there are in a community. This include ourselves so this can never be 0, should at least be 1. Note that this is pretty much the same as the nb_nodes member of dyn_info, but this one is calculated dynamically from peer list, while the other one is updated from time to time from game_state information.
Return value: number of community members, including this node (us).
sys_context: global system context
info: node info object to modify
Resets all peers, set community to only one member, ourselves.
Return value: none.
sys_context: global system context
info: node to query
Builds a string containing all peer ids, separated by a separator.
Return value: newly allocated string
sys_context: global system context
info: node to modify
peer_id_list_str: new value
Interprets a peer_id_list_str and puts it into the node data structures. Note that this function won’t really copy the list, instead it will populate the dyn_info struct with the right values.
Return value: none
sys_context: global system context
info: node to process
func: function to use as a callback
func_data: data passed along with the function
Applies function func to all the members of the community which have an id but not an URL...
Return value: none.
sys_context: global system context
dyn_info: the dyn info struct to free
Frees a dyn info object, to be used after a
call to lw6nod_info_dup_dyn for instance.
Return value: none
sys_context: global system context
program: the program (normally it’s liquidwar6)
version: the version
codename: the codename
stamp: the stamp
id: the node id
url: the node public url
title: the node title
description: the node description
password: the node password
bench: the node bench
open_relay: open relay or not
uptime: uptime in seconds
idle_screenshot_size: the size (bytes) of the image to display when game is idle
idle_screenshot_data: the data (jpeg) of the image to display when game is idle
Creates a node info object. The arguments correspond to the immutable node
attributes, other properties such as how many players are connected or
set in other functions like lw6nod_info_update which can be called later.
Return value: newly allocated object, NULL on error.
sys_context: global system context
info: the node info to free
Frees a node info object.
Return value: none
info: the node info to lock
Locks a node info object, this is usefull for some members, typically list of servers, can be accessed by separated threads, one reading, many writing, and these objects (chained lists) certainly do not want to be modified while being read.
Return value: 1 if ok, 0 if not.
sys_context: global system context
info: the node info to unlock
Unlocks a node info object, this is the compation of
the lw6nod_info_lock function.
Return value: 1 if ok, 0 if not.
sys_context: global system context
info: the node info to modify
Clears a node info object and sets all its variable attributes to NULL/default values. This is what we want when the node is idle, not playing.
Return value: none.
sys_context: global system context
info: the node info to update
community_id: the id of the community the node belongs to
round: the current round (can have an offset with real round number)
level: the name of the current level (map)
required_bench: the bench required to connect
nb_colors: number of colors playing
max_nb_colors: max number of colors allowed
nb_cursors: number of cursors playing
max_nb_cursors: max number of cursors allowed
nb_nodes: number of nodes playing
max_nb_nodes: max number of nodes allowed
peer_id_list: list of peers ids, can be NULL
game_screenshot_size: size of screenshot (bytes)
game_screenshot_data: screenshot data (byte buffer, contains JPEG)
Set a node info object variable attributes. Call this whenever the node has changed some parameter. Not too often for it’s not needed and some operations such as modying the screenshot, can be time consuming.
Return value: 1 if OK, 0 if error.
sys_context: global system context
info: the node info containing the dyn info to duplicate
Extracts the dynamic part of an info struct and duplicates it, this is to avoid protection fault error when concurrent threads access this info.
Return value: newly allocated object, must be freed.
sys_context: global system context
Creates a new hash, to be used as a discovered nodes list. Using this function has the advantage of setting the hash options to their defaults. We use a hash to avoid having uselessly long lists containing always the same node due to multiple detections.
Return value: an empty hash
sys_context: global system context
info: the node info to update
public_url: the address of the discovered node
Registers a new server, and queues it as something that should be checked later because it’s interesting. We can’t insert in the database all the servers we suspect to exist so network threads should use this, then main thread will process discovered servers afterwards. This is also a good way to avoid trivial DOS attacks.
Return value: 1 if OK, O if error.
sys_context: global system context
info: the node info to query
Returns a list of all discovered nodes (their public URL) and empties the current queue as well.
Return value: a list of dynamically allocated strings.
sys_context: global system context
Creates a new list, to be filled with nodes and typically passed
to lw6nod_info_set_verified_nodes. Using this function has the
advantage of setting the listh options to their defaults.
Return value: an empty list
sys_context: global system context
info: the node info to modify
list: the list of verified nodes, will be freed by this function
Sets the list of verified nodes, that is, the list of nodes
we are sure to exist, this is typically the list we will
display later on a web page. We can’t directly display
any discovered node, one needs to filter them through main thread.
Something very important about this function is that list will
be freed by function, that is, if you call this, then you can
(you should) forget your object, it will disappear any time soon.
Return value: 1 if OK, 0 on error.
sys_context: global system context
info: the node info concerned
func: the function to apply
func_data: arbitrary pointer holding data to pass to function
Calls lw6sys_hash_map with func on every member of the list of verified
nodes. The reason there’s a function for this is that it is
very important that list object is locked when doing this.
This function does perform a lock/unlock so it is safe.
Return value: none.
sys_context: global system context
mode: test mode (bitmask)
Registers all tests for the libnod module.
Return value: 1 if test is successfull, 0 on error.
sys_context: global system context
mode: test mode (bitmask)
Runs the nod module test suite, testing most (if not all...)
functions.
Return value: 1 if test is successfull, 0 on error.
Constant informations about a node, these are informations that do not vary through the node’s life, so they are set object creation then left unchanged.
Type: char *
Definition: char* lw6nod_const_info_s::program
Program, this should be set to liquidwar6.
Type: char *
Definition: char* lw6nod_const_info_s::version
The version of the program.
Type: char *
Definition: char* lw6nod_const_info_s::codename
The codename of the program.
Type: int
Definition: int lw6nod_const_info_s::stamp
The stamp of the program.
Type: lw6nod_ref_info_t
Definition: lw6nod_ref_info_t lw6nod_const_info_s::ref_info
Reference information, how to uniquely identify node.
Type: char *
Definition: char* lw6nod_const_info_s::title
The title of the node, its readable short name.
Type: char *
Definition: char* lw6nod_const_info_s::description
More details about the node.
Type: int
Definition: int lw6nod_const_info_s::has_password
Wether the node is password protected or not.
Type: char *
Definition: char* lw6nod_const_info_s::password
The password used, cleartext.
Type: int
Definition: int lw6nod_const_info_s::bench
The node bench.
Type: int
Definition: int lw6nod_const_info_s::open_relay
Wether the node acts as an open relay or not.
Type: int64_t
Definition: int64_t lw6nod_const_info_s::creation_timestamp
The node creation timestamp.
Type: int
Definition: int lw6nod_const_info_s::idle_screenshot_size
Size of the screenshot (in bytes) when in idle mode.
Type: void *
Definition: void* lw6nod_const_info_s::idle_screenshot_data
Idle mode screenshot data. This is just a plain JPEG buffer, which will be used as a fallback if there’s no real screenshot available.
Dynamic informations about a node, these are informations that vary through the node’s life, so they are unset at object creation and can then be updated from game context.
Type: u_int64_t
Definition: u_int64_t lw6nod_dyn_info_s::community_id_int
The ID of the community this node belongs to, as a 64-bit unsigned integer.
Type: char *
Definition: char* lw6nod_dyn_info_s::community_id_str
The ID of the community this node belongs to, as a string (64-bit integer converted to hexa).
Type: lw6nod_ref_info_t
Definition: lw6nod_ref_info_t lw6nod_dyn_info_s::community_peers[LW6NOD_MAX_NB_PEERS]
The list of community members, you need to refer to the nb_nodes member to know quickly how many members they are but actually, in practice, there can be holes in this array, you need to check each slot, for instance 0 can be filled, 2 can be filled too, but 1 be empty. Note that we don’t count ourselves in this list.
Type: int
Definition: int lw6nod_dyn_info_s::round
The current round.
Type: char *
Definition: char* lw6nod_dyn_info_s::level
The current level.
Type: int
Definition: int lw6nod_dyn_info_s::required_bench
The required bench to connect to this node.
Type: int
Definition: int lw6nod_dyn_info_s::nb_colors
Number of colors playing.
Type: int
Definition: int lw6nod_dyn_info_s::max_nb_colors
Maximum number of colors allowed to play.
Type: int
Definition: int lw6nod_dyn_info_s::nb_cursors
Number of cursors playing.
Type: int
Definition: int lw6nod_dyn_info_s::max_nb_cursors
Maximum number of cursors allowed to play.
Type: int
Definition: int lw6nod_dyn_info_s::nb_nodes
Number of nodes playing.
Type: int
Definition: int lw6nod_dyn_info_s::max_nb_nodes
Maximum number of nodes allowed to play.
Type: int
Definition: int lw6nod_dyn_info_s::game_screenshot_size
Size of the screenshot, in bytes.
Type: void *
Definition: void* lw6nod_dyn_info_s::game_screenshot_data
Game screenshot data. This is just a plain JPEG buffer, which will be served when peers and/or web clients want to gather informations about the game. This can be NULL, in that the fallback constant data will be used.
Informations about a node. Note that in practice this structure is just used to describe our current node, there might be several instances of this if a program instanciates several nodes, but another data structure is used to store information about peers.typedef struct lw6nod_info_s
Type: lw6sys_mutex_t *
Definition: lw6sys_mutex_t* lw6nod_info_s::mutex
Mutex used to access dynamic informations.
Type: lw6nod_const_info_t
Definition: lw6nod_const_info_t lw6nod_info_s::const_info
Constant informations, never changes.
Type: lw6nod_dyn_info_t
Definition: lw6nod_dyn_info_t lw6nod_info_s::dyn_info
Dynamic informations, can be updated. Do not modify this directly, instead use appropriate functions which will use mutexes properly.
Type: lw6sys_hash_t *
Definition: lw6sys_hash_t* lw6nod_info_s::discovered_nodes
List of discovered nodes, do not access this directly, instead use proper query functions which, in turn, will use mutexes properly.
Type: lw6sys_list_t *
Definition: lw6sys_list_t* lw6nod_info_s::verified_nodes
List of verified nodes, do not access this directly, instead use proper query functions which, in turn, will use mutexes properly.
Reference information about a node, this is all you need to uniquely identify a node. In theory, only the ID are only the URL are enough, in practice it’s not that bad to have some redundancy, plus it makes it easier and faster to connect to them and transmit informations.
Type: u_int64_t
Definition: u_int64_t lw6nod_ref_info_s::id_int
The id of the node, as an integer (64-bit unsigned).
Type: char *
Definition: char* lw6nod_ref_info_s::id_str
The id of the node, as a string (64-bit converted to hexa).
Type: char *
Definition: char* lw6nod_ref_info_s::url
The public URL of the node.
View lcov test coverage results on http://www.ufoot.org/liquidwar/v6/doc/coverage/src/lib/p2p/index.html.
sys_context: global system context
argc: number of args, as passed to main
argv: args array, as passed to main
name: the database name
Creates a new database object. Normally there’s only one object like this at a given time, it can be shared among various nodes. The database name is appended to user directory path, this allows different databases to be created, in theory.
Return value: a pointer on the newly created object.
sys_context: global system context
db: the db to close
Closes a db object, memory ressources will be freed.
Return value: none.
sys_context: global system context
db: the db to work on
Gives a readable representation of the db
Return value: a dynamically allocated string
sys_context: global system context
argc: number of args, as passed to main
argv: args array, as passed to main
name: the database name
Clears the database. Simply removes the db file, in fact. Do not call while database is used...
Return value: 1 on success, 0 if failed.
sys_context: global system context
Returns the default database name, should be p2p.db (this is a relative path, not an absolute path, will be appended to user dir).
Return value: the default database name, need not (must not) be freed.
sys_context: global system context
db: the db object concerned (used to calculate time origin)
timestamp: the timestamp as returned by lw6sys_get_timestamp
Returns a timestamp suitable for db usage (seconds since object creation), set to the timestamp passed as an argument (milliseconds). The reason we don’t use regular timestamps is that they are 1) too accurate (msec is useless for what’s involved here) and 2) too big and likely to be negative in signed mode even if converted to seconds.
Return value: a timestamp, 0 means "beginning of program" (think of it as uptime)
sys_context: global system context
db: the db object concerned (used to calculate time origin)
Returns a timestamp suitable for db usage, (seconds since object creation) set to the current moment. The reason we don’t use regular timestamps is that they are 1) too accurate (msec is useless for what’s involved here) and 2) too big and likely to be negative in signed mode even if converted to seconds.
Return value: a timestamp, 0 means "beginning of program" (think of it as uptime)
sys_context: global system context
creation_timestamp: when it has been created, UNIX timestamp
version: version of the node
codename: codename of the node
stamp: stamp of the node
id: id of the node (string representation)
url: public url of the node
title: title of the node
description: description of the node
has_password: wether node is password protected or not
bench: node bench
open_relay: wether the node is in open relay mode or not
round: current round
level: current level played
required_bench: current bench
nb_colors: number of colors playing
max_nb_colors: maximum number of colors
nb_cursors: number of cursors playing
max_nb_cursors: maximum number of cursors
nb_nodes: number of nodes playing
max_nb_nodes: maximum number of nodes
ip: node ip (string representation)
port: node port
last_ping_timestamp: UNIX timestamp of last contact with node
ping_delay_msec: ping delay, in milliseconds
available: wether node is available, wether we can connect to it
Creates a new p2p entry. Will accept NULL parameters for strings as well as arbitrary long strings, will simply cut them short if there aren’t already limited to max size.
Return value: newly allocated object
sys_context: global system context
entry: entry to free
Frees a p2p entry.
Return value: none.
sys_context: global system context
entry: entry to represent
Gives a human-readable representation of the entry
Return value: dynamically allocated string
sys_context: global system context
argc: number of args, as passed to main
argv: args array, as passed to main
db: the database to use
client_backends: the list of client backends to use
server_backends: the list of server backends to use
bind_ip: the IP address to bind on
bind_port: the IP port to listen on
broadcast: wether broadcast is allowed on this node
node_id: the node id
public_url: the public URL we want to show
title: the title of the node
description: the description of the node
password: the password to use
bench: the bench of the node (its power)
open_relay: act as an open relay or not
known_nodes: list of already known nodes
network_reliability: drop 1 packet out of X
trojan: act as a stupid trojan to test out automatic kick-off
Creates a new "pear to pear" node. This will fire the server and allow client access, on demand. A lot of stuff can be done in the background once this is called.
Return value: a pointer on the newly created objects.
sys_context: global system context
node: the node to free
Frees a node object, all network communications will be shut.
Return value: none.
sys_context: global system context
node: the node to work on
Gives a readable representation of the node
Return value: a dynamically allocated string
sys_context: global system context
node: the node to poll
progress: progress indicator to show the advancement
Polls a p2p node. This must be called on a regular basis, else network communication is stalled.
Return value: 1 on success, 0 on error.
sys_context: global system context
node: the node to close
Closes a p2p node. Closing is necessary in some contexts, for instance scheme/smob instanciation when you want to release the object ressources (sockets, ports, threads...) *before* it is deleted by, for instance, a garbage collector.
Return value: 1 on success, 0 on error.
sys_context: global system context
node: the node to query
Returns the node id, an id which is supposed to uniquely identify the node at run-time.
Return value: numerical id.
sys_context: global system context
node: node to query
skip_local: wether to skip local node, 1 to skip, 0 to keep
Returns a list of all known nodes, this is a plain table dump, sorted so that the most likely to be interesting to connect oneself to are listed *last*, this is just a (little) optimization, since we know we’ll need to parse this list to construct a Guile object, we reverse the order.
Return value: list object containing lw6p2p_entry_t objects
sys_context: global system context
node: node to start
seq_0: seq when starting the server
Starts a node in server mode, if node was previously connected to other nodes, disconnect it from any peer.
Return value: 1 on success, 0 on failure.
sys_context: global system context
node: node to use
remote_id: id of remote node to join
remote_url: url of remote node to join
progress: progress indicator to show end-user the advancement of process
Starts a node in client mode, joins the given node, if node was previously connected to other nodes, disconnect it from any peer.
Return value: 1 on success, 0 on failure.
sys_context: global system context
node: node to use
remote_id: id of remote node to refresh
remote_url: url of remote node to refresh
Forces a refresh of a remote node, that is, try and get more up-to-date informations from it, not waiting for the standard update schedule.
Return value: 1 on success, 0 on failure.
sys_context: global system context
node: node to disconnect
Disconnects a node, if node was previously connected to other nodes, disconnect it from any peer. Note that this does not affect out-of-band connections, only real game-related links.
Return value: 1 on success, 0 on failure.
sys_context: global system context
node: node to update
round: the current round (can have an offset with real round number)
level: the name of the current level (map)
nb_colors: number of colors playing
max_nb_colors: max number of colors allowed
nb_cursors: number of cursors playing
max_nb_cursors: max number of cursors allowed
nb_nodes: number of nodes playing
max_nb_nodes: max number of nodes allowed
game_screenshot_size: size of screenshot (bytes)
game_screenshot_data: screenshot data (byte buffer, contains JPEG)
Updates node info, that is, all the data/metadata which can be displayed to other peers and are, by nature, dynamic.
Return value: 1 on success, 0 on failure.
sys_context: global system context
node: the object to calibrate
timestamp: the current ticks setting (1000 ticks per second)
seq: the round expected to be returned with this ticks value
Calibrates the node, so that sequence numbering is consistent accross nodes.
Return value: none.
sys_context: global system context
node: the object to query
Gets the reference local seq_0 for this node, the information is taken from the warehouse, even if node->calibrate_seq should probably return the same value.
Return value: the seq.
sys_context: global system context
node: the object to query
Gets the local seq_last for this node, the information is taken from the warehouse, which has parsed the messages and this information can in return be used to avoid maintaining outside of the node the information about what was the last seq used for a local message.
Return value: the seq.
sys_context: global system context
node: the object to query
Gets the minimum seq registered, not of utmost importance but interesting for debugging purpose, to check what’s in the warehouse.
Return value: the seq.
sys_context: global system context
node: the object to query
Gets the maximum seq registered, this is typically used for guessing which seq might make sense for this node, but in a real example one should rely on algorithm/ker-side kept values.
Return value: the seq.
sys_context: global system context
node: the object to query
Gets the seq of the current draft as the warehouse understands it. Note that it’s the responsibility of the caller to update the pilot according to this, this information is just about what is in the warehouse, not necessarly what is in the pilot / game_state.
Return value: the seq.
sys_context: global system context
node: the object to query
Gets the seq of the current reference as the warehouse understands it. Note that it’s the responsibility of the caller to update the pilot according to this, this information is just about what is in the warehouse, not necessarly what is in the pilot / game_state.
Return value: the seq.
sys_context: global system context
node: the object to query
peer_id: id of the peer we want to check
Tests wether the node is connected to us. This is a different question from being registered, being connected means there’s a tentacle connected to the peer, but it does not necessarly means this peer actively takes part in the game.
Return value: 1 if connected, 0 if not.
sys_context: global system context
node: the object to query
peer_id: id of the peer we want to check
Tests wether the node is registered within the warehouse. This is a different question from being connected, being registered means we received a message (possibly from another peer) that means "this peer is part of the game" regardless of the fact it’s connected or not. Returns true if test is performed with the local id.
Return value: 1 if registered, 0 if not.
sys_context: global system context
node: node to query
Returns true (1) if the local node needs to send a SEED message. A SEED message will basically be sent at the beginning of a session when a client connects to a server. Basically this message is of no use but it’s interesting to have a short message (not DUMP) to start with.
Return value: 1 if SEED must be sent.
sys_context: global system context
node: node to query
Returns true (1) if the local node needs to send a DUMP message. A DUMP message will basically reset level, game struct, game state, it’s typically sent when a new player is connected. This function will return true once then always 0 so one should really act and do something whenever it’s called and returns 1.
Return value: 1 if DUMP must be sent.
sys_context: global system context
node: node object to use
msg: message
Puts a message in the object. The message will be splitted into several atoms if needed, it can be arbitrary long.
Return value: 1 on success, 0 on error
sys_context: global system context
node: node to query
progress: progress indicator (read/write)
Get the next waiting reference msg. This is used to maintain the stable reference game state we can rely upon. One is supposed to call this until it returns NULL, then switch draft messages.
Return value: newly allocated string, must be freed.
sys_context: global system context
node: node to query
progress: progress indicator (read/write)
Get the next waiting draft msg. This is used to maintain the anticipated draft game state we use for drawing. One is supposed to call this after all reference messages have been treated.
Return value: newly allocated string, must be freed.
sys_context: global system context
mode: test mode (bitmask)
Registers all tests for the libp2p module.
Return value: 1 if test is successfull, 0 on error.
sys_context: global system context
mode: test mode (bitmask)
Runs the p2p module test suite, testing most (if not all...)
functions.
Return value: 1 if test is successfull, 0 on error.
Handler on a database connection, this must be used to pass order to store/retrieve persistent informations about peers.
Type: u_int32_t
Definition: u_int32_t lw6p2p_db_s::id
The first member, id, is the same as the internal _lw6p2p_db_t structure. The rest of it is hidden. The program will cast from lw6p2p_db_t to _lw6p2p_db_t internally.
This entry object matches as close as possible the corresponding (node) entry in the database.
Type: int
Definition: int lw6p2p_entry_s::creation_timestamp
Node creation timestamp.
Type: char
Definition: char lw6p2p_entry_s::version[LW6P2P_VERSION_SIZE+1]
Node version.
Type: char
Definition: char lw6p2p_entry_s::codename[LW6P2P_CODENAME_SIZE+1]
Node codename.
Type: int
Definition: int lw6p2p_entry_s::stamp
Node stamp.
Type: char
Definition: char lw6p2p_entry_s::id[LW6P2P_ID_SIZE+1]
Node id, 64-bit integer as an hexa string.
Type: char
Definition: char lw6p2p_entry_s::url[LW6P2P_URL_SIZE+1]
Node URL, the public URL it displays to others.
Type: char
Definition: char lw6p2p_entry_s::title[LW6P2P_TITLE_SIZE+1]
Node title, the short readable name for the node.
Type: char
Definition: char lw6p2p_entry_s::description[LW6P2P_DESCRIPTION_SIZE+1]
Node description, mode details about this node.
Type: int
Definition: int lw6p2p_entry_s::has_password
Wether it requires a password or not.
Type: int
Definition: int lw6p2p_entry_s::bench
Node bench, reflects how powerfull it is.
Type: int
Definition: int lw6p2p_entry_s::open_relay
Wether this node acts as an open relay or not.
Type: char
Definition: char lw6p2p_entry_s::community_id[LW6P2P_COMMUNITY_ID_SIZE+1]
Community id, 64-bit integer as an hexa string.
Type: int
Definition: int lw6p2p_entry_s::round
Current round.
Type: char
Definition: char lw6p2p_entry_s::level[LW6P2P_LEVEL_SIZE+1]
Level used.
Type: int
Definition: int lw6p2p_entry_s::required_bench
Required bench to connect to this community.
Type: int
Definition: int lw6p2p_entry_s::nb_colors
Number of colors playing.
Type: int
Definition: int lw6p2p_entry_s::max_nb_colors
Maximum number of colors allowed to play.
Type: int
Definition: int lw6p2p_entry_s::nb_cursors
Number of cursors playing.
Type: int
Definition: int lw6p2p_entry_s::max_nb_cursors
Maximum number of cursors allowed to play.
Type: int
Definition: int lw6p2p_entry_s::nb_nodes
Number of nodes playing.
Type: int
Definition: int lw6p2p_entry_s::max_nb_nodes
Maximum number of nodes playing.
Type: char
Definition: char lw6p2p_entry_s::ip[LW6P2P_IP_SIZE+1]
IP addess of node.
Type: int
Definition: int lw6p2p_entry_s::port
IP port of node.
Type: int
Definition: int lw6p2p_entry_s::last_ping_timestamp
Last time this node has been pinged.
Type: int
Definition: int lw6p2p_entry_s::ping_delay_msec
Ping delay, in milliseconds.
Type: int
Definition: int lw6p2p_entry_s::available
Wether this node is ready to accept connections.
Node object, the main network object, this one will encaspulate everything else, the node can connect to other peers, listen on the network, it’s the high-level interface.
Type: u_int32_t
Definition: u_int32_t lw6p2p_node_s::id
The first member, id, is the same as the internal _lw6p2p_node_t structure. The rest of it is hidden. The program will cast from lw6p2p_node_t to _lw6p2p_node_t internally.
View lcov test coverage results on http://www.ufoot.org/liquidwar/v6/doc/coverage/src/lib/pil/index.html.
sys_context: global system context
argc: number of args as passed to main
argv: args passed to main
bench_result: pointer to float, will contain the bench result
progress: to inform the caller of the process advancement
Runs a standard, normalized bench on a default map. Results can be interpreted as an estimated speed/power of your computer.
Return value: 1 on success, 0 if failure
sys_context: global system context
command_text: readable text of the command
seq_0: sequence offset reference (to calculate difference between sequence and rounds)
round_0: round offset reference (to calculate difference between sequence and rounds)
Creates a new command from its text representation.
Return value: newly allocated object
sys_context: global system context
command: object to duplicate
Creates a copy of a command struct.
Return value: newly allocated object.
sys_context: global system context
command: command to free
Frees a command struct, with all its members.
Return value: none.
sys_context: global system context
command: command to represent
Gives a readable representation of a command.
Return value: dynamically allocated string.
sys_context: global system context
dump: pointer on dump structure (out param, can be NULL)
timestamp: current timestamp (can be 0 if dump is NULL)
game_state: game state to work on, can be NULL (usefull for DUMP)
command: command to process
Interprets a command and runs it against game_state. If dump and timestamp are set, then any DUMP command will fill the dump structure with the right values. If not running from a pilot context, this is useless, use NULL and 0LL.
Return value: 1 if ok, 0 if failed.
sys_context: global system context
dump: pointer on dump structure (out param, can be NULL)
timestamp: current timestamp (can be 0 if dump is NULL)
game_state: game state to work on, can be NULL (typically for DUMP)
command_text: command text to process
seq_0: reference seq_0, used to genereate consistent dumps if needed
Interprets a command text and runs it against game_state. If dump and timestamp are set, then any DUMP command will fill the dump structure with the right values. If not running from a pilot context, this is useless, use NULL and 0LL.
Return value: 1 if ok, 0 if failed.
sys_context: global system context
local_cursors: local cursors information
command: command to execute
Executes a local command, typically a cursor move, on the local_cursor struct, without changing any game state.
Return value: 1 if success, 0 if failure.
sys_context: global system context
local_cursors: local cursors information
command_text: command text to execute
Executes a local command text, typically a cursor move, on the local_cursor struct, without changing any game state.
Return value: 1 if success, 0 if failure.
sys_context: global system context
rules: the set of rules to use (defines polarity)
shape: the shape of the map (logical part)
x: the x coord to fix
y: the y coord to fix
z: the z coord to fix
Similar to lw6map_coords_fix but using floats, this function
can be used to check cursor position boundaries. Any float pointer
can be NULL.
Return value: none.
sys_context: global system context
rules: the set of rules to use (defines polarity)
shape: the shape of the map (logical part)
x: the x coord to fix
y: the y coord to fix
z: the z coord to fix
Similar to lw6pil_coords_fix but does use a wider range, say 10 times
the actual size of the map, this is not to contain the cursor within
the map but just to avoid overflow errors.
Return value: none.
sys_context: global system context
dump: object to initialize
Fills a dump object with zero, regardless of what was there before.
Return value: none.
sys_context: global system context
dump: object to clear
Clears a dump object, that is, frees all existing object if they are here, and sets pointers to NULL.
Return value: none.
sys_context: global system context
dump: object to test
Tests wether there’s actually a dump in the structure, or if it’s empty.
Return value: 1 if there’s a dump, 0 if all fields set to NULL.
sys_context: global system context
pilot: the pilot to transform as a DUMP.
server_id: ID of server issuing the command
seq: seq at which the dump should be generated
Creates the DUMP command for a given pilot, that is, a command that describes the whole data and state. One must give a sequence number since the dump would otherwise typically be *always* late by at least one round (or seq). We give the seq as we would for any message generated, to make it fit well within the standard message queue.
Return value: newly allocated string
sys_context: global system context
dump: will contain the dump data, pilot and game state, struct, and level
timestamp: current timestamp
command: the command to execute
progress: progress object to show the advancement of process
Interprets a DUMP command. A new pilot will be returned, along with game state, game struct and level. Old objects won’t be deleted, but you could (should) get rid of them at they are useless now.
Return value: newly allocated string
sys_context: global system context
local_cursors: the structure to reset
Resets a local cursors struct. Note that this need not be called very often, in fact the local cursors can cope with "dead" cursors easily. In practise, in a local game, there are only 4 of them, great maximum.
Return value: none.
sys_context: global system context
local_cursors: the structure to query
cursor_id: the id of the cursor to query
Returns a pointer on the cursor with the given id.
Return value: a pointer (must *not* be freed) which is NULL is cursor does not exist.
local_cursors: the structure to query
x: a pointer to the x position, may be NULL
y: a pointer to the y position, may be NULL
mouse_controlled: a pointer to the mouse_controlled flag, may be NULL
cursor_id: the id of the cursor to query
Gets the x,y position of the cursor, and tells if it’s mouse controlled.
Return value: 1 on success (cursor exists), 0 on failure (no such cursor).
sys_context: global system context
local_cursors: the structure to modify
cursor_id: the id of the cursor to modify
x: the x position
y: the y position
Sets the position of a cursor in the local cursors struct. If cursor does not exists, it’s appended to the list.
Return value: 1 on success (cursor exists), 0 on failure (no such cursor).
sys_context: global system context
local_cursors: the structure to modify
cursor_id: the id of the cursor to modify
mouse_controlled: the mouse_controlled attribute
Sets which cursor is mouse controlled. If mouse_controlled is 1, the flag is set for this cursor and cleared for all others. If set to 0, only this cursor’s flag is cleared.
Return value: 1 on success (cursor exists), 0 on failure (no such cursor).
sys_context: global system context
local_cursors: the structure to query
cursor_id: the id of the main cursor, may be NULL
x: a pointer to the x position, may be NULL
y: a pointer to the y position, may be NULL
mouse_controlled: a pointer to the mouse_controlled flag, may be NULL
Gets the x,y position of the main cursor, and tells if it’s mouse controlled.
Return value: 1 on success (cursor exists), 0 on failure (no such cursor).
sys_context: global system context
local_cursors: the structure to modify
cursor_id: the id of the cursor to be labelled as main cursor
Sets the main cursor attribute, the main cursor is later used, for instance, to decide how to display the map (centered on it, for instance).
Return value: 1 on success (cursor exists), 0 on failure (no such cursor).
sys_context: global system context
dump: will contain the dump information if needed, can be NULL
command_text: the command received from the network.
timestamp: timestamp, used to initialize the pilot
Normally, it’s the commit function of the pilot which will automatically return a dump if needed. But... when a client connects, at first, it has absolutely no pilot/map whatsoever yet, so this is just to bootstrap the process, this function will take network messages, any message, and if it’s about a dump -> it will create the dump.
Return value: 1 on success, 0 on failure.
sys_context: global system context
game_state: the game state we’re going to work on
seq_0: the start sequence to use, that is, the seq at round=0
timestamp: the current ticks (1000 ticks per sec, used to calibrate)
progress: object used to show the advancement of the process
Initializes a ’pilot’ object, this object is responsible for interpreting messages, transform them into low-level ’ker’ module function calls, and handle all the thread-spooky stuff.
Return value: a working pilot object. May be NULL on memory failure.
sys_context: global system context
pilot: the object to free.
Frees a ’pilot’ object, note that this might involve joining some threads, so it can ’take some time’.
Return value: none.
sys_context: global system context
pilot: the object to send commands to.
command_text: the text of the command, as received form network
verified: wether we’re sure this message is valid.
Sends a command and handles it internally.
Return value: 1 if OK, 0 if not.
sys_context: global system context
pilot: the object to apply the local command on
command_text: the command text
This function is used to fix the annoying fact that by only sending commands a limited number of times per sec to the game state, the display always reflect an outdated position for cursors. But players do not want to see this, they want to see the cursor in the right place. So what we do is that the pilot can process "local" commands which have absolutely no effect on the game but simply update a local cursor state, only used for display. It’s here in the pil module for it’s where the command interpreting code is, and the fact that there’s this lag is directly linked with the pilot way of doing things.
Return value: 1 on success, 0 on failure.
sys_context: global system context
dump: will contain the dump information if needed, can be NULL
pilot: the object to commit.
Commits all commands sent and actually send them to the corresponding threads. This commit system allows better performance by sending, for instance, all the commands for a given round together.
Return value: none.
sys_context: global system context
pilot: the object to perform the backup on
Makes a new backup in the pilot, that is, copy ’reference’ to ’backup’.
Return value: 1 if OK, 0 if not.
sys_context: global system context
target: the target game_state we would sync on
pilot: the object to perform the backup on
Tests wether sync functions are callable with a given game state. It verifies if the internal game_state and the target look the same.
Return value: 1 if sync functions can be called, 0 if not.
sys_context: global system context
target: the game_state structure which will get the informations.
pilot: the object to get informations from.
Gets the backup from the pilot object. This is the last snapshot
taken by make_backup or, by default, the game_state the pilot
was constructed with.
Return value: 1 if OK, 0 if not.
sys_context: global system context
target: the game_state structure which will get the informations.
pilot: the object to get informations from.
Gets the latest reference game_state, that is, a stable snapshot of the game, with no inconsistency, a game position that exists and that we can rely on. Note that getting this can take time since a global mutex is required, and computations must end before you get the data.
Return value: 1 if OK, 0 if not.
sys_context: global system context
target: the game_state structure which will get the informations.
pilot: the object to get informations from.
dirty_read: wether to allow dirty read or not
Gets the informations from the pilot object, not being worried about game consistency, this one will just return the latest version available. It might even be in an inconsistent state, the position could reflect a position which will never exist. Still, the data returned will not correspond to a half-spread or half-moved game_state if dirty_read is set to 0. In this case the data has at least some basic consistency and getting this does require some mutex lock, however wait time should be fairly small (max. a round). But, in a general manner, this function is only used for display, and we do not care much if there’s a small glitch, we prefer fast & smooth display.
Return value: 1 if OK, 0 if not.
sys_context: global system context
pilot: the object to get informations from.
Returns a direct access to the most up-to-date game_state, without locking anything whatsoever. This is clearly to implement a dirty read mode as the name of the function suggests.
Return value: 1 if OK, 0 if not.
sys_context: global system context
Returns a string describing the pilot. This is a very short description, use it for logs, and to debug stuff. By no means it’s a complete exhaustive description. Still, the string returned should be unique.
Return value: a dynamically allocated string.
sys_context: global system context
pilot: the object to calibrate
timestamp: the current ticks setting (1000 ticks per second)
seq: the round expected to be returned with this ticks value
Calibrates the pilot, that is, initializes it so that subsequent calls
to lw6pil_pilot_get_round return consistent values.
Return value: none.
sys_context: global system context
pilot: the pilot to speed up
seq_inc: the number of seqs
Re-calibrates the pilot so that it speeds up a bit. This will basically increase next_seq by seq_inc.
Return value: none.
sys_context: global system context
pilot: the pilot to speed up
seq_dec: the number of seqs
Re-calibrates the pilot so that it slows down a bit. This will basically decrease next_seq by seq_inc.
Return value: none.
sys_context: global system context
pilot: pilot object to query
Get the initial round (the one passed at object construction) which says what the round was at object creation, it’s just an offset.
Return value: 64-bit integer
sys_context: global system context
pilot: pilot object to query
Get the initial seq (the one passed at object construction) which says what the seq was at round=0, it’s just an offset.
Return value: 64-bit integer
sys_context: global system context
pilot: pilot object to work on
seq: the seq to convert
Converts a seq (64-bit) to a round (32-bit). 64-bit seqs are used to avoid out-of-range errors on very long games, OTOH a round is 32-bit to garantee the atomicity of its affection, even on platforms which are not native 64-bit.
Return value: the round (32-bit integer)
sys_context: global system context
pilot: pilot object to work on
round: the round to convert
Converts a round (32-bit) to a seq (64-bit). 64-bit seqs are used to avoid out-of-range errors on very long games, OTOH a round is 32-bit to garantee the atomicity of its affection, even on platforms which are not native 64-bit.
Return value: the seq (64-bit integer)
sys_context: global system context
pilot: the object to query
timestamp: the current ticks setting (1000 ticks per second)
Returns the seq one should use to generate new events/commands at a given time (given in ticks).
Return value: none.
sys_context: global system context
pilot: the object to query
Returns the seq of the last commit (reference game_state) for this object.
Return value: the commit seq (reference object)
sys_context: global system context
pilot: the object to query
Returns the seq which is targetted in the reference game_state, this is ’how far computation will go in the reference game_state if no new commands are issued’. Note that there can always be some commands which are not yet processed, so you should not rely on this too heavily, however it gives a good idea of how things are going.
Return value: the target seq (reference object)
sys_context: global system context
pilot: the object to query
Returns the current seq in the reference game_state. There’s no lock on this call so don’t rely on this too heavily, it just gives you an idea of wether the pilot is very late on its objectives or just on time.
Return value: the current seq (reference object)
sys_context: global system context
pilot: the object to query
Returns the max current seq in the reference or draft game states. No lock on this call so don’t rely on this too heavily, it just gives you an idea of computation state.
Return value: the current seq (reference object)
sys_context: global system context
pilot: the object to query
Tells wether the game is over or not.
Return value: 1 if over, 0 if not
sys_context: global system context
pilot: the object to query
cursor_id: the cursor_id concerned
Tells wether a given cursor was winner or not.
Return value: 1 if over, 0 if not
sys_context: global system context
pilot: the object to query
Gets the winner color.
Return value: a team color, -1 if no winner and/or error.
sys_context: global system context
pilot: the object to query
Gets the looser color.
Return value: a team color, -1 if no looser and/or error.
sys_context: global system context
pilot: object to query
Returns a pointer on the local_cursors struct used within the object. Beware, this is the *real* pointer, not a copy...
Return value: pointer on internal object
sys_context: global system context
pilot: the pilot to track
checksum_log_interval: dump interval, if 0, feature is disabled
Debugging function used to set automatically an interval at which engine will log a checksum automatically. This is typically to track down where and when there starts to be a difference between two game_states that have evolved separately. This function will propagate the parameter to all the game_states handled by the pilot, each will log its informations separately.
Return value: none
sys_context: global system context
pilot: the pilot to transform as a SEED.
server_id: ID of server issuing the command
seq: seq at which the dump should be generated
Creates the SEED command for a given pilot, that is, a command that contains macro informations about the game state such as current seq. It should be followed by a dump.
Return value: newly allocated string
sys_context: global system context
Gets a pseudo-random start seq, why do we use this? Just to make sure even in non-network situations, seq are always very high and random, this way this is one less bug to check in networked context.
Return value: random integer value, always greater than INT_MAX
sys_context: global system context
dump: dump to use as a base to init the suite (out param)
timestamp: timestamp used for pilot creation (should be "now")
Build the objects used by the test suite. The idea is to wrap all this in a single function since it requires to be exactly the same every time as the test suite is very pedantic about checksums.
Return value: 1 on success, 0 on failure.
sys_context: global system context
Get the base seq_0 for the reference test suite.
Return value: 64-bit integer.
sys_context: global system context
node_index: index of the node we want informations about
Get the node_id associated to an index, typically a 64-bit unique. The index is just a simple integer which is 0 for node A, 1 for node B, etc.
Return value: the node id, as an unsigned 64-bit integer
sys_context: global system context
node_index: index of the node (not its id)
stage: major stage of the test suite
step: minor step of the test suite
Get the reference test suite message by node_index, stage and step.
Return value: static string, must not be freed.
sys_context: global system context
stage: major stage of the test suite
step: minor step of the test suite
Get the reference test suite message by stage and step. Messages from various nodes are mixed and sorted.
Return value: static string, must not be freed.
sys_context: global system context
step: minor step of the test suite
Get the reference test suite message by step. Messages from various nodes and stages are mixed and sorted.
Return value: static string, must not be freed.
sys_context: global system context
game_state_checksum: expected checksum for the given checkpoint (out param)
seq: expected seq for the given checkpoint (out param)
round: expected round for the given checkpoint (out param)
stage: stage to query checksum and other info about
Gives the values which are expected for a given checkpoint. If the right messages have been feeded, then these values are expected.
Return value: none, everything in out params
sys_context: global system context
mode: test mode (bitmask)
Registers all tests for the libpil module.
Return value: 1 if test is successfull, 0 on error.
sys_context: global system context
mode: test mode (bitmask)
Runs the pil module test suite, testing most (if not all...)
functions.
Return value: 1 if test is successfull, 0 on error.
Arguments passed to the ADD command.
Type: u_int16_t
Definition: u_int16_t lw6pil_add_args_s::cursor_id
Cursor ID (16-bit non-zero unsigned int).
Type: int
Definition: int lw6pil_add_args_s::team_color
Team color (0 to 9).
Command structure, contains both full-text version and parsed information.
Type: int64_t
Definition: int64_t lw6pil_command_s::seq
The sequence number, a very large 64-bit integer. The sequence is here because the round wouldn’t be able to stand multiple games for long as it is only 32-bit. OTOH making round a 64-bit would cause multithread problems because of non-atomicity of 64-bit affectation on truely 32-bit platforms.
Type: int
Definition: int lw6pil_command_s::round
The game round.
Type: u_int64_t
Definition: u_int64_t lw6pil_command_s::node_id
The node ID issuing that command.
Type: lw6pil_command_code_t
Definition: lw6pil_command_code_t lw6pil_command_s::code
The command code.
Type: lw6pil_command_args_t
Definition: lw6pil_command_args_t lw6pil_command_s::args
The command arguments, parsed.
Type: char *
Definition: char* lw6pil_command_s::text
The original full text of the command.
Arguments passed to the DUMP command.
Type: char *
Definition: char* lw6pil_dump_args_s::level_hexa
Hexa dump of level.
Type: char *
Definition: char* lw6pil_dump_args_s::game_struct_hexa
Hexa dump of game struct.
Type: char *
Definition: char* lw6pil_dump_args_s::game_state_hexa
Hexa dump of game state.
Stores the information contained in a dump, this is just an utility struct used to hold all the data (level, game struct, game state and pilot) together
Type: lw6map_level_t *
Definition: lw6map_level_t* lw6pil_dump_s::level
Will hold the new level if a dump is received.
Type: lw6ker_game_struct_t *
Definition: lw6ker_game_struct_t* lw6pil_dump_s::game_struct
Will hold the new game struct if a dump is received.
Type: lw6ker_game_state_t *
Definition: lw6ker_game_state_t* lw6pil_dump_s::game_state
Will hold the new game state if a dump is received.
Type: lw6pil_pilot_p
Definition: lw6pil_pilot_p lw6pil_dump_s::pilot
Will hold the new pilot if a dump is received.
Contains information about all local cursors, which will override information from game state.
Type: u_int16_t
Definition: u_int16_t lw6pil_local_cursors_s::main_cursor_id
Main cursor ID (16-bit non-zero unsigned int). By main, we usually mean the mouse-driven one but necessarily. But still, this is a cursor which will have a special role, it will be used to center the map if needed, among other things.
Type: int
Definition: int lw6pil_local_cursors_s::main_i
Main cursor index.
Type: int
Definition: int lw6pil_local_cursors_s::nb_cursors
Number of cursors.
Type: lw6pil_local_cursor_t
Definition: lw6pil_local_cursor_t lw6pil_local_cursors_s::cursors[LW6MAP_MAX_NB_CURSORS]
The cursors array.
Stores informations about local cursors. This is usefull for user feedback. Indeed there can be some delay between, for instance, a mouse move or a keyboard press, and the time this information makes it through the whole pipeline. Players wouldn’t understand such a lag so for local cursors we override the information from the game state with that information we get right from the GUI.
Type: u_int16_t
Definition: u_int16_t lw6pil_local_cursor_s::cursor_id
Cursor ID (16-bit non-zero unsigned int).
Type: int
Definition: int lw6pil_local_cursor_s::x
X position (map coords).
Type: int
Definition: int lw6pil_local_cursor_s::y
Y position (map coords).
Type: int
Definition: int lw6pil_local_cursor_s::mouse_controlled
Wether this cursor is mouse controlled. If yes, then information will be taken directly from the mouse driver.
Type: int
Definition: int lw6pil_local_cursor_s::is_main
Wether this cursor is the main cursor.
Pilot is a container for several game states, a reference state which we can rely upon and a draft state which is anticipated to provide interactive feedback but reflects non-validated informations. The first member, id, is the same as the internal _lw6pil_pilot_t structure. The rest of it is hidden. The program will cast from lw6pil_pilot_t to _lw6pil_pilot_t internally.
Type: u_int32_t
Definition: u_int32_t lw6pil_pilot_s::id
The id of the object, this is non-zero and unique within one run session, incremented at each object creation.
Arguments passed to the REMOVE command.
Type: u_int16_t
Definition: u_int16_t lw6pil_remove_args_s::cursor_id
Cursor ID (16-bit non-zero unsigned int).
Arguments passed to the SET command.
Type: u_int64_t
Definition: u_int64_t lw6pil_set_args_s::cursor_id
Cursor ID (16-bit non-zero unsigned int).
Type: int
Definition: int lw6pil_set_args_s::x
X position (map coords).
Type: int
Definition: int lw6pil_set_args_s::y
Y position (map coords).
Type: int
Definition: int lw6pil_set_args_s::fire
Wether to activate primary weapon.
Type: int
Definition: int lw6pil_set_args_s::fire2
Wether to activate secondary weapon.
Worker thread data, used to calculate stuff in a separate thread. The principle is simple, it tries to keep up with a given target round, whenever this round isn’t reached, it computes more and more rounds.
Type: int
Definition: volatile int lw6pil_worker_s::run
Wether this thread should run, 0 will stop it.
Type: int
Definition: int lw6pil_worker_s::verified
Wether this is running in verified mode or not.
Type: int
Definition: volatile int lw6pil_worker_s::current_round
Current game round.
Type: int
Definition: volatile int lw6pil_worker_s::target_round
Round up to which we should compute stuff.
Type: int
Definition: volatile int lw6pil_worker_s::computed_rounds
How many rounds where computed since object creation.
Type: int
Definition: volatile int lw6pil_worker_s::over
Wether the game is over or not.
Type: lw6sys_thread_handler_t *
Definition: lw6sys_thread_handler_t* lw6pil_worker_s::compute_thread
The thread that does the job.
Type: lw6sys_mutex_t *
Definition: lw6sys_mutex_t* lw6pil_worker_s::global_mutex
Global data mutex.
Type: lw6sys_mutex_t *
Definition: lw6sys_mutex_t* lw6pil_worker_s::compute_mutex
Mutex used for the computing thread.
Type: lw6ker_game_state_t *
Definition: lw6ker_game_state_t* lw6pil_worker_s::game_state
Game state the computing thread is working on.
Type: lw6sys_list_r_t *
Definition: lw6sys_list_r_t* lw6pil_worker_s::commands
List of commands to be processed.
Type: lw6pil_dump_t
Definition: lw6pil_dump_t lw6pil_worker_s::dump
Dump information.
Arguments passed to various commands.
Type: lw6pil_add_args_t
Definition: lw6pil_add_args_t lw6pil_command_args_u::add
Arguments when command is ADD.
Type: lw6pil_remove_args_t
Definition: lw6pil_remove_args_t lw6pil_command_args_u::remove
Arguments when command is REMOVE.
Type: lw6pil_set_args_t
Definition: lw6pil_set_args_t lw6pil_command_args_u::set
Arguments when command is SET.
Type: lw6pil_dump_args_t
Definition: lw6pil_dump_args_t lw6pil_command_args_u::dump
Arguments when command is DUMP.
View lcov test coverage results on http://www.ufoot.org/liquidwar/v6/doc/coverage/src/lib/scm/index.html.
sys_context: global system context
funcs: list of functions, used as an input to size the hash correctly
Creates a new coverage hash, this is a simple hash containing pointers to integers. At startup hash is empty, whenever a scheme user function is called, if the entry exists it’s incremented, else it’s created with an initial value of 1 (one call).
Return value: newly allocated hash
sys_context: global system context
coverage: the hash to use to store the update
func: the name of the function (its callable scheme name)
Registers a call on a given function.
Return value: none.
sys_context: global system context
coverage: the hash containing the call data
Logs the information about which function has been called, and how many times. This is only about scheme functions.
Return value: none
sys_context: global system context
percent: if not NULL, will contain the percentage of coverage
coverage: object to query, containing coverage information
funcs: list of functions to check
Checks wether the script code coverage is fine, that is, wether all functions are called at least once. For each function listed (as a string) in funcs, it will look in coverage and check wether the entry exists and was called. Note that this function assumes that in c functions are defined with _scm_my_function (prefixed with _scm_ and using underscore) while in scm functions are defined with c-my-function (prefixed with c- and using minus).
Return value: 1 if OK, 0 if KO.
sys_context: global system context
funcname: function name to change
Transforms a function name of the form c-my-func to _scm_my_func.
Return value: new allocated string.
sys_context: global system context
funcname: function name to change
Transforms a function name of the form _scm_my_func to c-my-func.
Return value: new allocated string.
sys_context: global system context
string: SCM object to convert
For a GNU gettext-like behavior of scheme code, exported with a name such as _ then calling function _ from Guile will just do the same as _ in C.
Return value: SCM value, the translated string
sys_context: global system context
mode: test mode (bitmask)
Registers all tests for the libscm module.
Return value: 1 if test is successfull, 0 on error.
sys_context: global system context
mode: test mode (bitmask)
Runs the scm module test suite, testing most (if not all...)
functions.
Return value: 1 if test is successfull, 0 on error.
sys_context: global system context
string: SCM object to convert
Helper function, creates a 0 terminated string from a Guile string. A very common task. This function is just a wrapper that performs type checking, memory allocation around standard Guile function.
Return value: newly allocated string, pointer must be freed.
sys_context: global system context
c_list: list object to convert
Transform a C list containing strings to a Guile list containing those strings.
Return value: Guile object, a list of strings
sys_context: global system context
c_assoc: assoc object to convert
Transform a C assoc containing strings to a Guile assoc containing those strings.
Return value: Guile object, an assoc of strings
sys_context: global system context
list: SCM object to convert
Creates a C list from an SCM list containing strings. Beware of types, function will fail if members are not all strings, it won’t convert them.
Return value: new C list object
sys_context: global system context
assoc: SCM object to convert
Creates a C assoc from an SCM assoc containing strings. Beware of types, function will fail if members are not all strings, it won’t convert them.
Return value: new C assoc object
sys_context: global system context
name: name of the function when called from guile
req: required parameters
opt: optional parameters
rst: ? should RTFM to find that out
fcn: the function itself (pointer on the C executable code)
Wrapper on scm_c_define_gsubr, one of the value of this function is that
it does check wether it’s documented before registering it. So if you
try to register something not documented, it will fire a warning, which
is a very nice code-quality tool.
Return value: 1 on success, 0 on failure.
sys_context: global system context
filename: file to execute
Loads and executes a script. Will add a log message while doing it.
Return value: 1 on success, 0 on failure.
sys_context: global system context
func: callback to use
data: data to pass to callback
Initializes Guile and calls function within it.
Return value: callback return value.
View lcov test coverage results on http://www.ufoot.org/liquidwar/v6/doc/coverage/src/lib/sim/index.html.
sys_context: global system context
results: data to print
f: file to print data to
Pretty prints results on standard output.
Return value: none.
sys_context: global system context
results: out param, will be cleared
Fills the struct with zeroes.
Return value: none.
sys_context: global system context
results: results set to work on (in/out param)
Updates the structure so that the percent members are up to date.
Return value: 1 on success, 0 on failure.
sys_context: global system context
argc: argc as passed to main
argv: argv as passed to main
results: out param, results of the simulation
nb_teams: number of teams
bot_backend: bot backend to use
Runs a simulation of several battle/games on the default map using different team settings. Will test teams up to the given number, for instance if you give 3 as an argument, will run tests with teams 0, 1 and 2 (that’s to say a total of 3 teams).
Return value: 1 on success, 0 on failure.
sys_context: global system context
argc: argc as passed to main
argv: argv as passed to main
results: out param, results of the simulation
Runs a simulation of several battle/games on the default map using different team settings. Will test the most common colors only, with the most popular bot.
Return value: 1 on success, 0 on failure.
sys_context: global system context
argc: argc as passed to main
argv: argv as passed to main
results: out param, results of the simulation
Runs a simulation of several battle/games on the default map using different team settings. Will test all colors, with the most popular bot.
Return value: 1 on success, 0 on failure.
sys_context: global system context
mode: test mode (bitmask)
Registers all tests for the libsim module.
Return value: 1 if test is successfull, 0 on error.
sys_context: global system context
mode: test mode (bitmask)
Runs the sim module test suite, testing most (if not all...)
functions.
Return value: 1 if test is successfull, 0 on error.
Results for the game simulation, contains basic statistics about who won the games.
Type: int
Definition: int lw6sim_results_s::nb_teams
Number of teams that were tested.
Type: int
Definition: int lw6sim_results_s::absolute[LW6MAP_MAX_NB_TEAMS]
Absolute score. The unit is arbitrary and depends on the game type, the number of games. Well, it means nothing in itself, each team needs to be compared to the other ones.
Type: float
Definition: float lw6sim_results_s::percent[LW6MAP_MAX_NB_TEAMS]
Score as a percentage. This is based on several games played, the higher it is the stronger the team is.
Next: mod-csound, Previous: libsim, Up: C API [Contents][Index]
View lcov test coverage results on http://www.ufoot.org/liquidwar/v6/doc/coverage/src/lib/snd/index.html.
sys_context: global system context
backend: sound backend to use
fx_id: sound fx id
Plays a sound fx.
Return value: 1 on success, 0 on error
sys_context: global system context
backend: sound backend to use
map_dir: map directory, to search additionnal files
music_path: config entry containing multiple paths
music_file: relative/local name of a music file
Tells wether a file is a valid music file, typicallly based on file existence and extension. Not bullet proof, file might actually not be loadable, but chances are 99%.
Return value: 1 if music file, 0 if not
backend: sound backend to use
map_dir: map directory, to search additionnal files
music_path: config entry containing multiple paths
music_file: relative/local name of a music file
Plays a music file.
Return value: 1 if OK, 0 if not.
sys_context: global system context
backend: sound backend to use
music_path: config entry containing multiple paths
music_filter: string filter, must be present
music_exclude: string filter, must not be present
Plays a random music file. The filter and exclude mecanisms are not complete regex filters, only a quick and dirty feature which should still help in some cases, such as sorting musics for the menus and for the rest.
Return value: 1 if OK, 0 if not.
sys_context: global system context
backend: sound backend to use
Stops the music.
Return value: none.
sys_context: global system context
backend: the graphical backend to use
fx_volume: sound fx volume
water_volume: water sounds volume
music_volume: music volume
Sets up the sound backend for good, initializing a playback engine ready to play sounds and set to defaults. This call can typically fail if there’s no device available, if the user doesn’t have enough rights to access the hardware, and so on.
Return value: 1 on success, 0 if not
sys_context: global system context
backend: sound backend to use
volume: sound fx volume
Changes sound fx volume.
Return value: none.
sys_context: global system context
backend: sound backend to use
volume: water sounds volume
Changes water sounds volume.
Return value: none.
sys_context: global system context
backend: sound backend to use
volume: music volume
Changes music volume.
Return value: none.
sys_context: global system context
backend: sound backend to use
Polling function, must be called on a regular basis.
Return value: none.
sys_context: global system context
backend: the backend to quit
Uninitializes the backend, that is, releases resources, stops playback.
Return value: none.
sys_context: global system context
backend: the backend to represent
Returns a readable version of the backend object.
Return value: a newly allocated pointer.
sys_context: global system context
argc: argc, as passed to main
argv: argv, as passed to main
List available snd backends. The hash contains pairs with id and name for each backend. The id is the technical key you can use to load the backend, the name is something more readable you can display in an interface. The backend objects themselves are not instanciated by this (in fact, they are, but released on the fly) you need to load and initialize them afterwards.
Return value: hash containing id/name pairs.
sys_context: global system context
argc: argc, as passed to main
argv: argv, as passed to main
name: string containing snd key, typically got from lw6snd_get_backends
Creates a snd backend, this is just about loading the dynamic library if needed, and/or check snd engine is available, and connect to it. It does not perform initialization.
Return value: snd backend.
sys_context: global system context
backend: snd backend to destroy
Frees the ressources associated to a snd, which must have been properly uninitialized before.
Return value: none.
sys_context: global system context
mode: test mode (bitmask)
Registers all tests for the libsnd module.
Return value: 1 if test is successfull, 0 on error.
sys_context: global system context
mode: test mode (bitmask)
Runs the snd module test suite, testing most (if not all...)
functions.
Return value: 1 if test is successfull, 0 on error.
The snd backend is the first argument passed to any snd function, it contains reference to all the functions which can be used as well as a pointer on associated data. In OO, this would just be an object, with members and methods, using polymorphism through opaque pointers.
Type: lw6dyn_dl_handle_t *
Definition: lw6dyn_dl_handle_t* lw6snd_backend_s::dl_handle
Handle on dynamic library (if it makes sense).
Type: void *
Definition: void* lw6snd_backend_s::snd_context
Snd specific data, what is behind this pointer really depends on the snd engine.
Type: int
Definition: int lw6snd_backend_s::argc
The argc value passed to main.
Type: const char **
Definition: const char** lw6snd_backend_s::argv
The argv value passed to main.
Type: u_int32_t
Definition: u_int32_t lw6snd_backend_s::id
The id of the object, this is non-zero and unique within one run session, incremented at each object creation.
Type: int(*
Definition: int(* lw6snd_backend_s::play_fx)(lw6sys_context_t *sys_context, void *snd_context, int fx_id)
Pointer on lw6snd_play_fx callback code.
Type: int(*
Definition: int(* lw6snd_backend_s::is_music_file)(lw6sys_context_t *sys_context, void *snd_context, char *music_file)
Pointer on lw6snd_is_music_file callback code.
Type: int(*
Definition: int(* lw6snd_backend_s::play_music_file)(lw6sys_context_t *sys_context, void *snd_context, char *music_file)
Pointer on lw6snd_play_music_file callback code.
Type: int(*
Definition: int(* lw6snd_backend_s::play_music_random)(lw6sys_context_t *sys_context, void *snd_context, char *music_path, char *music_filter, char *music_exclude)
Pointer on lw6snd_play_music_randomcallback code.
Type: void(*
Definition: void(* lw6snd_backend_s::stop_music)(lw6sys_context_t *sys_context, void *snd_context)
Pointer on lw6snd_stop_music callback code.
Type: void *(*
Definition: void*(* lw6snd_backend_s::init)(lw6sys_context_t *sys_context, int argc, const char *argv[], float fx_volume, float water_volume, float music_volume)
Pointer on lw6snd_init callback code.
Type: void(*
Definition: void(* lw6snd_backend_s::set_fx_volume)(lw6sys_context_t *sys_context, void *snd_context, float volume)
Pointer on lw6snd_set_fx_volume callback code.
Type: void(*
Definition: void(* lw6snd_backend_s::set_water_volume)(lw6sys_context_t *sys_context, void *snd_context, float volume)
Pointer on lw6snd_set_water_volume callback code.
Type: void(*
Definition: void(* lw6snd_backend_s::set_music_volume)(lw6sys_context_t *sys_context, void *snd_context, float volume)
Pointer on lw6snd_set_music_volume callback code.
Type: void(*
Definition: void(* lw6snd_backend_s::poll)(lw6sys_context_t *sys_context, void *snd_context)
Pointer on lw6snd_poll callback code.
Type: void(*
Definition: void(* lw6snd_backend_s::quit)(lw6sys_context_t *sys_context, void *snd_context)
Pointer on lw6snd_quit callback code.
Type: char *(*
Definition: char*(* lw6snd_backend_s::repr)(lw6sys_context_t *sys_context, void *snd_context, u_int32_t id)
Pointer on lw6snd_repr callback code.
View lcov test coverage results on http://www.ufoot.org/liquidwar/v6/doc/coverage/src/lib/snd/mod-csound/index.html.
Defined to tell mod_csound is compatible with GNU General Public License Of course it is. This function does nothing, but the fact it’s declared makes its GPL compatibility obvious. Having this declared is required.
Return value: none
Defined to tell mod_csound has no dlclose issue, once can safely call lt_dlclose on it when done with it, without risking any segfault. Some other LW6 modules/shared libraries do have this problem.
Return value: none
sys_context: global system context
Returns the pedigree for mod-csound, giving details about the module, including name, description, licence, date/time of compilation.
Return value: dynamically allocated object.
sys_context: global system context
Creates a mod-csound backend.
Return value: backend pointer.
Next: libsrv, Previous: mod-csound, Up: C API [Contents][Index]
View lcov test coverage results on http://www.ufoot.org/liquidwar/v6/doc/coverage/src/lib/snd/mod-ogg/index.html.
Defined to tell mod_ogg is compatible with GNU General Public License Of course it is. This function does nothing, but the fact it’s declared makes its GPL compatibility obvious. Having this declared is required.
Return value: none
Defined to tell mod_ogg has no dlclose issue, once can safely call lt_dlclose on it when done with it, without risking any segfault. Some other LW6 modules/shared libraries do have this problem.
Return value: none
sys_context: global system context
Returns the pedigree for mod-ogg, giving details about the module, including name, description, licence, date/time of compilation.
Return value: dynamically allocated object.
sys_context: global system context
Creates a mod-ogg backend.
Return value: backend pointer.
View lcov test coverage results on http://www.ufoot.org/liquidwar/v6/doc/coverage/src/lib/srv/index.html.
sys_context: global system context
backend: backend to use
listener: listener object to use when constructing the backend.
Initializes a server backend. Must be performed before any other call.
Return value: 1 on success, 0 on failure
sys_context: global system context
backend: unitialize a srv backend
Closes a srv, but does not free all ressources.
sys_context: global system context
backend: server backend to use
tcp_accepter: TCP mode accepter
node_info: this node information
remote_id: remote host id (out param)
remote_url: remote host URL (out param, dynamically allocated)
Analyzes new TCP messages, typically handled within the accepter
object. The result is a combination of bitwise flags, namely
namely LW6SRV_ANALYSE_DEAD, LW6SRV_ANALYSE_UNDERSTANDABLE,
and LW6SRV_ANALYSE_OOB which helps knowing what to do with
message.
Return value: bitwise flag.
sys_context: global system context
backend: server backend to use
udp_buffer: UDP buffer
node_info: this node information
remote_id: remote host id (out param)
remote_url: remote host URL (out param, dynamically allocated)
Analyzes an UDP buffer, received on a socket.
The result is a combination of bitwise flags, namely
namely LW6SRV_ANALYSE_DEAD, LW6SRV_ANALYSE_UNDERSTANDABLE,
and LW6SRV_ANALYSE_OOB which helps knowing what to do with
message.
Return value: bitwise flag.
sys_context: global system context
backend: server backend to use
node_info: this node information
oob_data: OOB data received
Processes an OOB message sent from a client.
Return value: 1 if OK, 0 if not.
sys_context: global system context
backend: server backend to use
local_url: local url to use (to send to peer)
remote_url: remote url to communicate with
remote_ip: remote ip to communicate with
remote_port: remote port to communicate with
password: password to use (the real password, not a hash)
local_id: the local 64-bit id
remote_id: the remove 64-bit id
dns_ok: 1 if no DNS mismatch, 0 if situation is unclear
network_reliability: the greater, the more reliable it is
Opens a server connection. One might wonder, clients open
connections, but servers? To some extent, this is the equivalent
of accept in the socket API, it will actually create an object
one can then use to communicate. Be carefull with the implementation
of the callback, keep in mind it can be called any time in
multithreaded mode, you need to set up locks when accessing shared
objects, including, but not limited to, your own data buffers.
Return value: new connection object.
sys_context: global system context
backend: server backend to use
connection: connection to use
tcp_accepter: TCP accepter holding data
When data is receivedm feeds the server object with data. Will typically fire the callback receive function if there are actually some data stuff.
Return value: 1 some data processed, else 0
sys_context: global system context
backend: server backend to use
connection: connection to use
When data is receivedm feeds the server object with data. Will typically fire the callback receive function if there are actually some data stuff.
Return value: 1 some data processed, else 0
sys_context: global system context
backend: server backend to use
connection: connection to close
Closes a connection, will also free it.
Return value: none.
sys_context: global system context
backend: server backend to use
connection: connection to use
now: current timestamp
physical_ticket_sig: physical ticket
logical_ticket_sig: logical ticket
logical_from_id: logical id of sender
logical_to_id: logical id of receiver
message: string with the message to send
Sends a message. The added value with a plain send is that it handles all the special ticket fields.
Return value: 1 on success, 0 if not
sys_context: global system context
backend: server backend to use
connection: connection to use
Tells wether a server connection can technically send messages. This does not garantee send will succeed, but if it’s not OK at this stage, it’s not even worth trying.
Return value: 1 if it can be used to send messages, 0 if not ready.
sys_context: global system context
backend: server backend to use
connection: connection to use
Polling function, to be called on a regular basis.
Return value: none.
sys_context: global system context
backend: backend to use
connection: connection to represent
Gives a human readable representation of the connection.
Return value: dynamically allocated string.
sys_context: global system context
ip: ip address to listen on
port: port IP to bind to
Starts a server, binds the socket(s) and returns a listener object which can in turn be used to create connections.
Return value: new listener object.
sys_context: global system context
listener: listener to stop
Stops a listener object, and frees it.
Return value: none.
sys_context: global system context
remote_ip: remote IP address
remote_port: remote port
sock: the socket handler (either TCP or UDP)
first_line: the first line of data (can be NULL)
Create a new OOB structure, copying required objects. We need to make copies for this is for usage in a separate thread. The thread member is not set here since the right way to do things is first to set up data then to fire the thread.
Return value: new object
sys_context: global system context
oob: the object to free
Frees an OOB structure.
Return value: none
sys_context: global system context
Returns the list of the default srv backends.
Return value: comma separated string, must not be freed.
sys_context: global system context
argc: argc, as passed to main
argv: argv, as passed to main
List available srv backends. The hash contains pairs with id and name for each backend. The id is the technical key you can use to load the backend, the name is something more readable you can display in an interface. The backend objects themselves are not instanciated by this (in fact, they are, but released on the fly) you need to load and initialize them afterwards.
Return value: hash containing id/name pairs.
sys_context: global system context
argc: argc, as passed to main
argv: argv, as passed to main
name: string containing srv key, typically got from lw6srv_get_backends
Creates a srv backend, this is just about loading the dynamic library if needed, and/or check srv engine is available, and connect to it. It does not perform initialization.
Return value: srv backend.
sys_context: global system context
backend: backend to destroy
Destroys a srv backend.
Return value: none.
client_ip: the client ip, will be freed when accepter is freed, do not copy it
client_port: the client port
sock: the socket used
Creates a tcp_accepter object.
Return value: none
tcp_accepter: the object to free
Frees a tcp_accepter object.
Return value: none
sys_context: global system context
mode: test mode (bitmask)
Registers all tests for the libsrv module.
Return value: 1 if test is successfull, 0 on error.
sys_context: global system context
mode: test mode (bitmask)
Runs the srv module test suite, testing most (if not all...)
functions.
Return value: 1 if test is successfull, 0 on error.
sys_context: global system context
client_ip: the client ip, will be freed when object is freed, do not free it
client_port: the client port
line: the line received, will be freed when object is freed, do not free it
Creates an udp_buffer object.
Return value: none
sys_context: global system context
udp_buffer: the object to free
Frees a udp_buffer object.
Return value: none
The srv backend is the first argument passed to any srv function, it contains reference to all the functions which can be used as well as a pointer on associated data. In OO, this would just be an object, with members and methods, using polymorphism through opaque pointers.
Type: lw6dyn_dl_handle_t *
Definition: lw6dyn_dl_handle_t* lw6srv_backend_s::dl_handle
Handle on dynamic library (if it makes sense).
Type: void *
Definition: void* lw6srv_backend_s::srv_context
Srv specific data, what is behind this pointer really depends on the srv engine.
Type: int
Definition: int lw6srv_backend_s::argc
The argc value passed to main.
Type: const char **
Definition: const char** lw6srv_backend_s::argv
The argv value passed to main.
Type: u_int32_t
Definition: u_int32_t lw6srv_backend_s::id
The id of the object, this is non-zero and unique within one run session, incremented at each object creation.
Type: char *
Definition: char* lw6srv_backend_s::name
Module name.
Type: lw6cnx_properties_t
Definition: lw6cnx_properties_t lw6srv_backend_s::properties
General backend properties.
Type: lw6nod_info_t *
Definition: lw6nod_info_t* lw6srv_backend_s::info
Information about local node.
Type: void *(*
Definition: void*(* lw6srv_backend_s::init)(lw6sys_context_t *sys_context, int argc, const char *argv[], lw6cnx_properties_t *properties, lw6srv_listener_t *listener)
Pointer on lw6srv_init callback code.
Type: void(*
Definition: void(* lw6srv_backend_s::quit)(lw6sys_context_t *sys_context, void *srv_context)
Pointer on lw6srv_quit callback code.
Type: int(*
Definition: int(* lw6srv_backend_s::analyse_tcp)(lw6sys_context_t *sys_context, void *srv_context, lw6srv_tcp_accepter_t *tcp_accepter, lw6nod_info_t *node_info, u_int64_t *remote_id, char **remote_url)
Pointer on lw6srv_analyse_tcp callback code.
Type: int(*
Definition: int(* lw6srv_backend_s::analyse_udp)(lw6sys_context_t *sys_context, void *srv_context, lw6srv_udp_buffer_t *udp_buffer, lw6nod_info_t *node_info, u_int64_t *remote_id, char **remote_url)
Pointer on lw6srv_analyse_udp callback code.
Type: int(*
Definition: int(* lw6srv_backend_s::process_oob)(lw6sys_context_t *sys_context, void *srv_context, lw6nod_info_t *node_info, lw6srv_oob_data_t *oob_data)
Pointer on lw6srv_process_oob callback code.
Type: lw6cnx_connection_t *(*
Definition: lw6cnx_connection_t*(* lw6srv_backend_s::open)(lw6sys_context_t *sys_context, void *srv_context, lw6srv_listener_t *listener, const char *local_url, const char *remote_url, const char *remote_ip, int remote_port, const char *password, u_int64_t local_id, u_int64_t remote_id, int dns_ok, int network_reliability)
Pointer on lw6srv_open callback code.
Type: int(*
Definition: int(* lw6srv_backend_s::feed_with_tcp)(lw6sys_context_t *sys_context, void *srv_context, lw6cnx_connection_t *connection, lw6srv_tcp_accepter_t *tcp_accepter)
Pointer on lw6srv_feed_with_tcp callback code.
Type: int(*
Definition: int(* lw6srv_backend_s::feed_with_udp)(lw6sys_context_t *sys_context, void *srv_context, lw6cnx_connection_t *connection, lw6srv_udp_buffer_t *udp_buffer)
Pointer on lw6srv_feed_with_udp callback code.
Type: void(*
Definition: void(* lw6srv_backend_s::close)(lw6sys_context_t *sys_context, void *srv_context, lw6cnx_connection_t *connection)
Pointer on lw6srv_close callback code.
Type: int(*
Definition: int(* lw6srv_backend_s::send)(lw6sys_context_t *sys_context, void *srv_context, lw6cnx_connection_t *connection, int64_t now, u_int32_t physical_ticket_sig, u_int32_t logical_ticket_sig, u_int64_t logical_from_id, u_int64_t logical_to_id, const char *message)
Pointer on lw6srv_send callback code.
Type: int(*
Definition: int(* lw6srv_backend_s::can_send)(lw6sys_context_t *sys_context, void *srv_context, lw6cnx_connection_t *connection)
Pointer on lw6srv_can_send callback code.
Type: void(*
Definition: void(* lw6srv_backend_s::poll)(lw6sys_context_t *sys_context, void *srv_context, lw6cnx_connection_t *connection)
Pointer on lw6srv_poll callback code.
Type: char *(*
Definition: char*(* lw6srv_backend_s::repr)(lw6sys_context_t *sys_context, void *srv_context, lw6cnx_connection_t *connection)
Pointer on lw6srv_repr callback code.
Parsed client ID, this is not the numerical 64-bit ID but an IP:port pair which uniquely and physically identifies the peer.
Type: char *
Definition: char* lw6srv_client_id_s::client_ip
Client IP address, as a string.
Type: int
Definition: int lw6srv_client_id_s::client_port
Client IP port.
The listener is the object which listens on the network and can create tcp accepters or udp buffers depending on what is received.
Type: char *
Definition: char* lw6srv_listener_s::ip
IP address we are binded to.
Type: int
Definition: int lw6srv_listener_s::port
IP port we are binded to.
Type: int
Definition: int lw6srv_listener_s::tcp_sock
TCP socket, binded in listening mode.
Type: lw6sys_list_t *
Definition: lw6sys_list_t* lw6srv_listener_s::tcp_accepters
List of lw6srv_tcp_accepter_t objects, created when data is received.
Type: int
Definition: int lw6srv_listener_s::udp_sock
UDP socket, binded.
Type: lw6sys_list_t *
Definition: lw6sys_list_t* lw6srv_listener_s::udp_buffers
List of lw6srv_udp_buffer_t objects, created when data is received.
Used to store out of band data. Typically, when data is recognized as out of band, it’s treated in a separate thread, and not mainstream. This is both because out-of-band data is the default (anything not recognized and/or not trusted is OOB) and because this can easily be treated separately as all we need is to server nearly static informations.
Type: int64_t
Definition: int64_t lw6srv_oob_data_s::creation_timestamp
Date of the request.
Type: int
Definition: volatile int lw6srv_oob_data_s::do_not_finish
Used to interrupt the OOB process before it’s over.
Type: char *
Definition: char* lw6srv_oob_data_s::remote_ip
IP address of peer.
Type: int
Definition: int lw6srv_oob_data_s::remote_port
IP port of peer.
Type: int
Definition: int lw6srv_oob_data_s::sock
Socket used, can either be TCP or UDP, depends on backend.
Type: char *
Definition: char* lw6srv_oob_data_s::first_line
First line of data.
Used to handle OOB requests. This is a container over the OOB data and its treatment thread.
Type: lw6sys_thread_handler_t *
Definition: lw6sys_thread_handler_t* lw6srv_oob_s::thread
Thread use to handle the data.
Type: lw6srv_oob_data_t
Definition: lw6srv_oob_data_t lw6srv_oob_s::data
The OOB data, what we received from the network.
A TCP accepter is an object which is created after a listening socket received some random information (in TCP mode, hence its name). Itprovides basic support to accept/reject requests and choose the right protocol/backend for the answer.
Type: lw6srv_client_id_t
Definition: lw6srv_client_id_t lw6srv_tcp_accepter_s::client_id
Where the data does come from.
Type: int
Definition: int lw6srv_tcp_accepter_s::sock
Socket returned by the accept POSIX function, this is the one we can use to reply and send data back.
Type: char
Definition: char lw6srv_tcp_accepter_s::first_line[LW6SRV_PROTOCOL_BUFFER_SIZE+1]
First line received over the network. This is "peeked" so it’s still available for the actual backend, in fact that’s the very thing we need an object for, with the information "these bytes came from ip:port" one can take a decision on what to do with the request.
Type: int64_t
Definition: int64_t lw6srv_tcp_accepter_s::creation_timestamp
Timestamp of accepter creation. This is more or less the same that the instant we received data on the network. There’s a small lag, but not that bad. This is mostly used for timeout.
A UDP datagram, this structure contains both the data and information about who sent it.
Type: lw6srv_client_id_t
Definition: lw6srv_client_id_t lw6srv_udp_buffer_s::client_id
Where the data does come from.
Type: char *
Definition: char* lw6srv_udp_buffer_s::line
The data itself. This is typically a C-string with a 0 char at the end, anything else will be rejected anyway.
View lcov test coverage results on http://www.ufoot.org/liquidwar/v6/doc/coverage/src/lib/srv/mod-httpd/index.html.
Defined to tell mod_httpd is compatible with GNU General Public License Of course it is. This function does nothing, but the fact it’s declared makes its GPL compatibility obvious. Having this declared is required.
Return value: none
Defined to tell mod_httpd has no dlclose issue, once can safely call lt_dlclose on it when done with it, without risking any segfault. Some other LW6 modules/shared libraries do have this problem.
Return value: none
sys_context: global system context
Returns the pedigree for mod-httpd, giving details about the module, including name, description, licence, date/time of compilation.
Return value: dynamically allocated object.
sys_context: global system context
Creates a mod-httpd backend.
Return value: backend pointer.
View lcov test coverage results on http://www.ufoot.org/liquidwar/v6/doc/coverage/src/lib/srv/mod-tcpd/index.html.
Defined to tell mod_tcpd is compatible with GNU General Public License Of course it is. This function does nothing, but the fact it’s declared makes its GPL compatibility obvious. Having this declared is required.
Return value: none
Defined to tell mod_tcpd has no dlclose issue, once can safely call lt_dlclose on it when done with it, without risking any segfault. Some other LW6 modules/shared libraries do have this problem.
Return value: none
sys_context: global system context
Returns the pedigree for mod-tcpd, giving details about the module, including name, description, licence, date/time of compilation.
Return value: dynamically allocated object.
sys_context: global system context
Creates a mod-tcpd backend.
Return value: backend pointer.
View lcov test coverage results on http://www.ufoot.org/liquidwar/v6/doc/coverage/src/lib/srv/mod-udpd/index.html.
Defined to tell mod_udpd is compatible with GNU General Public License Of course it is. This function does nothing, but the fact it’s declared makes its GPL compatibility obvious. Having this declared is required.
Return value: none
Defined to tell mod_udpd has no dlclose issue, once can safely call lt_dlclose on it when done with it, without risking any segfault. Some other LW6 modules/shared libraries do have this problem.
Return value: none
sys_context: global system context
Returns the pedigree for mod-udpd, giving details about the module, including name, description, licence, date/time of compilation.
Return value: dynamically allocated object.
sys_context: global system context
Creates a mod-udpd backend.
Return value: backend pointer.
View lcov test coverage results on http://www.ufoot.org/liquidwar/v6/doc/coverage/src/lib/sys/index.html.
sys_context: global system context
keyword: the option to match, without the prefix "-" or "–"
argv_string: the argv value, for instance argv[1]
This is an utility function which allow the program to handle options in a uniform manner. Key comparison is insensitive, that is, –option and –OPTION are equivalent. Besides, -option and –OPTION are equivalent too. Liquid War 6 documentation mentions options in lowercase with a double dash (–option) by default, but it’s a fact, the program supports variants. This is just for convenience, the philosophy behind this behavior is "be as permissive as possible when interpreting input, and as strict as possible when generating output". In fact, it’s even said that Liquid War 6 will accept the argument without any prefix dash as being valid... This is to say running "liquidwar6 –option" is the same as running "liquidwar6 option". But, this is a secret 8-)
Return value: non zero if it matches, 0 if it doesn’t.
sys_context: global system context
argc: the number of arguments, as passed to main
argv: an array of arguments, as passed to main
keyword: the keyword to match
Parses all command-line arguments, searching for one precise "–key[=...]" entry.
Return value: 1 if key is present, 0 if not.
argc: the number of arguments, as passed to main
argv: an array of arguments, as passed to main
keyword: the keyword to match
Parses all command-line arguments, searching for one precise "–key=value" pair, and returns the value.
Return value: a pointer to the value. May be NULL. Must be freed.
sys_context: global system context
argc: the number of arguments, as passed to main
argv: an array of arguments, as passed to main
keyword: the keyword to match
Parses all command-line arguments, searching for one precise "–key=value" pair, and returns the value. If a corresponding environment variable is available, but no command-line parameter was passed, the environment variable is intepreted. Such environment variables are uppercased, prefixed by "LW6_" and "_" replaces "-". The environment variable will be overriden if the command-line parameter is present.
Return value: a pointer to the value. May be NULL. Must be freed.
sys_context: global system context
argc: argc as passed to main
argv: argv as passed to main
Chooses between the two test modes "check" or "test" and also reports wether one should run "batch" or "interactive" tests. This is done by using the bit mask defined in LW6SYS_TEST_MODE_FULL_TEST and LW6SYS_TEST_MODE_INTERACTIVE.
Return value: a bit mask one can pass to test functions
sys_context: global system context
free_func: optional callback used to free memory when stored date is a pointer. Can be NULL when one stores non dynamically allocated data, such as an integer or a static array.
Creates an empty assoc. There’s a difference between NULL and an empty assoc. The empty assoc would (in Scheme) be ’() whereas NULL corresponds to undefined "is not a assoc and will generate errors if you ever call assoc functions on it". Such created assoc are not performant hash tables but slowish "strcmp me for each key" associative arrays, the key being a "char *" string and the value a "void *" pointer.
Return value: a pointer to the newly allocated associative
array. Must be freed with lw6sys_assoc_free.
sys_context: global system context
assoc: the assoc to be freed.
The function will cascade delete all elements, using (if not NULL...) the callback passed when first creating the assoc.
Return value: void
sys_context: global system context
assoc: the assoc to test
key: the key to search
Not a very fast function, since on a "big" assoc, strcmp will be called internally until the key is found.
Return value: non-zero if there’s an entry with the corresponding key.
sys_context: global system context
assoc: the assoc to query
key: the key of which we want the value
Return value: a void pointer to the data contained in the assoc. Note that the pointer on the actual data is returned, that is, if it’s static data, you must not try to free it... As long as memory management is concerned, destroying the assoc will actually free the data if needed.
sys_context: global system context
assoc: the assoc to modify
key: the key we want to updated
value: the new value
Sets a value in an associative array. The key pointer need not be persistent, it can be freed after affectation. In fact a new string will be created internally. This is not true for the value, it’s hard to find way to copy "any object". So if you want an associative array of strings, key can disappear after calling this function, but not value. The function passed as free_func when creating the assoc will be used to free stuff whenever needed (unset or free).
Return value: void
sys_context: global system context
assoc: the assoc concerned
key: the key to unset
Clears an entry in an associative array. The callback passed when creating the assoc will be called if needed, to free the data automatically.
Return value: void
sys_context: global system context
assoc: the assoc to work on
Returns a list containing all the keys of the assoc. The list must be free with lw6sys_list_free by the caller. This list copies all the keys of the assoc, so it is safe to use it once the assoc is deleted. However the keys will of course be of little interest in this case. But the program won’t segfault.
Return value: the list of keys.
sys_context: global system context
assoc: the assoc to work on
func: a callback to call on each entry
func_data: a pointer on some data which will be passed to the callback
Executes a function on all assoc items. The func_data parameter allows you to pass extra values to the function, such as a file handler or any variable which can not be inferred from list item values, and you of course do not want to make global...
Return value: void
sys_context: global system context
assoc: the assoc to work on
func: a callback to call on each entry, may be NULL
func_data: a pointer on some data which will be passed to the callback
Executes a function on all assoc items, like lw6sys_assoc_sort_and_map
but befor doing so, sorts all entries in alphabetical order.
Return value: void
sys_context: global system context
assoc: the assoc to duplicate, can be NULL
dup_func: the function which will be called to duplicate data
Duplicates an assoc. All keys will be copied so that if the first assoc is deleted, the duplicated one is fine. Additionnaly, dup_func will be called with all data fields. If dup_func is NULL, then data values will simply be copied. This is likely to be usefull when data is not dynamically allocated.
Returned value: a newly allocated assoc.
sys_context: global system context
skip: number of calls to skip
detailed: 0 for light output, 1 for complete, detailed messages
Returns the current backtrace as a comma separated list.
This can typically be used for debugging purposes. Not available
on some platforms, including mingw32, it requires backtrace_symbols
to be defined. Note that this function calls internal string functions
so it makes usage of the sys module in many ways, therefore should
be used only in other modules, it can’t be used for debugging of
internal memory functions for instance. To debug those, use
backtrace_symbols_fd directly (or maybe just gdb...). The skip
parameter allows you to skip caller’s stack, 0 will display
everything but lw6sys_backtrace itself.
Return value: dynamically allocated string
sys_context: global system context
Will set up a default memory bazooka, a slow yet convenient tool to track down and hopefully kill memory leaks. Named bazooka after a night wasted to track down an unfoundable leak... BAZOOOOOOKA!!!
Return value: 1 if success, 0 if failed.
sys_context: global system context
Clears the memory bazooka.
Return value: none.
sys_context: global system context
size: number of items (calls to malloc) to keep
Resizes, the memory bazooka. What’s this? It’s an inelegant yet efficient tool to track down memory leak. Memory bazooka will keep track of every call to malloc, keeping a trace of what has been malloced, where it has been called (from which file, which line), how much memory was allocated, it will even show you what’s at the address in a 0-terminated string-friendly fashion. Of course this slows down the program, so in production, you might set this to 0, but for debugging, a million bazooka is worth the megabytes and CPU cycles it wastes.
Return value: 1 if success, 0 if failure.
sys_context: global system context
The companion of lw6sys_set_memory_bazooka_size. This function
will return how many calls to malloc can be traced. A return
value of 0 indicates that feature is disabled.
Return value: size of the bazooka array.
sys_context: global system context
state: the state of the eraser
Sets the memory bazooka eraser state. Note that to really work, it requires the memory bazooka to be "big enough".
Return value: 1 if activated, 0 if not. Note that the main reason for it not to be activated is if the memory bazooka has zero size.
sys_context: global system context
Provided you have always called the LW6SYS_MALLOC an LW6SYS_CALLOC to
allocate memory, this function will tell you how many times malloc
has been called.
Return value: the number of calls to lw6sys_malloc or lw6sys_calloc since
program was started.
sys_context: global system context
Provided you have always called the LW6SYS_FREE macro to free
memory, this function will tell you how many times free has been called.
Return value: the number of calls to lw6sys_free since
program was started.
sys_context: global system context
Provided you have always called the LW6SYS_MALLOC an LW6SYS_CALLOC to
allocate memory, this function will tell you the current number of
pointer returned by LW6SYS_MALLOC an LW6SYS_CALLOC, currently
alive on the heap.
Return value: the number of calls to lw6sys_malloc or lw6sys_calloc since
program was started.
sys_context: global system context
Provided you have always called the LW6SYS_MALLOC an LW6SYS_CALLOC to
allocate memory, this function will tell you the maximum of pointers
returned by malloc that were present at the same time on the heap.
Return value: the number of calls to lw6sys_malloc or lw6sys_calloc since
program was started.
sys_context: global system context
Provided you have always called the LW6SYS_MALLOC an LW6SYS_CALLOC to
allocate memory, this function will tell you how many bytes malloc
has reserved.
Return value: the number of calls to lw6sys_malloc or lw6sys_calloc since
program was started.
sys_context: global system context
Provided you have always called the LW6SYS_FREE macro to free
memory, this function will tell you how many bytes free has freed.
Return value: the number of calls to lw6sys_free since
program was started.
sys_context: global system context
Provided you have always called the LW6SYS_MALLOC an LW6SYS_CALLOC to
allocate memory, this function will tell you the current number of
bytes returned by LW6SYS_MALLOC an LW6SYS_CALLOC, currently
alive on the heap.
Return value: the number of calls to lw6sys_malloc or lw6sys_calloc since
program was started.
sys_context: global system context
Provided you have always called the LW6SYS_MALLOC an LW6SYS_CALLOC to
allocate memory, this function will tell you the maximum bytes
returned by malloc that were present at the same time on the heap.
Return value: the number of calls to lw6sys_malloc or lw6sys_calloc since
program was started.
sys_context: global system context
Returns true if memory bazooka data are perfectly trustable, that is, it has never been resetted or resized.
Return value: 1 if trustable, 0 if not.
sys_context: global system context
Reports memory bazooka diagnostics on the console. Carefull, this one is not reentrant, call at the end of your program when all threads are joined.
Return value: 1 if no allocated stuff left, 0 if there are still malloc’ed stuff
Returns the name of the package. This is the PACKAGE_TARNAME constant
defined by the GNU Autoconf ./configure script. While it’s always possible
to use the defined constant directly, using this function will return
the value defined when compiling the binary, not the one you’re using
when compiling another program relying on Liquid War as a library.
Return value: a non-NULL string "liquidwar6", must not be freed.
Returns the name of the package, in a user friendly form, which can
include spaces, for instance. This is the PACKAGE_NAME constant
defined by the GNU Autoconf ./configure script. While it’s always possible
to use the defined constant directly, using this function will return
the value defined when compiling the binary, not the one you’re using
when compiling another program relying on Liquid War as a library.
Return value: a non-NULL string "Liquid War 6", must not be freed.
Returns the description of the package. This is the PACKAGE_STRING constant
defined by the GNU Autoconf ./configure script. It’s the concatenation
of PACKAGE_NAME and VERSION. While it’s always possible
to use the defined constant directly, using this function will return
the value defined when compiling the binary, not the one you’re using
when compiling another program relying on Liquid War as a library.
Return value: a non-NULL string "Liquid War 6 <version>", must not be freed.
Returns the id of the package. This is not an autotools standard
ID, in fact it’s just PACKAGE_TARNAME concatenated
with VERSION, that is liquidwar6-<version>.
Return value: a non-NULL string "liquidwar6-<version>", must not be freed.
Returns the version of the program. This is the VERSION constant
defined by the GNU Autoconf ./configure script. Same as PACKAGE_VERSION.
Note that while using a function to get PACKAGE_TARNAME might seem
useless, having both ways to get the version, that is, a function and
a constant, is very usefull. Think, for instance, that a dynamically
loaded shared library might need to check its own version against the
version of the core program.
Return value: a non-NULL string, which must not be freed.
Returns the the program codename. This is the little name of the version. It’s been decided that all LW6 releases would take the name of a famous general, warrior, whatever. For instance, it could be "Napoleon".
Return value: a non-NULL string, traditionnally the name of a famous general, someone which has been involved in war. Must not be freed (I mean, the string, not the general).
Returns the program base version number. If version is X.Y.Z, this is X.Y, think of it as MAJOR.MINOR and globally determines the level of compatibility of the program. Two program exposing the same version should be network compatible and also be able to use the same ressource files (graphics, maps, sounds...) as well as being capable of using the same binary modules (graphics backends, bots and so on).
Return value: a non-NULL string, typically "0.1" (beta release) or "6.0" (stable). Must not be freed.
Returns the program major version number. If version is X.Y.Z, this is X. It’s mainly used to make the difference between alpha/beta releases (with "0" here) and stable releases using "6" as we are talking about LW6, after all.
Return value: a non-NULL string, typically "0" (beta release) or "6" (stable). Must not be freed.
Returns the program minor version number. If version is X.Y.Z, this is Y. This one should increase manually at each significant/public release of the game.
Return value: a non-NULL string like "42", which must not be freed.
Returns the program stamp. This is like a serial number. It’s is not the same as the version. The version is meant to be set to something readable. This is just a cryptic thing, incremented at each ./configure or each developper’s "I feel like it needs to be incremented". The idea is just to keep (one more...) track of which source code is build. Ideally, this would be plugged to the source revision control system but this has some drawbacks, including that it would require it to modify files before commiting them, which is not safe, and almost impossible if you sign archives. One more point: this is a string. It’s true the return value is actually a string containing the representation of an integer, but because all other build parameters are strings, and because we don’t know what the future reserves, it’s a string. If version is X.Y.Z, this is Z. Also called revision.
Return value: a non-NULL string like "666", which must not be freed.
Returns an md5 checkum which is caculated from C (.c and .h) source files. This is complementary with the build stamp. By default the stamp will be enough to check what has been compiled, but one can always imagine a case where Bob compiles something a little different than Alice, with the same stamp, incremented by 1 from a common source tree. They apply their own patches, for instance. This md5sum double-checks that two binaries have been built from the same sources. Note that this is not the md5 checksum of the generated binary. Nor does it include any information about scheme scripts and data.
Return value: a non-NULL string, which must not be freed.
Returns a (very) short copyright information about the program.
Return value: a non-NULL string, single line whithout ’\n’ at the end. Must not be freed.
Returns the license for the program (GNU GPL v3 or later).
Return value: a non-NULL string, single line whithout ’\n’ at the end. Must not be freed.
Returns the URL of the game, its homepage.
Return value: a non-NULL string, single line whithout ’\n’ at the end. Must not be freed.
Returns the URL for bugs, the bug reports page.
Return value: a non-NULL string, single line whithout ’\n’ at the end. Must not be freed.
Returns the arguments passed to the GNU Autoconf ./configure script when buildling the game. Very usefull to know how the binary was generated, that is, what kind of optimizations are peculiar settings it uses.
Return value: a non-NULL string, which, passed to ./configure again, would hopefully generate the same binary. Must not be freed.
Returns __VERSION__ GCC preprocessor value, that is, the human readable version of the compiler.
Return value: a non-NULL string, must not be freed.
Returns the arguments which would allow another program to use liquidwar6 as a library. Typically, pass this to gcc when compiling your sources. Basically contains "-I" switches which tell where the headers are.
Return value: a non-NULL string, which must not be freed.
Returns the arguments which would allow another program to link against liquidwar6. Pass this to gcc or libtool when compiling your program. Basically contains a "-L" option which says where the library is. Note that this will only allow you to link against the main libliquidwar6 library, but not the dynamically loaded modules.
Return value: a non-NULL string, which must not be freed.
Returns the value return by the standard shell hostname command
on the machine where the game has been built. Usefull to track binaries
and know where do they come from.
Return value: a non-NULL string, must not be freed.
Returns the compilation date. While this information can easily be
obtained with the C __DATE__ macro, having this function is convenient
for it returns a value which is the same for the whole program, and does
not possibly change in every file.
Return value: a non-NULL string, must not be freed.
Returns the compilation date. While this information can easily be
obtained with the C __TIME__ macro, having this function is convenient
for it returns a value which is the same for the whole program, and does
not possibly change in every file.
Return value: a non-NULL string, must not be freed.
Returns the CPU this program is designed for. Convenient on i386 compatible CPUs to know which flavor (i386, i586...) the binary is made for.
Return value: a non-NULL string, must not be freed.
sys_context: global system context
Returns the endianness of the computer.
Return value: ’little’ (x86-like) or ’big’ (ppc-like), as a string. Must not be freed.
Returns the system pointer size, in bytes.
Return value: 4 for 32-bit, 8 for 64-bit.
Tells wether CPU belongs to x86 family or not.
Return value: 1 if x86, 0 if not
Tells wether CPU belongs to amd64 family or not.
Return value: 1 if amd64, 0 if not
Returns the OS this program is designed for. Usefull for bug reports.
Return value: a non-NULL string, must not be freed.
Tells wether the program was compiled for a GNU system, or not.
Return value: 1 if compiled on windows, 0 if not
Tells wether the program was compiled for a UNIX system, or not.
Return value: 1 if compiled on windows, 0 if not
Tells wether the program was compiled for Microsoft Windows, or not.
Return value: 1 if compiled on windows, 0 if not
Tells wether the program was compiled for Mac OS X, or not.
Return value: 1 if compiled on OS X, 0 if not
Tells wether the program was compiled for GP2X, or not.
Return value: 1 if compiled on OS X, 0 if not
sys_context: global system context
Returns the top source directory, when the game was built. This can seem useless and non relevant on the end-user’s machine, but... it’s a must-have for developpers and packagers. Without this, binaries would never find their associated data, especially when building outside the source tree. Or, testing the game would be impossible without installing it, given the fact that most of the code is in scripts that are stored in /usr/local by default, this would be painfull. So this function is here to help finding data within the source tree when the game is not installed yet. Note that the function is rather clever, since it will automatically try to remove useless ’../’ sequences at the beginning of a possibly relative path. Note that the equivalent abs_srcdir function is somewhat more reliable.
Return value: a non-NULL string, must not be freed.
Returns top_srcdir as an absolute path, this is most of the time more usable than the relative path.
Return value: a non-NULL string, must not be freed.
Returns the prefix value as given to the GNU Autoconf ./configure script.
Used to deduce the path to other directories and files.
Return value: a non-NULL string, "/usr/local" by default. Must not be freed.
Returns the datadir value defined by the GNU Autoconf ./configure script.
This is not the value which can be overriden by the Liquid War 6 specific.
"–data-dir" option. datadir is usually something like "/usr/local/share"
while the actual Liquid War 6 defined data dir is a more profound path
which includes the name of the package, its version, and so on.
Return value: a non-NULL string, "/usr/local/share" by default. Must not be freed.
Returns the libdir value defined by the GNU Autoconf ./configure script.
This is not the value which can be overriden by the Liquid War 6 specific.
"–mod-dir" option. libdir is usually something like "/usr/local/lib"
while the actual Liquid War 6 defined module dir is a more profound path
which includes the name of the package, its version, and so on.
Return value: a non-NULL string, "/usr/local/lib" by default. Must not be freed.
Returns the includedir value defined by the GNU Autoconf ./configure script.
As for other options, it’s interesting to have this value, this enables
the program to inform people who want to hack the game of the place
headers are supposed to be installed.
Return value: a non-NULL string, "/usr/local/include" by default. Must not be freed.
Returns the localedir value defined by the GNU Autoconf
./configure script.
Used as an argument for gettext / libintl functions.
Return value: a non-NULL string, "/usr/local/share/locale" by default. Must not be freed.
Returns the docdir value defined by the GNU Autoconf
./configure script.
Used to write consistent XML file headers.
Return value: a non-NULL string, "/usr/local/share/doc/liquidwar6" by default. Must not be freed.
Tells wether console is enabled or not.
Return value: "yes" or "no", must no be freed.
Tells wether gtk is enabled or not.
Return value: "yes" or "no", must no be freed.
Tells wether the graphical mod-gl1 backend was compiled.
Return value: "yes" or "no", must no be freed.
Tells wether the graphical mod-gles2 backend was compiled.
Return value: "yes" or "no", must no be freed.
Tells wether the graphical mod-soft backend was compiled.
Return value: "yes" or "no", must no be freed.
Tells wether the graphical mod-caca backend was compiled.
Return value: "yes" or "no", must no be freed.
Tells wether the audio mod-csound backend was compiled.
Return value: "yes" or "no", must no be freed.
Tells wether the audio mod-ogg backend was compiled.
Return value: "yes" or "no", must no be freed.
Tells wether the network mod-http backend was compiled.
Return value: "yes" or "no", must no be freed.
Tells wether the game was compiled with openmp support.
Return value: "yes" or "no", must no be freed.
Tells wether the game was compiled in optimize mode.
Return value: "yes" or "no", must no be freed.
Tells wether the game was compiled in allinone mode.
Return value: "yes" or "no", must no be freed.
Tells wether the game was compiled in fullstatic mode.
Return value: "yes" or "no", must no be freed.
Tells wether the game was compiled with paranoid memory management.
Return value: "yes" or "no", must no be freed.
Tells wether the game was compiled with suitable informations for gprof.
Return value: "yes" or "no", must no be freed.
Tells wether the game was compiled with the ’-finstrument-fonctions’ GCC flag.
Return value: "yes" or "no", must no be freed.
Tells wether the game was compiled for later use with Google Profiler support.
Return value: "yes" or "no", must no be freed.
Tells wether the game was compiled with suitable informations for gcov.
Return value: "yes" or "no", must no be freed.
Tells wether the game was compiled for later use with valgrind.
Return value: "yes" or "no", must no be freed.
sys_context: global system context
Returns the internal bin-id value, which does not mean anything but changes at each build.
Return value: an integer
sys_context: global system context
Dumps in the log file the whole program pedigree, host, modules, that is, what are the values of all the build options. Usefull for bug reports.
Return value: none.
sys_context: global system context
free_func: optional callback used to free memory when stored date is a pointer. Can be NULL when one stores non dynamically allocated data, such as an integer or a static array.
size: the estimated size of the cache table. This is required because, internally, the object uses a hash. Note that this is an estimation only. You could theorically fit 1000000 objects in a 3-sized cache. Problem -> this is inefficient, you’d better use an assoc or a bigger cache. If you store 3 elements in a 1000000-sized cache, you’ll waste memory. It might be wise to use a prime number as the estimated size. 421 is prime ;)
Creates an empty cache. There’s a difference between NULL and an empty cache.
Return value: a pointer to the newly allocated cache table.
Must be freed with lw6sys_cache_free.
sys_context: global system context
cache: the cache to be freed.
The function will cascade delete all elements, using (if not NULL...) the callback passed when first creating the cache.
Return value: void
sys_context: global system context
data: data to free, this is normally an cache item
This is a wrapper, used as the actual free callback for the internal hash. What it does is that it just runs the real free callback (the one given by the user) on the member value. This indirection is required since we use the intermediate item object to store the timestamp along with the key and data.
Return value: none.
sys_context: global system context
cache: the cache to test
key: the key to search
Tells wether the key is present or not. If key is here but too old (expired) then will return 0 and key will be deleted on the fly.
Return value: non-zero if there’s an entry with the corresponding key.
sys_context: global system context
cache: the cache to query
key: the key of which we want the value
Gets the value corresponding to a given key. Note that the value might be NULL, even if the key exists. If the key has expired, NULL will be returned, and the entry deleted on the fly.
Return value: a void pointer to the data contained in the cache. Note that the pointer on the actual data is returned, that is, if it’s static data, you must not try to free it... As long as memory management is concerned, destroying the cache will actually free the data if needed.
cache: the cache to modify
key: the key we want to updated
value: the new value
Sets a value in a cache table. The key pointer need not be persistent, it can be freed after affectation. In fact a new string will be created internally. This is not true for the value, it’s hard to find way to copy "any object". So if you want a cache of strings, key can disappear after calling this function, but not value. The function passed as free_func when creating the cache will be used to free stuff whenever needed (unset or free).
Return value: void
sys_context: global system context
cache: the cache concerned
key: the key to unset
Clears an entry in a cache table. The callback passed when creating the cache will be called if needed, to free the data automatically.
Return value: void
sys_context: global system context
data: the data to process
len: the length, in bytes, of the data to process
Creates a checksum from a byte array. This could be mapped on any standard CRC-32 and/or MD5 algorithm, but licence issues for those are such a headache that for the sake of simplicity, it’s wrapped here. In LW6 context, we do not really really fear any attack for these checksums are used internally to track bugs and check, for instance, that two game states are actually the same on two distant computers in a network game. Data encryption and security of network links is another debate. Additionnally, this function returns an integer, easier to handle in standard C than any malloc’ed stuff.
Return value: the checksum, as an integer.
sys_context: global system context
value: the string to process
Creates a checksum from a string. This is a convenience function to save the programmer the hassle of calling strlen before any checksum calculation.
Return value: the checksum, as an integer.
sys_context: global system context
value: the integer to process
Creates a checksum from an integer. This is a convenience function to save the programmer the hassle of passing a pointer to the integer with the size of it each time there’s a checksum to do. Additionnally, with this one you can pass an int8 or an int16, and function will work just the same indenpendantly of endianness.
Return value: the checksum, as an integer.
value: the integer to process
Creates a checksum from an integer. This is a convenience function to save the programmer the hassle of passing a pointer to the integer with the size of it each time there’s a checksum to do. This function handles 64-bit long long integers..
Return value: the checksum, as an integer.
sys_context: global system context
whd: a pointer to the wh struct to be processed
Creates a checksum from the given structure. Convenience
function to save the hassle of passing a pointer to and the size
of the lw6sys_wh_t struct each time, knowing that there are very often
checksums calculated on it. Also avoids endianess issues.
Return value: the checksum, as an integer.
sys_context: global system context
xyz: a pointer to the xy struct to be processed
Creates a checksum from the given structure. Convenience
function to save the hassle of passing a pointer to and the size
of the lw6sys_xy_t struct each time, knowing that there are very often
checksums calculated on it. Also avoids endianess issues.
Return value: the checksum, as an integer.
sys_context: global system context
checksum: a pointer to the previous checksum
data: the data to process
len: the length, in bytes, of the data to process
Creates a checksum from the given data. The difference
with lw6sys_checksum is that this one updates an existing
checksum, thus enabling the programmer to call it sequentially
and get a global checksum on different sources.
Return value: none.
sys_context: global system context
checksum: a pointer to the previous checksum
value: the string to process
Creates a checksum from the given string. The difference
with lw6sys_checksum_str is that this one updates an existing
checksum, thus enabling the programmer to call it sequentially
and get a global checksum on different sources.
Return value: none.
sys_context: global system context
checksum: a pointer to the previous checksum
value: the integer to process
Creates a checksum from the given integer. The difference
with lw6sys_checksum_int32 is that this one updates an existing
checksum, thus enabling the programmer to call it sequentially
and get a global checksum on different sources.
Return value: none.
sys_context: global system context
checksum: a pointer to the previous checksum
value: the integer to process
Creates a checksum from the given integer. The difference
with lw6sys_checksum_int64 is that this one updates an existing
checksum, thus enabling the programmer to call it sequentially
and get a global checksum on different sources.
Return value: none.
sys_context: global system context
checksum: a pointer to the previous checksum
whd: a pointer to the wh struct to be processed
Creates a checksum from the given structure. The difference
with lw6sys_checksum_whd is that this one updates an existing
checksum, thus enabling the programmer to call it sequentially
and get a global checksum on different sources.
Return value: none.
sys_context: global system context
checksum: a pointer to the previous checksum
xyz: a pointer to the xy struct to be processed
Creates a checksum from the given structure. The difference
with lw6sys_checksum_xyz is that this one updates an existing
checksum, thus enabling the programmer to call it sequentially
and get a global checksum on different sources.
Return value: none.
f: the value to convert, from 0.0f to 1.0f
Converts a floating point value between 0.0f and 1.0f to its 8-bit equivalent between 0 and 255. Usefull in color conversion.
Return value: an integer between 0 and 255.
i: the value to convert, from 0 to 255
Converts an 8-bit value between 0 and 255 to its floating-point equivalent between 0.0f and 1.0f. Usefull in color conversion.
Return value: a float between 0.0f and 1.0f.
color_f: the color to convert
Converts a color from floating point format to the integer "0 to 255" common format. All fields (RGBA) are converted.
Return value: the color in 8-bit format.
color_f: the converted color (pointer must point to writable memory)
color_8: the color to convert
Converts a color from the integer "0 to 255" common format to floating point format. All fields (RGBA) are converted.
Return value: none.
color_f: the color to convert
Converts a color from floating point format to a single integer, where all fields (RGBA) are serialized. This serialization is endianess independant. Could be used directly by low-level libraries such as SDL.
Return value: the color serialized in an integer.
color_f: the color to convert
Converts a color from floating point format to a single integer, where all fields (BGRA) are serialized. This serialization is endianess independant. Could be used directly by low-level libraries such as SDL.
Return value: the color serialized in an integer.
color_f: the color to convert
Converts a color from floating point format to a single integer, where all fields (ARGB) are serialized. This serialization is endianess independant. Could be used directly by low-level libraries such as SDL.
Return value: the color serialized in an integer.
color_f: the color to convert
Converts a color from floating point format to a single integer, where all fields (ABGR) are serialized. This serialization is endianess independant. Could be used directly by low-level libraries such as SDL.
Return value: the color serialized in an integer.
color_8: the color to convert
Converts a color from common "0 to 255" structured format to a single integer, where all fields (RGBA) are serialized. This serialization is endianess independant. Could be used directly by low-level libraries such as SDL.
Return value: the color serialized in an integer.
color_8: the color to convert
Converts a color from common "0 to 255" structured format to a single integer, where all fields (BGRA) are serialized. This serialization is endianess independant. Could be used directly by low-level libraries such as SDL.
Return value: the color serialized in an integer.
color_8: the color to convert
Converts a color from common "0 to 255" structured format to a single integer, where all fields (ARGB) are serialized. This serialization is endianess independant. Could be used directly by low-level libraries such as SDL.
Return value: the color serialized in an integer.
color_8: the color to convert
Converts a color from common "0 to 255" structured format to a single integer, where all fields (ABGR) are serialized. This serialization is endianess independant. Could be used directly by low-level libraries such as SDL.
Return value: the color serialized in an integer.
color_f: the converted color (point must point to writable memory)
color_i: the color to convert
Converts a color from a serialized integer format (RGBA) to a floating point structure.
Return value: none.
color_f: the converted color (point must point to writable memory)
color_i: the color to convert
Converts a color from a serialized integer format (BGRA) to a floating point structure.
Return value: none.
color_f: the converted color (point must point to writable memory)
color_i: the color to convert
Converts a color from a serialized integer format (ARGB) to a floating point structure.
Return value: none.
color_f: the converted color (point must point to writable memory)
color_i: the color to convert
Converts a color from a serialized integer format (ABGR) to a floating point structure.
Return value: none.
color_i: the color to convert
Converts a color from a serialized integer format (RGBA) to a "0 to 255" based structure.
Return value: the converted color (structure).
color_i: the color to convert
Converts a color from a serialized integer format (BGRA) to a "0 to 255" based structure.
Return value: the converted color (structure).
color_i: the color to convert
Converts a color from a serialized integer format (ARGB) to a "0 to 255" based structure.
Return value: the converted color (structure).
color_i: the color to convert
Converts a color from a serialized integer format (ABGR) to a "0 to 255" based structure.
Return value: the converted color (structure).
sys_context: global system context
ascii: the color to convert
Converts a color from a human readable string to a "0 to 255" based structure. The string must be of the form "#RRGGBBAA" or "#RGB", in a general manner any HTML-valid value should work.
Return value: the converted color (structure).
sys_context: global system context
color_f: the converted color (pointer must point to writable memory)
ascii: the color to convert
Converts a color from a human readable string to a float based structure. The string must be of the form "#RRGGBBAA" or "#RGB", in a general manner any HTML-valid value should work.
Return value: none.
sys_context: global system context
color_8: the color to convert
Converts a color from a "0 - 255" integer based structure to its readable form "#RRGGBBAA". If alpha is 255 (0xFF), that is, if it’s opaque, then the "AA" part is ommitted.
Return value: a newly allocated string.
sys_context: global system context
color_hsv: the target color, in HSV format
color_8: the source color, in RGB 256 format
Converts from HSV to RGB. Usefull for color manipulation, since most colors are stored in RGB but HSV is convenient for transformation. Alpha layer is kept as is.
Return value: none.
sys_context: global system context
color_hsv: the source color, in HSV format
Converts from RGB to HSV. Usefull to make colors transformed in HSV format usable again by all display routines, which consume RGB. Alpha layer is kept as is.
Return value: the RGB color.
sys_context: global system context
color_hsv: the source color, in HSV format
invert_h: wether to invert the hue
invert_s: wether to invert the saturation
invert_v: wether to invert the value
Inverts an HSV color, calling it with 1,0,0 the color will become a color with opposite hue but same saturation and same value.
Return value: none.
color: the color to test
Tells wether a color is pure grey or not. This is interesting for such colors have no hue and sometimes need special handling.
Return value: 1 if grey, 0 if colored
sys_context: global system context
size: number of the color array (number of items)
colors: the colors to compute
Tries to find out the "average" color from an array of colors. The algorithm is far from perfect, but should output a color which reflects the colors passed in.
Return value: the (inexact) average color.
sys_context: global system context
color1: first color
color2: second color
coeff: the ponderation coefficient
Tries to find a color between the two colors passed as an argument. The coefficient can be used, to set the relative weight of each color. Using 0 will return color1, 1 will return color2 and 0.5 will make an average between the two colors. Any value between 0 and 1 can be used.
Return value: the (inexact) ponderated color.
sys_context: global system context
color1: first color
color2: second color
Calculates the distance between two colors. The unit is arbitrary, a big value means "colors are different", 0 means they are the same. A distance of 1 corresponds to colors which have barely anything in common, but the result can still be greater than 1. Alpha layer is not taken in account.
Return value: the distance.
sys_context: global system context
color1: the first color to compare
color2: the second color to compare
Compares two colors.
Return value: 1 if they are the same, 0 if not.
color: the color to modify
Make a color "solid" that is make it not transparent at all.
Return value: none.
color: the color to modify
Make a color "solid" that is make it not transparent at all.
Return value: none.
Create a new global system context. This is normally called only once during a program execution and is wrapped in lw6sys_context_init.
Return value: newly allocated context
sys_context: global system context
Frees a global system context. Called only once during a program execution and is wrapped in lw6sys_context_quit.
Return value: none
sys_context: global system context
Performs all initializations required for lw6sys functions to behave correctly, this includes locale settings, timer initialization, memory management related stuff. This is wrapped into lw6sys_context_init.
Return value: none
sys_context: global system context
Performs all cleanup required after all lw6sys functions have been called. Once this has been called, do not call any function that requires a valid context, except maybe lw6sys_context_free. This is wrapped into lw6sys_context_quit.
Return value: 1 on success, 0 on failure. A failure can reveal a problem that occured way upstream, typically some memory not cleanly freed.
Create a new global system context, and initalizes it, so that it’s ready for general use.
Return value: newly allocated and valid context
sys_context: global system context
Performs all cleanup required after all lw6sys functions have been called, and frees the object.
Return value: 1 on success, 0 on failure. A failure can reveal a problem that occured way upstream, typically some memory not cleanly freed.
sys_context: global system context
str: string to convert
Just a plain wrapper on atoi, it’s here for API consistency.
Will check if str is NULL (and in this case return 0).
Return value: an integer.
sys_context: global system context
str: string to convert
Wrapper on atoll, it’s here for API consistency.
Will check if str is NULL (and in this case return 0).
Return value: a 64-bit integer.
sys_context: global system context
str: string to convert
Transform a string into a boolean value. Accepts "0"/"1" in input, but also y/n, yes/no, true/false, on/off. Will check if str is NULL (and in this case return 0).
Return value: an integer, 0 or 1.
sys_context: global system context
str: string to convert
A wrapper on atof, makes sure the locale used is C (default)
and won’t change the decimal separator whatsoever. Usefull for
serialization for instance.
Will check if str is NULL (and in this case return 0).
Return value: a float.
sys_context: global system context
value: the integer to convert
Converts an integer to a string, the advantage of this function is it allocates memory, and does the dirty job.
Return value: a newly allocated pointer, must be freed, may be NULL.
value: the integer to convert
Converts a 64-bit integer to a string, the advantage of this function is it allocates memory, and does the dirty job.
Return value: a newly allocated pointer, must be freed, may be NULL.
sys_context: global system context
value: the boolean to convert
Converts a boolean to a string, the advantage of this function is it allocates memory, and does the dirty job.
Return value: a newly allocated pointer, must be freed, may be NULL.
sys_context: global system context
value: the float to convert
Converts a float to a string, the advantage of this function is it allocates memory, and does the dirty job.
Return value: a newly allocated pointer, must be freed, may be NULL.
sys_context: global system context
mode: mode passed to program (bit mask)
Run all registered suites and their tests, will interpret mode and call the right CUnit function (Batch, Console, NCurses...).
Return value: 1 if tests or OK, 0 if not.
sys_context: global system context
Clears the global CUnit related lock.
Return value: none.
sys_context: global system context
Locks a global CUnit related lock, this is to allow the use of test macro LW6SYS_TEST_ACK in multithreaded environment, as CUnit does not, by default garantee that concurrent accesses to its API will work. Just to be sure... we lock.
Return value: 1 if locked, 0 on failure.
sys_context: global system context
Unlocks the global CUnit related lock, this is to allow the use of test macro LW6SYS_TEST_ACK in multithreaded environment, as CUnit does not, by default garantee that concurrent accesses to its API will work. Just to be sure... we lock.
Return value: 1 if unlocked, 0 on failure.
sys_context: global system context
argc: argc as passed to main
argv: argv as passed to main
Get the default pid file, used to lock daemon and avoid 2 daemons running at the same time.
Return value: newly allocated string
sys_context: global system context
pid_file: the pid file used for the daemon
Calls fork internally to put the process in the program,
make it a daemon. Note this won’t work on all platforms,
for instance it won’t work on MS-Windows but this is rarely
an issue as MS-Windows users are rarely concerned with
detaching a program from a tty. Note that this isn’t a
wrapper on fork, the return value is different,
Return value: 1 on success, 0 on failure.
sys_context: global system context
pid_file: the pid file used for the daemon
Removes the daemon pid file. Can be called safely even if daemon wasn’t started.
Return value: 1 on success, 0 on failure
sys_context: global system context
Gets the debug mode.
sys_context: global system context
mode: the debug mode, 1 if set, 0 if not.
Sets the debug mode.
sys_context: global system context
user_dir: the user directory, where user can write data.
Clears the dump file. That is, resets it to a "0 byte" file.
Return value: none.
sys_context: global system context
user_dir: the user directory, where user can write data.
content: the content to be written in the dump file.
Writes the dump file onto the disk. The dump is used for special error messages which do not really fit in the standard log, and require a special treatment. In pratice, it’s used to log fatal script (Guile) errors.
Return value: 1 if success, 0 if failure.
Gets the ENV separator, that is, for instance, the character used to separate paths in environment variables. Typically, this would be ":" on GNU and ";" on Microsft platforms.
Return value: the ascii character code.
Gets the ENV separator, that is, for instance, the character used to separate paths in environment variables. Typically, this would be ":" on GNU and ";" on Microsft platforms.
Return value: a pointer to a single 0-terminated character string which contains the character. Must not be freed.
sys_context: global system context
value1: the left part to be concatenated
value2: the right part to be concatenated
Concatenates two values and puts the ENV separator, as returned
by lw6sys_env_separator_char between them.
Return value: the concatenated string, must be freed.
sys_context: global system context
keyword: the keyword to be searched in the environment variables.
Searches environment variables for the given keyword. The keyword will be fixed so that all dashes "-" characters are replaced by underscores "_" characters. Characters will be changed to uppercase. Any non alphanumeric character will be replaced by "_". Finally, an "LW6_" prefix will be added. That is to say, calling this function with "my-param" will search for the "LW6_MY_PARAM" environment variable.
Return value: 1 if the environment variable exists, 0 if not.
sys_context: global system context
key: the environment variable to get.
Searches environment variables for the given value. This is a wrapper over the standard C getenv, the difference is it will return a dynamically allocated pointer, and on some platforms will query specific OS functions.
Return value: the value for the given keyword. May be NULL. Must be freed.
sys_context: global system context
keyword: the keyword to be searched in the environment variables.
Searches environment variables for the given value. The keyword will be fixed so that all dashes "-" characters are replaced by underscores "_" characters. Characters will be changed to uppercase. Any non alphanumeric character will be replaced by "_". Finally, an "LW6_" prefix will be added. That is to say, calling this function with "my-param" will search for the "LW6_MY_PARAM" environment variable.
Return value: the value for the given keyword. May be NULL. Must be freed.
keyword: the environment variable to set
value: the value of the environment variable to set
Sets the environment variable to a given value. If value is NULL, variable is unset. Note that unlike lw6sys_getenv_prefixed, this function does not transform the keyword into "LW6_..." before setting the value, so it’s your responsability to call "lw6sys_keyword_as_env" if needed.
Return value: 1 if success, 0 if failed
sys_context: global system context
keyword: the keyword to be searched in the environment variables.
value: the value of the environment variable to set
Sets the environment variable to the given value. The keyword will be fixed so that all dashes "-" characters are replaced by underscores "_" characters. Characters will be changed to uppercase. Any non alphanumeric character will be replaced by "_". Finally, an "LW6_" prefix will be added. That is to say, calling this function with "my-param" will set the "LW6_MY_PARAM" environment variable.
Return value: 1 if success, 0 if failure
sys_context: global system context
value: the value, a list of item separated by... the separator
Splits the environment value into a list of strings containing each element. All strings are dynamically allocated, but they will be freed automatically when the list is freed.
Return value: a list of strings.
sys_context: global system context
Gets the home directory of the user. Used internally to calculate
the user-dir value. Note that Liquid War 6, by default, never
stores files under ’$HOME’, instead it put things in ’$HOME/.liquidwar6’,
that is ’user-dir’. If the environment variable ’HOME’ is not set,
will return ’.’.
Return value: a newly allocated pointer, must be freed.
sys_context: global system context
Gets the name of the current user. Difference with the standard
function getlogin is that this function will returned a dynamically
allocated pointer, and provide a default value if it’s undefined.
Also, if will look at the content of the ’LOGNAME’ environment
variable if needed, and will even provide a default value.
Return value: a newly allocated pointer, must be freed.
sys_context: global system context
Gets the name of the current host. The name of the computer. Might not work perfectly, this function is just used to provide default values for player names and such things.
Return value: a newly allocated pointer, must be freed.
sys_context: global system context
src: the string to escape
Transforms a string so that it does not contain any non-valid URL chars, it will mostly convert chars over 128 into their an hexadecimal code which replaces them in URLs. Note that this function is non really standard compliant for it won’t encode ’%’ but keep it the same. This is to allow using it several times on the same string and avoid double-triple encoding of ’%’. In practice it’s not recommended to have public_url for nodes with ’%’ in them, and the program will never generate such url when guessing urls.
Return value: newly allocated string.
sys_context: global system context
src: the string to escape
Transforms a string so that it can fit in a html field, this is typically for alt="" or title="" fields so it will convert a double quote into its equivalent escaped char.
Return value: newly allocated string.
sys_context: global system context
src: the string to escape
Transforms a string so that it can fit as an SQL parameter, it will get rid URL chars, it will mostly convert chars over 128 into an hexadecimal form which replaces them in URLs.
Return value: newly allocated string.
sys_context: global system context
argc: number of args as passed to main
argv: array of args as passed to main
Finds the path of the program currently run, this is typically to
pass it to lw6sys_exec_again and run it again.
Return value: the path (newly allocated string).
sys_context: global system context
argc: number of args as passed to main
argv: array of args as passed to main
Tells wether the program is already executed by itself by
lw6sys_exec_again function. Based on environment and command switches.
Return value: 1 if executed again, 0 if not.
sys_context: global system context
argc: number of args as passed to main
argv: array of args as passed to main
Runs the program from itsef, that is fires a new program (the same running)
and ends up the current one. This is used to fix some environment variable
issues. If LW6_EXECUTED_AGAIN (environment variable) is set, will not
run the program so this is not really like exec as in the C standard
library, this function will actually return and be successfull even
if no other process was started. It’s just designed to bootstrap/launch
the process once.
Return value: 1 on success, 0 on failure (always fail)
sys_context: global system context
argc: number of args as passed to main
argv: array of args as passed to main
Restart the program with exactly the same arguments it was given the first time.
Return value: 1 on success, 0 on failure (always fail)
sys_context: global system context
filename: absolute or relative filename
Clears a file, that is, make it a 0 byte file, empty, ready to be filled if needed. If this function is called successfully, program can reasonnably assume file will be writable during its execution.
Return value: 1 if success, 0 if failure.
sys_context: global system context
filename: absolute or relative filename
Reads the content of a file, and returns it as a string. Note that content might or might not be ascii or binary, the function will however put a tailing 0 character at the end so that low-level standard C functions do not segfault when used with the returned value.
Return value: a newly allocated pointer, must be freed.
sys_context: global system context
filesize: will contain the file size, in bytes
filename: absolute or relative filename
Reads the content of a file, and returns it as a binary
buffer. Even if not ascii or binary,
the function will however put a tailing 0 character
at the end so that low-level standard C functions do not
segfault when used with the returned value. This 0 character
is not included in filesize so if there are 4 bytes in the
file the 5 bytes will be allocated, this is just for string
functions not to explode if called by accident. The filesize
can be NULL, in that case function is just like
the lw6sys_read_file_content function.
Return value: a newly allocated pointer, must be freed.
sys_context: global system context
filename: absolute or relative filename
content: the content to be written.
Writes the content into the file. Content is assumed to be a string, function will segfault if it’s not correctly 0 terminated as in C string convention. So this function will not allow you to write down arbitrary binary data, however LW6 uses mostly text files to store information, and opaque binary data usage is not recommended.
sys_context: global system context
free_func: optional callback used to free memory when stored date is a pointer. Can be NULL when one stores non dynamically allocated data, such as an integer or a static array.
size: the estimated size of the hash table. Note that this is an estimation only. You could theorically fit 1000000 objects in a 3-sized hash. Problem -> this is inefficient, you’d better use an assoc or a bigger hash. If you store 3 elements in a 1000000-sized hash, you’ll waste memory. It might be wise to use a prime number as the estimated size. 421 is prime ;)
Creates an empty hash. There’s a difference between NULL and an empty hash.
Return value: a pointer to the newly allocated hash table.
Must be freed with lw6sys_hash_free.
sys_context: global system context
hash: the hash to be freed.
The function will cascade delete all elements, using (if not NULL...) the callback passed when first creating the hash.
Return value: void
sys_context: global system context
hash: the hash to test
key: the key to search
Tells wether the key is present or not.
Return value: non-zero if there’s an entry with the corresponding key.
sys_context: global system context
hash: the hash to query
key: the key of which we want the value
Gets the value corresponding to a given key. Not that the value can be NULL, even if the key exitsts.
Return value: a void pointer to the data contained in the hash. Note that the pointer on the actual data is returned, that is, if it’s static data, you must not try to free it... As long as memory management is concerned, destroying the hash will actually free the data if needed.
sys_context: global system context
hash: the hash to modify
key: the key we want to updated
value: the new value
Sets a value in a hash table. The key pointer need not be persistent, it can be freed after affectation. In fact a new string will be created internally. This is not true for the value, it’s hard to find way to copy "any object". So if you want a hash table of strings, key can disappear after calling this function, but not value. The function passed as free_func when creating the hash will be used to free stuff whenever needed (unset or free).
Return value: void
sys_context: global system context
hash: the hash concerned
key: the key to unset
Clears an entry in a hash table. The callback passed when creating the hash will be called if needed, to free the data automatically.
Return value: void
sys_context: global system context
hash: the hash to work on
Returns a list containing all the keys of the hash. The list must be free with lw6sys_list_free by the caller. This list copies all the keys of the hash, so it is safe to use it once the hash is deleted. However the keys will sometimes be of little interest in this case. But the program won’t segfault.
Return value: the list of keys.
sys_context: global system context
hash: the hash to work on
func: a callback to call on each entry
func_data: a pointer on some data which will be passed to the callback
Executes a function on all hash items. The func_data parameter allows you to pass extra values to the function, such as a file handler or any variable which can not be inferred from list item values, and you of course do not want to make global...
Return value: void
sys_context: global system context
hash: the hash to work on
func: a callback to call on each entry, may be NULL
func_data: a pointer on some data which will be passed to the callback
Executes a function on all hash items, like lw6sys_hash_sort_and_map
but befor doing so, sorts all entries in alphabetical order.
Return value: void
sys_context: global system context
hash: the hash to duplicate, can be NULL
dup_func: the function which will be called to duplicate data
Duplicates an hash. All keys will be copied so that if the first hash is deleted, the duplicated one is fine. Additionnaly, dup_func will be called with all data fields. If dup_func is NULL, then data values will simply be copied. This is likely to be usefull when data is not dynamically allocated.
Returned value: a newly allocated hash.
sys_context: global system context
hexa_string: an initialization string, can be NULL.
Creates an hexa serializer object. It can be initialized or not, if an initialization string is provided it must of course be valid hexadecimal ascii code, and all serialized content will simply be appended to it.
Return value: a newly allocated object.
sys_context: global system context
hexa_serializer: an hexa serializer object
Frees an hexa serializer object.
Return value: none.
sys_context: global system context
hexa_serializer: an hexa serializer object
Rewinds the serializer pointer, that is, make it point to start. Usefull before calling pop functions, when one wants to be sure to get the first object.
Return value: none.
sys_context: global system context
hexa_serializer: an hexa serializer object
Tests wether we’re at EOF. Usefull when one wants to know if there’s still some data or if all objects have been correctly popped.
Return value: 1 if at end of file, 0 if not.
sys_context: global system context
hexa_serializer: an hexa serializer object
Exports the current content of the serializer as a string. String can then safely be sent on the network, for instance. String is copied from internal value, so it’s safe to use it after serializer has been freed or modified.
Return value: a newly allocated string, must be freed.
sys_context: global system context
hexa_serializer: an hexa serializer object
value: value to push
Pushes a 64 bit integer in the serializer object.
Return value: 1 if success, 0 if failure
sys_context: global system context
hexa_serializer: an hexa serializer object
value: value to push
Pushes a 32 bit integer in the serializer object.
Return value: 1 if success, 0 if failure
sys_context: global system context
hexa_serializer: an hexa serializer object
value: value to push
Pushes a 16 bit integer in the serializer object.
Return value: 1 if success, 0 if failure
sys_context: global system context
hexa_serializer: an hexa serializer object
value: value to push
Pushes an 8 bit integer in the serializer object.
Return value: 1 if success, 0 if failure
sys_context: global system context
hexa_serializer: an hexa serializer object
value: value to push
Pushes a floating point value in the serializer object.
Return value: 1 if success, 0 if failure
sys_context: global system context
hexa_serializer: an hexa serializer object
value: value to push
Pushes a string in the serializer object. Note that the string is not directly copied in the serializer, instead all its characters are converted to their ASCII equivalent, then appended.
Return value: 1 if success, 0 if failure
sys_context: global system context
hexa_serializer: an hexa serializer object
value: value to push
Pushes a lw6sys_xyz_t structure in the serializer object. Calling this avoids calling push for 2 integers separately.
Return value: 1 if success, 0 if failure
sys_context: global system context
hexa_serializer: an hexa serializer object
value: value to push
Pushes a lw6sys_whd_t structure in the serializer object. Calling this avoids calling push for 2 integers separately.
Return value: 1 if success, 0 if failure
sys_context: global system context
hexa_serializer: an hexa serializer object
value: value to push
Pushes a color structure in the serializer object.
Return value: 1 if success, 0 if failure
sys_context: global system context
hexa_serializer: an hexa serializer object
value: value to pop (returned value)
Pops a 64 bit integer from the serializer object.
Return value: 1 if success, 0 if failure
sys_context: global system context
hexa_serializer: an hexa serializer object
value: value to pop (returned value)
Pops a 32 bit integer from the serializer object.
Return value: 1 if success, 0 if failure
sys_context: global system context
hexa_serializer: an hexa serializer object
value: value to pop (returned value)
Pops a 16 bit integer from the serializer object.
Return value: 1 if success, 0 if failure
sys_context: global system context
hexa_serializer: an hexa serializer object
value: value to pop (returned value)
Pops an 8 bit integer from the serializer object.
Return value: 1 if success, 0 if failure
sys_context: global system context
hexa_serializer: an hexa serializer object
value: value to pop (returned value)
Pops a floating point value from the serializer object.
Return value: 1 if success, 0 if failure
sys_context: global system context
hexa_serializer: an hexa serializer object
value: value to pop (returned value)
Pops a string from the serializer object. The returned value is a newly allocated pointer, which must be freed, you don’t need to provide a buffer, just a valid pointer on a NULL pointer.
Return value: 1 if success, 0 if failure
sys_context: global system context
hexa_serializer: an hexa serializer object
value: value to pop (returned value)
Pops a lw6sys_xyz_t structure from the serializer object. Avoids calling two integer pops.
Return value: 1 if success, 0 if failure
hexa_serializer: an hexa serializer object
value: value to pop (returned value)
Pops a lw6sys_whd_t structure from the serializer object. Avoids calling two integer pops.
Return value: 1 if success, 0 if failure
sys_context: global system context
hexa_serializer: an hexa serializer object
value: value to pop (returned value)
Pops a color from the serializer object.
Return value: 1 if success, 0 if failure
sys_context: global system context
buf: binary buffer to convert
size: binary buffer length
str: the source string
Converts the stringified hexa representation of a string to
its source binary buffer. Buffer must be exactly strlen(str)/2
Return value: 1 on success
sys_context: global system context
buf: the buffer to stringify
size: the length of the buffer
Transforms a binary buffer into its hexa representation.
Return value: newly allocated string.
sys_context: global system context
str: the string containing an hexa representation of pointer
Transforms a string into a pointer, this is typically used to store pointers in temporary agnostic storage such as a database. Beware not to use that to exchange data with other computers and/or use it for persistent data. This is a high-risk function as it lets you do real dirty stuff but it really does save time compared to using a key returned by the database engine and then search this key in a user-space hash table. Direct pointer access is definitely faster.
Return value: the pointer, or NULL is str is invalid.
sys_context: global system context
ptr: pointer to convert into string representation
Transforms a pointer into a string, this is typically used to store pointers in temporary agnostic storage such as a database. Beware not to use that to exchange data with other computers and/or use it for persistent data. This is a high-risk function as it lets you do real dirty stuff but it really does save time compared to using a key returned by the database engine and then search this key in a user-space hash table. Direct pointer access is definitely faster.
Return value: the string, can be NULL on errror, must be freed.
sys_context: global system context
Initializes the history system. Not initializing won’t cause any segfault, but data will be inconsistent.
Return value: none.
sys_context: global system context
msg: the message to register.
Registers a message in the history log, that is, adds it.
Return value: none.
sys_context: global system context
timeout: the message age limit.
Get all the messages that are younger than timeout (in seconds).
Return value: a pointer on string pointers. May be NULL. Last pointer is NULL too, that’s how you know the array is over.
sys_context: global system context
history: the data to free
Frees a pointer returned by lw6sys_history_get.
Return value: none.
sys_context: global system context
string: the string to convert
Used to force strings into UTF-8 mode, this is basically to match the TTF font settings used when displaying stuff on OpenGL. Indeed, in this case, the standard _ gettext function won’t work, we need to force UTF-8 mode. If the locale is UTF-8, then function does nothing, but at least it’s transparent usage won’t hurt.
Returned value: a newly allocated string, always in UTF-8 no matter what the locale is.
sys_context: global system context
Long 16-bit ID generator, calls the random function internally. As usual, those are not perfect random numbers, however the function implementation emphasizes more on ’real randomness’ rather than relying on performance. Generating twice the same number should be fairly rare.
sys_context: global system context
Long 32-bit ID generator, calls the random function internally. As usual, those are not perfect random numbers, however the function implementation emphasizes more on ’real randomness’ rather than relying on performance. Generating twice the same number should be fairly rare.
sys_context: global system context
Long 64-bit ID generator, calls the random function internally. As usual, those are not perfect random numbers, however the function implementation emphasizes more on ’real randomness’ rather than relying on performance. Generating twice the same number should be fairly rare.
sys_context: global system context
id_16: the id to check
Checks wether the given id is a valid 16-bit id.
Return value: 1 if OK, 0 if not a valid id.
sys_context: global system context
id_32: the id to check
Checks wether the given id is a valid 32-bit id.
Return value: 1 if OK, 0 if not a valid id.
sys_context: global system context
id_64: the id to check
Checks wether the given id is a valid 64-bit id.
Return value: 1 if OK, 0 if not a valid id.
sys_context: global system context
id: the id to check
Checks wether the given id is a valid id (16, 32 or 64-bit).
Return value: 1 if OK, 0 if not a valid id.
sys_context: global system context
id: the id to convert
Transform an id into its string representation. Error checking is done, if the id is invalid, returned value is NULL. All ids (16, 32 and 64-bit) are handled.
Return value: a newly allocated string, might be NULL.
sys_context: global system context
id: the id to convert
Transform an id into a long integer. Error checking is done, if the id is invalid, returned value is 0. All ids (16, 32 and 64-bit) are handled.
Return value: the id as a long integer, 0 if incorrect source id.
sys_context: global system context
keyword: the keyword to transform
Transforms a keyword into a "key", that is, removes all heading dashes, switches to lowercase, and other stuff. This is used internally to match options and config file parameters, for instance.
Return value: a newly allocated pointer, must be freed.
sys_context: global system context
keyword: the keyword to transform
Transforms a keyword into a command-line parameter to be matched.
Does the same as lw6sys_keyword_as_key, and adds a "–" prefix.
Return value: a newly allocated pointer, must be freed.
keyword: the keyword to transform
Transforms a keyword into the corresponding environment variable name. It will uppercase the name, replace "-" by "_", and add a "LW6_" prefix. "my-param" will become "LW6_MY_PARAM".
Return value: a newly allocated pointer, must be freed.
sys_context: global system context
keyword: the keyword to transform
Transforms a keyword into the corresponding config file entry.
In practice, just the same as lw6sys_keyword_as_key.
Return value: a newly allocated pointer, must be freed.
sys_context: global system context
free_func: a callback which will be called on data when freeing the list
Creates an empty list. There’s a difference between NULL and an empty list. The empty list would (in Scheme) be ’() whereas NULL corresponds to undefined "is not a list and will generate errors if you ever call list functions on it".
Return value: a pointer to the created object, may be NULL.
sys_context: global system context
list: the list to delete.
Delete a list, this will cascade delete all the following items in the list.
Return value: none.
sys_context: global system context
list: the current position in the list
It’s safer to call this rather than dig right into the internals of the list.
Return value: a new position in the list, may be NULL.
sys_context: global system context
list: the list we want informations about
Checks wether the list is empty or not. Note that being empty and being NULL is not the same. An empty list is a valid pointer on a list where there’s no item, a NULL pointer is not a list at all. Do *NOT* call this function on NULL.
Return value: 1 if empty, 0 if there is at list one item.
sys_context: global system context
list: the list we want informations about
Calculates the length of the list. This is a performance killer for lists are inadapted to this. But it can still be usefull.
Return value: the number of elements, 0 is none (empty list).
sys_context: global system context
list: the list where elements will be taken
func: the function which will be executed
func_data: additionnal data to be passed to func
Executes a function on all list items.
The func_data parameter allows you to pass extra values to
the function, such as a file handler or any variable which
can not be inferred from list item values, and you of course
do not want to make global... Not as convenient as a
real "for each" construct as can be found in any modern
langage, but does the job. No return value, if you really
want one, pass a structure in func_data and modify something
in it on success, failure, whatever.
Return value: none.
sys_context: global system context
list: the list where elements will be taken
func: the function which will be executed
func_data: additionnal data to be passed to func
Executes a function on all list items and keeps only those
for which the function returned non zero (true).
The func_data parameter allows you to pass extra values to
the function, such as a file handler or any variable which
can not be inferred from list item values, and you of course
do not want to make global...
Return value: none.
sys_context: global system context
list: a pointer to the list (pointer on pointer, read/write value)
data: the data to be pushed
Pushes data on the list. The free_func function is copied
from the previous element. The pointer on the list is
changed "in place" (in/out). Note that if there’s a malloc
problem it might end-up being NULL... This should be rare
but it *can* happen. You cannot push something else than a
pointer, pushing an int is a very bad idea. Push a pointer
on the integer, and ensure it’s always there, or malloc it
and pass lw6sys_free_callback when creating the list.
If you think you can cast an integer into a pointer, think
64-bit machines...
Return value: none.
sys_context: global system context
list: a pointer to the list (pointer on pointer, read/write value)
Pops data from the list, the returned value is what
was passed to list_push. The pointer on the list is
changed "in place" (in/out). When data is popped,
that needs some freeing (i.e. free_func was not NULL
when creating the list) then it’s the responsibility
of the caller to free it when popping it. One popped
it’s not freed, but it’s out of the list scope. Of
course the lw6sys_list_t is freed, but not the data.
If you happen to store non-NULL data in your list, you
can call this function without bothering calling lw6sys_list_is_empty
and assume that when you get NULL, there’s no data left.
At this stage, the list won’t exist anymore BTW, you won’t
even need to free it. The idea is: popping a list which
has no elements left (empty list) destroys the list and returns NULL.
Return value: a pointer on the popped data, whatever you pushed.
sys_context: global system context
list: a pointer to the list (pointer on pointer, read/write value)
Pops data to a list, in last-in first-out mode (AKA LIFO).
This is equivalent t lw6sys_list_push_front.
Return value: none.
sys_context: global system context
list: a pointer to the list (pointer on pointer, read/write value)
Pops the first element of a list, in last-in first-out mode (AKA LIFO).
This is equivalent to lw6sys_list_pop_front.
Return value: a pointer on the popped data, whatever you pushed.
sys_context: global system context
list: a pointer to the list (pointer on pointer, read/write value)
Pops data to a list, in first-in first-out mode (AKA FIFO).
This is equivalent t lw6sys_list_push_front.
Return value: none.
sys_context: global system context
list: a pointer to the list (pointer on pointer, read/write value)
Pops the first element of a list, in last-in first-out mode (AKA FIFO).
This is equivalent to lw6sys_list_pop_back.
It can be quite time-consuming on big lists.
Return value: a pointer on the popped data, whatever you pushed.
sys_context: global system context
list: the list to duplicate, can be NULL
dup_func: the function which will be called to duplicate data
Duplicates a list. All data will be copied so that if the first list is deleted, the duplicated one is fine. Addtionnally, dup_func will be called to filter all data, and possibly allocated new pointers if needed, for instance. If dup_func is NULL, then data values will simply be copied. This is likely to be usefull when data is not dynamically allocated.
Returned value: a newly allocated list.
sys_context: global system context
free_func: a callback which will be called on data when freeing the list
Creates an empty reentrant list. This is different from a regular list in the sense that here the object is a holder with both a mutex and the list itself.
Return value: a pointer to the created object, may be NULL.
sys_context: global system context
list_r: the list to delete.
Delete a reentrant list, this will cascade delete all the items in the list.
Return value: none.
sys_context: global system context
list_r: the list we want informations about
Checks wether the reentrant list is empty or not. Note there’s a slight difference with basic lists, here it can’t / should not be NULL, as the list_r is really a list container.
Return value: 1 if empty, 0 if there is at list one item.
sys_context: global system context
list_r: the list we want informations about
Calculates the length of the reentrant list. This is a performance killer for lists are inadapted to this. But it can still be usefull.
Return value: the number of elements, 0 is none (empty list).
sys_context: global system context
list_r: the list where elements will be taken
func: the function which will be executed
func_data: additionnal data to be passed to func
Executes a function on all reentrant list items.
This is a wrapper on lw6sys_list_map.
Return value: none.
sys_context: global system context
list_r: the list where elements will be taken
func: the function which will be executed
func_data: additionnal data to be passed to func
Executes a function on all reentrant list items.
Ths is a wrapper on lw6sys_list_filter.
Return value: none.
sys_context: global system context
list_r: a pointer to the list (pointer on pointer, read/write value)
data: the data to be pushed
Wapper on lw6sys_list_push_front, reentrant version.
Return value: none.
sys_context: global system context
Wrapper on lw6sys_list_pop_front, reentrant version.
Return value: a pointer on the popped data, whatever you pushed.
sys_context: global system context
list_r: a pointer to the list (pointer on pointer, read/write value)
data: the data to be pushed
Wapper on lw6sys_list_push_back, reentrant version.
Return value: none.
sys_context: global system context
Wrapper on lw6sys_list_pop_back, reentrant version.
Return value: a pointer on the popped data, whatever you pushed.
sys_context: global system context
list_r: a pointer to the list (pointer on pointer, read/write value)
data: the data to be pushed
Wapper on lw6sys_lifo_r_push_, reentrant version.
Return value: none.
sys_context: global system context
Wrapper on lw6sys_lifo_r_pop, reentrant version.
Return value: a pointer on the popped data, whatever you pushed.
sys_context: global system context
list_r: a pointer to the list (pointer on pointer, read/write value)
data: the data to be pushed
Wapper on lw6sys_fifo_r_push, reentrant version.
Return value: none.
sys_context: global system context
Wrapper on lw6sys_fifo_r_pop, reentrant version.
Return value: a pointer on the popped data, whatever you pushed.
sys_context: global system context
list_r: the reentrant list to duplicate
dup_func: the function which will be called to duplicate data
Duplicates a reentrant list.
This is a wrapper on lw6sys_list_dup, but is reentrant
and works on a list_r type.
Returned value: a newly allocated reentrant list.
sys_context: global system context
list_r: the reentrant list to transfer
Transfers the contents of a reentrant list to a regular list. Basically, this locks the list, extracts informations from it, then releases the lock and leaves the list_r empty. This is convenient in multithreaded contexts, typical pattern is a thread that pushes items, then another thread does massive transfers and processes each item separately with local pops on the regular list. This limits the amount of locking.
Returned value: a standard list, must be freed.
sys_context: global system context
list_r: the reentrant list where to put data
list: the list to get data from
Transfers the contents of a regular list to a reentrant list. Basically, this locks the list, then appends all contents from the source standard list, then releases the lock. The source list pointer is set to an empty list, if it’s NULL it means an error happened. This is convenient in multithreaded contexts, typical pattern is a thread that pushes items in a bulked mode, this has the advantage of less lock/unlock, plus the side effect of having more atomicity, one can indeed garantee that a whole packet of items are sent at once. There’s no garantee on the order, you’d better sort them afterwards if order does matter, by default the function does what is fastest/easiest to do.
Returned value: none, but check if *list is not null.
sys_context: global system context
errno_int: the error code, typically errno
Convenience fonction which returns the "macro" corresponding to an errno code. I find it easier to use this than bothering declaring a buffer for strerror_r... Besides LW6b has its own error messages. Wil never return NULL, if error does not exists just returns "?".
Return value: static string, must not be freed
sys_context: global system context
filename: the name of the log file.
Sets up the log file. Until you call this function, messages
all logged to the default log file, as returned by
the lw6sys_get_default_log_file function.
Return value: void
sys_context: global system context
filename: the name of the log file.
Clears the log file, this function would typically be called at the beginning of the program. If filename is NULL, then the default log file is cleared.
Return value: void
sys_context: global system context
timeout_sec: number of seconds to wait before alert dialogs disappear
By default, alert boxes will stay out forever unless one clicks on them, however, this parameter will force the dialog shutdown after some time. Mostly used for testing, to allow tests being blocked on a dialog.
Return value: 1 if timeout is supported on platform, 0 if not
sys_context: global system context
level_id: the log level to use. Possible values are, by order, LW6SYS_LOG_ERROR_ID (0), LW6SYS_LOG_WARNING_ID (1), LW6SYS_LOG_NOTICE_ID (2), LW6SYS_LOG_INFO_ID (3), LW6SYS_LOG_DEBUG_ID (4) and LW6SYS_LOG_TMP_ID (5).
file: the name of the source file where the function is called, one can use __FILE__
line: the line in the source file where the function is called, one can use __LINE__
func: the name of the function where this log line was called, on can use __FUNCTION__
fmt: a printf-like format string
...: printf-like arguments, corresponding to fmt.
This function is usually called with the first three arguments
packed into a single macro. For instance the
LW6SYS_LOG_WARNING macro expands and fills the first 3
args, so there’s no need to type __FILE__ and __LINE__ again
and again. Note that this function will reset errno. The
idea is to call it whenever there’s something to do with errno
(if you deal with errno, it’s a good habit to log it) then
errno is cleared so that it won’t interfere with next log messages.
sys_context: global system context
fmt: a printf-like format string
...: printf-like arguments, corresponding to fmt.
This function is a special log function which will dump informations on the console only, without opening any log file whatsoever. The idea is that it’s a "never fail" function. Additionnally, it will never return but quit the program. This can be used as an ultimate emergency function, use it when the program won’t run for sure, and displaying an immediate error message is the only issue.
sys_context: global system context
Get the current log level.
sys_context: global system context
level: the log level, integer between 0 & 4. 4 is very verbose (debug), 0 displays errors only.
Set the current log level.
sys_context: global system context
Gets the current backtrace mode.
sys_context: global system context
backtrace_mode: the backtrace mode, LW6SYS_LOG_BACKTRACE_MODE_FULL or LW6SYS_LOG_BACKTRACE_MODE_FUNC.
Sets the current backtrace mode.
Return value : none
sys_context: global system context
Get the console output state. This is important, for instance to set the console "back in the state it was" after setting it on or off.
Return value: 1 if enabled, 0 if not.
sys_context: global system context
state: 1 to activate console output, 0 to disable it.
Enables or disables console output. By console output, we basically mean stderr (and possibly stdout). If console output is enabled (the default) all output is copied to stderr. If it’s disabled, only the log file will contain the information.
Return value: none.
sys_context: global system context
y: the return value (position, may be NULL)
s: the return value (speed, may be NULL)
x: the x parameter, the value to iterate on
w: the width, that is, the x value after which output is constant
y1: the initial value, when v is s1 and x=0
y2: the target value, when v=0 and x>=w
s1: the initial speed, that is dy/dx at x=0
A function which can be used to implement smooth moving. It will extrapolate, for values of x>=0, an y position with a continuous derivate (dy/dx is continuous, function is 2nd order polynom) and which ends up at x=w with a constant value, that is dy/dx=v=0. Typically an item set with an initial speed of v with this function
sys_context: global system context
x: x coordinate
y: y coordinate
This is a wrapper over the standard atan function which will
handle internally the special x == 0 case and the various positive/negative
values of x and y.
Return value: the angle, in degrees
sys_context: global system context
x: the parameter (typically a timestamp)
period: the period (typically something like 1000 milliseconds)
y1: the low value (heart at rest)
y2: the high value (when bumping)
A heartbeat function, typically usefull to power up eye-candy, but it could do something else.
sys_context: global system context
x: the parameter (typically a timestamp)
period: the period (typically something like 1000 milliseconds)
This function will alternatively return 1 or 0, usefull to handle blinking for instance.
Return value: 0 or 1
sys_context: global system context
lin_value: value on a linear scale
base: the base to use, 10 for decibel-like scale
Converts a linar-scale value to a logarithmic one. The scale is done so that base in linear mode is base in scaled mode, and it uses a log-base conversion, so that with a base 10 it behaves the way the decibel sound-volume unit works.
Return value: value on a logarithmic scale.
sys_context: global system context
base: the base to use, 10 for decibel-like scale
Converts a linar-scale value to a logarithmic one. The scale is done so that 10 in linear mode is 10 in scaled mode, and it uses a log-base conversion, so that with a base 10 it behaves the way the decibel sound-volume unit works.
Return value: value on a linear scale.
deg: angle in degrees
Converts an angle from degrees to radians.
Return value: angle in radians.
rad: angle in radians
Converts an angle from radians to degrees.
Return value: angle in degrees.
sys_context: global system context
size: number of bytes to allocate.
file: name of the file calling the function, use __FILE__
line: line in the file calling the function, use __LINE__
func: name of the caller function, use __FUNCTION__
This is a wrapper over the standard malloc function. Additionnally
it will keep track of the call with an internal program-wide counter,
thus enabling memory leak checks. You should not use this function
directly but use the macro LW6SYS_MALLOC which has the same syntax,
without the last two parameters, which are automatically provided
by macro expansion.
Return value: the newly allocated pointer. Data is not initialized.
sys_context: global system context
size: number of bytes to allocate.
file: name of the file calling the function, use __FILE__
line: line in the file calling the function, use __LINE__
func: name of the caller function, use __FUNCTION__
This is a wrapper over the standard calloc function. Additionnally
it will keep track of the call with an internal program-wide counter,
thus enabling memory leak checks. You should not use this function
directly but use the macro LW6SYS_CALLOC which has the same syntax,
without the last two parameters, which are automatically provided
by macro expansion.
Return value: the newly allocated pointer. Data is filled with zeros.
sys_context: global system context
ptr: the pointer to reallocate.
size: number of bytes to allocate.
file: name of the file calling the function, use __FILE__
line: line in the file calling the function, use __LINE__
func: name of the caller function, use __FUNCTION__
This is a wrapper over the standard realloc function.
You should not use this function
directly but use the macro LW6SYS_REALLOC which has the same syntax,
without the last two parameters, which are automatically provided
by macro expansion.
Return value: the newly allocated pointer.
sys_context: global system context
ptr: the pointer to free.
file: name of the file calling the function, use __FILE__
line: line in the file calling the function, use __LINE__
func: name of the caller function, use __FUNCTION__
This is a wrapper over the standard free function. Additionnally
it will keep track of the call with an internal program-wide counter,
thus enabling memory leak checks. You should not use this function
directly but use the macro LW6SYS_FREE which has the same syntax,
without the last two parameters, which are automatically provided
by macro expansion.
Return value: none.
sys_context: global system context
ptr: the pointer to free.
This is a callback to be used when the lw6sys_free does not fit.
A good example is a list, which, to free its elements, requires
you to provide a callback that only takes 1 arg, the pointer
to free. Problem, lw6sys_free takes 3 args. And the LW6SYS_FREE
macro is not usable in such a context. And you can’t use standard free
either for it would mess up the malloc / free automatical count
which is so convenient to track memory leaks. So this callback is
here, it’s only drawback is that in case of an error, the error
will not be reported with the real file and line parameters. It’s
still better than nothing.
Return value: none.
sys_context: global system context
Gives a raw approximation of available memory, in megabytes. Value is to be taken with distance, but it can give good hints when system is running short of ressources.
Return value: number of megabytes (physical memory) available.
sys_context: global system context
Checks the endianess of the machine. PPC is big endian, for instance.
Return value: 1 if system is big endian, 0 if little endian.
sys_context: global system context
Checks the endianess of the machine. x86 is little endian, for instance.
Return value: 1 if system is little endian, 0 if big endian.
sys_context: global system context
Checks of common types and usefull structures, this is a debugging function which helps finding compiler strange behaviors and programmer’s bad intuitions.
Return value: 1 if everything is OK, 0 if error.
sys_context: global system context
file: the name of the source file where the function is called, one can use __FILE__
line: the line in the source file where the function is called, one can use __LINE__
func: the name of the function where this log line was called, on can use __FUNCTION__
Creates a mutex object.
Return value: newly allocated pointer.
sys_context: global system context
mutex: the mutex to destroy.
file: the name of the source file where the function is called, one can use __FILE__
line: the line in the source file where the function is called, one can use __LINE__
func: the name of the function where this log line was called, on can use __FUNCTION__
Destroys a mutex object.
Return value: none.
sys_context: global system context
mutex: the mutex to use
file: the name of the source file where the function is called, one can use __FILE__
line: the line in the source file where the function is called, one can use __LINE__
func: the name of the function where this log line was called, on can use __FUNCTION__
Locks the mutex. Note that this should never fail unless there’s a serious initialization problem, instead, function will wait forever until mutex is released.
Return value: 1 if success, 0 if failure.
sys_context: global system context
mutex: the mutex to use
file: the name of the source file where the function is called, one can use __FILE__
line: the line in the source file where the function is called, one can use __LINE__
func: the name of the function where this log line was called, on can use __FUNCTION__
Tries to locks the mutex. That is, tells wether mutex can be locked immediately or not. Note that this does not mean there’s 100% chance next call to lock will terminated immediately, since lock can still be acquired by another thread.
Return value: 1 if mutex unlocked, 0 if locked or error.
sys_context: global system context
mutex: the mutex to use
file: the name of the source file where the function is called, one can use __FILE__
line: the line in the source file where the function is called, one can use __LINE__
func: the name of the function where this log line was called, on can use __FUNCTION__
Unlocks a mutex.
Return value: 1 if sucess, 0 if error.
sys_context: global system context
Returns how many mutexes have been locked since program start. Usefull for sanity checking when debugging.
Return value: number of calls to lock
Returns how many mutexes have been unlocked since program start. Usefull for sanity checking when debugging.
Return value: number of calls to unlock
sys_context: global system context
Checks wether unlock has been called as many times as lock. Usefull for sanity checking when debugging.
Return value: 1 if OK, 0 if inconsistency.
Function which returns always true, that is, something different than 0.
Function which returns always false, that is, 0. This can seem totally useless but it does have some utility. It’s used for instance to "fool" the compiler and force it to compile and link functions in binaries, so that, afterwards, dynamically loaded .so files can find in the main binary some functions which would otherwise be stripped during the final link.
sys_context: global system context
Wrapper on omp_get_num_procs the advantage of this is that
it’s always defined, wether OpenMP supported is compiled in
or not, will returned 1 if no OpenMP support.
Return value: number of procs
sys_context: global system context
Returns the current working directory (absolute path).
Return value: a newly allocated string.
sys_context: global system context
Returns the default user directory. Note that this value
is not static, it can depend, for instance, of the environment
variable HOME.
Return value: a newly allocated string.
sys_context: global system context
Returns the default config file. Note that this value
is not static, it can depend, for instance, of the environment
variable HOME.
Return value: a newly allocated string.
sys_context: global system context
Returns the default log file. Note that this value
is not static, it can depend, for instance, of the environment
variable HOME.
Return value: a newly allocated string.
sys_context: global system context
Returns the default prefix, could be /usr/local for instance.
Return value: a newly allocated string.
sys_context: global system context
Returns the default module directory (dynamically loaded libraries).
Return value: a newly allocated string.
sys_context: global system context
Returns the default data directory.
Return value: a newly allocated string.
sys_context: global system context
Returns the default music directory.
Return value: a newly allocated string.
sys_context: global system context
Returns the default music path, which can be composed of several directories.
Return value: a newly allocated string.
sys_context: global system context
Returns the default map directory.
Return value: a newly allocated string.
sys_context: global system context
Returns the default map path, which can be composed of several directories.
Return value: a newly allocated string.
sys_context: global system context
Returns the default script file.
Return value: a newly allocated string.
sys_context: global system context
Logs all default values to log file. Usefull for debugging, to know where the program is searching for its informations.
sys_context: global system context
argc: argc, number of arguments, as given to main
argv: argv, pointer to arguments, as given to main
Returns the binary directory, that is, the directory the binary is stored in. This is calculated dynamically, by interpreting command-line arguments.
Return value: a newly allocated string.
sys_context: global system context
argc: argc, number of arguments, as given to main
argv: argv, pointer to arguments, as given to main
Returns the user dir, taking in account command-line and environment variables. However config file content has no impact on the result.
Return value: a newly allocated string.
sys_context: global system context
argc: argc, number of arguments, as given to main
argv: argv, pointer to arguments, as given to main
Returns the config file, taking in account command-line and environment variables. However config file content has no impact on the result.
Return value: a newly allocated string.
sys_context: global system context
argc: argc, number of arguments, as given to main
argv: argv, pointer to arguments, as given to main
Returns the log file, taking in account command-line and environment variables. However config file content has no impact on the result.
Return value: a newly allocated string.
sys_context: global system context
argc: argc, number of arguments, as given to main
argv: argv, pointer to arguments, as given to main
Returns the prefix, taking in account command-line and environment variables. However config file content has no impact on the result.
Return value: a newly allocated string.
sys_context: global system context
argc: argc, number of arguments, as given to main
argv: argv, pointer to arguments, as given to main
Returns the mod dir (modules, shared .so), taking in account command-line and environment variables. However config file content has no impact on the result.
Return value: a newly allocated string.
sys_context: global system context
argc: argc, number of arguments, as given to main
argv: argv, pointer to arguments, as given to main
Returns the data dir, taking in account command-line and environment variables. However config file content has no impact on the result.
Return value: a newly allocated string.
sys_context: global system context
argc: argc, number of arguments, as given to main
argv: argv, pointer to arguments, as given to main
Returns the music dir, taking in account command-line and environment variables. However config file content has no impact on the result.
Return value: a newly allocated string.
sys_context: global system context
argc: argc, number of arguments, as given to main
argv: argv, pointer to arguments, as given to main
Returns the music path, taking in account command-line and environment variables. However config file content has no impact on the result. Music path can contain several directories.
Return value: a newly allocated string.
sys_context: global system context
argc: argc, number of arguments, as given to main
argv: argv, pointer to arguments, as given to main
Returns the map dir, taking in account command-line and environment variables. However config file content has no impact on the result.
Return value: a newly allocated string.
sys_context: global system context
argc: argc, number of arguments, as given to main
argv: argv, pointer to arguments, as given to main
Returns the map path, taking in account command-line and environment variables. However config file content has no impact on the result. Map path can contain several directories.
Return value: a newly allocated string.
sys_context: global system context
argc: argc, number of arguments, as given to main
argv: argv, pointer to arguments, as given to main
Returns the script file, taking in account command-line and environment variables. However config file content has no impact on the result.
Return value: a newly allocated string.
sys_context: global system context
argc: argc, number of arguments, as given to main
argv: argv, pointer to arguments, as given to main
Logs all the main options values which are not config-file dependant but depend on built-in defaults, command-line arguments and environment variables. Usefull to debug and know where the program is searching for things.
sys_context: global system context
filename: the file to test
Tests the existence of a file on the filesystem. File is considered to exists if it’s at least readable.
Return value: 1 if OK, 0 if file doesn’t exist or can’t be read.
sys_context: global system context
dirname: the directory to test
Tests the existence of a directory on the filesystem.
Return value: 1 if OK, 0 if directory doesn’t exist.
sys_context: global system context
dirname: the directory to test
Tests the existence of a directory on the filesystem, will also validate that it contains a README or readme.txt file.
Return value: 1 if OK, 0 if directory doesn’t exist.
sys_context: global system context
dirname: the directory to test
needle: string to search, can be NULL
Tests the existence of a directory on the filesystem, with a README or readme.txt file, which contains the string needle.
Return value: 1 if OK, 0 if directory doesn’t exist.
sys_context: global system context
dirname: the directory to create
Creates a directory, performing sanity checks such as verifying the directory really exists after being created.
Return value: 1 if OK, 0 if error.
sys_context: global system context
dirname: the directory to create
Creates a directory like lw6sys_create_dir but this function
is silent in the sense that it won’t log any error. Usefull
to create the log directory itself, for instance, and avoid
infinite loops on error.
Return value: 1 if OK, 0 if error.
sys_context: global system context
path: a path
Adds a slash, or in a general manner, a directory separator, at the end of a path, if needed. So /foo/bar will become /foo/bar/ but /bar/foo/ will remain /bar/foo/.
Return value: a newly allocated string, must be freed.
sys_context: global system context
path: a path
Strips the slash, or in a general manner, the directory separator, at the end of a path, if needed. So /foo/bar/ will become /foo/bar but /bar/foo will remain /bar/foo.
Return value: a newly allocated string, must be freed.
sys_context: global system context
path1: left part of the path
path2: right part of the path
Concatenates 2 parts of a path. Function will try to avoid stupid "double-slash" when concatenating /foo/ with /bar/ and conversely insert a directory separator when concatenating /foo with bar/.
Return value: a newly allocated string, must be freed.
sys_context: global system context
path: a path
Splits a path into all its parts. For instance /boo/bar/foo2/bar2 returns a 4 elements list. This is more than a plain split, for heading and tailing slashes will be ignored, and various path separators will be interpreted (depends on platform).
Return value: a list containing 0-terminated strings.
sys_context: global system context
path: a path
Returns the file name only, without heading directories.
Return value: file name, must be freed
sys_context: global system context
path: a path
Checks wether a path is relative or absolute.
Return value: 1 if relative, 0 if absolute.
sys_context: global system context
path: a path
Checks wether a path is "." or not. Will also trap "" and "./".
Return value: 1 if relative, 0 if absolute.
sys_context: global system context
path: a path
Returns the parent path. That will return /foo when given /foo/bar in input.
Return value: a newly allocated string, must be freed.
sys_context: global system context
path: a path
Given the ../foo/bar path, will return foo/bar. Usefull to get rid of heading ../ when a path is known to start with it.
Return value: a newly allocated string, must be freed.
sys_context: global system context
path: a path
Given the ../foo/bar path, will return foo/bar. Usefull to
get rid of heading ../ when a path is known to start with it.
This is different from lw6sys_path_unparent just because
the result is not dynamically allocated and copied from source.
Return value: a pointer which points somewhere within the string passed as an argument.
sys_context: global system context
dir: the path of the directory to list
filter_func: a function which will filter entries, can be NULL
func_data: additionnal data passed to filter_func
n: will contain the number of items found
This list a directory. The filter will be passed the file path as an argument. If it returns 1, the file is kept, if it returns 0 it’s suppressed from the list.
Return value: a list containing strings (file paths).
sys_context: global system context
path: the path of the path to list
filter_func: a function which will filter entries, can be NULL
func_data: additionnal data passed to filter_func
n: will contain the number of items found
This list a directory. By path we mean here a list of separated
directories, separated by : for instance.
The filter will be passed the file path
as an argument. If it returns 1, the file is kept, if it returns 0
it’s suppressed from the list. It’s like performing a call
to lw6sys_dir_list on each of the path members.
Return value: a list containing strings (file paths).
sys_context: global system context
dir: a directory, when to search the file first
path: the path to search too, a separated list of dirs
file: the filename to search for
Tries to find a file in the given paths. The function is typically
used to find music files. First it tries to find the file in dir,
then it tries to find it in each dir of path. file must be only
a file name and not contain any directory. The function will use
the filename only anyway.
Return value: the full path of the found file.
sys_context: global system context
f: file to output content to
Prints a standard Liquid War compliant XML header in the given file.
Return value: none.
sys_context: global system context
f: file to output content to
Prints a standard Liquid War 6 compliant XML footer in the given file.
Return value: none.
sys_context: global system context
Tells wether functions related to fork and pids are likely to work allright or not. Typically, those functions will return false (0) systematically if called on a platform that does not support them fully. In practice this is only for a few tests, so it’s not that bad if it does not really work. Would be better if, but well, it’s OK.
Return value: 1 if supported, 0 if not.
sys_context: global system context
data: pointer on arbitrary data used by func
This is not a standard fork function, it will return to the caller (parent) with something >0 if a child has been created, or 0 if failed. On the child it will launch the callback func, run it and exit right away.
Return value: a process ID on success, 0 on failure.
sys_context: global system context
pid: pid to kill
Kills a process with the given PID. The kill will first use a signal 1 SIGTERM the a signal 9 SIGKILL. This is mostly for testing, the idea is to be sure to vaccum after we’re done. We use 64-bit for PIDs, yes, they are very likely 32 only, but had to choose (and pid_t is a pain because for logging one would needed to check the length before calling printf like functions...).
Return value: 1 on success, 0 if failed
sys_context: global system context
verbose: wether to display informations on the console
Checks wether Google Profiler support has been built, and if it’s set, outputs the log file. If CPUPROFILE is defined but binary has no support for it, will display a warning message.
Return value: 1 if google profile enabled and activated, 0 if not
sys_context: global system context
progress: the progress struct to initialize
value: the value to point to
Sets a progress struct to default values, that is, ranging from 0.0f to 1.0f, does not touch the value.
Return value: none.
sys_context: global system context
progress: the progress struct to initialize
value: the value to point to
Sets a progress struct to default values, that is, ranging from 0.0f to 1.0f. This function won’t touch the value, one needs to call begin or update or end to do that.
Return value: none.
sys_context: global system context
progress: the progress struct to update
min: the min value
max: the max value
value: the current value
Updates a progress struct. This is typically the function used by a callback to show the progress of a process. Note that this is note an initializer. Rather, the progress struct was initialized before, and this call is done in a loop with min being 0, max being the last value in the loop, and value the current index in the loop. NULL pointers correctly handled internally, so call this with any parameters, it’s safe.
Return value: none.
sys_context: global system context
progress1: the first part of the splitted progress
progress2: the second part of the splitted progress
progress_src: the progress to split
Utility function to split a progress struct, that is, if a progress was ranging from a to b, make 2 progress structs, ranging from a to c and from c to b, c being between a and b.
Return value: none
sys_context: global system context
progress1: the first part of the splitted progress
progress2: the second part of the splitted progress
progress_src: the progress to split
here: where to split
Utility function to split a progress struct, that is, if a progress was ranging from a to b, make 2 progress structs, ranging from a to c and from c to b, c being between a and b. The here value controls what c is. If here=0, then c=a. If here=1, then c=b.
Return value: none
sys_context: global system context
progress1: the first part of the splitted progress
progress2: the second part of the splitted progress
progress3: the third part of the splitted progress
progress_src: the progress to split
Utility function to split a progress struct, this one will split it into 3 equal parts.
Return value: none
sys_context: global system context
progress1: the first part of the splitted progress
progress2: the second part of the splitted progress
progress3: the third part of the splitted progress
progress4: the fourth part of the splitted progress
progress_src: the progress to split
Utility function to split a progress struct, this one will split it into 4 equal parts.
Return value: none
sys_context: global system context
progress1: the first part of the splitted progress
progress2: the second part of the splitted progress
progress3: the third part of the splitted progress
progress4: the fourth part of the splitted progress
progress5: the fourth part of the splitted progress
progress_src: the progress to split
Utility function to split a progress struct, this one will split it into 5 equal parts.
Return value: none
sys_context: global system context
progress: the progress to update
Sets the progress to its min value, NULL values correctly handled.
Return value: none
sys_context: global system context
progress: the progress to update
Sets the progress to the average between min and max, NULL values correctly handled.
Return value: none
sys_context: global system context
progress: the progress to update
Sets the progress to its max value, NULL values correctly handled.
Return value: none
sys_context: global system context
range: the high limit for random generated numbers. If you want random numbers between 0 and 5, set this to 6.
Wrapper over standard random function. This one is thread safe. This idea is not to provide cryptographic-proof random numbers, rather generate sequences which are random enough to generate unique server ids and such things. The function is initialized on its first call, and results depend on timestamp, host name, user name, and memory available.
sys_context: global system context
min: the min value, as a float
max: the max value, as a float
Returns a random float number between min & max. Can be equal to min or max.
sys_context: global system context
Function used to avoid initializing SDL several times in a program.
AFAIK Allegro has a was_init function, but SDL doesn’t. With this
function - which every LW6 sub-module should use - one can know
globally, for the whole program, wether SDL has been initialized
or not. Note that this function uses the global system context,
and can therefore be buggy when used in multithreaded / reentrant
mode. So in some cases, that is, with two different contexts, SDL
could be called twice. This is a limitation of current SDL implementations,
should it have a per-thread / per-handler context, the problem would
be solved. Fundamentally, the idea is that SDL does have a global static
state, you’ve been warned.
sys_context: global system context
Call this whenever you are done with SDL and exit it, so that
the lw6sys_sdl_register function works correctly.
Return value: 1 if SDL needs to be unregistered, that is, if it has already been initialized, else 0.
sys_context: global system context
data: pointer to the data, must contain at least 8 bytes of writable space
value: the integer to serialize
Serializes a 64-bit integer in a byte buffer. Result is not dependant on machine endianess. Typically used for checksums or high-level serializations.
sys_context: global system context
data: pointer to the data, must contain at least 8 bytes
Recovers a 64-bit integer from a byte buffer created,
for instance, with lw6sys_serialize_int64.
sys_context: global system context
data: pointer to the data, must contain at least 4 bytes of writable space
value: the integer to serialize
Serializes a 32-bit integer in a byte buffer. Result is not dependant on machine endianess. Typically used for checksums or high-level serializations.
sys_context: global system context
data: pointer to the data, must contain at least 4 bytes
Recovers a 32-bit integer from a byte buffer created,
for instance, with lw6sys_serialize_int32.
sys_context: global system context
data: pointer to the data, must contain at least 2 bytes of writable space
value: the integer to serialize
Serializes a 16-bit integer in a byte buffer. Result is not dependant on machine endianess. Typically used for checksums or high-level serializations.
sys_context: global system context
data: pointer to the data, must contain at least 2 bytes
Recovers a 16-bit integer from a byte buffer created,
for instance, with lw6sys_serialize_int16.
sys_context: global system context
shape: the dimensions to control
min: the minimum shape allowed
max: the maximum shape allowed
Will check wether the given shape respects some basic constraints, being not to small and not too big.
Return value: 1 if OK, 0 if not.
sys_context: global system context
shape: the boundary box
pos: the position
Checks wether position is within the given boundary box.
Return value: 1 if OK, 0 if not.
sys_context: global system context
shape_a: the first shape to compare
shape_b: the other shape to compare
Compares two shapes.
Return value: 1 if same, 0 if not.
sys_context: global system context
shape_a: the first shape to compare
shape_b: the other shape to compare
Compares two shapes, but ignores the z (d) parameter.
Return value: 1 if same_xy, 0 if not.
sys_context: global system context
shape: the shape to query
Gives the volume (w * h * d) for a given shape.
Return value: the volume.
sys_context: global system context
shape: the shape to query
Gives the surface (w * h) for a given shape.
Return value: the surface.
sys_context: global system context
trap_errors: set to 1 if you want to trap SIGSEGV and SIGFPE
Set up our signal handlers. This will probably be overrided
later by other libs such as libSDL, but at least in pure server
mode it gives a way to treat SIGTERM the right way.
The callbacks will use the sys_context passed here, ignoring
whatever thread and/or whatever value for this context was used
when the error was detected. However, one needs at least one
context, for instance to log messages.
Return value: none.
sys_context: global system context
Restore default signal handlers for those modified by lw6sys_signal_custom.
Return value: none.
signum: SIGTERM
The own TERM signal handler, will basically call
the lw6sys_signal_send_quit function, which will
set a flag used later by lw6sys_signal_poll_quit.
Return value: none.
signum: SIGINT
The own INT signal handler, will basically call
the lw6sys_signal_send_quit function, which will
set a flag used later by lw6sys_signal_poll_quit.
Return value: none.
signum: SIGTERM
The own HUP signal handler, will basically do something that shows the program is alive, typically display a NOTICE message.
Return value: none.
signum: SIGTERM
The own SEGV signal handler, will display a backtrace and exit.
Return value: none.
signum: SIGTERM
The own FPE signal handler, will display a backtrace and exit.
Return value: none.
sys_context: global system context
Sets the quit flag to 1, so that lw6sys_signal_poll_quit returns
true, that is, tells the polling loop to stop.
Return value: none.
sys_context: global system context
Tests wether we need to stop right now.
Return value: 1 if we need to stop now, 0 if program can continue.
sys_context: global system context
func_data: function specific data
ptr_a: pointer to an int item
ptr_b: pointer to an int item
A typicall sort callback function, can be passed to lw6sys_sort
to sort a list of integers.
Return value: -1 if ptr_a < ptr_b , 0 if ptr_a == ptr_b,
1 if ptr_a > ptr_b
sys_context: global system context
func_data: function specific data
ptr_a: pointer to an int item
ptr_b: pointer to an int item
A typicall sort callback function, can be passed to lw6sys_sort
to sort a list of integers. This one will sort in reverse mode.
Return value: 1 if ptr_a < ptr_b , 0 if ptr_a == ptr_b,
-1 if ptr_a > ptr_b
sys_context: global system context
func_data: function specific data
ptr_a: pointer to a float item
ptr_b: pointer to a float item
A typicall sort callback function, can be passed to lw6sys_sort
to sort a list of floating point numbers.
Return value: -1 if ptr_a < ptr_b , 0 if ptr_a == ptr_b,
1 if ptr_a > ptr_b
sys_context: global system context
func_data: function specific data
ptr_a: pointer to a float item
ptr_b: pointer to a float item
A typicall sort callback function, can be passed to lw6sys_sort
to sort a list of floating point numbers. This one will
sort in reverse mode.
Return value: 1 if ptr_a < ptr_b , 0 if ptr_a == ptr_b,
-1 if ptr_a > ptr_b
sys_context: global system context
func_data: function specific data
ptr_a: pointer to a string item
ptr_b: pointer to a string item
A typicall sort callback function, can be passed to lw6sys_sort
to sort a list of 0-terminated strings.
Return value: -1 if ptr_a < ptr_b , 0 if ptr_a == ptr_b,
1 if ptr_a > ptr_b
sys_context: global system context
func_data: function specific data
ptr_a: pointer to a string item
ptr_b: pointer to a string item
A typicall sort callback function, can be passed to lw6sys_sort
to sort a list of 0-terminated strings. This one will sort
in reverse mode.
Return value: 1 if ptr_a < ptr_b , 0 if ptr_a == ptr_b,
-1 if ptr_a > ptr_b
sys_context: global system context
list: the list to sort, might be modified by the function
sort_func: the callback function used to sort
func_data: function specific data
A general sorting function. Internally, will use the glibc qsort
function, but this one is adapted to the LW6 specific data
structures, more exactly, the lw6sys_list structure. Several
default sort callbacks are defined, but one is free to use
any callback, provided it has the right prototype.
sys_context: global system context
Creates a spinlock object.
Return value: newly allocated pointer.
sys_context: global system context
spinlock: the spinlock to destroy.
Destroys a spinlock object.
Return value: none.
sys_context: global system context
spinlock: the spinlock to use
Locks the spinlock. Note that this should never fail unless there’s a serious initialization problem, instead, function will wait forever until spinlock is released.
Return value: 1 if success, 0 if failure.
sys_context: global system context
spinlock: the spinlock to use
Tries to locks the spinlock. That is, tells wether spinlock can be locked immediately or not. Note that this does not mean there’s 100% chance next call to lock will terminated immediately, since lock can still be acquired by another thread.
Return value: 1 if spinlock unlocked, 0 if locked or error.
sys_context: global system context
spinlock: the spinlock to use
Unlocks a spinlock.
Return value: 1 if sucess, 0 if error.
sys_context: global system context
src: the string to copy
Duplicate a string, creating a new pointer on it, which
must be freed afterwards. The main difference with strdup
is that here we use the LW6SYS_MALLOC macro to track down
possible memory leaks.
Return value: a newly allocated pointer, must be freed.
sys_context: global system context
str1: the left part to be concatenated
str2: the right part to be concatenated
Concatenate 2 strings, and put the result in a newly
allocated string. Unlike strcat which uses the same
pointer.
Return value: a newly allocated pointer, must be freed.
sys_context: global system context
fmt: a format string, like the one you would pass to printf
...: optional arguments, like the ones you would pass to printf
An sprintf like function, except it allocates a new string automatically, with "enough space". This is not a highly optimized function, it will allocate plenty of memory, possibly several times, and thus consume time and resources. But it has the great advantage of freeing the programmer of the dirty work of guessing "how log will the sprintf’ed string be?" before even generating it. So it’s a time saver for the programmer. Additionnally, helps avoiding memory leaks and buffer overflows.
Return value: a new allocated string, must be freed.
sys_context: global system context
buf: a buffer of len+1 chars
len: the max length of string
fmt: a format string, like the one you would pass to printf
...: optional arguments, like the ones you would pass to printf
Almost like snprintf except that it will *always* append a char 0 (’\0’) at the end of the string. Therefore buf must be of size len+1.
Return value: 1 if success, 0 if failed.
sys_context: global system context
str: the string to test
Tests wether a string is blank, that is, if it’s composed of space, tabs, or carriage returns only.
Return value: 1 if blank, 0 if not.
sys_context: global system context
str: the string to test
Tests wether a string is NULL or empty (string with 0 chars "").
Return value: 1 if NULL or empty, 0 if contains something.
sys_context: global system context
str: the string to test
Returns always a non-NULL string, if string is NULL, returns ""
The argument str is not passed as const else this function
would equate to a disguised cast from const to non-const.
Return value: source string or "" if it was NULL
sys_context: global system context
str_a: 1st string to compare, can be NULL
str_b: 2nd string to compare, can be NULL
Compares two strings for equality. Difference with strcmp is that this one won’t check for alphabetical order and return -1 or +1, but will check for NULL args. of space, tabs, or carriage returns only.
Return value: 1 if same, 0 if not.
sys_context: global system context
str_a: 1st string to compare, can be NULL
str_b: 2nd string to compare, can be NULL
Compares two strings for equality. Difference with strcmp is that this one won’t check for alphabetical order and return -1 or +1, but will check for NULL args. of space, tabs, or carriage returns only. This function is not case sensitive.
Return value: 1 if same, 0 if not.
sys_context: global system context
str: the string to analyse
beginning: the pattern to search
Tells wether string starts with a given beginning.
Return value: 1 if str starts with beginning, 0 if not
sys_context: global system context
str: the string to analyse
beginning: the pattern to search
Tells wether string starts with a given beginning. This function is not case sensitive.
Return value: 1 if str starts with beginning, 0 if not
sys_context: global system context
str_ptr: a pointer to a string pointer (read/write parameter).
Skips blanks at the beginning of a string. The passed parameter is modifed in place. Usefull for parsing.
Return value: 1 if blanks were found, else 0.
str: a pointer to the string, which will be modified in-place.
Used to clean up some strings, for instance if they come from the network, we don’t necessarly want system chars to be displayed on the console. Basically it removes all characters with an ASCII code inferior to 32, that is, all system characters. This way, there won’t be any tab, linefeed, or any of such characters left.
Return value: none.
sys_context: global system context
str: a pointer to the string, which will be modified in-place.
Used to clean up some strings, for instance if they come from the network, we don’t necessarly want system chars to be displayed on the console. Basically it removes all characters with an ASCII code inferior to 32, that is, all system characters. This way, there won’t be any tab, linefeed, or any of such characters left. This function will even remove any character above ASCII 127.
Return value: none.
sys_context: global system context
str: a pointer to the string we want to modify
prefix: a prefix to put before each line
Reformats a string, that is, insert newline characters in the right places to that it fits in a given number of columns. A prefix is appended at the beginning of each line. Will not handle strings which already contain newline characters perfectly.
Return value: a newly allocated string, must be freed.
sys_context: global system context
str: a pointer to the string we want to modify
Reformats a string, that is, insert newline characters in the
right places to that it fits in a given number of columns.
This function will modify the buffer so str must be writeable.
Will not handle strings which already contain newline
characters perfectly.
Return value: none
sys_context: global system context
Returns the value of EOL, that is, the "end of line" sequence. Will simply return "\n" on UNIX and "\r\n" on Microsoft platforms. Note that while this is convenient to write config and example files, for instance, it’s a bad idea to use this to generate network messages, because this kind of message needs to be platform independant. Thus any network protocol oriented string would use chr(10) and char(13) directly.
Return value: the EOL string, must not be freed.
sys_context: global system context
str: a string
c: the delimiter to split with
Splits a string, for instance ’foo,bar’ splited with ’o’ will return ’f’, ” and ’,bar’.
Return value: a list containing 0-terminated strings.
sys_context: global system context
str: a string
c: the delimiter to split with
Splits a string, ignoring empty ’0-length’ members. For instance ’foo,bar’ splited with ’o’ will return ’f’ and ’,bar’.
Return value: a list containing 0-terminated strings.
sys_context: global system context
str: a string
Splits a string, ignoring empty ’0-length’ members, and using the comma ’,’ as a separator. This is typically usefull for config elements such as backend lists. Only paths need another separator (platform-dependant).
Return value: a list containing 0-terminated strings.
sys_context: global system context
list: list of strings to join
glue: string to add in-between
Companion function of lw6sys_str_split which will do
the contrary and join the string. Here we use a string
as the glue/separator, more flexible than a simple char
in this case.
Return value: dynamically allocated string
sys_context: global system context
str: the string to modify
Transforms a string to upper case, the pointer must point to modifiable data.
Return value: none, str pointed data modified in-place
sys_context: global system context
str: the string to modify
Transforms a string to lower case, the pointer must point to modifiable data.
Return value: none, str pointed data modified in-place
sys_context: global system context
str: the string to truncate
len: the new length
Truncates a string to the max given length. If truncated to 3, "abcdef" becomes "abc".
Return value: none, str pointed data modified in-place
sys_context: global system context
str: the string to truncate
len: the new length
middle: the string to add in the middle
Truncates a string to the max given length, by truncating the middle of the string, and putting the string middle at this place. Calling it with "abcdefghijk",5,"X" will give "abXjk".
Return value: none, str pointed data modified in-place
sys_context: global system context
len: the length of the random string to generate.
Generates a random string, this is usefull for testing.
Return value: newly allocated string
sys_context: global system context
len: the length of the random string to generate.
Generates a random string, this is usefull for testing. This version only generates words with alpha-numerical content (letters and digits plus spaces).
Return value: newly allocated string
sys_context: global system context
len: the length of the random string to generate.
Generates a random string, this is usefull for testing. This version generates on single word with alpha-numerical content (letters and digits but no spaces).
Return value: newly allocated string
sys_context: global system context
buf: the buffer to test
len: the length of the buffer
Tests wether a buffer is likely to contain a string. This is not a bulletproof function, just a simple heuristic based estimator.
Return value: 1 if probably binary, 0 if probably text
sys_context: global system context
f: file to get input from, typically stdin
Will read file/stream and return it as a string. This is not
for serious stream operation since it will return only when
stream is closed, and read all file into memory before doing anything.
It’s also limited in size since it uses a fixed length buffer,
so this is just for quick testing, typically used by command line switches
which are used to test encoding/decoding functions. Do not use it
to read a filesystem file, lw6sys_read_file_content is much better.
Return value: newly allocated string.
sys_context: global system context
f: file to receive the string
str: the string to output
Here only for API consistency, will just put string to file (just a simple fprint).
Return value: none.
test_and_set: pointer to the value used to test and set
Low level function which performs an atomic exchange to implement a spinlock. This one is just a wrapper to help debugging asm calls.
Return value: 1 when lock is acquired.
test_and_set: pointer to the value used to test and set
Low level function which performs an atomic exchange to implement a spinlock. This one is just a wrapper to help debugging asm calls.
Return value: 1 when lock is acquired.
sys_context: global system context
mode: test mode (bitmask)
Registers all tests for the libsys module.
Return value: 1 if test is successfull, 0 on error.
sys_context: global system context
mode: test mode (bitmask)
Runs the sys module test suite, testing most (if not all...)
functions. Note that some tests perform file system operations
and might therefore fail on a read-only filesystem, or if
user permissions are not sufficient.
Return value: 1 if test is successfull, 0 on error.
sys_context: global system context
argc: number of args as passed to main
argv: array of args as passed to main
mode: 0 for check only, 1 for full test
Runs the sys module test which is specific to exec functions,
these ones require argc and argv to be correctly set so the
extra argument justifies putting it outside lw6sys_test.
Additionnally, it’s not fool proof... Moreover, it should be
run at the beginning of the program, running it afterwards could
give unpredictable results. So it’s safer to use it outside the
CUnit standard mechanisms.
Return value: 1 if test is successfull, 0 on error.
sys_context: global system context
callback_func: the main callback, the function that will run the thread
callback_join: function which will be called when joining, at the end
callback_data: data which will be passed to the callback
Creates a thread. All threads must be joined. This is because we really do not want the game to leak, and detached threads are typically the kind of thing that leaves stuff in the heap. Note that callback_func is just something which will be called when joining it can be NULL. The idea is to put in it free & delete functions, which you can’t call before joining when you want the main thread to get the results of the callback_func.
Return value: an opaque pointer on the thread. Can be NULL if failed.
sys_context: global system context
thread_handler: thread to work on
Tells wether the callback is done, that is to say, wether the results are available, and we can join.
Return value: 1 if done, else 0.
sys_context: global system context
thread_handler: thread to work on
Waits until the callback of the thread is done, this does not necessarly mean it’s freed, in fact it’s not at this stage, the join callback can still be yet to call, but at least the main stuff is done.
Return value: 1 if done, 0 on error
sys_context: global system context
thread_handler: thread to query
Returns the id of the thread, this is an internal value, unique for each process, which can help identifying the thread.
Return value: the id, should be >0.
sys_context: global system context
thread_handler: thread to query
Returns the data associated to the thread, that is, the pointer which was passed to the callback function.
Return value: a pointer.
sys_context: global system context
thread_handler: thread to end
Joins the thread, that’s to say wait until the thread is over, and destroys the ressources associated to it. Note that if the thread is looping forever, this function will just wait forever. This is the only way to end a thread.
Return value: none.
sys_context: global system context
Utility function used to check how many threads where created and joined.
Return value: how many threads were created.
sys_context: global system context
Utility function used to check how many threads where created and joined.
Return value: how many threads were joined.
sys_context: global system context
Utility function used to check how many threads where created and joined.
This one will compare the results of lw6sys_get_thread_create_count
and lw6sys_get_thread_join_count.
Return value: 1 if both are equals, 0 if not (error...).
sys_context: global system context
Returns a 64-bit timestamp, for general purpose. The unit is milliseconds, should return the number of milliseconds since EPOCH. Don’t use this for accurate date handling, but rather to technical stamp events.
Return value: the timestamp.
sys_context: global system context
Returns the number of milliseconds since program was started. Milliseconds are often referred to as ’ticks’.
Return value: the number of milliseconds (64-bit)
sys_context: global system context
Returns a 32-bit timestamp, which is likely to "loop" and have twice
the same value during a single program execution. The idea here is
just to provide a 32-bit value, not too big, for animation purposes.
The idea is that with 64-bit values, numbers are too big and if the
goal is just to animate a cursor or spin a sphere, one does not care
if every ten hours there’s a display glitch because value became
zero again. Besides, those values are often used for their "rest"
in a module operation, to translate textures for instance, and
having too big numbers causes floating point imprecisions. In fact
those values or even only 20-bit. The function is based
on lw6sys_get_uptime so it will return 0 at game startup.
Return value: the cycle value, a 20-bit integer.
sys_context: global system context
timestamp: the timestamp in msec since EPOCH (output), can be NULL
uptime: the uptime in msec since startup (output), can be NULL
cycle: a 20-bit value for animation purpose.
Returns timestamp & uptime with only one system call.
Return value: none (parameters modified).
sys_context: global system context
seconds: the number of seconds to wait, fractions allowed
Will sleep for the given amount of seconds. Same as lw6sys_delay
only input is provided as a floating number of seconds instead
of ticks.
sys_context: global system context
msec: the number of milliseconds (ticks) to wait
Will sleep for the given amount of seconds. Provides accurate timing
and has "about-millisecond" precision, since it
uses usleep or select internally.
Might however be interrupted in some cases, so consider function can
always return quicker than specified. A common usage of this function
is polling loops, where you don’t care if 2 polls are very close,
but simply want to avoid polling continuously, therefore consumming
100% of the CPU for nothing.
sys_context: global system context
Will sleep for a minimal amount of time, just giving the OS a chance to let other threads/processes execute themselves. This can make a big difference in polling loops between a process that eats 100% CPU and a process that has a very moderate load. of ticks.
sys_context: global system context
Will sleep for some time, like lw6sys_idle, except it’s a "longer"
time, use this when you don’t really care about reactivity but are
more concerned about saving CPU, not running uselessly the same
polling code.
sys_context: global system context
Global initializations required to handle time properly.
sys_context: global system context
seconds_from_now: an offset to add to current time
Gives the date according to RFC1123, this is typically usefull for HTTP protocol.
Return value: newly allocated string.
sys_context: global system context
Gives the date in a format which is compatible with Apache CLF Common Log Format.
Return value: newly allocated string.
sys_context: global system context
timestamp_delta: the duration to show, in msec
Returns a readable form of an uptime, typically 1d 12:34:06 for one day, 12 hours, 34 min, 6 sec or 7:03:45 for 7 hours, 3 minutes 45 sec.
Return value: newly allocated string
sys_context: global system context
ip: IP address
port: IP port
Returns an http URL pointing to ip: port that is, adds a heading http:// and a trailing /, and treats port 80 as default. This is used to create public_url in net modules.
Return value: a newly allocated string, NULL on error.
sys_context: global system context
url: the URL to parse
Parses a URL, this is not a complete RFC compliant parser, it’s only used to transform URLs into their ’canonical’ form as well as getting basic info such as on which port one should connect.
Return value: a newly allocated struct, NULL on error
sys_context: global system context
url: the url struct to free
Frees a URL struct and all its members.
Return value: none.
sys_context: global system context
url: the url to check & transform
Checks if a given URL is correct and, if it is, transforms it into its canonical form. This is mostly to get rid of typesettings error, add a tailing /, transform all domain into lowercase, among other things. A canonized url passed into this function should come out exactly the same.
Return value: a newly allocated string.
sys_context: global system context
url: the URL to check
Checks wether an URL is in its canonized form.
Return value: 1 if OK (canonized form), 0 if not
sys_context: global system context
version_a: 1st version to compare
version_b: 2nd version to compare
Compares two versions and tells wether they are compatible or not. Actually, it only checks that MAJOR.MINOR is the same in both cases. As a side not, it’s not case sensitive. In most LW6 relevant cases, it’s a moot issue since MAJOR.MINOR is a number, but well, just in case.
Return value: 1 if compatible, 0 if not
sys_context: global system context
callback_func: the main callback, the function that will run the thread
callback_join: function which will be called when joining, at the end
callback_data: data which will be passed to the callback
This function is similar to lw6sys_thread_create, but it’s dedicated to
creating a unique (one per process only) thread, which, in turn, will
be able to run commands in the main thread itself. This is a hack to
allow apparently spawned child threads to be actually handled by main.
This is because some libraries, which LW6 uses in threads, need to be
actually called in the main thread. SDL, for instance. Note that after
running this you loose control on the main thread, this one will only
wait for possible commands from the spawned thread, typically sent
with the lw6sys_vthread_create function.
Return value: 1 on success, 0 on failure.
sys_context: global system context
Returns true if lw6sys_vthread_run has been called. Note that this
is not bullet proof, it will return true in a correct manner only
if you call it from the vthread itself. In practise this shouldn’t
be a problem, the idea is just to write portable code for the main
control thread and be able to decide on the fly wether to create
a thread we should prefer the lw6sys_thread_create or its
equivalent the lw6sys_vthread_create function.
Return value: 1 on success, 0 on failure.
sys_context: global system context
callback_func: the main callback, the function that will run the thread
callback_join: function which will be called when joining, at the end
callback_data: data which will be passed to the callback
The equivalent of lw6sys_thread_create but for the vthread infrastructure.
The idea is to pretend firing a spawned thread, but in fact it’s the main
thread that runs the code. This function must imperatively be called
within the lw6sys_vthread_run function, else it will fail or be buggy.
Return value: 1 on success, 0 on failure.
sys_context: global system context
The equivalent of lw6sys_thread_join but for the vthread infrastructure.
The idea is to pretend firing a spawned thread, but in fact it’s the main
thread that runs the code. This function must imperatively be called
within the lw6sys_vthread_run function, else it will fail or be buggy.
Return value: none.
Assoc is a basic key/pair structure where key is a string. Use it for basic associations, it’s not fast when there are many keys, in that case, prefer a hash.
Type: char *
Definition: char* lw6sys_assoc_s::key
The key, a 0 terminated standard C string.
Type: void *
Definition: void* lw6sys_assoc_s::value
The value, pointer to arbitrary data.
Type: lw6sys_free_func_t
Definition: lw6sys_free_func_t lw6sys_assoc_s::free_func
This function will be called whenever the element is deleted. You can set it to NULL in that case no callback will be called on deletion.
Type: lw6sys_assoc_p
Definition: lw6sys_assoc_p lw6sys_assoc_s::next_item
Pointer on the next item, will be NULL on last element, there’s a difference between a NULL pointer and a valid assoc with only one item being EOL.
Cache item is the object used to hold data within hash, to implement cache features. It basically stores a pointer to the actual data, and a timestamp which marks the expiration time. In practice, a cache is just an hash which contains this kind of data.
Type: int64_t
Definition: int64_t lw6sys_cache_item_s::expiration_timestamp
Expiration time, after this time, key is considered invalid.
Type: lw6sys_free_func_t
Definition: lw6sys_free_func_t lw6sys_cache_item_s::real_free_func
OK, now this requires some explanation : to use standard hash / assoc function we need the cache hash to behave like a real hash. So the trick is to store within the data structure the pointer on the real free callback. This way the special cache_free callback will have a way to call the genuine free function before destroying the cache container. This duplicates the pointer, but avoids code duplication. In practice caches shouldn’t be that big anyway, so it won’t eat up all your memory anyway.
Type: void *
Definition: void* lw6sys_cache_item_s::value
The actual value.
Cache is an object based on which works pretty much the same but adds the possiblity to give an expiration time to a key. Any key with an expiration time in the past will be removed on query and appear as non-existing to callers.
Type: int
Definition: int lw6sys_cache_s::delay_msec
Delay in milliseconds before a key expires.
Type: lw6sys_free_func_t
Definition: lw6sys_free_func_t lw6sys_cache_s::real_free_func
The real free_func to call on objects.
Type: lw6sys_hash_t *
Definition: lw6sys_hash_t* lw6sys_cache_s::data
The actual data.
Used to store colors when representing them in RGBA mode with integers ranging from 0 to 255.
Type: u_int8_t
Definition: u_int8_t lw6sys_color_8_s::r
Red [0 ... 255].
Type: u_int8_t
Definition: u_int8_t lw6sys_color_8_s::g
Green [0 ... 255].
Type: u_int8_t
Definition: u_int8_t lw6sys_color_8_s::b
Blue [0 ... 255].
Type: u_int8_t
Definition: u_int8_t lw6sys_color_8_s::a
Alpha [0 ... 255]. 255 is opaque, 0 is transparent.
Used to store colors when representing them in RGBA mode with floats ranging from 0.0f to 1.0f.
Type: float
Definition: float lw6sys_color_f_s::r
Red [0 ... 1.0f].
Type: float
Definition: float lw6sys_color_f_s::g
Green [0 ... 1.0f].
Type: float
Definition: float lw6sys_color_f_s::b
Blue [0 ... 1.0f].
Type: float
Definition: float lw6sys_color_f_s::a
Alpha [0 ... 1.0f]. 1.0f is opaque, 0.0f is transparent.
Used to store colors when representing them in HSV mode with floats ranging from 0.0f to 1.0f. An alpha channel has been added so this is more HSVA than HSV.
Type: float
Definition: float lw6sys_color_hsv_s::h
Hue [0 ... 360.0f]. 0.0f is red, 120.0f is green, 240.0f is blue.
Type: float
Definition: float lw6sys_color_hsv_s::s
Saturation [0 ... 1.0f].
Type: float
Definition: float lw6sys_color_hsv_s::v
Value [0 ... 1.0f].
Type: float
Definition: float lw6sys_color_hsv_s::a
Alpha [0 ... 1.0f]. 1.0f is opaque, 0.0f is transparent.
Global context, used by pretty much any function, this is used to avoid storing global static variables, and allow all code to be used in a multithreaded context. In practice some libraries the program relies on might still use globals but at least the limitation is not induced by Liquid War 6 itself. Note that this structure is a wrapper over the internal structure which contains the real members, the first two members need be the same as it is casted internally.
Type: u_int32_t
Definition: u_int32_t lw6sys_context_s::id
The id of the object, this is non-zero and unique within one run session, incremented at each object creation.
Hash is a basic hash structure, relying on assoc for implementation. Actually, what it does is storing an array of assoc, the number of assoc elements is given at construction. Then when accessing a member, a quick checksum is made from the key, which enables finding out which assoc must be queried. If the hash is properly sized, then once one has found the right assoc, finding the right key is fast, since there are only a few of them in each assoc, and it avoids scanning for for all keys, which is the very purpose of the hash.
Type: int
Definition: int lw6sys_hash_s::size
Number of assoc used for this hash, passed at construction.
Type: lw6sys_assoc_t **
Definition: lw6sys_assoc_t** lw6sys_hash_s::entries
Array of assoc holding the actual data.
Type: lw6sys_free_func_t
Definition: lw6sys_free_func_t lw6sys_hash_s::free_func
This function will be called whenever the element is deleted. You can set it to NULL in that case no callback will be called on deletion.
The hexa (for hexadecimal) serializer is a tool used to simplify serialization processes, you can just push/pop basic data types on it, it will concatenate the string, allocate memory, do all this dirty stuff without requiring you to plan the size of the buffer, among other things.
Type: char *
Definition: char* lw6sys_hexa_serializer_s::buf
Data buffer.
Type: int
Definition: int lw6sys_hexa_serializer_s::buf_size
Size of data buffer, in bytes.
Type: int
Definition: int lw6sys_hexa_serializer_s::pos
Current position within the buffer, this is, typically, the place where data will be appended at the next push call, or where it will be fetched from at the next pop call.
List_r is a list system based on list plus a mutex that ensures you can safely call functions on it, without worrying about concurrency. All functions with list_r_ in in their name do lock the list_r before using it, and release it afterwards. Else, the API is pretty much the same, except some functions that take a ** with a list take a simple * with a list_r.
Type: lw6sys_mutex_t *
Definition: lw6sys_mutex_t* lw6sys_list_r_s::mutex
Mutex used to avoid multiple accesses. Locked / unlocked on each member function call except new and free.
Type: lw6sys_list_t *
Definition: lw6sys_list_t* lw6sys_list_r_s::list
List containing the data. Basically, the list_r is just a wrapper on this, bundled with the mutex.
Type: lw6sys_free_func_t
Definition: lw6sys_free_func_t lw6sys_list_r_s::free_func
This function will be called whenever the element is deleted. You can set it to NULL in that case no callback will be called on deletion.
List is a basic list system, with a void * pointer to hold arbitrary data and a callback function for deletion. Provides basic functions to push, pop, walk, any array-like call will of course be very slow. As of current implementation, front operations are fast, but back operations are slow.
Type: void *
Definition: void* lw6sys_list_s::data
Opaque pointer on element data.
Type: lw6sys_free_func_t
Definition: lw6sys_free_func_t lw6sys_list_s::free_func
This function will be called whenever the element is deleted. You can set it to NULL in that case no callback will be called on deletion.
Type: lw6sys_list_p
Definition: lw6sys_list_p lw6sys_list_s::next_item
Pointer on the next item, will be NULL on last element, there’s a difference between a NULL pointer and a valid list with only one item being EOL. Other way to state it: NULL and empty list are two different things.
Structure used to store informations about a module. This describes the module, its author license, this is both a legal check and a technical check, to maximize the chances the code we’re running is the right one, and to trace it.
Type: char *
Definition: char* lw6sys_module_pedigree_s::id
Module id, for instance, could be "gl1".
Type: char *
Definition: char* lw6sys_module_pedigree_s::category
Module category, for instance, could be "gfx".
Type: char *
Definition: char* lw6sys_module_pedigree_s::name
Module name, readable (displayable) name.
Type: char *
Definition: char* lw6sys_module_pedigree_s::readme
Module readme text.
Type: char *
Definition: char* lw6sys_module_pedigree_s::version
Module version.
Type: char *
Definition: char* lw6sys_module_pedigree_s::copyright
Module (short) copyright information.
Type: char *
Definition: char* lw6sys_module_pedigree_s::license
Module (short) license.
Type: char *
Definition: char* lw6sys_module_pedigree_s::date
Date of module compilation.
Type: char *
Definition: char* lw6sys_module_pedigree_s::time
Time of module compilation.
Mutex is our own wrapper on the pthread mutex object. Why not use the pthread mutex directly? For debugging, this allows us to place and instrument hooks if needed.
Type: u_int32_t
Definition: u_int32_t lw6sys_mutex_s::id
The id of the object, this is non-zero and unique within one run session, incremented at each object creation.
Structure used to store progress information. The idea is that is that must be usable in polling mode or in multithreaded mode, and we must be able to truncate a progress indicator into several stages. So this structure contains a range start, a range end, and its value between those two, which is meant to be written by the code executing the operation and read by the caller/rendering thread.
Type: float
Definition: float lw6sys_progress_s::min
Where the progress operation starts.
Type: float
Definition: float lw6sys_progress_s::max
Where the progress operation ends.
Type: float *
Definition: volatile float* lw6sys_progress_s::value
Somewhere between min and max.
Spinlock is our own wrapper on a spinlock based mutex. Why not use the pthread spinlock directly? For debugging, this allows us to place and instrument hooks if needed. Additionnally, some implementations of pthread do not provide spinlock and in that case we provide our own alternative.
Type: u_int32_t
Definition: u_int32_t lw6sys_spinlock_s::id
The id of the object, this is non-zero and unique within one run session, incremented at each object creation.
Thread handler is our own wrapper on the pthread object. Why not use the pthread handler directly? Basically to store basic flags and context data (void * pointer on our thread data for instance) along with the handler. This is merely for debugging and convenience. Internally this will be casted to _lw6sys_thread_handler_t.
Type: u_int32_t
Definition: u_int32_t lw6sys_thread_handler_s::id
The id of the object, this is non-zero and unique within one run session, incremented at each object creation.
Describes an URL, with its elements splitted, this is just to be able to use half-parsed URLs and avoid redoing this parsing everytime.
Type: int
Definition: int lw6sys_url_s::use_ssl
1 if in https, 0 if in http.
Type: char *
Definition: char* lw6sys_url_s::host
Host name.
Type: int
Definition: int lw6sys_url_s::port
IP port.
Type: char *
Definition: char* lw6sys_url_s::uri
URI, that is, everything after the port.
Contains the shape of a 3D box. There are 3 differences with its "XYZ" equivalent. First, sometimes w*h*d reads better than x,y,z. Then, xyz is signed, whd is unsigned. Finally, these are real int32 values, they are not 14-bit limited. It does not really cost any memory for it’s usually used as a single "shape" attribute for a whole map. At the same time, it’s very often used as a test value in loops, so it’s interesting to have it in a value that’s easy to optimize for the compiler (exactly one register...)
Type: u_int32_t
Definition: u_int32_t lw6sys_whd_s::w
Width.
Type: u_int32_t
Definition: u_int32_t lw6sys_whd_s::h
Height.
Type: u_int32_t
Definition: u_int32_t lw6sys_whd_s::d
Depth.
All-in 32 bit 3D position, to save memory.It’s a deliberate choice in Liquid War to handle "limited size" levels. In fact 14 bits still allows 8000x8000 maps, which are at least 100 times too slow to play now (2008). Should we follow Moore’s law we’d have at least 6 years until those are playable, and well, until then, let’s wait. The point is that storing this information (x*y) on 4 bytes might be very important in some cases, since it can reduce memory footprint on structs which are stored in numerous quantities, and therefore maximize chances that we use level 1 & 2 caches and other nice things which happen when memory consumption is not too high.Point is: why use INT32 and then limit it to 14 bits instead of using an INT16 or short in the first place? Answer: it’s easier to handle INT32 all the time in the rest of the code. Compiler and CPU might even handle that better than short. Then, and only when data will be read/written in the struct will it be truncated. Typical example is: we want to multiplicate y by w (which is a width). Result is beyond INT16/short scope but we want to handle it! Casting everything to INT32/int is a pain. With this int y:14 trick, we use y as a "full-featured" INT32/int and well, when it will be read/written we’ll loose values over 8191, but we simply do not care.
Type: int32_t
Definition: int32_t lw6sys_xyz_s::x
X position, from -8192 to +8191.
Type: int32_t
Definition: int32_t lw6sys_xyz_s::y
Y position, from -8192 to +8191.
Type: int32_t
Definition: int32_t lw6sys_xyz_s::z
Z position, from -8 to +7.
View lcov test coverage results on http://www.ufoot.org/liquidwar/v6/doc/coverage/src/lib/tsk/index.html.
sys_context: global system context
loader: loader object
map_path: map-path config entry
relative_path: relative map path
default_param: default parameters to use for load
forced_param: parameters to be forced and their values
display_w: display width
display_h: display height
bench_value: bench value, reflecting computer CPU power
magic_number: used to calibrate speed
Pushes a load request to the loader. Will stop the current load and push a new one. The request concerns a map which should be loaded from a map directory on the filesystem.
Return value: none.
sys_context: global system context
loader: loader object
seed: seed string used to create the map
display_w: display width
display_h: display height
bench_value: bench value, reflecting computer CPU power
magic_number: used to calibrate speed
Pushes a load request to the loader. Will stop the current load and push a new one. The request is forwarded to the pseudo-random map generation module.
Return value: none.
sys_context: global system context
level: loaded level (out param)
game_struct: loaded struct (out param)
game_state: loaded state (out param)
bench_value: the bench_value used (out param)
loader: loader object
Pops data from the loader, will allocate everything dynamically. Function can either return just level or level and game struct and game state (3 of them together). It’s safe to use the received level, display it right away, then wait for the rest. If things are loaded fast enough, you just receive everything at once.
Return value: 1 if some data, 0 if none.
sys_context: global system context
sleep: how many seconds to wait between every poll
user_dir: user directory
progress: progress indicator to use
Creates a new loader. This object is used to do some reputed slow calculus in the background, in a separated thread. Typical example is map loading. This is a high-level objects which encapsulates threads and other wizardry.
Return value: a pointer to the loader, NULL if failed.
sys_context: global system context
loader: the loader to free.
Deletes a loader. Will automatically stop the child thread, free data, and so on.
Return value: none.
sys_context: global system context
loader: the loader to represent.
Creates a string which briefly describes the loader.
Return value: a dynamically allocated pointer, must be freed.
sys_context: global system context
loader: the loader to query.
Returns the current stage of the loader.
Return value: 0 if idle, 1 if loading the map from disk, 2 if build dynamic stuff such as game_state.
sys_context: global system context
mode: test mode (bitmask)
Registers all tests for the libtsk module.
Return value: 1 if test is successfull, 0 on error.
sys_context: global system context
mode: test mode (bitmask)
Runs the tsk module test suite, testing most (if not all...)
functions.
Return value: 1 if test is successfull, 0 on error.
Loader object, allows asynchronous map loading.
Type: u_int32_t
Definition: u_int32_t lw6tsk_loader_s::id
The id of the object, this is non-zero and unique within one run session, incremented at each object creation.
Type: lw6sys_thread_handler_t *
Definition: lw6sys_thread_handler_t* lw6tsk_loader_s::thread
Thread used to run the loader.
Type: void *
Definition: void* lw6tsk_loader_s::data
Data used by the loader.
View lcov test coverage results on http://www.ufoot.org/liquidwar/v6/doc/coverage/src/lib/vox/index.html.
sys_context: global system context
game_state: the game state to use
Creates a voxel rendering object (todo, not implemented yet).
Return value: renderer object
sys_context: global system context
renderer: the renderer object
Frees a voxel rendering object (todo, not implemented yet).
Return value: none
sys_context: global system context
mode: test mode (bitmask)
Registers all tests for the libvox module.
Return value: 1 if test is successfull, 0 on error.
sys_context: global system context
mode: test mode (bitmask)
Runs the vox module test suite, testing most (if not all...)
functions.
Return value: 1 if test is successfull, 0 on error.
Voxel renderer object, not implemented yet.
Type: int
Definition: int lw6vox_renderer_s::dummy
Todo...
Next: 2005 .plan, Up: Top [Contents][Index]
Here’s a list of contributors :
Project maintainer, main developper :
Original idea :
Artwork, level design :
Musics :
Libcaca backend :
Translations :
Many people contributed to Liquid War 5, their names are not listed here, but without them Liquid War 6 would obviously never have been started. Special thanks to all of them. However this is not a direct contribution to the project, in terms of code and other copyrightable materials.
Here’s my .plan file, which describes what I (Christian Mauduit) have planned for Liquid War 6. There’s no garantee that what’s written here is a precise description of the real future, however it should give a good idea of what I have in mind.
Note that the information here was written in summer 2005, it might or not be accurate now, as the main reason for plans to exist is that people never follow them. I’m no exception.
Liquid War 6 will be an almost complete rewrite. I mean that common code between branches 5 and 6 might end up in representing 0% of the total code. I think this is a wise decision, for the current code is really hard to maintain, and would not survive any serious cleanup. LW5 was first written in 1998, for DOS, when I had much less experience in programming. In 7 years I - and other people as well - hacked major enhancements in it such as cross-platform support, network games, and if you compare release 5.0 with the latest 5.x.x release, you’ll see that a bunch of things have changed. I had never expected I would patch and fix this game for so long, and it’s no surprise that it’s bloated today.
FYI, here’s a list of what makes LW5 unsuitable for major improvements without a complete rewrite:
Liquid War 6 will use a different technical framework than Liquid War 5.
It happens that coding a large project in pure C is a waist of time, if possible at all.
If one applies the standard 80/20 rule to a computer game, one might state that 80% of the code eat up 20% of the CPU and the other 20% of the code eat up 80% of the CPU, the former being high-level glue code and the latter being low-level algorithmic code.
With Liquid War, one could speak of the 99/01 rule. I mean that 99% of the CPU time concerns only 1% of the code, and vice-versa. Basically, Liquid War has a very CPU-greedy core algorithm, still spends a fair amount of CPU displaying stuff (but this is delegated to the low-level game programming library) and the rest is totally unsignificant, in terms of CPU. Point is this "rest" represents the vast majority of the code, and also represents the very same buggy code I spend nights to patch on Liquid War 5. I’m talking about network code, GUI, and other high-level glue-code which are currently being written in C.
This idea is to write all this in a convenient scripting language. There won’t be any impact on performances. I can’t garantee Liquid War 6 will be blazingly fast, but for sure it won’t be the scripting language fault. And of course if, as in Liquid War 3 and 5, I feel the need to implement some stuff in assembly for performances issues, I will do it.
We end up with a multi-language architecture: script + C + assembly.
My guess is that I’ll use Scheme as an extension language. Python would be a good choice too. Let’s say I’ll give Scheme a chance, and if it’s really not adapted, I’ll switch back to Python. The point is that today I know Python and don’t really know Scheme, but, well, it’s always a pleasure for me to learn new things. It’s fun.
So what is planned today is that Liquid War 6 will be a Scheme program, which will call callbacks functions written in C and/or assembly. These functions will do all the low-level time consuming algorithmic and graphical stuff. The rest of the code being entirely scripted.
Liquid War is not a 3D game, so why use OpenGL?
This choice implies that I won’t use Allegro anymore. Allegro stays a very convenient library and I would recommend it for it’s excellent, easy to learn, powerfull, and stable. But for the needs of Liquid War 6 I’ll use something else (because of OpenGL). I first thought of using GLUT but I might end up simply using SDL. The idea is just fo have an OpenGL wrapper which sets up OpenGL in a similar manner on all platforms, and handles basic things such as mouse or keyboard.
I’ve got two excellent books on Csound, and the will to learn how to use this tool.
I’ll probably use Csound for a number of things, ranging from "bubbling sounds" to full blown music. Stay tuned 8-)
Of course Liquid War 6 will look nicer than Liquid War 5, blah blah blah. What do you think?
Maybe I’ll try to use some OpenGL features to make it possible to play on a ball, on a Moebius ring, or other fancy things. I have zillion of ideas, future will decide which ones will be implemented first.
To make it clear, visual enhancements aren’t my top-level priority. However I’ll try and make room for these enhancements, and prepare the terrain correctly. So it’s possible that the first releases of Liquid War 6 won’t be that much better than Liquid War 5, but at least Liquid War 6 will have the possibility to evolve. Something Liquid War 5 doesn’t have.
There are many things that could be done easily:
As for graphical improvements, this is not my top-level priority. Simply, I’ll make the game ready-to-improve. Again, all these enhancements are very hard to code in Liquid War 5, else I would already have coded them. Network enhancements
That’s my top-level prioriry.
Why is that? Well, think of Liquid War in terms of "what makes it a good game?" and "what makes it a poor game?".
It’s a good game because:
It’s a poor game because:
For the ugliness, well, OpenGL and some artwork should make it. But for the network, what’s the real problem?
The real problem is that in the current situation, the server needs to have all "keystrokes" before doing anything, and all players must be connected before a game starts. Here’s what I plan to do to fix this:
This third point will be the real enhancement of Liquid War with version 6. It’s one of the very points which drives me to rewrite it completely. First because it’s impossible to implement it without some heavy work. Then because I find it very motivating.
Many gamers submitted suggestions, either by mail or by posting messages on the mailing list.
Don’t worry, I keep them. Not reading them here does not mean I won’t implement them. It simply means I won’t implement them first. I first need the game basically function before enhancing it with fancy stuff.
As I stated on the mailing list, when thinking about Liquid War 6, think of years rather than months (unless I get fired, jobless, or spend several months in a hospital with a laptop).
Note that this road map takes it for granted that I’ll be the lone coder on the project. It’s unlikely that someone is going to help me for the first stages, until there’s at least something real, something playable. Something that proves that the concept is valid. Besides, (real) team work implies a significant overhead, especially at project start. It’s hard to figure out how to distribute tasks when the tasks themselves are not clearly identified. But for the rest (starting in 2007 or 2008), it’s possible that external help might greatly... ...help!
Next: Links, Previous: 2005 .plan, Up: Top [Contents][Index]
Quoting Gavin: “I wrote a liquid war fanfic some time ago [...] I wrote it after a friend claimed that there wasn’t any liquid war fanfic because it wasn’t possible.”
So here it is, a Liquid War fanfic. It was initially written for Liquid War 5, but applies to Liquid War 6 as well. Enjoy!
...
The General presided over his massing army in his seat, or rather hovering ring, of power. It dipped slightly as he flew low over his troops marching through the viscous marsh-like terrain. They were like children: obedient, loyal, and they ate a lot.
Glancing at the status panel mounted in front of him he grimaced; the other five armies: Yellow, Green, Orange, Turquoise, and, of course, Red, were also readying armies of a similar size to his own. His violet clones would have to fight hard and eat well to win this day.
Today would not be a battle of luck, the General mused, it would be a battle of tactics, of alliances, and of betrayal. Every clone was identical - that was the general idea behind clones - and the terrain seemed strangely symmetrical; it would not give advantage to any of the six armies amassed today. Glancing at the hologram of the battlefield projected in front of him the General noted that he would have to move quickly, Orange and Yellow were too close for comfort, though fortunately Baron Red’s army of eponymous coloured clones was the furthest.
General Violet’s fingertips were sweaty even before they touched the four main control keys in front of him. They were labeled ’W’, ’A’, ’D’, and, of course, the full retreat button - very useful for misleading foes and ambushing them as they pursued - ’S’. The keys were arrange in a roughly equilateral triangular pattern; with ’S’ forming the base and being adjacent to both ’A’ and ’D’, ’W’ formed the tip of the triangle.
A long breath left his parched lips as at last he made his move.
...
“Dammit!” he screamed moments later. He had misjudged Captain Yellow and Commander Orange; he had expected one at least to attack immediately, one he could have handled. They were working together - foiling his attempt to shoot between them to near the center of the battlefield to gain a better vantage point. Yellow had shot down towards him, cutting off his advance, and now Orange had sealed his escape route. “It’s not over yet” muttered the General. He opened a voice channel with Commander Orange:
“Very clever. Flawed, but still clever.”
“Flawed?” came the reply.
“Yes flawed, when the good Captain is finished devouring my army who do you think he will turn to next?”, bluffed the General - his hands worked quickly as he manoeuvred his hovering control ring, all that his troops ever saw of him, carefully towards the weakest section of his attackers. If he could just break out a few units he could soon turn the tide against both Yellow and Orange.
“We have an alliance...” Orange’s voice was unsure now.
Time for some sarcasm to through her even more off balance, thought the General,
“I gathered”, he spoke softly, slowly, and with too much meaning. Then closing the channel he turned his attention back to his escape.
...
“Yes!” wooped the ecstatic figure of the General. Fifty or so of his troops had broken free undetected and were even now working their way cautiously towards the camps of the Yellow army, only the front lines were still actively fighting; this opening gambit of Yellow and Orange had turned into a stale siege and Yellow’s army had pitched tent.
General Violet steered his hovering guidance ring to the center of the Yellow camp. His troops struck, both those who had got behind the lines and those who were still besieged. Yellow reacted too slowly and suddenly found that her army, was shrinking back from the onslaught. There was nowhere to run to, and bye now her only ally - Commander Orange - had abandoned her to her fate; he was too busy engaging Sir. Turquoise, who had managed to escape from the slaughter that the Baron had caused to the Turquoise ranks and was even now valiantly attacking the flanks of the Orange troops.
A glance at the status panel showed that Yellow’s life force was fading quickly: 8%, 3%, 1%, Gone.
The General smiled, he always enjoyed getting the first kill, and by now his armies life force had grown and his clones had replicated. With his, now, formidable fighting force it was no problem to engulf both Sir. Turquoise and Commander Orange’s brawling armies and annihilate them. Once again his army grew in size and power. Now if only the Baron didn’t notice that..., thought the General.
...
“Too late!” yelped the General, now thrown into panic, as he saw the approaching Baron. His army had also grown in size and power - having fatally injured the Turquoise army within the opening moments of the battle, and having finally managed to catch the elusive fleeing form of, or what remained of, Emperor Green.
Gripping the controls harder the General thought quickly, his army doesn’t so completely outnumber me that this is already over, however unless I can cause him to make a mistake that allows me to take the upper hand then I will inevitably lose. Maybe I can...
This thought was terminated and replaced by another as the Baron’s angry red troops broke through the undergrowth that had covered their movements and started to surround the General’s army. The thought that now throbbed through the panic-stricken mind of General Violet was simply ’Run!’.
Even as he signaled the retreat and made for what seemed to be the only possible means of escape the Baron’s blood red control ring appeared at the opening. The General knew it was over, even before the host of red beings appeared at the opening.
There was no escape. His life force was almost depleted and he was surrounded. Then it was that the Baron decided to communicate:
“Too bad. It was a good game”
The General blinked, gaped, and was generally gobsmacked. Just before his life force completely failed and his own weary eyes closed in defeat he snarled,
“What!? This is not a game!” were the General’s dying words.
This section lists various Internet Liquid War related links.
These are the “official” links, hopefully you’ll find everything you need here:
#liquidwar on irc.freenode.net
Note that some of these links might link to and/or promote proprietary software. It’s important to emphasize Liquid War 6 is free software, free as in speech, and you are encouraged to use software that protects your freedom. However, for your convenience, those links are provided, they might give you a hopefully neutral idea of what the game is all about.
This list is also by no way extensive, it’s provided “as is”.
Various links that are deprecated, but still might contain interesting informations for those who enjoy digging into the past.
Next: GNU Free Documentation License, Previous: Links, Up: Top [Contents][Index]
Copyright © 2007 Free Software Foundation, Inc. http://fsf.org/

Everyone is permitted to copy and distribute verbatim copies of this
license document, but changing it is not allowed.
The GNU General Public License is a free, copyleft license for software and other kinds of works.
The licenses for most software and other practical works are designed to take away your freedom to share and change the works. By contrast, the GNU General Public License is intended to guarantee your freedom to share and change all versions of a program—to make sure it remains free software for all its users. We, the Free Software Foundation, use the GNU General Public License for most of our software; it applies also to any other work released this way by its authors. You can apply it to your programs, too.
When we speak of free software, we are referring to freedom, not price. Our General Public Licenses are designed to make sure that you have the freedom to distribute copies of free software (and charge for them if you wish), that you receive source code or can get it if you want it, that you can change the software or use pieces of it in new free programs, and that you know you can do these things.
To protect your rights, we need to prevent others from denying you these rights or asking you to surrender the rights. Therefore, you have certain responsibilities if you distribute copies of the software, or if you modify it: responsibilities to respect the freedom of others.
For example, if you distribute copies of such a program, whether gratis or for a fee, you must pass on to the recipients the same freedoms that you received. You must make sure that they, too, receive or can get the source code. And you must show them these terms so they know their rights.
Developers that use the GNU GPL protect your rights with two steps: (1) assert copyright on the software, and (2) offer you this License giving you legal permission to copy, distribute and/or modify it.
For the developers’ and authors’ protection, the GPL clearly explains that there is no warranty for this free software. For both users’ and authors’ sake, the GPL requires that modified versions be marked as changed, so that their problems will not be attributed erroneously to authors of previous versions.
Some devices are designed to deny users access to install or run modified versions of the software inside them, although the manufacturer can do so. This is fundamentally incompatible with the aim of protecting users’ freedom to change the software. The systematic pattern of such abuse occurs in the area of products for individuals to use, which is precisely where it is most unacceptable. Therefore, we have designed this version of the GPL to prohibit the practice for those products. If such problems arise substantially in other domains, we stand ready to extend this provision to those domains in future versions of the GPL, as needed to protect the freedom of users.
Finally, every program is threatened constantly by software patents. States should not allow patents to restrict development and use of software on general-purpose computers, but in those that do, we wish to avoid the special danger that patents applied to a free program could make it effectively proprietary. To prevent this, the GPL assures that patents cannot be used to render the program non-free.
The precise terms and conditions for copying, distribution and modification follow.
“This License” refers to version 3 of the GNU General Public License.
“Copyright” also means copyright-like laws that apply to other kinds of works, such as semiconductor masks.
“The Program” refers to any copyrightable work licensed under this License. Each licensee is addressed as “you”. “Licensees” and “recipients” may be individuals or organizations.
To “modify” a work means to copy from or adapt all or part of the work in a fashion requiring copyright permission, other than the making of an exact copy. The resulting work is called a “modified version” of the earlier work or a work “based on” the earlier work.
A “covered work” means either the unmodified Program or a work based on the Program.
To “propagate” a work means to do anything with it that, without permission, would make you directly or secondarily liable for infringement under applicable copyright law, except executing it on a computer or modifying a private copy. Propagation includes copying, distribution (with or without modification), making available to the public, and in some countries other activities as well.
To “convey” a work means any kind of propagation that enables other parties to make or receive copies. Mere interaction with a user through a computer network, with no transfer of a copy, is not conveying.
An interactive user interface displays “Appropriate Legal Notices” to the extent that it includes a convenient and prominently visible feature that (1) displays an appropriate copyright notice, and (2) tells the user that there is no warranty for the work (except to the extent that warranties are provided), that licensees may convey the work under this License, and how to view a copy of this License. If the interface presents a list of user commands or options, such as a menu, a prominent item in the list meets this criterion.
The “source code” for a work means the preferred form of the work for making modifications to it. “Object code” means any non-source form of a work.
A “Standard Interface” means an interface that either is an official standard defined by a recognized standards body, or, in the case of interfaces specified for a particular programming language, one that is widely used among developers working in that language.
The “System Libraries” of an executable work include anything, other than the work as a whole, that (a) is included in the normal form of packaging a Major Component, but which is not part of that Major Component, and (b) serves only to enable use of the work with that Major Component, or to implement a Standard Interface for which an implementation is available to the public in source code form. A “Major Component”, in this context, means a major essential component (kernel, window system, and so on) of the specific operating system (if any) on which the executable work runs, or a compiler used to produce the work, or an object code interpreter used to run it.
The “Corresponding Source” for a work in object code form means all the source code needed to generate, install, and (for an executable work) run the object code and to modify the work, including scripts to control those activities. However, it does not include the work’s System Libraries, or general-purpose tools or generally available free programs which are used unmodified in performing those activities but which are not part of the work. For example, Corresponding Source includes interface definition files associated with source files for the work, and the source code for shared libraries and dynamically linked subprograms that the work is specifically designed to require, such as by intimate data communication or control flow between those subprograms and other parts of the work.
The Corresponding Source need not include anything that users can regenerate automatically from other parts of the Corresponding Source.
The Corresponding Source for a work in source code form is that same work.
All rights granted under this License are granted for the term of copyright on the Program, and are irrevocable provided the stated conditions are met. This License explicitly affirms your unlimited permission to run the unmodified Program. The output from running a covered work is covered by this License only if the output, given its content, constitutes a covered work. This License acknowledges your rights of fair use or other equivalent, as provided by copyright law.
You may make, run and propagate covered works that you do not convey, without conditions so long as your license otherwise remains in force. You may convey covered works to others for the sole purpose of having them make modifications exclusively for you, or provide you with facilities for running those works, provided that you comply with the terms of this License in conveying all material for which you do not control copyright. Those thus making or running the covered works for you must do so exclusively on your behalf, under your direction and control, on terms that prohibit them from making any copies of your copyrighted material outside their relationship with you.
Conveying under any other circumstances is permitted solely under the conditions stated below. Sublicensing is not allowed; section 10 makes it unnecessary.
No covered work shall be deemed part of an effective technological measure under any applicable law fulfilling obligations under article 11 of the WIPO copyright treaty adopted on 20 December 1996, or similar laws prohibiting or restricting circumvention of such measures.
When you convey a covered work, you waive any legal power to forbid circumvention of technological measures to the extent such circumvention is effected by exercising rights under this License with respect to the covered work, and you disclaim any intention to limit operation or modification of the work as a means of enforcing, against the work’s users, your or third parties’ legal rights to forbid circumvention of technological measures.
You may convey verbatim copies of the Program’s source code as you receive it, in any medium, provided that you conspicuously and appropriately publish on each copy an appropriate copyright notice; keep intact all notices stating that this License and any non-permissive terms added in accord with section 7 apply to the code; keep intact all notices of the absence of any warranty; and give all recipients a copy of this License along with the Program.
You may charge any price or no price for each copy that you convey, and you may offer support or warranty protection for a fee.
You may convey a work based on the Program, or the modifications to produce it from the Program, in the form of source code under the terms of section 4, provided that you also meet all of these conditions:
A compilation of a covered work with other separate and independent works, which are not by their nature extensions of the covered work, and which are not combined with it such as to form a larger program, in or on a volume of a storage or distribution medium, is called an “aggregate” if the compilation and its resulting copyright are not used to limit the access or legal rights of the compilation’s users beyond what the individual works permit. Inclusion of a covered work in an aggregate does not cause this License to apply to the other parts of the aggregate.
You may convey a covered work in object code form under the terms of sections 4 and 5, provided that you also convey the machine-readable Corresponding Source under the terms of this License, in one of these ways:
A separable portion of the object code, whose source code is excluded from the Corresponding Source as a System Library, need not be included in conveying the object code work.
A “User Product” is either (1) a “consumer product”, which means any tangible personal property which is normally used for personal, family, or household purposes, or (2) anything designed or sold for incorporation into a dwelling. In determining whether a product is a consumer product, doubtful cases shall be resolved in favor of coverage. For a particular product received by a particular user, “normally used” refers to a typical or common use of that class of product, regardless of the status of the particular user or of the way in which the particular user actually uses, or expects or is expected to use, the product. A product is a consumer product regardless of whether the product has substantial commercial, industrial or non-consumer uses, unless such uses represent the only significant mode of use of the product.
“Installation Information” for a User Product means any methods, procedures, authorization keys, or other information required to install and execute modified versions of a covered work in that User Product from a modified version of its Corresponding Source. The information must suffice to ensure that the continued functioning of the modified object code is in no case prevented or interfered with solely because modification has been made.
If you convey an object code work under this section in, or with, or specifically for use in, a User Product, and the conveying occurs as part of a transaction in which the right of possession and use of the User Product is transferred to the recipient in perpetuity or for a fixed term (regardless of how the transaction is characterized), the Corresponding Source conveyed under this section must be accompanied by the Installation Information. But this requirement does not apply if neither you nor any third party retains the ability to install modified object code on the User Product (for example, the work has been installed in ROM).
The requirement to provide Installation Information does not include a requirement to continue to provide support service, warranty, or updates for a work that has been modified or installed by the recipient, or for the User Product in which it has been modified or installed. Access to a network may be denied when the modification itself materially and adversely affects the operation of the network or violates the rules and protocols for communication across the network.
Corresponding Source conveyed, and Installation Information provided, in accord with this section must be in a format that is publicly documented (and with an implementation available to the public in source code form), and must require no special password or key for unpacking, reading or copying.
“Additional permissions” are terms that supplement the terms of this License by making exceptions from one or more of its conditions. Additional permissions that are applicable to the entire Program shall be treated as though they were included in this License, to the extent that they are valid under applicable law. If additional permissions apply only to part of the Program, that part may be used separately under those permissions, but the entire Program remains governed by this License without regard to the additional permissions.
When you convey a copy of a covered work, you may at your option remove any additional permissions from that copy, or from any part of it. (Additional permissions may be written to require their own removal in certain cases when you modify the work.) You may place additional permissions on material, added by you to a covered work, for which you have or can give appropriate copyright permission.
Notwithstanding any other provision of this License, for material you add to a covered work, you may (if authorized by the copyright holders of that material) supplement the terms of this License with terms:
All other non-permissive additional terms are considered “further restrictions” within the meaning of section 10. If the Program as you received it, or any part of it, contains a notice stating that it is governed by this License along with a term that is a further restriction, you may remove that term. If a license document contains a further restriction but permits relicensing or conveying under this License, you may add to a covered work material governed by the terms of that license document, provided that the further restriction does not survive such relicensing or conveying.
If you add terms to a covered work in accord with this section, you must place, in the relevant source files, a statement of the additional terms that apply to those files, or a notice indicating where to find the applicable terms.
Additional terms, permissive or non-permissive, may be stated in the form of a separately written license, or stated as exceptions; the above requirements apply either way.
You may not propagate or modify a covered work except as expressly provided under this License. Any attempt otherwise to propagate or modify it is void, and will automatically terminate your rights under this License (including any patent licenses granted under the third paragraph of section 11).
However, if you cease all violation of this License, then your license from a particular copyright holder is reinstated (a) provisionally, unless and until the copyright holder explicitly and finally terminates your license, and (b) permanently, if the copyright holder fails to notify you of the violation by some reasonable means prior to 60 days after the cessation.
Moreover, your license from a particular copyright holder is reinstated permanently if the copyright holder notifies you of the violation by some reasonable means, this is the first time you have received notice of violation of this License (for any work) from that copyright holder, and you cure the violation prior to 30 days after your receipt of the notice.
Termination of your rights under this section does not terminate the licenses of parties who have received copies or rights from you under this License. If your rights have been terminated and not permanently reinstated, you do not qualify to receive new licenses for the same material under section 10.
You are not required to accept this License in order to receive or run a copy of the Program. Ancillary propagation of a covered work occurring solely as a consequence of using peer-to-peer transmission to receive a copy likewise does not require acceptance. However, nothing other than this License grants you permission to propagate or modify any covered work. These actions infringe copyright if you do not accept this License. Therefore, by modifying or propagating a covered work, you indicate your acceptance of this License to do so.
Each time you convey a covered work, the recipient automatically receives a license from the original licensors, to run, modify and propagate that work, subject to this License. You are not responsible for enforcing compliance by third parties with this License.
An “entity transaction” is a transaction transferring control of an organization, or substantially all assets of one, or subdividing an organization, or merging organizations. If propagation of a covered work results from an entity transaction, each party to that transaction who receives a copy of the work also receives whatever licenses to the work the party’s predecessor in interest had or could give under the previous paragraph, plus a right to possession of the Corresponding Source of the work from the predecessor in interest, if the predecessor has it or can get it with reasonable efforts.
You may not impose any further restrictions on the exercise of the rights granted or affirmed under this License. For example, you may not impose a license fee, royalty, or other charge for exercise of rights granted under this License, and you may not initiate litigation (including a cross-claim or counterclaim in a lawsuit) alleging that any patent claim is infringed by making, using, selling, offering for sale, or importing the Program or any portion of it.
A “contributor” is a copyright holder who authorizes use under this License of the Program or a work on which the Program is based. The work thus licensed is called the contributor’s “contributor version”.
A contributor’s “essential patent claims” are all patent claims owned or controlled by the contributor, whether already acquired or hereafter acquired, that would be infringed by some manner, permitted by this License, of making, using, or selling its contributor version, but do not include claims that would be infringed only as a consequence of further modification of the contributor version. For purposes of this definition, “control” includes the right to grant patent sublicenses in a manner consistent with the requirements of this License.
Each contributor grants you a non-exclusive, worldwide, royalty-free patent license under the contributor’s essential patent claims, to make, use, sell, offer for sale, import and otherwise run, modify and propagate the contents of its contributor version.
In the following three paragraphs, a “patent license” is any express agreement or commitment, however denominated, not to enforce a patent (such as an express permission to practice a patent or covenant not to sue for patent infringement). To “grant” such a patent license to a party means to make such an agreement or commitment not to enforce a patent against the party.
If you convey a covered work, knowingly relying on a patent license, and the Corresponding Source of the work is not available for anyone to copy, free of charge and under the terms of this License, through a publicly available network server or other readily accessible means, then you must either (1) cause the Corresponding Source to be so available, or (2) arrange to deprive yourself of the benefit of the patent license for this particular work, or (3) arrange, in a manner consistent with the requirements of this License, to extend the patent license to downstream recipients. “Knowingly relying” means you have actual knowledge that, but for the patent license, your conveying the covered work in a country, or your recipient’s use of the covered work in a country, would infringe one or more identifiable patents in that country that you have reason to believe are valid.
If, pursuant to or in connection with a single transaction or arrangement, you convey, or propagate by procuring conveyance of, a covered work, and grant a patent license to some of the parties receiving the covered work authorizing them to use, propagate, modify or convey a specific copy of the covered work, then the patent license you grant is automatically extended to all recipients of the covered work and works based on it.
A patent license is “discriminatory” if it does not include within the scope of its coverage, prohibits the exercise of, or is conditioned on the non-exercise of one or more of the rights that are specifically granted under this License. You may not convey a covered work if you are a party to an arrangement with a third party that is in the business of distributing software, under which you make payment to the third party based on the extent of your activity of conveying the work, and under which the third party grants, to any of the parties who would receive the covered work from you, a discriminatory patent license (a) in connection with copies of the covered work conveyed by you (or copies made from those copies), or (b) primarily for and in connection with specific products or compilations that contain the covered work, unless you entered into that arrangement, or that patent license was granted, prior to 28 March 2007.
Nothing in this License shall be construed as excluding or limiting any implied license or other defenses to infringement that may otherwise be available to you under applicable patent law.
If conditions are imposed on you (whether by court order, agreement or otherwise) that contradict the conditions of this License, they do not excuse you from the conditions of this License. If you cannot convey a covered work so as to satisfy simultaneously your obligations under this License and any other pertinent obligations, then as a consequence you may not convey it at all. For example, if you agree to terms that obligate you to collect a royalty for further conveying from those to whom you convey the Program, the only way you could satisfy both those terms and this License would be to refrain entirely from conveying the Program.
Notwithstanding any other provision of this License, you have permission to link or combine any covered work with a work licensed under version 3 of the GNU Affero General Public License into a single combined work, and to convey the resulting work. The terms of this License will continue to apply to the part which is the covered work, but the special requirements of the GNU Affero General Public License, section 13, concerning interaction through a network will apply to the combination as such.
The Free Software Foundation may publish revised and/or new versions of the GNU General Public License from time to time. Such new versions will be similar in spirit to the present version, but may differ in detail to address new problems or concerns.
Each version is given a distinguishing version number. If the Program specifies that a certain numbered version of the GNU General Public License “or any later version” applies to it, you have the option of following the terms and conditions either of that numbered version or of any later version published by the Free Software Foundation. If the Program does not specify a version number of the GNU General Public License, you may choose any version ever published by the Free Software Foundation.
If the Program specifies that a proxy can decide which future versions of the GNU General Public License can be used, that proxy’s public statement of acceptance of a version permanently authorizes you to choose that version for the Program.
Later license versions may give you additional or different permissions. However, no additional obligations are imposed on any author or copyright holder as a result of your choosing to follow a later version.
THERE IS NO WARRANTY FOR THE PROGRAM, TO THE EXTENT PERMITTED BY APPLICABLE LAW. EXCEPT WHEN OTHERWISE STATED IN WRITING THE COPYRIGHT HOLDERS AND/OR OTHER PARTIES PROVIDE THE PROGRAM “AS IS” WITHOUT WARRANTY OF ANY KIND, EITHER EXPRESSED OR IMPLIED, INCLUDING, BUT NOT LIMITED TO, THE IMPLIED WARRANTIES OF MERCHANTABILITY AND FITNESS FOR A PARTICULAR PURPOSE. THE ENTIRE RISK AS TO THE QUALITY AND PERFORMANCE OF THE PROGRAM IS WITH YOU. SHOULD THE PROGRAM PROVE DEFECTIVE, YOU ASSUME THE COST OF ALL NECESSARY SERVICING, REPAIR OR CORRECTION.
IN NO EVENT UNLESS REQUIRED BY APPLICABLE LAW OR AGREED TO IN WRITING WILL ANY COPYRIGHT HOLDER, OR ANY OTHER PARTY WHO MODIFIES AND/OR CONVEYS THE PROGRAM AS PERMITTED ABOVE, BE LIABLE TO YOU FOR DAMAGES, INCLUDING ANY GENERAL, SPECIAL, INCIDENTAL OR CONSEQUENTIAL DAMAGES ARISING OUT OF THE USE OR INABILITY TO USE THE PROGRAM (INCLUDING BUT NOT LIMITED TO LOSS OF DATA OR DATA BEING RENDERED INACCURATE OR LOSSES SUSTAINED BY YOU OR THIRD PARTIES OR A FAILURE OF THE PROGRAM TO OPERATE WITH ANY OTHER PROGRAMS), EVEN IF SUCH HOLDER OR OTHER PARTY HAS BEEN ADVISED OF THE POSSIBILITY OF SUCH DAMAGES.
If the disclaimer of warranty and limitation of liability provided above cannot be given local legal effect according to their terms, reviewing courts shall apply local law that most closely approximates an absolute waiver of all civil liability in connection with the Program, unless a warranty or assumption of liability accompanies a copy of the Program in return for a fee.
If you develop a new program, and you want it to be of the greatest possible use to the public, the best way to achieve this is to make it free software which everyone can redistribute and change under these terms.
To do so, attach the following notices to the program. It is safest to attach them to the start of each source file to most effectively state the exclusion of warranty; and each file should have at least the “copyright” line and a pointer to where the full notice is found.
one line to give the program's name and a brief idea of what it does.
Copyright (C) year name of author

This program is free software: you can redistribute it and/or modify
it under the terms of the GNU General Public License as published by
the Free Software Foundation, either version 3 of the License, or (at
your option) any later version.

This program is distributed in the hope that it will be useful, but
WITHOUT ANY WARRANTY; without even the implied warranty of
MERCHANTABILITY or FITNESS FOR A PARTICULAR PURPOSE.  See the GNU
General Public License for more details.

You should have received a copy of the GNU General Public License
along with this program.  If not, see http://www.gnu.org/licenses/.
Also add information on how to contact you by electronic and paper mail.
If the program does terminal interaction, make it output a short notice like this when it starts in an interactive mode:
program Copyright (C) year name of author
This program comes with ABSOLUTELY NO WARRANTY; for details type ‘show w’.
This is free software, and you are welcome to redistribute it
under certain conditions; type ‘show c’ for details.
The hypothetical commands ‘show w’ and ‘show c’ should show the appropriate parts of the General Public License. Of course, your program’s commands might be different; for a GUI interface, you would use an “about box”.
You should also get your employer (if you work as a programmer) or school, if any, to sign a “copyright disclaimer” for the program, if necessary. For more information on this, and how to apply and follow the GNU GPL, see http://www.gnu.org/licenses/.
The GNU General Public License does not permit incorporating your program into proprietary programs. If your program is a subroutine library, you may consider it more useful to permit linking proprietary applications with the library. If this is what you want to do, use the GNU Lesser General Public License instead of this License. But first, please read http://www.gnu.org/philosophy/why-not-lgpl.html.
Copyright © 2000, 2001, 2002, 2007, 2008 Free Software Foundation, Inc.
http://fsf.org/

Everyone is permitted to copy and distribute verbatim copies
of this license document, but changing it is not allowed.
The purpose of this License is to make a manual, textbook, or other functional and useful document free in the sense of freedom: to assure everyone the effective freedom to copy and redistribute it, with or without modifying it, either commercially or noncommercially. Secondarily, this License preserves for the author and publisher a way to get credit for their work, while not being considered responsible for modifications made by others.
This License is a kind of “copyleft”, which means that derivative works of the document must themselves be free in the same sense. It complements the GNU General Public License, which is a copyleft license designed for free software.
We have designed this License in order to use it for manuals for free software, because free software needs free documentation: a free program should come with manuals providing the same freedoms that the software does. But this License is not limited to software manuals; it can be used for any textual work, regardless of subject matter or whether it is published as a printed book. We recommend this License principally for works whose purpose is instruction or reference.
This License applies to any manual or other work, in any medium, that contains a notice placed by the copyright holder saying it can be distributed under the terms of this License. Such a notice grants a world-wide, royalty-free license, unlimited in duration, to use that work under the conditions stated herein. The “Document”, below, refers to any such manual or work. Any member of the public is a licensee, and is addressed as “you”. You accept the license if you copy, modify or distribute the work in a way requiring permission under copyright law.
A “Modified Version” of the Document means any work containing the Document or a portion of it, either copied verbatim, or with modifications and/or translated into another language.
A “Secondary Section” is a named appendix or a front-matter section of the Document that deals exclusively with the relationship of the publishers or authors of the Document to the Document’s overall subject (or to related matters) and contains nothing that could fall directly within that overall subject. (Thus, if the Document is in part a textbook of mathematics, a Secondary Section may not explain any mathematics.) The relationship could be a matter of historical connection with the subject or with related matters, or of legal, commercial, philosophical, ethical or political position regarding them.
The “Invariant Sections” are certain Secondary Sections whose titles are designated, as being those of Invariant Sections, in the notice that says that the Document is released under this License. If a section does not fit the above definition of Secondary then it is not allowed to be designated as Invariant. The Document may contain zero Invariant Sections. If the Document does not identify any Invariant Sections then there are none.
The “Cover Texts” are certain short passages of text that are listed, as Front-Cover Texts or Back-Cover Texts, in the notice that says that the Document is released under this License. A Front-Cover Text may be at most 5 words, and a Back-Cover Text may be at most 25 words.
A “Transparent” copy of the Document means a machine-readable copy, represented in a format whose specification is available to the general public, that is suitable for revising the document straightforwardly with generic text editors or (for images composed of pixels) generic paint programs or (for drawings) some widely available drawing editor, and that is suitable for input to text formatters or for automatic translation to a variety of formats suitable for input to text formatters. A copy made in an otherwise Transparent file format whose markup, or absence of markup, has been arranged to thwart or discourage subsequent modification by readers is not Transparent. An image format is not Transparent if used for any substantial amount of text. A copy that is not “Transparent” is called “Opaque”.
Examples of suitable formats for Transparent copies include plain ASCII without markup, Texinfo input format, LaTeX input format, SGML or XML using a publicly available DTD, and standard-conforming simple HTML, PostScript or PDF designed for human modification. Examples of transparent image formats include PNG, XCF and JPG. Opaque formats include proprietary formats that can be read and edited only by proprietary word processors, SGML or XML for which the DTD and/or processing tools are not generally available, and the machine-generated HTML, PostScript or PDF produced by some word processors for output purposes only.
The “Title Page” means, for a printed book, the title page itself, plus such following pages as are needed to hold, legibly, the material this License requires to appear in the title page. For works in formats which do not have any title page as such, “Title Page” means the text near the most prominent appearance of the work’s title, preceding the beginning of the body of the text.
The “publisher” means any person or entity that distributes copies of the Document to the public.
A section “Entitled XYZ” means a named subunit of the Document whose title either is precisely XYZ or contains XYZ in parentheses following text that translates XYZ in another language. (Here XYZ stands for a specific section name mentioned below, such as “Acknowledgements”, “Dedications”, “Endorsements”, or “History”.) To “Preserve the Title” of such a section when you modify the Document means that it remains a section “Entitled XYZ” according to this definition.
The Document may include Warranty Disclaimers next to the notice which states that this License applies to the Document. These Warranty Disclaimers are considered to be included by reference in this License, but only as regards disclaiming warranties: any other implication that these Warranty Disclaimers may have is void and has no effect on the meaning of this License.
You may copy and distribute the Document in any medium, either commercially or noncommercially, provided that this License, the copyright notices, and the license notice saying this License applies to the Document are reproduced in all copies, and that you add no other conditions whatsoever to those of this License. You may not use technical measures to obstruct or control the reading or further copying of the copies you make or distribute. However, you may accept compensation in exchange for copies. If you distribute a large enough number of copies you must also follow the conditions in section 3.
You may also lend copies, under the same conditions stated above, and you may publicly display copies.
If you publish printed copies (or copies in media that commonly have printed covers) of the Document, numbering more than 100, and the Document’s license notice requires Cover Texts, you must enclose the copies in covers that carry, clearly and legibly, all these Cover Texts: Front-Cover Texts on the front cover, and Back-Cover Texts on the back cover. Both covers must also clearly and legibly identify you as the publisher of these copies. The front cover must present the full title with all words of the title equally prominent and visible. You may add other material on the covers in addition. Copying with changes limited to the covers, as long as they preserve the title of the Document and satisfy these conditions, can be treated as verbatim copying in other respects.
If the required texts for either cover are too voluminous to fit legibly, you should put the first ones listed (as many as fit reasonably) on the actual cover, and continue the rest onto adjacent pages.
If you publish or distribute Opaque copies of the Document numbering more than 100, you must either include a machine-readable Transparent copy along with each Opaque copy, or state in or with each Opaque copy a computer-network location from which the general network-using public has access to download using public-standard network protocols a complete Transparent copy of the Document, free of added material. If you use the latter option, you must take reasonably prudent steps, when you begin distribution of Opaque copies in quantity, to ensure that this Transparent copy will remain thus accessible at the stated location until at least one year after the last time you distribute an Opaque copy (directly or through your agents or retailers) of that edition to the public.
It is requested, but not required, that you contact the authors of the Document well before redistributing any large number of copies, to give them a chance to provide you with an updated version of the Document.
You may copy and distribute a Modified Version of the Document under the conditions of sections 2 and 3 above, provided that you release the Modified Version under precisely this License, with the Modified Version filling the role of the Document, thus licensing distribution and modification of the Modified Version to whoever possesses a copy of it. In addition, you must do these things in the Modified Version:
If the Modified Version includes new front-matter sections or appendices that qualify as Secondary Sections and contain no material copied from the Document, you may at your option designate some or all of these sections as invariant. To do this, add their titles to the list of Invariant Sections in the Modified Version’s license notice. These titles must be distinct from any other section titles.
You may add a section Entitled “Endorsements”, provided it contains nothing but endorsements of your Modified Version by various parties—for example, statements of peer review or that the text has been approved by an organization as the authoritative definition of a standard.
You may add a passage of up to five words as a Front-Cover Text, and a passage of up to 25 words as a Back-Cover Text, to the end of the list of Cover Texts in the Modified Version. Only one passage of Front-Cover Text and one of Back-Cover Text may be added by (or through arrangements made by) any one entity. If the Document already includes a cover text for the same cover, previously added by you or by arrangement made by the same entity you are acting on behalf of, you may not add another; but you may replace the old one, on explicit permission from the previous publisher that added the old one.
The author(s) and publisher(s) of the Document do not by this License give permission to use their names for publicity for or to assert or imply endorsement of any Modified Version.
You may combine the Document with other documents released under this License, under the terms defined in section 4 above for modified versions, provided that you include in the combination all of the Invariant Sections of all of the original documents, unmodified, and list them all as Invariant Sections of your combined work in its license notice, and that you preserve all their Warranty Disclaimers.
The combined work need only contain one copy of this License, and multiple identical Invariant Sections may be replaced with a single copy. If there are multiple Invariant Sections with the same name but different contents, make the title of each such section unique by adding at the end of it, in parentheses, the name of the original author or publisher of that section if known, or else a unique number. Make the same adjustment to the section titles in the list of Invariant Sections in the license notice of the combined work.
In the combination, you must combine any sections Entitled “History” in the various original documents, forming one section Entitled “History”; likewise combine any sections Entitled “Acknowledgements”, and any sections Entitled “Dedications”. You must delete all sections Entitled “Endorsements.”
You may make a collection consisting of the Document and other documents released under this License, and replace the individual copies of this License in the various documents with a single copy that is included in the collection, provided that you follow the rules of this License for verbatim copying of each of the documents in all other respects.
You may extract a single document from such a collection, and distribute it individually under this License, provided you insert a copy of this License into the extracted document, and follow this License in all other respects regarding verbatim copying of that document.
A compilation of the Document or its derivatives with other separate and independent documents or works, in or on a volume of a storage or distribution medium, is called an “aggregate” if the copyright resulting from the compilation is not used to limit the legal rights of the compilation’s users beyond what the individual works permit. When the Document is included in an aggregate, this License does not apply to the other works in the aggregate which are not themselves derivative works of the Document.
If the Cover Text requirement of section 3 is applicable to these copies of the Document, then if the Document is less than one half of the entire aggregate, the Document’s Cover Texts may be placed on covers that bracket the Document within the aggregate, or the electronic equivalent of covers if the Document is in electronic form. Otherwise they must appear on printed covers that bracket the whole aggregate.
Translation is considered a kind of modification, so you may distribute translations of the Document under the terms of section 4. Replacing Invariant Sections with translations requires special permission from their copyright holders, but you may include translations of some or all Invariant Sections in addition to the original versions of these Invariant Sections. You may include a translation of this License, and all the license notices in the Document, and any Warranty Disclaimers, provided that you also include the original English version of this License and the original versions of those notices and disclaimers. In case of a disagreement between the translation and the original version of this License or a notice or disclaimer, the original version will prevail.
If a section in the Document is Entitled “Acknowledgements”, “Dedications”, or “History”, the requirement (section 4) to Preserve its Title (section 1) will typically require changing the actual title.
You may not copy, modify, sublicense, or distribute the Document except as expressly provided under this License. Any attempt otherwise to copy, modify, sublicense, or distribute it is void, and will automatically terminate your rights under this License.
However, if you cease all violation of this License, then your license from a particular copyright holder is reinstated (a) provisionally, unless and until the copyright holder explicitly and finally terminates your license, and (b) permanently, if the copyright holder fails to notify you of the violation by some reasonable means prior to 60 days after the cessation.
Moreover, your license from a particular copyright holder is reinstated permanently if the copyright holder notifies you of the violation by some reasonable means, this is the first time you have received notice of violation of this License (for any work) from that copyright holder, and you cure the violation prior to 30 days after your receipt of the notice.
Termination of your rights under this section does not terminate the licenses of parties who have received copies or rights from you under this License. If your rights have been terminated and not permanently reinstated, receipt of a copy of some or all of the same material does not give you any rights to use it.
The Free Software Foundation may publish new, revised versions of the GNU Free Documentation License from time to time. Such new versions will be similar in spirit to the present version, but may differ in detail to address new problems or concerns. See http://www.gnu.org/copyleft/.
Each version of the License is given a distinguishing version number. If the Document specifies that a particular numbered version of this License “or any later version” applies to it, you have the option of following the terms and conditions either of that specified version or of any later version that has been published (not as a draft) by the Free Software Foundation. If the Document does not specify a version number of this License, you may choose any version ever published (not as a draft) by the Free Software Foundation. If the Document specifies that a proxy can decide which future versions of this License can be used, that proxy’s public statement of acceptance of a version permanently authorizes you to choose that version for the Document.
“Massive Multiauthor Collaboration Site” (or “MMC Site”) means any World Wide Web server that publishes copyrightable works and also provides prominent facilities for anybody to edit those works. A public wiki that anybody can edit is an example of such a server. A “Massive Multiauthor Collaboration” (or “MMC”) contained in the site means any set of copyrightable works thus published on the MMC site.
“CC-BY-SA” means the Creative Commons Attribution-Share Alike 3.0 license published by Creative Commons Corporation, a not-for-profit corporation with a principal place of business in San Francisco, California, as well as future copyleft versions of that license published by that same organization.
“Incorporate” means to publish or republish a Document, in whole or in part, as part of another Document.
An MMC is “eligible for relicensing” if it is licensed under this License, and if all works that were first published under this License somewhere other than this MMC, and subsequently incorporated in whole or in part into the MMC, (1) had no cover texts or invariant sections, and (2) were thus incorporated prior to November 1, 2008.
The operator of an MMC Site may republish an MMC contained in the site under CC-BY-SA on the same site at any time before August 1, 2009, provided the MMC is eligible for relicensing.
To use this License in a document you have written, include a copy of the License in the document and put the following copyright and license notices just after the title page:
  Copyright (C)  year  your name.
  Permission is granted to copy, distribute and/or modify this document
  under the terms of the GNU Free Documentation License, Version 1.3
  or any later version published by the Free Software Foundation;
  with no Invariant Sections, no Front-Cover Texts, and no Back-Cover
  Texts.  A copy of the license is included in the section entitled ``GNU
  Free Documentation License''.
If you have Invariant Sections, Front-Cover Texts and Back-Cover Texts, replace the “with…Texts.” line with this:
    with the Invariant Sections being list their titles, with
    the Front-Cover Texts being list, and with the Back-Cover Texts
    being list.
If you have Invariant Sections without Cover Texts, or some other combination of the three, merge those two alternatives to suit the situation.
If your document contains nontrivial examples of program code, we recommend releasing these examples in parallel under your choice of free software license, such as the GNU General Public License, to permit their use in free software.
Previous: GNU Free Documentation License, Up: Top [Contents][Index]
| Jump to: | A B C D G H L M R S T |
|---|
| Jump to: | A B C D G H L M R S T |
|---|
| Jump to: | -
_
A B C D E F G H I J K L M N O P R S T U V W X Y Z |
|---|
| Jump to: | -
_
A B C D E F G H I J K L M N O P R S T U V W X Y Z |
|---|
| Jump to: | L |
|---|
| Jump to: | L |
|---|